
1.复制Assets文件到手机SD卡
assets文件夹里面的文件都是保持原始的文件格式,需要用AssetManager以字节流的形式读取文件。
- 先在Activity里面调用
getAssets()来获取AssetManager引用; - 再用AssetManager的
open(String fileName, int accessMode)方法则指定读取的文件以及访问模式就能得到输入流InputStream; - 然后就是用已经open file 的
inputStream读取文件,读取完成后记得inputStream.close(); - 调用
AssetManager.close()关闭AssetManager。 封装类实现FileUtils类,代码遵循单例模式
1import android.content.Context;
2import android.os.Environment;
3import android.os.Handler;
4import android.os.Looper;
5import android.os.Message;
6
7import java.io.File;
8import java.io.FileOutputStream;
9import java.io.InputStream;
10
11public class FileUtils {
12
13    private static FileUtils instance;
14    private static final int SUCCESS = 1;
15    private static final int FAILED = 0;
16    private Context context;
17    private FileOperateCallback callback;
18    private volatile boolean isSuccess;
19    private String errorStr;
20
21    public static FileUtils getInstance(Context context) {
22        if (instance == null)
23            instance = new FileUtils(context);
24        return instance;
25    }
26
27    private FileUtils(Context context) {
28        this.context = context;
29    }
30
31    private Handler handler = new Handler(Looper.getMainLooper()) {
32        @Override
33        public void handleMessage(Message msg) {
34            super.handleMessage(msg);
35            if (callback != null) {
36                if (msg.what == SUCCESS) {
37                    callback.onSuccess();
38                }
39                if (msg.what == FAILED) {
40                    callback.onFailed(msg.obj.toString());
41                }
42            }
43        }
44    };
45
46    public FileUtils copyAssetsToSD(final String srcPath, final String sdPath) {
47        new Thread(new Runnable() {
48            @Override
49            public void run() {
50                copyAssetsToDst(context, srcPath, sdPath);
51                if (isSuccess)
52                    handler.obtainMessage(SUCCESS).sendToTarget();
53                else
54                    handler.obtainMessage(FAILED, errorStr).sendToTarget();
55            }
56        }).start();
57        return this;
58    }
59
60    public void setFileOperateCallback(FileOperateCallback callback) {
61        this.callback = callback;
62    }
63
64    private void copyAssetsToDst(Context context, String srcPath, String dstPath) {
65        try {
66            String fileNames[] = context.getAssets().list(srcPath);
67            if (fileNames.length > 0) {
68                File file = new File(Environment.getExternalStorageDirectory(), dstPath);
69                if (!file.exists()) file.mkdirs();
70                for (String fileName : fileNames) {
71                    if (!srcPath.equals("")) { // assets 文件夹下的目录
72                        copyAssetsToDst(context, srcPath + File.separator + fileName, dstPath + File.separator + fileName);
73                    } else { // assets 文件夹
74                        copyAssetsToDst(context, fileName, dstPath + File.separator + fileName);
75                    }
76                }
77            } else {
78                File outFile = new File(Environment.getExternalStorageDirectory(), dstPath);
79                InputStream is = context.getAssets().open(srcPath);
80                FileOutputStream fos = new FileOutputStream(outFile);
81                byte[] buffer = new byte[1024];
82                int byteCount;
83                while ((byteCount = is.read(buffer)) != -1) {
84                    fos.write(buffer, 0, byteCount);
85                }
86                fos.flush();
87                is.close();
88                fos.close();
89            }
90            isSuccess = true;
91        } catch (Exception e) {
92            e.printStackTrace();
93            errorStr = e.getMessage();
94            isSuccess = false;
95        }
96    }
97
98    public interface FileOperateCallback {
99        void onSuccess();
100
101        void onFailed(String error);
102    }
103
104}
105
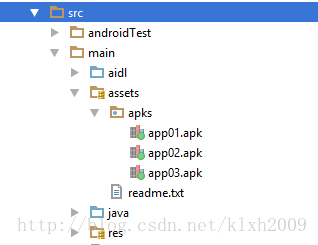
调用代码实现文件复制: 如果你需要将如图所示的apks下的文件复制到SD卡的app/apks目录下,则这样调用:
1FileUtils.getInstance(Context context).copyAssetsToSD("apks","app/apks");
 如果你需要收到文件复制完成的时的回调,则使用如下代码
1FileUtils.getInstance(Context context).copyAssetsToSD("apks","app/apks").setFileOperateCallback(new FileUtils.FileOperateCallback() {
2            @Override
3            public void onSuccess() {
4                // TODO: 文件复制成功时,主线程回调
5            }
6
7            @Override
8            public void onFailed(String error) {
9                // TODO: 文件复制失败时,主线程回调
10            }
11        });
代码说明 在上面代码中,通过单例模式传入一个context获得FileUtils实例,通过实例去调用copyAssetsToSD()方法,方法参数:
String srcPath 传入assets文件夹下的某个文件夹名,如上述apks,可传入为空”“字符,则复制到SD后,默认将assets文件夹下所有文件复制;
String sdPath 传入你希望将文件复制到的位置,如SD卡下的“abc”文件夹,则传入”abc”
2.Androidstudio中添加jar包的方法
先到网上下载你需要的jar包,下载下来后,将你Androidstudio中的项目切换为project,找到app下的libs,将你下载的jar包复制粘贴进去
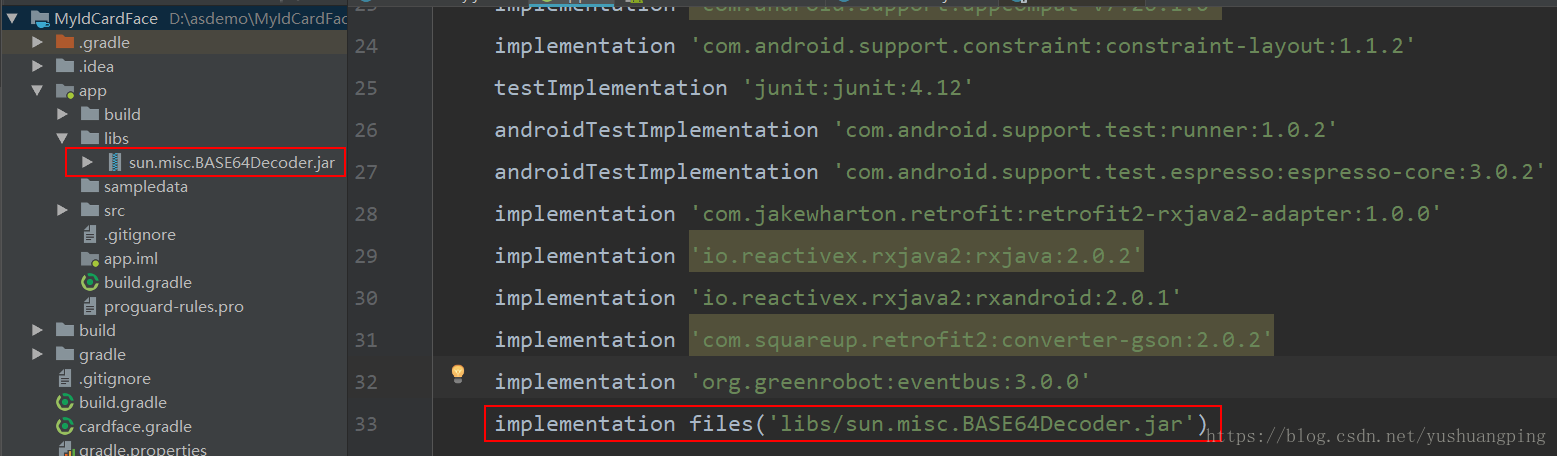
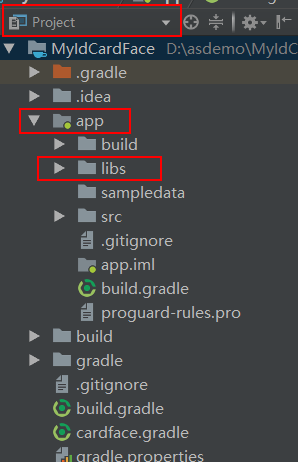 jar包复制进去后,选中你的jar包,比如这里放了一个sun.misc.BASE64Decoder的jar包进去,选中sun.misc.BASE64Decoder,右键,选择add as library,放进你的module中(要是有多个module,要注意自己要放进哪个module),然后加载下就可以了,下图所示,说明jar包添加成功:
3.在Android Project种编写并独立运行测试纯Java代码
方法一:通过Java Library实现
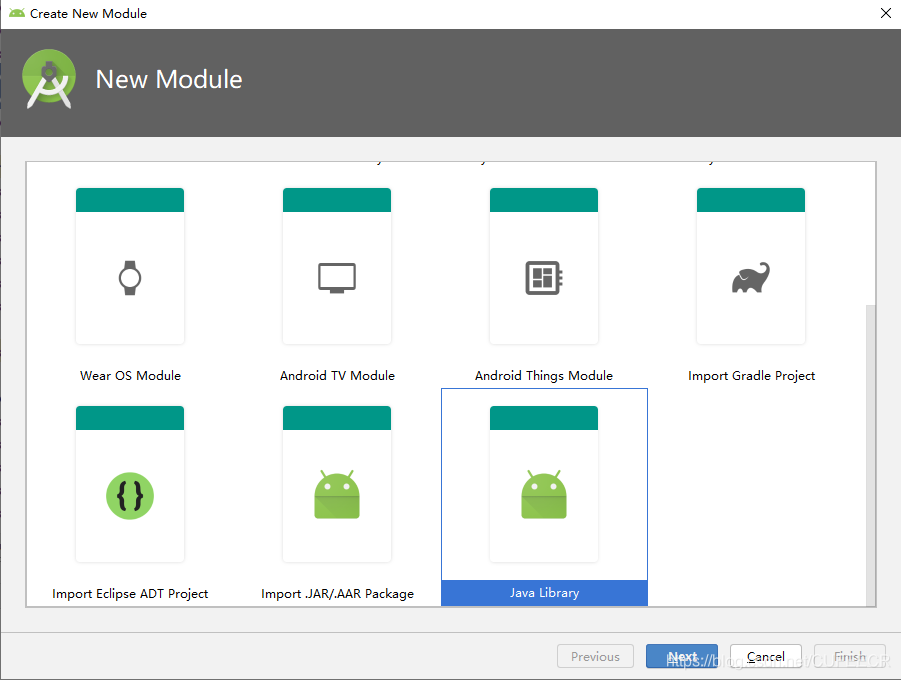
(1)新建
File-->New-->New Module-->Java Library-->Next-->Finish,此步骤最重要是选择Java Library,请注意选择,有可能你需要下拉到最底下才能找到,如图:
 (2)代码示例
1package com.baidu.tts.javalib;
2
3public class JavaTest {
4    public static void main(String args[]){
5        System.out.println("Hello World!!!");
6    }
7}
8
(3)运行
常用的运行方法有三种:
①直接点击函数右边三角符号;
②在.java文件上右键,选择Run;
③点击工具栏上的三角符号。
如下图所示
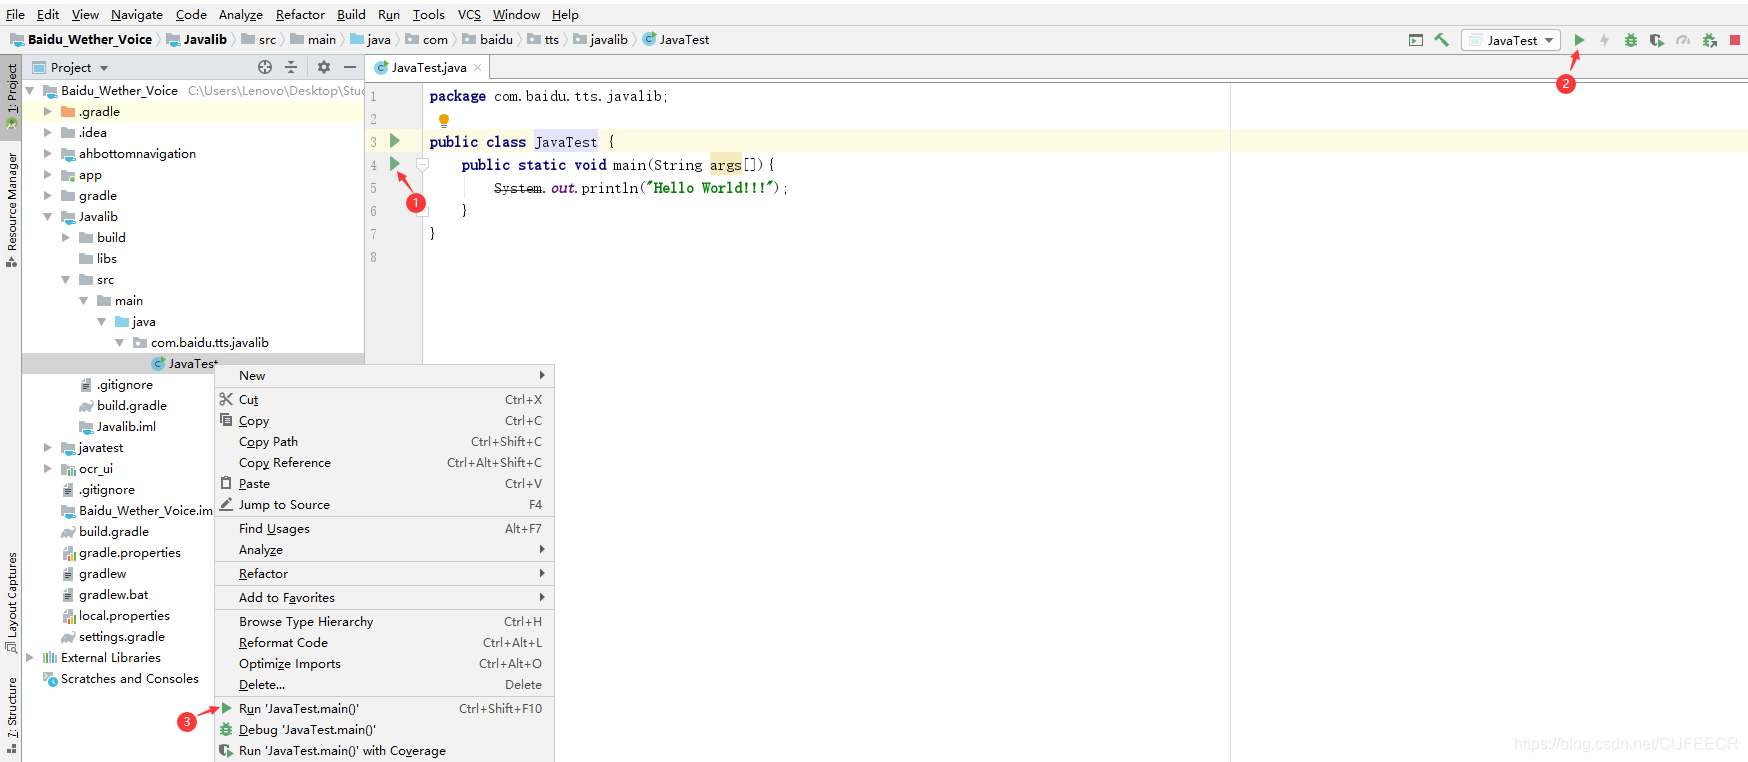
方法二:通过单元测试实现
单元测试中有一个本地测试(Local Tests)可实现此功能。
(1)新建
Android Studio创建项目的时候会自动创建一个test文件夹,如图。
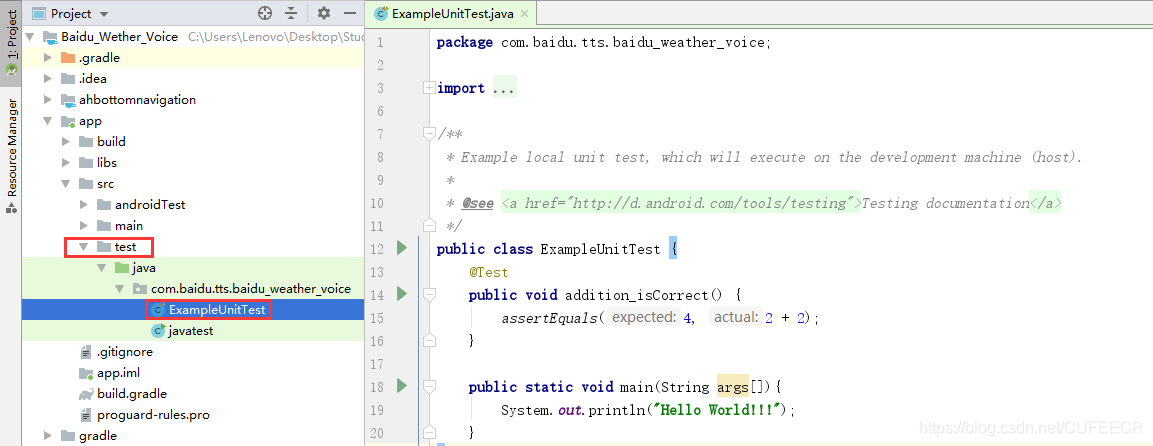 (2)代码示例
1public class ExampleUnitTest {
2    @Test
3    public void addition_isCorrect() {
4        assertEquals(4, 2 + 2);
5    }
6
7    public static void main(String args[]){
8        System.out.println("Hello World!!!");
9    }
10}
11
(3)运行 同方法一。 ※推荐使用方法2,Android Studio自带,不会污染代码。
4.在EditText中软键盘的调起、关闭
(1)EditText有焦点(focusable为true)阻止输入法弹出
1editText.setOnTouchListener(new OnTouchListener(){
2
3	public boolean onTouch(View view,MotionEvent event){
4
5		editText.setInputType(Input.TYPE_NULL);//关闭软键盘
6
7		return false;
8
9}});
(2)EditText无焦点(focusable=false)时阻挡输入法弹出
1public static void hideInputManager(Context context,View view){
2     InputMethodManager imm = (InputMethodManager) context.getSystemService(Context.INPUT_METHOD_SERVICE);
3     if (view !=null && imm != null){
4         imm.hideSoftInputFromWindow(view.getWindowToken(), 0);  //强制隐藏
5     }
6 }
(3)键盘永远不会弹出
1android:focusable="false"// 键盘永不弹出
5.禁止EditText自动弹出软键盘
(1)在包含EditText的父布局中添加android:focusable="true"和android:focusableInTouchMode="true"
1<?xml version="1.0" encoding="utf-8"?>
2<LinearLayout xmlns:android="http://schemas.android.com/apk/res/android"
3     android:layout_width="match_parent"
4     android:layout_height="match_parent"
5     android:orientation="vertical"
6     android:focusable="true"
7     android:focusableInTouchMode="true"
8   >
9
10   <EditText
11       android:id="@+id/edit"
12       android:layout_width="match_parent"
13       android:layout_height="wrap_content"
14       android:inputType="text"
15       android:maxLines="1"
16       />
17</LinearLayout>
18
(2)在AndroidManifest.xml中添加stateHidden
1<activity android:name=".TestAActivity"
2     android:windowSoftInputMode="adjustResize|stateHidden">
3</activity>
(3)进入页面强制隐藏软键盘 如果前两种方法都不起作用的话,可以使用这种方法:
1/**
2  * 隐藏输入软键盘
3  * @param context
4  * @param view
5  */
6 public static void hideInputManager(Context context,View view){
7     InputMethodManager imm = (InputMethodManager) context.getSystemService(Context.INPUT_METHOD_SERVICE);
8     if (view !=null && imm != null){
9         imm.hideSoftInputFromWindow(view.getWindowToken(), 0);  //强制隐藏
10     }
11 }
6.EditText输入文本从右边开始显示
在进行计算器等开发的时候,常常需要在EditText控件输入的文本从右边开始显示:
在xml文件中加入android:gravity="right"或者android:gravity="end"。
7.判断APP是否联网
首先要做的是在manifest中添加权限:
1<uses-permission android:name="android.permission.ACCESS_NETWORK_STATE"/>
然后判断:
1ConnectivityManager cwjManager=(ConnectivityManager)getSystemService(Context.CONNECTIVITY_SERVICE);
2NetworkInfo info = cwjManager.getActiveNetworkInfo();
3if (info != null && info.isAvailable()){
4 //you want do eveything!
5
6}
7else
8{
9	Toast.makeText(MainActivity.this,"无互联网连接",Toast.LENGTH_SHORT).show();
10}
8.检查网络连接状态的变化无网络时跳转到设置界面
在AndroidManifest.xml中加一个权限:
1<uses-permission android:name="android.permission.ACCESS_NETWORK_STATE" />
2<intent-filter>
3  <action android:name="android.net.conn.CONNECTIVITY_CHANGE" />
4</intent-filter>
主代码中实现:
1@Override
2protected void onCreate(Bundle savedInstanceState) {
3  super.onCreate(savedInstanceState);
4  setContentView(R.layout.activity_main);
5  checkNetwork();
6  if (!checkNetwork()) {
7    Toast.makeText(this, "没有网络", Toast.LENGTH_LONG).show();
8    Intent intent = new Intent("android.settings.WIRELESS_SETTINGS");
9    startActivity(intent);
10    return;
11  }
12}
13
14private boolean checkNetwork() {
15  ConnectivityManager conn = (ConnectivityManager) getSystemService(Context.CONNECTIVITY_SERVICE);
16  NetworkInfo net = conn.getActiveNetworkInfo();
17  if (net != null && net.isConnected()) {
18    return true;
19  }
20  return false;
21}
9.复制Assets文件到SD卡
原理: (1)先在Activity里面调用getAssets() 来获取AssetManager引用。 (2)再用AssetManager的open(String fileName, int accessMode) 方法则指定读取的文件以及访问模式就能得到输入流InputStream。 (3)然后就是用已经open file 的inputStream读取文件,读取完成后记得inputStream.close() 。 (4)调用AssetManager.close() 关闭AssetManager。 代码:
1import android.content.Context;
2import android.os.Environment;
3import android.os.Handler;
4import android.os.Looper;
5import android.os.Message;
6
7import java.io.File;
8import java.io.FileOutputStream;
9import java.io.InputStream;
10
11
12public class FileUtils {
13
14    private static FileUtils instance;
15    private static final int SUCCESS = 1;
16    private static final int FAILED = 0;
17    private Context context;
18    private FileOperateCallback callback;
19    private volatile boolean isSuccess;
20    private String errorStr;
21
22    public static FileUtils getInstance(Context context) {
23        if (instance == null)
24            instance = new FileUtils(context);
25        return instance;
26    }
27
28    private FileUtils(Context context) {
29        this.context = context;
30    }
31
32    private Handler handler = new Handler(Looper.getMainLooper()) {
33        @Override
34        public void handleMessage(Message msg) {
35            super.handleMessage(msg);
36            if (callback != null) {
37                if (msg.what == SUCCESS) {
38                    callback.onSuccess();
39                }
40                if (msg.what == FAILED) {
41                    callback.onFailed(msg.obj.toString());
42                }
43            }
44        }
45    };
46
47    public FileUtils copyAssetsToSD(final String srcPath, final String sdPath) {
48        new Thread(new Runnable() {
49            @Override
50            public void run() {
51                copyAssetsToDst(context, srcPath, sdPath);
52                if (isSuccess)
53                    handler.obtainMessage(SUCCESS).sendToTarget();
54                else
55                    handler.obtainMessage(FAILED, errorStr).sendToTarget();
56            }
57        }).start();
58        return this;
59    }
60
61    public void setFileOperateCallback(FileOperateCallback callback) {
62        this.callback = callback;
63    }
64
65    private void copyAssetsToDst(Context context, String srcPath, String dstPath) {
66        try {
67            String fileNames[] = context.getAssets().list(srcPath);
68            if (fileNames.length > 0) {
69                File file = new File(Environment.getExternalStorageDirectory(), dstPath);
70                if (!file.exists()) file.mkdirs();
71                for (String fileName : fileNames) {
72                    if (!srcPath.equals("")) { // assets 文件夹下的目录
73                        copyAssetsToDst(context, srcPath + File.separator + fileName, dstPath + File.separator + fileName);
74                    } else { // assets 文件夹
75                        copyAssetsToDst(context, fileName, dstPath + File.separator + fileName);
76                    }
77                }
78            } else {
79                File outFile = new File(Environment.getExternalStorageDirectory(), dstPath);
80                InputStream is = context.getAssets().open(srcPath);
81                FileOutputStream fos = new FileOutputStream(outFile);
82                byte[] buffer = new byte[1024];
83                int byteCount;
84                while ((byteCount = is.read(buffer)) != -1) {
85                    fos.write(buffer, 0, byteCount);
86                }
87                fos.flush();
88                is.close();
89                fos.close();
90            }
91            isSuccess = true;
92        } catch (Exception e) {
93            e.printStackTrace();
94            errorStr = e.getMessage();
95            isSuccess = false;
96        }
97    }
98
99    public interface FileOperateCallback {
100        void onSuccess();
101
102        void onFailed(String error);
103    }
104
105}
106
可参考https://blog.csdn.net/klxh2009/article/details/55191409。
10.从当前APP跳转到其他应用
(1)为目标APP的目标Activity添加权限属性(让其它应用拥有启动它的权限)
1<activity android:name=".SplashActivity" android:exported="true">
2    <intent-filter>
3        <action android:name="android.intent.action.demo"/>
4        <category android:name="android.intent.category.DEFAULT"/>  (不加此行会崩溃报错)
5    </intent-filter>
6</activity>
(2)进行跳转 方式一:
1/**
2 * App内跳转其它应用某activity的第一种方式
3 */
4Intent intent = new Intent();
5intent.setAction("android.intent.action.demo");
6startActivity(intent);
方式二:
1/**
2 * App内跳转其它应用某activity的第二种方式
3 */
4ComponentName componetName = new ComponentName(
5        "com.example.life",  //这个是另外一个应用程序的包名
6        "com.example.life.SplashActivity");   //这个参数是要启动的Activity的全路径名
7try {
8    Intent intent = new Intent();
9    intent.setComponent(componetName);
10    startActivity(intent);
11} catch (Exception e) {
12    Toast.makeText(this, "跳转异常,请检查跳转配置、包名及Activity访问权限", Toast.LENGTH_SHORT).show();
13}
注意事项:
无论方式一还是方式二,都必须给目标activity注册标签中加入 android:exported="true"属性;
在不清楚目标包名 以及 目标Activity的完整路径时,建议使用 代码第一种方式,即 使用 action 启动,但是不要忘记在目标App的Activity注册时,添加对应的action和category ;
如果知晓目标APP的包名以及目标Activity路径,这种情况就建议使用第二种方式,这种方式就无需在目标Activity注册的标签中加入action 和 category标签了。
可参考https://blog.csdn.net/xyl826/article/details/88555585。
本文原文首发来自博客专栏移动应用开发,由本人转发至https://www.helloworld.net/p/Z1Xi0Lu7wuzB,其他平台均属侵权,可点击https://blog.csdn.net/CUFEECR/article/details/103489522查看原文,也可点击https://blog.csdn.net/CUFEECR浏览更多优质原创内容。