
一、Python程序结构
Python中,有3种常见的程序结构:
- Sequence顺序 从上向下依次执行。
- Condition条件 满足某个条件则执行。
- Loop循环 重复执行某个动作。
1.if条件
判断某个变量是否满足某个条件时如下:
1possibility_to_rain = 0.7
2print(possibility_to_rain > 0.8)
3print(possibility_to_rain > 0.3)
4possibility_to_rain = 1
5print(possibility_to_rain > 0.8)
6print(possibility_to_rain > 0.3)
输出:
1False
2True
3True
4True
如需本节同步
ipynb文件,可以直接点击加QQ群 <a target="_blank" href="https://qm.qq.com/cgi-bin/qm/qr?k=rgE7cwG7OGHgfEucpRIQoSlYCTOEkmEr&jump_from=webapi"><img border="0" src="https://pub.idqqimg.com/wpa/images/group.png" alt="Python极客部落" title="Python极客部落">963624318</a> 在群文件夹商业数据分析从入门到入职中下载即可。
但是如果想在变量满足某个条件时需要执行某个动作,则需要if条件判断语句,如下:
1possibility_to_rain = 0.7
2
3if possibility_to_rain > 0.8:
4    print("Do take your umberalla with you.") ## 这个地方标准格式是四个空格的缩进
5elif possibility_to_rain > 0.3:
6    print("Take your umberalla just in case. hahaha")
7else:
8    print("Enjoy the sunshine!")
9print('hello')
输出:
1Take your umberalla just in case. hahaha
这段代码的意思是:
如果possibility_to_rain > 0.8为True,则执行print("Do take your umberalla with you."),如果不满足前述条件,但满足possibility_to_rain > 0.3,则执行print("Take your umberalla just in case. hahaha"),否则执行print("Enjoy the sunshine!");
if语句执行完后,再执行后面的语句,如print('hello');
需要注意缩进,if、elif、else语句后面的语句都应该缩进4格并保持对齐,即通过缩进控制代码块和代码结构,而不像其他语言使用{}来控制代码结构,如下:
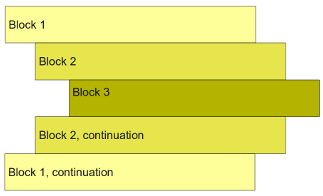
前面也看到,出现了很多以#开头的代码和文字性说明,代码颜色也是和其他代码有所区别的,这就是Python中的单行注释,注释后的代码不会被执行,而只能起到说明作用,这段代码中这个地方标准格式是四个空格的缩进被#注释,这一行前面的代码能正常执行,#后的文字不会执行、也不会报错、作为解释性语句。
除了对数值进行判断,还能对字符串进行判断:
1card_type = "debit"
2account_type = "checking"
3
4if card_type == "debit":
5    if account_type == "checking":
6        print("Checkings selectd.")
7    else:
8        print("Savings selected.")
9else:
10    print("Credit card.")
输出:
1Take your umberalla just in case. hahaha
2hello
可以看到,使用到了条件判断的嵌套。
2.循环
while循环
之前要是需要执行重复操作,可能如下:
1count =1
2print(count)
3count+=1
4print(count)
5count+=1
6print(count)
7count+=1
8print(count)
9count+=1
10print(count)
11count+=1
12print(count)
13count+=1
14print(count)
15count+=1
16print(count)
17count+=1
18print(count)
19count+=1
20print(count)
输出:
11
22
33
44
55
66
77
88
99
1010
显然,代码很冗长,此时就可以使用循环进行优化。
使用while循环如下:
1count = 1
2while count <= 10:
3    print(count)
4    count += 1
执行效果与前面相同;
需要注意,循环一般要有停止的条件,当满足count <= 10时循环会一直执行,直到count = 11时就会不符合、从而退出循环;
如果没有停止条件,则可能陷入死循环、消耗内存。
再如:
1cnt = 1
2while True:
3    print("cnt = %d" % cnt)
4    ch = input('Do you want to continue? [y:n]: ')
5    if ch == 'y':
6        cnt += 1
7    else:
8        break
输出如下:
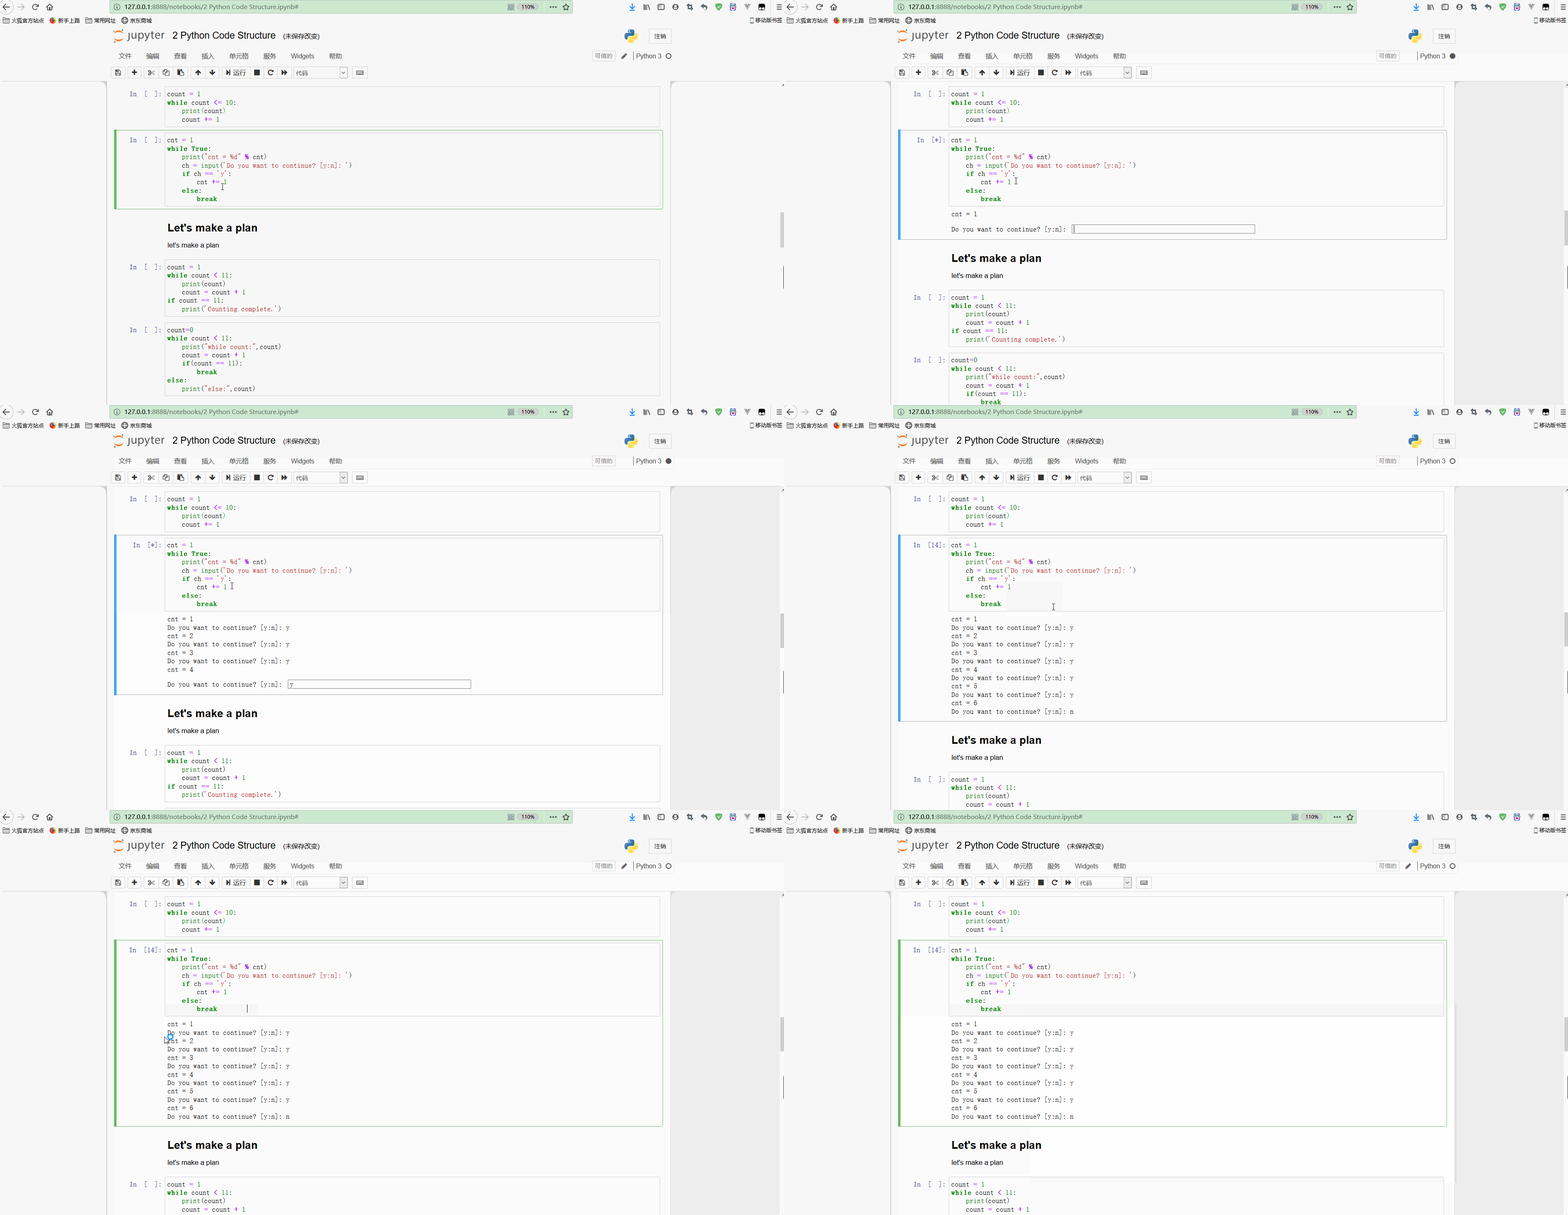
可以看到,虽然循环条件为True,是恒成立的,但是循环内部进行了条件判断,输入的是y就会一直循环,输入其他则执行break退出循环;
但是需要注意,这里只有严格地输入y才能继续循环,但是输入yes都会退出循环,所以要想进一步控制运行逻辑、还需要对代码进行完善。
在Python中,else也可以与while循环结合使用,如果循环不是因调用break而结束的,将执行else中的语句,这可以用于判断循环是不是完全执行,例如前面第1个循环的例子是不是运行了10次。
如下:
1count = 1
2while count < 11:
3    print(count)
4    count = count + 1
5else:
6    print('Counting complete.')
7
8    print()
9count = 1
10while count < 11:
11    print(count)
12    count = count + 1
13    if count == 8:
14        break
15else:
16    print('Counting complete.')
输出:
11
22
33
44
55
66
77
88
99
1010
11Counting complete.
12
131
142
153
164
175
186
197
可以看到: 第一个循环并没有因为break而停止循环,因此在执行完循环语句后执行了else语句; 第二个循环因为count为8时满足if条件而退出循环、并未将循环执行完毕,因此未执行else语句。
再如:
1count=0
2while count < 11:
3    print("while count:",count)
4    count = count + 1
5    if count == 11:
6        break
7else:
8    print("else:",count)
输出:
1while count: 0
2while count: 1
3while count: 2
4while count: 3
5while count: 4
6while count: 5
7while count: 6
8while count: 7
9while count: 8
10while count: 9
11while count: 10
显然,此时因为执行最后一次循环时满足if条件而执行了break语句,因此并未执行else语句块。
for循环
经常与for循环同时出现的还有range,range(self, /, *args, **kwargs)函数有以下两种常见的用法:
1range(stop) -> range object
2range(start, stop[, step]) -> range object
该函数返回一个对象,该对象以step为步长生成从start(包含)到stop(排除)的整数序列。例如range(i, j)产生i,i+1,i+2,…,j-1的序列。
输入:
1for i in range(10):
2    print(i)
输出:
10
21
32
43
54
65
76
87
98
109
再如:
1for i in range(4,10):
2    print(i)
3
4print()
5for i in range(4,10,2):
6    print(i)
7
8print()
9for i in range(5):
10    print('Corley')
11
12print()
13for i in range(5):
14    print('Corley'[i])
输出:
14
25
36
47
58
69
7
84
96
108
11
12Corley
13Corley
14Corley
15Corley
16Corley
17
18C
19o
20r
21l
22e
可以看到,for循环内也可以执行与i无关的操作; 还可以用来遍历字符串。
for循环中也可以使用break语句来终止循环,如下:
1for i in range(10):
2    print(i)
3    if i == 5:
4        break
输出:
10
21
32
43
54
65
再如:
1result = 0
2
3for num in range(1,100):
4    if num % 2 == 0:
5        result = result + num
6
7print(result)
输出:
12450
上面的例子实现了计算从1到100(不包括)的所有偶数的和。
3.案例-王者荣耀纯文本分析
目标是从以下文本提取出所有的英雄信息链接、头像图片链接、英雄名称,如herodetail/194.shtml、http://game.gtimg.cn/images/yxzj/img201606/heroimg/194/194.jpg和苏烈:

1<ul class="herolist clearfix"><li><a href="herodetail/194.shtml" target="_blank"><img src="http://game.gtimg.cn/images/yxzj/img201606/heroimg/194/194.jpg" width="91px" alt="苏烈">苏烈</a></li><li><a href="herodetail/195.shtml" target="_blank"><img src="http://game.gtimg.cn/images/yxzj/img201606/heroimg/195/195.jpg" width="91px" alt="百里玄策">百里玄策</a></li><li><a href="herodetail/196.shtml" target="_blank"><img src="http://game.gtimg.cn/images/yxzj/img201606/heroimg/196/196.jpg" width="91px" alt="百里守约">百里守约</a></li><li><a href="herodetail/193.shtml" target="_blank"><img src="http://game.gtimg.cn/images/yxzj/img201606/heroimg/193/193.jpg" width="91px" alt="铠">铠</a></li></ul>
我们可以先找出一个英雄的信息,即使用下标进行字符串切分,找下标时使用find()方法。
例如,对于链接http://game.gtimg.cn/images/yxzj/img201606/heroimg/194/194.jpg,如果找到第一个h字母和最后一个g字母的下标,就可以通过切分将该链接提取出来。
先读入字符串,如下:
1page_hero = '''<ul class="herolist clearfix"><li><a href="herodetail/194.shtml" target="_blank"><img src="http://game.gtimg.cn/images/yxzj/img201606/heroimg/194/194.jpg" width="91px" alt="苏烈">苏烈</a></li><li><a href="herodetail/195.shtml" target="_blank"><img src="http://game.gtimg.cn/images/yxzj/img201606/heroimg/195/195.jpg" width="91px" alt="百里玄策">百里玄策</a></li><li><a href="herodetail/196.shtml" target="_blank"><img src="http://game.gtimg.cn/images/yxzj/img201606/heroimg/196/196.jpg" width="91px" alt="百里守约">百里守约</a></li><li><a href="herodetail/193.shtml" target="_blank"><img src="http://game.gtimg.cn/images/yxzj/img201606/heroimg/193/193.jpg" width="91px" alt="铠">铠</a></li></ul>
2'''
此时再通过一步步地获取与目标相关字符的下标和根据下标切片来获取目标字符串,如获取图片链接如下:
1start_link = page_hero.find('<img src="')
2print(start_link)
3start_quote = page_hero.find('"', start_link)
4end_quote = page_hero.find('"', start_quote+1)
5hero_link = page_hero[start_quote+1:end_quote]
6print(hero_link)
输出:
181
2http://game.gtimg.cn/images/yxzj/img201606/heroimg/194/194.jpg
此时再依次获取英雄名和信息链接如下:
1# 第1个英雄
2start_link = page_hero.find('<a href="')
3start_quote = page_hero.find('"', start_link)
4end_quote = page_hero.find('"', start_quote+1)
5hero_info1 = page_hero[start_quote+1:end_quote]
6print(hero_info1)
7start_link = page_hero.find('<img src="', end_quote+1)
8start_quote = page_hero.find('"', start_link)
9end_quote = page_hero.find('"', start_quote+1)
10hero_link1 = page_hero[start_quote+1:end_quote]
11print(hero_link1)
12end_bracket = page_hero.find('>', end_quote+1)
13start_bracket = page_hero.find('<', end_bracket+1)
14hero_name1 = page_hero[end_bracket+1:start_bracket]
15print(hero_name1)
输出:
1herodetail/194.shtml
2http://game.gtimg.cn/images/yxzj/img201606/heroimg/194/194.jpg
3苏烈
显然,已经获取到第1个英雄的完整信息。
此时再获取第2个英雄的信息,如下:
1# 第2个英雄
2page_hero = page_hero[start_bracket:]
3start_link = page_hero.find('<a href="')
4start_quote = page_hero.find('"', start_link)
5end_quote = page_hero.find('"', start_quote+1)
6hero_info2 = page_hero[start_quote+1:end_quote]
7print(hero_info2)
8start_link = page_hero.find('<img src="', end_quote+1)
9start_quote = page_hero.find('"', start_link)
10end_quote = page_hero.find('"', start_quote+1)
11hero_link2 = page_hero[start_quote+1:end_quote]
12print(hero_link2)
13end_bracket = page_hero.find('>', end_quote+1)
14start_bracket = page_hero.find('<', end_bracket+1)
15hero_name2 = page_hero[end_bracket+1:start_bracket]
16print(hero_name2)
输出:
1herodetail/195.shtml
2http://game.gtimg.cn/images/yxzj/img201606/heroimg/195/195.jpg
3百里玄策
需要注意:
第二次切分不需要再在原字符串上进行切分、而只要从上次切分的位置开始查找和切分即可,所以page_hero = page_hero[end_quote:]即是将上次切分之后的子字符串重新赋值给page_hero作为新字符串;
因为各个英雄信息的字符串形式是一样的,所以可以直接利用查找第一个英雄的方式即可。
查找第3个和第4个英雄也类似如下:
1# 第3个英雄
2page_hero = page_hero[start_bracket:]
3start_link = page_hero.find('<a href="')
4start_quote = page_hero.find('"', start_link)
5end_quote = page_hero.find('"', start_quote+1)
6hero_info3 = page_hero[start_quote+1:end_quote]
7print(hero_info3)
8start_link = page_hero.find('<img src="', end_quote+1)
9start_quote = page_hero.find('"', start_link)
10end_quote = page_hero.find('"', start_quote+1)
11hero_link3 = page_hero[start_quote+1:end_quote]
12print(hero_link3)
13end_bracket = page_hero.find('>', end_quote+1)
14start_bracket = page_hero.find('<', end_bracket+1)
15hero_name3 = page_hero[end_bracket+1:start_bracket]
16print(hero_name3)
17
18# 第4个英雄
19page_hero = page_hero[start_bracket:]
20start_link = page_hero.find('<a href="')
21start_quote = page_hero.find('"', start_link)
22end_quote = page_hero.find('"', start_quote+1)
23hero_info4 = page_hero[start_quote+1:end_quote]
24print(hero_info4)
25start_link = page_hero.find('<img src="', end_quote+1)
26start_quote = page_hero.find('"', start_link)
27end_quote = page_hero.find('"', start_quote+1)
28hero_link4 = page_hero[start_quote+1:end_quote]
29print(hero_link4)
30end_bracket = page_hero.find('>', end_quote+1)
31start_bracket = page_hero.find('<', end_bracket+1)
32hero_name4 = page_hero[end_bracket+1:start_bracket]
33print(hero_name4)
输出:
1herodetail/196.shtml
2http://game.gtimg.cn/images/yxzj/img201606/heroimg/196/196.jpg
3百里守约
4herodetail/193.shtml
5http://game.gtimg.cn/images/yxzj/img201606/heroimg/193/193.jpg
6铠
可以看到,找4个英雄的思路都大致如下: (1)找到第一个出现的<img src= >=>start_link; (2)找到第一个出现的"=>start_quote; (3)找到start_quote+1之后那个引号 end_quote; (4)end_quote+1找到后面的>记作 end_bracket; (5)end_bracket+1 找到 start_bracket; (6)抛弃start_bracket之前的所有内容,再根据上面的方法找。
可以看到,3部分代码也有很大部分相似,因此可以使用循环来简化代码:
1# 使用循环简化代码
2page_hero = '''<ul class="herolist clearfix"><li><a href="herodetail/194.shtml" target="_blank"><img src="http://game.gtimg.cn/images/yxzj/img201606/heroimg/194/194.jpg" width="91px" alt="苏烈">苏烈</a></li><li><a href="herodetail/195.shtml" target="_blank"><img src="http://game.gtimg.cn/images/yxzj/img201606/heroimg/195/195.jpg" width="91px" alt="百里玄策">百里玄策</a></li><li><a href="herodetail/196.shtml" target="_blank"><img src="http://game.gtimg.cn/images/yxzj/img201606/heroimg/196/196.jpg" width="91px" alt="百里守约">百里守约</a></li><li><a href="herodetail/193.shtml" target="_blank"><img src="http://game.gtimg.cn/images/yxzj/img201606/heroimg/193/193.jpg" width="91px" alt="铠">铠</a></li></ul>
3'''
4for i in range(4):
5    print('第%d个英雄:' % (i+1))
6    start_link = page_hero.find('<a href="')
7    start_quote = page_hero.find('"', start_link)
8    end_quote = page_hero.find('"', start_quote+1)
9    hero_info = page_hero[start_quote+1:end_quote]
10    print(hero_info)
11    start_link = page_hero.find('<img src="', end_quote+1)
12    start_quote = page_hero.find('"', start_link)
13    end_quote = page_hero.find('"', start_quote+1)
14    hero_link = page_hero[start_quote+1:end_quote]
15    print(hero_link)
16    end_bracket = page_hero.find('>', end_quote+1)
17    start_bracket = page_hero.find('<', end_bracket+1)
18    hero_name = page_hero[end_bracket+1:start_bracket]
19    print(hero_name)
20    page_hero = page_hero[start_bracket:]
输出:
1第1个英雄:
2herodetail/194.shtml
3http://game.gtimg.cn/images/yxzj/img201606/heroimg/194/194.jpg
4苏烈
5第2个英雄:
6herodetail/195.shtml
7http://game.gtimg.cn/images/yxzj/img201606/heroimg/195/195.jpg
8百里玄策
9第3个英雄:
10herodetail/196.shtml
11http://game.gtimg.cn/images/yxzj/img201606/heroimg/196/196.jpg
12百里守约
13第4个英雄:
14herodetail/193.shtml
15http://game.gtimg.cn/images/yxzj/img201606/heroimg/193/193.jpg
16铠
17
显然,代码精简很多。
二、函数的介绍和基本使用
函数是一段命名的代码,并且独立于所有其他代码。 函数可以接受任何类型的输入参数,并返回任意数量和类型的输出结果。 简而言之,函数可以代替大段代码,在需要使用这些代码的时候、直接调用函数即可,而不再需要重复大段代码,很大程度上优化了代码的结构、提高了代码的可读性。
定义一个不做任何事的函数如下:
1# An empty function that does nothing
2def do_nothing():
3    pass
4
5do_nothing()
6type(do_nothing)
输出:
1function
其中,do_nothing()是调用函数,即函数名()。
定义一个不带参数和返回值的函数如下:
1# A function without parameters and returns values
2def greeting():
3    print("Hello Python")
4
5# Call the function
6a = greeting()
输出:
1Hello Python
以后需要打印Hello Python的地方,就不用再使用print("Hello Python")语句,直接调用greeting()即可。
还可以定义带参数、但是不带返回值的函数:
1# A function with a parameter that returns nothing
2def greeting(name):
3    print("Hello %s" % name)
4
5# Call the function
6greeting('Corley')
输出:
1Hello Corley
此时在调用函数时,传入了参数'Corley',会在函数内部使用,如果参数值变化,在函数内部被使用的变量也会同步变化,导致结果也可能变化。
但是此时:
1print(a)
输出:
1None
即返回为空,这是因为在函数内部并未定义返回值。 在需要时可以在函数内部定义返回值,以便用于下一步的运算。
如下:
1# A function with a parameter and return a string
2def greeting_str(name):
3    return "Hello again " + name
4
5# Use the function
6s = greeting_str("Corley")
7print(s)
输出:
1Hello again Corley
像许多编程语言一样,Python支持位置参数,其值按顺序复制到相应的参数中。即可以给函数传递多个参数,如下:
1# A function with 3 parameters
2def menu(wine, entree, dessert):
3    return "wine:{},entree:{},dessert:{}".format(wine,entree,dessert)
4
5# Get a menu
6menu('chardonnay', 'chicken', 'cake')
输出:
1'wine:chardonnay,entree:chicken,dessert:cake'
为了避免位置参数混淆,可以通过参数对应的名称来指定参数,甚至可以使用与函数中定义不同的顺序来指定参数,即关键字参数。 如下:
1menu(entree='beef', dessert='cake', wine='bordeaux')
输出:
1'wine:bordeaux,entree:beef,dessert:cake'
显然,此时不按照顺序也可以实现传参。
甚至可以混合使用位置参数和关键字参数; 但是需要注意,在输入任何关键字参数之前,必须提供所有位置参数。
如果函数调用者未提供任何参数的默认值,则可以为参数设置默认值。 如下:
1# default dessert is pudding
2def menu(wine, entree, dessert='pudding'):
3    return "wine:{},entree:{},dessert:{}".format(wine,entree,dessert)
4
5
6# Call menu without providing dessert
7menu('chardonnay', 'chicken')
输出:
1'wine:chardonnay,entree:chicken,dessert:pudding'
可以看到,此时也可以不给dessert参数传值也能正常运行,因为在定义函数时已经提供了默认值。
当然,也可以给dessert参数传值,此时就会使用传递的值代替默认值,如下:
1# Default value will be overwritten if caller provide a value
2menu('chardonnay', 'chicken', 'doughnut')
输出:
1'wine:chardonnay,entree:chicken,dessert:doughnut'
在函数中,存在作用域,即变量在函数内外是否有效。 如下:
1x = 1
2def new_x():
3    x = 5
4    print(x)
5
6
7def old_x():
8    print(x)
9
10new_x()
11old_x()
输出:
15
21
显然,第一个函数中的x在函数内部,属于局部变量,局部变量只能在当前函数内部使用; 第二个函数使用的x函数内部并未定义,因此使用函数外部的x,即全局变量,全局变量可以在函数内部使用,也可以在函数外部使用; 函数内部定义了与全局变量同名的局部变量后,不会改变全局变量的值。
要想在函数内部使用全局变量并进行修改,需要使用global关键字进行声明。
如下:
1x = 1
2
3def change_x():
4    global x
5    print('before changing inside,', x)
6    x = 3
7    print('after changing inside,', x)
8
9print('before changing outside,', x)
10change_x()
11print('after changing outside,', x)
输出:
1before changing outside, 1
2before changing inside, 1
3after changing inside, 3
4after changing outside, 3
可以看到,此时在函数内部对变量进行修改后,函数外部也发生改变。
此时可以对之前王者荣耀纯文本分析案例进一步优化:
1# 使用函数实现
2def extract_info(current_page):
3    start_link = current_page.find('<a href="')
4    start_quote = current_page.find('"', start_link)
5    end_quote = current_page.find('"', start_quote+1)
6    hero_info = current_page[start_quote+1:end_quote]
7    print(hero_info)
8    start_link = current_page.find('<img src="', end_quote+1)
9    start_quote = current_page.find('"', start_link)
10    end_quote = current_page.find('"', start_quote+1)
11    hero_link = current_page[start_quote+1:end_quote]
12    print(hero_link)
13    end_bracket = current_page.find('>', end_quote+1)
14    start_bracket = current_page.find('<', end_bracket+1)
15    hero_name = current_page[end_bracket+1:start_bracket]
16    print(hero_name)
17    return start_bracket
18
19
20start_bracket = 0
21page_hero = '''<ul class="herolist clearfix"><li><a href="herodetail/194.shtml" target="_blank"><img src="http://game.gtimg.cn/images/yxzj/img201606/heroimg/194/194.jpg" width="91px" alt="苏烈">苏烈</a></li><li><a href="herodetail/195.shtml" target="_blank"><img src="http://game.gtimg.cn/images/yxzj/img201606/heroimg/195/195.jpg" width="91px" alt="百里玄策">百里玄策</a></li><li><a href="herodetail/196.shtml" target="_blank"><img src="http://game.gtimg.cn/images/yxzj/img201606/heroimg/196/196.jpg" width="91px" alt="百里守约">百里守约</a></li><li><a href="herodetail/193.shtml" target="_blank"><img src="http://game.gtimg.cn/images/yxzj/img201606/heroimg/193/193.jpg" width="91px" alt="铠">铠</a></li></ul>
22'''
23for i in range(4):
24    print('第%d个英雄:' % (i+1))
25    page_hero = page_hero[start_bracket:]
26    start_bracket = extract_info(page_hero)
输出:
1第1个英雄:
2herodetail/194.shtml
3http://game.gtimg.cn/images/yxzj/img201606/heroimg/194/194.jpg
4苏烈
5第2个英雄:
6herodetail/195.shtml
7http://game.gtimg.cn/images/yxzj/img201606/heroimg/195/195.jpg
8百里玄策
9第3个英雄:
10herodetail/196.shtml
11http://game.gtimg.cn/images/yxzj/img201606/heroimg/196/196.jpg
12百里守约
13第4个英雄:
14herodetail/193.shtml
15http://game.gtimg.cn/images/yxzj/img201606/heroimg/193/193.jpg
16铠
显然,循环和函数结合使用,实现了功能,并且进一步简化代码。
除了使用for循环,还可以使用while循环,如下:
1# 使用函数实现
2def extract_info(i, current_page):
3    start_link = current_page.find('<a href="')
4    start_quote = current_page.find('"', start_link)
5    end_quote = current_page.find('"', start_quote+1)
6    hero_info = current_page[start_quote+1:end_quote]
7    start_link = current_page.find('<img src="', end_quote+1)
8    start_quote = current_page.find('"', start_link)
9    end_quote = current_page.find('"', start_quote+1)
10    hero_link = current_page[start_quote+1:end_quote]
11    end_bracket = current_page.find('>', end_quote+1)
12    start_bracket = current_page.find('<', end_bracket+1)
13    hero_name = current_page[end_bracket+1:start_bracket]
14    if hero_info.startswith('hero'):
15        print('第%d个英雄:' % i)
16        print(hero_info)
17        print(hero_link)
18        print(hero_name)
19        return start_bracket
20    else:
21        return -1
22
23
24start_bracket = 0
25i = 1
26page_hero = '''<ul class="herolist clearfix"><li><a href="herodetail/194.shtml" target="_blank"><img src="http://game.gtimg.cn/images/yxzj/img201606/heroimg/194/194.jpg" width="91px" alt="苏烈">苏烈</a></li><li><a href="herodetail/195.shtml" target="_blank"><img src="http://game.gtimg.cn/images/yxzj/img201606/heroimg/195/195.jpg" width="91px" alt="百里玄策">百里玄策</a></li><li><a href="herodetail/196.shtml" target="_blank"><img src="http://game.gtimg.cn/images/yxzj/img201606/heroimg/196/196.jpg" width="91px" alt="百里守约">百里守约</a></li><li><a href="herodetail/193.shtml" target="_blank"><img src="http://game.gtimg.cn/images/yxzj/img201606/heroimg/193/193.jpg" width="91px" alt="铠">铠</a></li></ul>
27'''
28while True:
29    page_hero = page_hero[start_bracket:]
30    start_bracket = extract_info(i, page_hero)
31    i += 1
32    if start_bracket == -1:
33        break
效果与前面一样。
三、函数进阶
1.可变位置参数
一般情况下,在定义了一个包含若干个参数的函数后,在调用时,也需要传递相同数量的参数值才能正常调用函数,否则会报错。
但是也可以看到,之前在调用print()函数时,每次要打印的变量数可能都不一样,即参数的数量可能是多变的,如果需要定义不变数量的参数,就需要使用参数*args,也称为可变位置参数。
如下:
1def print_args(*args):
2    print('Positonal args:', args)
3
4print('hello', 'Corley')
5print('hello', 'Corley','again')
6print('what', 'are','you','doing')
输出:
1hello Corley
2hello Corley again
3what are you doing
显然,此时传入不同个数的参数,均可以正常调用函数。
查看args类型,如下:
1def print_args(*args):
2    print(type(args))
3    print('Positonal args:', args)
4
5print_args('hello')
输出:
1<class 'tuple'>
2Positonal args: ('hello',)
可以看到,传入的args类型被解析为元组,包含了传递的所有参数;
print()函数也是用类似的方式定义的。
此时定义函数时,传递参数可以更加灵活。 如下:
1def print_args_with_required(req1, req2, *args):
2    print('req1:', req1)
3    print('req2:', req2)
4    print('all other  args:', args)
5
6print_args_with_required()
此时会报错:
1---------------------------------------------------------------------------
2TypeError                                 Traceback (most recent call last)
3<ipython-input-79-0f8d1d1519ce> in <module>
4      4     print('all other  args:', args)
5      5
6----> 6 print_args_with_required()
7
8TypeError: print_args_with_required() missing 2 required positional arguments: 'req1' and 'req2'
因为这样定义函数,是表示req1和req2都是必须要传的参数,还可以根据需要决定是否需要传递其他参数,如果有则包含进args中,此时调用并没有传递前两个参数,因此会报错。
测试:
1def print_args_with_required(req1, req2, *args):
2    print('req1:', req1)
3    print('req2:', req2)
4    print('all other  args:', args)
5
6print_args_with_required(1,2)
7print_args_with_required(1,2, 3, 'hello')
输出:
1req1: 1
2req2: 2
3all other  args: ()
4req1: 1
5req2: 2
6all other  args: (3, 'hello')
此时,如果有多余的参数,则会放入元组。
2.可变关键字参数
前面在传入额外的参数时没有指明参数名,直接传入参数值即可,但是还可以指定参数名,此时称为可变关键字参数,形式为**kwargs。
如下:
1def print_kwargs(**kwargs):
2    print('Keyword args:', kwargs)
3
4print_kwargs(1,2)
此时会报错:
1---------------------------------------------------------------------------
2TypeError                                 Traceback (most recent call last)
3<ipython-input-81-fbc2fa215023> in <module>
4      2     print('Keyword args:', kwargs)
5      3
6----> 4 print_kwargs(1,2)
7
8TypeError: print_kwargs() takes 0 positional arguments but 2 were given
此时需要指定参数名,如下:
1def print_kwargs(**kwargs):
2    print('Keyword args:', kwargs)
3
4print_kwargs(fst=1,scd=2)
输出:
1Keyword args: {'fst': 1, 'scd': 2}
可以看到,可变关键字参数被解析为字典。
可变位置参数和可变关键字参数可以结合使用。 如下:
1def print_all_args(req1, req2, *args, **kwargs):
2    print('required args:', req1, req2)
3    print('Positonal args:', args)
4    print('Keyword args:', kwargs)
5
6print_all_args(1,2,3,4,s='hello')
输出:
1required args: 1 2
2Positonal args: (3, 4)
3Keyword args: {'s': 'hello'}
4
在定义和调用函数时,需要注意3种参数的位置顺序: 必填参数位于最前,可变位置参数次之,可变关键字参数位于最后。
3.函数定义和查看文档字符串
在系统自定义的函数一般都有文档字符串,用来描述该函数的参数、用法注意事项等。
例如:
1?print
运行后,会在页面下方弹出框,内容为:
1Docstring:
2print(value, ..., sep=' ', end='\n', file=sys.stdout, flush=False)
3
4Prints the values to a stream, or to sys.stdout by default.
5Optional keyword arguments:
6file:  a file-like object (stream); defaults to the current sys.stdout.
7sep:   string inserted between values, default a space.
8end:   string appended after the last value, default a newline.
9flush: whether to forcibly flush the stream.
10Type:      builtin_function_or_method
其中,第一部分就是内部定义的文档字符串。
自定义的函数也可以实现该功能,如下:
1def odd_or_even(num):
2    '''
3    Return True id num is even,
4    or return False if num is odd
5    '''
6    return num % 2 == 0
7
8?odd_or_even
此时弹框中内容为:
1Signature: odd_or_even(num)
2Docstring:
3Return True id num is even,
4or return False if num is odd
5File:      XXX\<ipython-input-85-b86074aa0e21>
6Type:      function
可以看到,是通过三对引号将文档字符串包裹起来的形式定义的,相当于注释作用,但是也是文档字符串。
还可以通过help()函数实现查看函数文档:
1help(odd_or_even)
输出:
1Help on function odd_or_even in module __main__:
2
3odd_or_even(num)
4    Return True id num is even,
5    or return False if num is odd
或者使用函数对象的__doc__属性,如下:
1print(odd_or_even.__doc__)
输出:
1Return True id num is even,
2or return False if num is odd
5.函数作为参数
函数本身也可以作为参数传递到另一个函数中,进行调用。
如下:
1def ask():
2    print('Do you love Python?')
3
4def answer():
5    print('Yes, I do')
6
7def run_sth(func):
8    func()
9
10run_sth(ask)
11run_sth(answer)
输出:
1Do you love Python?
2Yes, I do
可以看到,也能正常执行。
还可以传递参数:
1def bin_op(func, op1, op2):
2    return func(op1, op2)
3
4def add(op1, op2):
5    return op1 + op2
6
7def sub(op1, op2):
8    return op1 - op2
9
10print('1 + 2 =', bin_op(add, 1,2))
11print('1 - 2 =', bin_op(sub, 1,2))
输出:
11 + 2 = 3
21 - 2 = -1
还能定义嵌套函数。 如下:
1def exp_factory(n):
2    def exp(a):
3        return a ** n
4    return exp
5
6sqr = exp_factory(2)
7print(type(sqr))
8print(sqr(3))
输出:
1<class 'function'>
29
可以看到,调用exp_factory(2)时返回的是exp()函数,其内部为return a ** 2,即求一个数的平方,所以再调用sqr(3)时,即是调用exp(3),所以返回3**2=9.
此即工厂函数模式,可以生产出具有特定功能的函数。 再如:
1cube = exp_factory(3)
2cube(3)
输出:
127
6.装饰器
函数可以使用装饰器,实现单独使用函数所不能实现的额外功能。
简单地说:装饰器就是修改其他函数的功能的函数,其有助于让代码更简短,也更Pythonic。
例如:
1def should_log(func):
2    def func_with_log(*args, **kwargs):
3        print('Calling:', func.__name__)
4        return func(*args, **kwargs)
5    return func_with_log
6
7add_with_log = should_log(add)
8add_with_log(2,3)
输出:
1Calling: add
2
35
可以看到,通过传递函数到should_log()函数中,使得函数具有了其他功能,例如打印日志;
__name__属性用于获取函数的名字。
但是显得不太方便,此时可进一步简化如下:
1@should_log
2def add(op1, op2):
3    return op1 + op2
4
5@should_log
6def sub(op1, op2):
7    return op1 * op2
8
9add(1, 2)
10sub(1, 2)
输出:
1Calling: add
2Calling: sub
3
42
此时用更简单的方式实现了需要的功能,这就是装饰器,经常适用于授权和日志等方面。
7.匿名函数-lambda表达式
之前定义函数都是通过特定的形式定义出来的,如下:
1def mul(op1, op2):
2    return op1 * op2
可以看到,该函数通过def关键字定义,有函数名为mul,同时还有两个参数和返回值,但是实际上实现的功能很简单,就是求出两个数的乘积并返回,显然,如果用到该函数的地方较少或者与当前代码相隔较远就不太合适。
此时就可以使用匿名函数,即没有函数名的函数,也叫lambda表达式,可以实现函数的功能。
如下:
1bin_op(lambda op1, op2:op1*op2, 2,4)
输出:
18
lambda表达式一般用于功能不复杂且使用不多的地方。
8.异常处理
很多时候,因代码逻辑的不正确会报错,也就是抛出异常,可以进行捕获和处理,从而使程序继续运行。
此时需要使用到try...except...语句。
如下:
1def div(op1, op2):
2    try:
3        return op1 / op2
4    except ZeroDivisionError:
5        print('Division by zero')
6
7div(5, 0)
输出:
1Division by zero
可以看到,此时除数为0,但是并没有抛出异常,而是执行了except中的语句;
如果try代码块中无异常,则正常执行该代码块,否则执行except块中的代码。
还可以结合finally使用。
如下:
1def div(op1, op2):
2    try:
3        return op1 / op2
4    except:
5        print('Division by zero')
6    finally:
7        print('finished')
8
9div(5, 0)
输出:
1Division by zero
2finished
此时无论执行的是try还是except中的语句,最终都会执行finally中的语句。
异常处理可以提高程序的稳定性,尽可能降低异常对程序的影响。
还有额外的代码结构的练习,如有需要,可以直接点击加QQ群 <a target="_blank" href="https://qm.qq.com/cgi-bin/qm/qr?k=rgE7cwG7OGHgfEucpRIQoSlYCTOEkmEr&jump_from=webapi"><img border="0" src="https://pub.idqqimg.com/wpa/images/group.png" alt="Python极客部落" title="Python极客部落">963624318</a> 在群文件夹商业数据分析从入门到入职中下载即可。
本文原文首发来自博客专栏数据分析,由本人转发至https://www.helloworld.net/p/Mne4cgaiw7Ij8,其他平台均属侵权,可点击https://blog.csdn.net/CUFEECR/article/details/108751537查看原文,也可点击https://blog.csdn.net/CUFEECR浏览更多优质原创内容。