
RTSP (Real Time Streaming Protocol),实时流协议,是一种应用层协议,专为流媒体使用。本文将介绍 GStreamer, VLC, FFmpeg 这几个工具,如何发送、接收 RTSP 流。
前提
GStreamer
安装:
1sudo apt install libgstreamer1.0-0 gstreamer1.0-plugins-base gstreamer1.0-plugins-good gstreamer1.0-plugins-bad gstreamer1.0-plugins-ugly gstreamer1.0-libav gstreamer1.0-doc gstreamer1.0-tools gstreamer1.0-x gstreamer1.0-alsa gstreamer1.0-gl gstreamer1.0-gtk3 gstreamer1.0-qt5 gstreamer1.0-pulseaudio
查看所有插件:
1# conda deactivate
2gst-inspect-1.0 -a
播放 ~/Videos/test.mp4 文件:
1gst-launch-1.0 filesrc location=~/Videos/test.mp4 ! decodebin ! autovideosink
播放 /dev/video0 webcam:
1gst-launch-1.0 v4l2src device=/dev/video0 \
2! video/x-raw, format=YUY2, width=640, height=480, framerate=30/1 \
3! autovideosink
/dev/video0 相关信息,可见后文“关于 Webcam”。
GStreamer RTSP Server
编译 test-launch 例子:
<!-- pip install meson pkg-config --modversion gstreamer-rtsp-server-1.0 -->1sudo apt install libgstreamer1.0-dev libgstrtspserver-1.0 2 3git clone https://github.com/GStreamer/gst-rtsp-server.git 4 5cd gst-rtsp-server/ 6git checkout 1.18 7 8cd examples/ 9gcc test-launch.c -o test-launch $(pkg-config --cflags --libs gstreamer-rtsp-server-1.0)
用 test-launch 发送 RTSP 测试流:
1$ ./test-launch "videotestsrc ! x264enc ! rtph264pay name=pay0 pt=96"
2stream ready at rtsp://127.0.0.1:8554/test
用 gst-launch 接收 RTSP 测试流:
1gst-launch-1.0 playbin uri=rtsp://127.0.0.1:8554/test
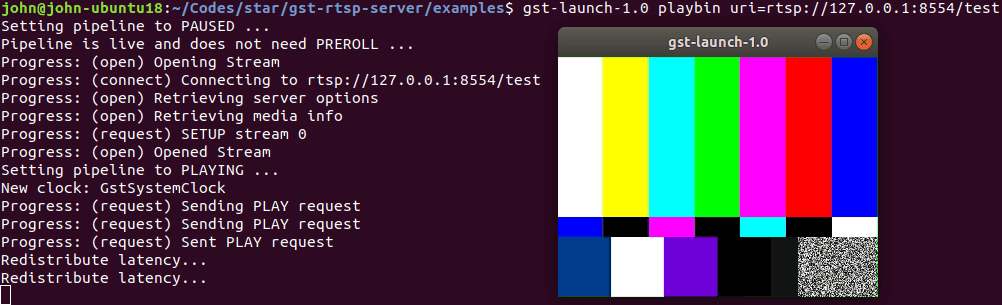
发送 RTSP,以 test-launch
发送 ~/Videos/test.mp4 文件:
1./test-launch "filesrc location=/home/john/Videos/test.mp4 ! decodebin ! x264enc ! rtph264pay name=pay0 pt=96"
发送 /dev/video0 webcam:
1./test-launch "v4l2src device=/dev/video0 ! video/x-raw,format=YUY2,width=640,height=480 ! videoconvert ! x264enc ! rtph264pay name=pay0 pt=96"
接收 RTSP,以 gst-launch
1gst-launch-1.0 playbin uri=rtsp://127.0.0.1:8554/test
2# or
3gst-launch-1.0 rtspsrc location=rtsp://127.0.0.1:8554/test ! decodebin ! autovideosink
参考
- GStreamer
- GStreamer RTSP Server
- Stream webcam with GStreamer (RTSP)
- x264 [error]: baseline profile doesn't support 4:2:2
VLC
安装:
<!-- sudo apt install vlc-bin sudo usermod -aG video ${USER} -->1sudo snap install vlc 2# allow camera permission 3snap connect vlc:camera :camera
查看可用模块:
1vlc --list
播放 ~/Videos/test.mp4 文件:
1vlc file:///home/john/Videos/test.mp4
播放 /dev/video0 webcam:
1vlc v4l2:///dev/video0:chroma=mjpg:width=640:height=480:fps=30
发送 RTSP,以 vlc
发送 ~/Videos/test.mp4 文件:
1vlc file:///home/john/Videos/test.mp4 \
2--sout '#transcode{vcodec=h264}:rtp{sdp=rtsp://:8554/test}'
发送 /dev/video0 webcam:
1vlc v4l2:///dev/video0:chroma=yuyv:width=640:height=480:fps=30 \
2--sout '#transcode{vcodec=h264,width=640,height=480}:rtp{sdp=rtsp://:8554/test}'
接收 RTSP,以 vlc
1vlc rtsp://127.0.0.1:8554/test
参考
FFmpeg
安装:
1sudo apt install ffmpeg
发送 RTSP,以 ffserver
配置 ffserver.conf:
1HTTPPort 8091
2HTTPBindAddress 0.0.0.0
3RTSPPort 1554
4MaxHTTPConnections 2000
5MaxClients 1000
6MaxBandwidth 1000
7CustomLog -
8
9<Stream test.mp4>
10  File "/home/john/Videos/test.mp4"
11  Format rtp
12</Stream>
开启 ffserver:
1$ nohup ffserver -f ffserver.conf &
2
3$ tail nohup.out
4  libavcodec     57.107.100 / 57.107.100
5  libavformat    57. 83.100 / 57. 83.100
6  libavdevice    57. 10.100 / 57. 10.100
7  libavfilter     6.107.100 /  6.107.100
8  libavresample   3.  7.  0 /  3.  7.  0
9  libswscale      4.  8.100 /  4.  8.100
10  libswresample   2.  9.100 /  2.  9.100
11  libpostproc    54.  7.100 / 54.  7.100
12Wed Apr 21 11:28:39 2021 Opening feed file '/home/john/Videos/test.mp4' for stream 'test.mp4'
13Wed Apr 21 11:28:39 2021 FFserver started.
接收 RTSP,以 ffplay
1ffplay rtsp://127.0.0.1:1554/test.mp4
参考
关于 Media
1$ sudo apt install ffmpeg
2
3$ ffprobe ~/Videos/test.mp4
4ffprobe version 3.4.8-0ubuntu0.2 Copyright (c) 2007-2020 the FFmpeg developers
5  built with gcc 7 (Ubuntu 7.5.0-3ubuntu1~18.04)
6  configuration: --prefix=/usr --extra-version=0ubuntu0.2 --toolchain=hardened --libdir=/usr/lib/x86_64-linux-gnu --incdir=/usr/include/x86_64-linux-gnu --enable-gpl --disable-stripping --enable-avresample --enable-avisynth --enable-gnutls --enable-ladspa --enable-libass --enable-libbluray --enable-libbs2b --enable-libcaca --enable-libcdio --enable-libflite --enable-libfontconfig --enable-libfreetype --enable-libfribidi --enable-libgme --enable-libgsm --enable-libmp3lame --enable-libmysofa --enable-libopenjpeg --enable-libopenmpt --enable-libopus --enable-libpulse --enable-librubberband --enable-librsvg --enable-libshine --enable-libsnappy --enable-libsoxr --enable-libspeex --enable-libssh --enable-libtheora --enable-libtwolame --enable-libvorbis --enable-libvpx --enable-libwavpack --enable-libwebp --enable-libx265 --enable-libxml2 --enable-libxvid --enable-libzmq --enable-libzvbi --enable-omx --enable-openal --enable-opengl --enable-sdl2 --enable-libdc1394 --enable-libdrm --enable-libiec61883 --enable-chromaprint --enable-frei0r --enable-libopencv --enable-libx264 --enable-shared
7  libavutil      55. 78.100 / 55. 78.100
8  libavcodec     57.107.100 / 57.107.100
9  libavformat    57. 83.100 / 57. 83.100
10  libavdevice    57. 10.100 / 57. 10.100
11  libavfilter     6.107.100 /  6.107.100
12  libavresample   3.  7.  0 /  3.  7.  0
13  libswscale      4.  8.100 /  4.  8.100
14  libswresample   2.  9.100 /  2.  9.100
15  libpostproc    54.  7.100 / 54.  7.100
16Input #0, mov,mp4,m4a,3gp,3g2,mj2, from '/home/john/Videos/test.mp4':
17  Metadata:
18    major_brand     : isom
19    minor_version   : 512
20    compatible_brands: isomiso2avc1mp41
21    encoder         : Lavf58.20.100
22  Duration: 00:10:22.04, start: 0.000000, bitrate: 4205 kb/s
23    Stream #0:0(und): Video: h264 (Main) (avc1 / 0x31637661), yuv420p, 1920x1080, 4204 kb/s, 25 fps, 25 tbr, 1200k tbn, 2400k tbc (default)
24    Metadata:
25      handler_name    : VideoHandler
关于 Webcam
1$ sudo apt install v4l-utils
2
3$ v4l2-ctl --list-devices
4HD Webcam: HD Webcam (usb-0000:00:14.0-13):
5	/dev/video0
6	/dev/video1
7
8$ v4l2-ctl -d 0 --list-formats-ext
9ioctl: VIDIOC_ENUM_FMT
10	Index       : 0
11	Type        : Video Capture
12	Pixel Format: 'MJPG' (compressed)
13	Name        : Motion-JPEG
14		Size: Discrete 640x480
15			Interval: Discrete 0.033s (30.000 fps)
16		Size: Discrete 1280x720
17			Interval: Discrete 0.033s (30.000 fps)
18		Size: Discrete 640x360
19			Interval: Discrete 0.033s (30.000 fps)
20		Size: Discrete 352x288
21			Interval: Discrete 0.033s (30.000 fps)
22		Size: Discrete 320x240
23			Interval: Discrete 0.033s (30.000 fps)
24		Size: Discrete 176x144
25			Interval: Discrete 0.033s (30.000 fps)
26		Size: Discrete 160x120
27			Interval: Discrete 0.033s (30.000 fps)
28
29	Index       : 1
30	Type        : Video Capture
31	Pixel Format: 'YUYV'
32	Name        : YUYV 4:2:2
33		Size: Discrete 640x480
34			Interval: Discrete 0.033s (30.000 fps)
35			Interval: Discrete 0.050s (20.000 fps)
36		Size: Discrete 1280x720
37			Interval: Discrete 0.100s (10.000 fps)
38		Size: Discrete 640x360
39			Interval: Discrete 0.033s (30.000 fps)
40		Size: Discrete 352x288
41			Interval: Discrete 0.033s (30.000 fps)
42		Size: Discrete 320x240
43			Interval: Discrete 0.033s (30.000 fps)
44		Size: Discrete 176x144
45			Interval: Discrete 0.033s (30.000 fps)
46		Size: Discrete 160x120
47			Interval: Discrete 0.033s (30.000 fps)
GoCoding 个人实践的经验分享,可关注公众号!