
 EMQ X Kuiper 是映云科技开源的轻量级物联网边缘数据分析和流式处理软件, Kuiper 设计的一个主要目标就是将在云端运行的实时流式计算框架(如 Apache Spark,Apache Storm 和 Apache Flink 等)迁移到边缘端。
Kuiper 参考了云端流式处理项目的架构与实现,结合边缘流式数据处理的特点,采用了编写基于源 (Source),SQL (业务逻辑处理), 目标 (Sink) 的规则引擎来实现边缘端的流式数据处理。
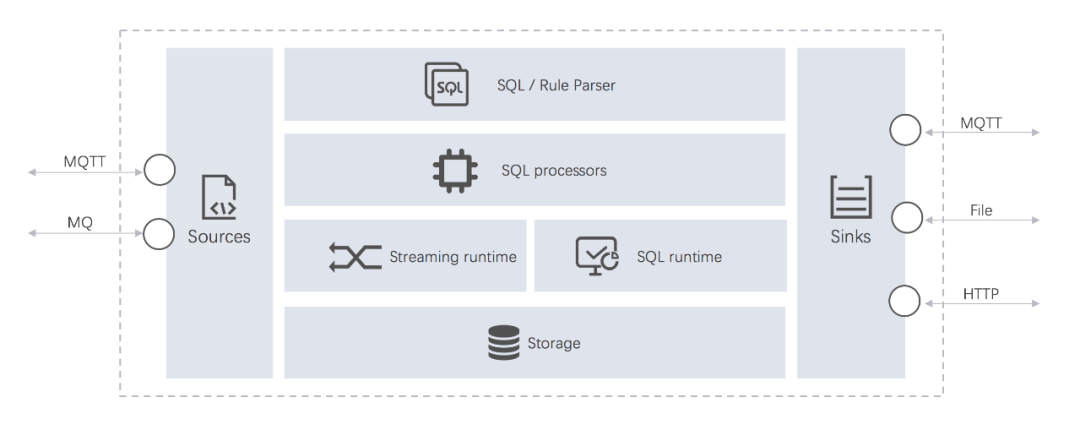 Kuiper 可以运行在各类物联网的边缘使用场景中, 如
流式处理:实现在边缘端的实时流式处理
规则引擎:灵活定义规则引擎,实现告警和消息转发
数据格式与协议转换:实现边缘与云端不同类型的数据格式与异构协议之间灵活转换,实现IT&OT融合
通过 Kuiper 在边缘端的处理,可以提升系统响应速度,节省网络带宽费用和存储成本,以及提高系统安全性等。
Kuiper 可以运行在各类物联网的边缘使用场景中, 如
流式处理:实现在边缘端的实时流式处理
规则引擎:灵活定义规则引擎,实现告警和消息转发
数据格式与协议转换:实现边缘与云端不同类型的数据格式与异构协议之间灵活转换,实现IT&OT融合
通过 Kuiper 在边缘端的处理,可以提升系统响应速度,节省网络带宽费用和存储成本,以及提高系统安全性等。
Kuiper 除了具备高可扩展性外,还具备与 KubeEdge 框架集成的能力。
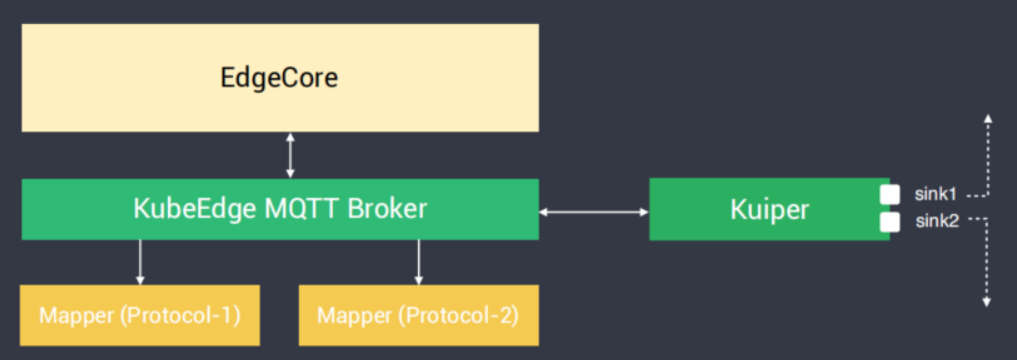 感兴趣的读者可以移步官网解锁更多的姿势,笔者这里就不赘述了。
https://docs.emqx.cn/kuiper/latest/
感兴趣的读者可以移步官网解锁更多的姿势,笔者这里就不赘述了。
https://docs.emqx.cn/kuiper/latest/
在边缘端安装 Kuiper
kubernetes 环境如下,其中树莓派为边缘端设备
1[root@k8s-test-master01 ~]# kubectl get no -o wide
2NAME                     STATUS   ROLES        AGE    VERSION                   INTERNAL-IP      EXTERNAL-IP   OS-IMAGE                         KERNEL-VERSION                 CONTAINER-RUNTIME
3k8s-test-master01        Ready    master       16h    v1.20.2                   172.31.250.220   <none>        CentOS Linux 8 (Core)            4.18.0-193.28.1.el8_2.x86_64   cri-o://1.20.0
4k8s-test-node01          Ready    node         18h    v1.20.2                   172.31.250.221   <none>        Ubuntu 20.04.1 LTS               5.4.0-58-generic               containerd://1.3.3-0ubuntu2.2
5k8s-test-node02          Ready    node         17h    v1.20.2                   172.31.250.222   <none>        openSUSE Leap 15.2               5.3.18-lp152.57-default        cri-o://1.17.3
6kubeedge-raspberrypi01   Ready    agent,edge   116m   v1.19.3-kubeedge-v1.5.0   192.168.13.102   <none>        Raspbian GNU/Linux 10 (buster)   5.4.51-v7l+                    docker://19.3.13
通过 kubernetes 部署 Kuiper,定义节点亲和性,把 Pod 调度到边缘节点,如果拥有的边缘设备量多,资源类别使用 daemonsets
MQTT_SOURCE__DEFAULT__SERVERS 指定的是 kubeedge 边缘端的 mqtt
1apiVersion: apps/v1
2kind: Deployment
3metadata:
4  name: edge-kuiper
5  labels:
6    app: edge-kuiper
7spec:
8  replicas: 1
9  selector:
10    matchLabels:
11      app: edge-kuiper
12  template:
13    metadata:
14      labels:
15        app: edge-kuiper
16    spec:
17      affinity:
18          nodeAffinity:
19            requiredDuringSchedulingIgnoredDuringExecution:
20              nodeSelectorTerms:
21                - matchExpressions:
22                    - key: node-role.kubernetes.io/edge
23                      operator: In
24                      values:
25                      - ""
26      containers:
27      - name: edge-kuiper
28        image: emqx/kuiper:1.1.1-alpine
29        env:
30        - name: MQTT_SOURCE__DEFAULT__SERVERS
31          value: "[tcp://127.0.0.1:1883]"
32        resources:
33          requests:
34            cpu: 100m
35            memory: 100Mi
36          limits:
37            cpu: 1000m
38            memory: 1024Mi
39        ports:
40        - containerPort: 9081
41          name: mq
42          hostPort: 9081
43        livenessProbe:
44          tcpSocket:
45            port: 9081
46          initialDelaySeconds: 60
47          periodSeconds: 60
Kuiper-manager 是用于管理 Kuiper 节点、流、规则和插件等的 Web 管理控制台
1apiVersion: apps/v1
2kind: Deployment
3metadata:
4  name: edge-kuiper-manager
5  labels:
6    app: edge-kuiper-manager
7spec:
8  replicas: 1
9  selector:
10    matchLabels:
11      app: edge-kuiper-manager
12  template:
13    metadata:
14      labels:
15        app: edge-kuiper-manager
16    spec:
17      affinity:
18          nodeAffinity:
19            requiredDuringSchedulingIgnoredDuringExecution:
20              nodeSelectorTerms:
21                - matchExpressions:
22                    - key: node-role.kubernetes.io/edge
23                      operator: In
24                      values:
25                      - ""
26      containers:
27      - name: edge-kuiper-manager
28        image: emqx/kuiper-manager:1.1.0
29        resources:
30          requests:
31            cpu: 100m
32            memory: 100Mi
33          limits:
34            cpu: 1000m
35            memory: 1024Mi
36        ports:
37        - containerPort: 9082
38          name: mq
39          hostPort: 9082
40        livenessProbe:
41          tcpSocket:
42            port: 9082
43          initialDelaySeconds: 60
44          periodSeconds: 60
使用 kubectl 命令 create 即可,安装完成后如下
1[root@k8s-test-master01 ~]# kubectl get po -o wide
2NAME                                 READY   STATUS    RESTARTS   AGE    IP               NODE                     NOMINATED NODE   READINESS GATES
3edge-kuiper-79667bd886-67xtw         1/1     Running   0          104m   172.17.0.3       kubeedge-raspberrypi01   <none>           <none>
4edge-kuiper-manager-ffb8bd5b-c9bxz   1/1     Running   0          94m    172.17.0.4       kubeedge-raspberrypi01   <none>           <none>
5edge-nginx-7bd689df6d-4rgvn          1/1     Running   0          124m   172.17.0.2       kubeedge-raspberrypi01   <none>           <none>
使用边缘端 IP + 9082 端口访问 Kuiper 控制台,用户密码默认为 admin/public ,添加节点即可。
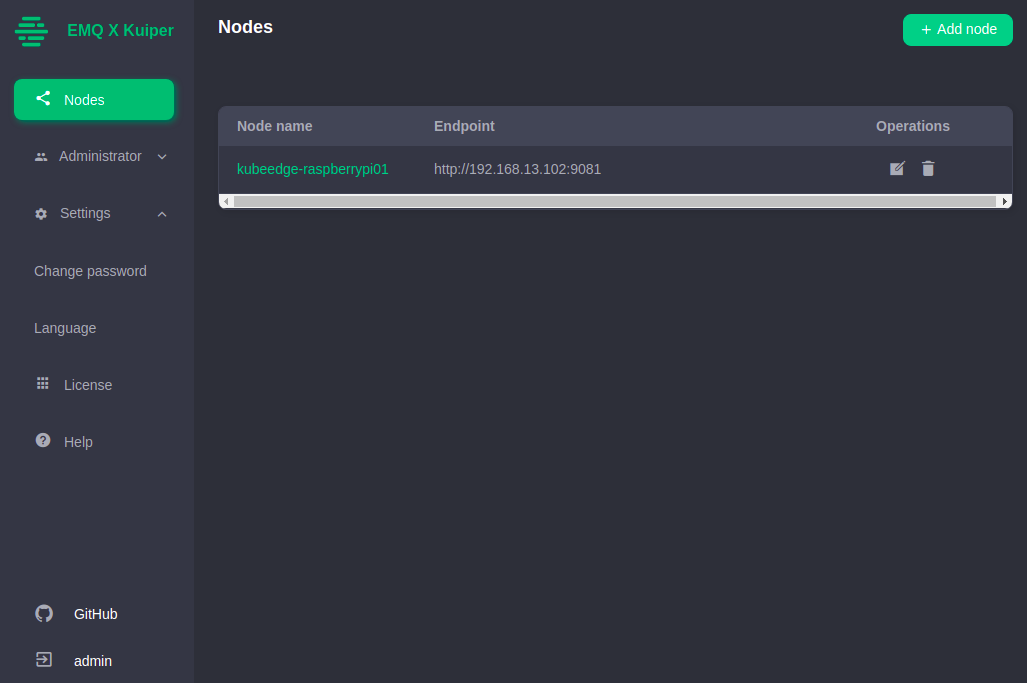
测试 Kuiper
先对 Kuiper 进行简单的测试
1.进入 Kuiper 容器
1kubectl exec -it edge-kuiper-79667bd886-67xtw -- /bin/sh
2.创建温度与湿度流(stream)
1/kuiper # bin/kuiper create stream demo '(temperature float, humidity bigint) WITH (FORMAT="JSON", DATASOURCE="devices/+/messages")'
2Connecting to 127.0.0.1:20498...
3Stream demo is created.
4
5# 查看创建的流
6/kuiper # bin/kuiper show streams
7Connecting to 127.0.0.1:20498...
8demo
流的名字为 demo, DATASOURCE 为 devices/+/messages ,对应 MQTT 的 toptic,MQTT 默认是安装 Kuiper 时通过变量传入的地址
3.进入 Kuiper 交互界面
1/kuiper # bin/kuiper query
2Connecting to 127.0.0.1:20498...
3kuiper > select * from demo WHERE temperature > 30;
4Query was submit successfully.
5kuiper >
该 SQL 规则将过滤掉 temperature 小于 30 的数据
4.在边缘端通过 MQTT 客户端制造一些数据
1mosquitto_pub -i kubeedge-kuiper-test -h 127.0.0.1  -p 1883 -m '{"temperature": 50, "humidity" : 20}' -t devices/device_001/messages
2mosquitto_pub -i kubeedge-kuiper-test -h 127.0.0.1  -p 1883 -m '{"temperature": 40, "humidity" : 20}' -t devices/device_001/messages
3mosquitto_pub -i kubeedge-kuiper-test -h 127.0.0.1  -p 1883 -m '{"temperature": 30, "humidity" : 20}' -t devices/device_001/messages
4mosquitto_pub -i kubeedge-kuiper-test -h 127.0.0.1  -p 1883 -m '{"temperature": 20, "humidity" : 20}' -t devices/device_001/messages
5mosquitto_pub -i kubeedge-kuiper-test -h 127.0.0.1  -p 1883 -m '{"temperature": 10, "humidity" : 20}' -t devices/device_001/messages
6mosquitto_pub -i kubeedge-kuiper-test -h 127.0.0.1  -p 1883 -m '{"temperature": 50, "humidity" : 20}' -t devices/device_002/messages
7mosquitto_pub -i kubeedge-kuiper-test -h 127.0.0.1  -p 1883 -m '{"temperature": 40, "humidity" : 20}' -t devices/device_002/messages
8mosquitto_pub -i kubeedge-kuiper-test -h 127.0.0.1  -p 1883 -m '{"temperature": 30, "humidity" : 20}' -t devices/device_002/messages
9mosquitto_pub -i kubeedge-kuiper-test -h 127.0.0.1  -p 1883 -m '{"temperature": 20, "humidity" : 20}' -t devices/device_002/messages
10mosquitto_pub -i kubeedge-kuiper-test -h 127.0.0.1  -p 1883 -m '{"temperature": 10, "humidity" : 20}' -t devices/device_002/messages
-h 指定的是 kubeedge 的 MQTT
5.正常的情况,在 Kuiper 交互界面会打印出过滤后的数据
1kuiper > [{"humidity":20,"temperature":50}][{"humidity":20,"temperature":40}][{"humidity":20,"temperature":50}][{"humidity":20,"temperature":40}]
也可以在 Kuiper 控制台创建流和插件等
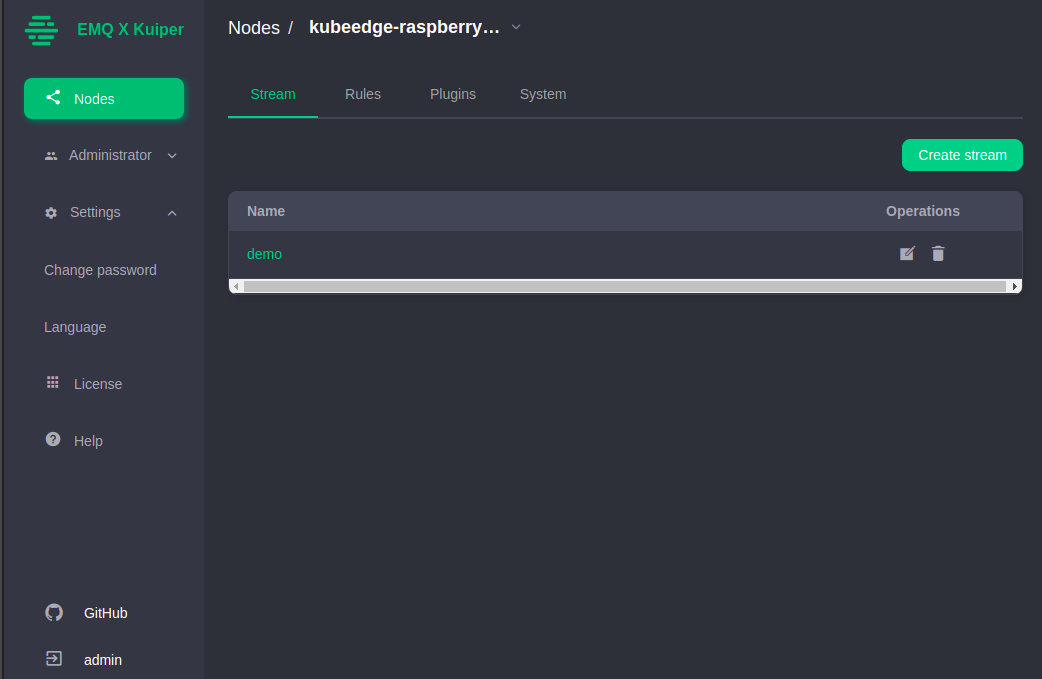
在云端安装 EMQX
云边协同在边缘计算中是一个很重要的概念,而云边的通道又是云边协同的枢纽,Kuiper 可以订阅 kubeedge 的 mqtt topic ( $hw/events/device/+/twin/update ),还可以把规则处理后的数据推送到云端的 mqtt 。
使用 helm 部署 emqx
1# 添加 emqx 仓库
2helm repo add emqx https://repos.emqx.io/charts
3# 更新仓库
4helm repo update
5# 查看 emqx 版本
6helm search repo emqx
7NAME            CHART VERSION   APP VERSION     DESCRIPTION
8emqx/emqx       4.2.7           4.2.7           A Helm chart for EMQ X
9emqx/emqx-ee    4.2.3           4.2.3           A Helm chart for EMQ X Enterprise
10emqx/kuiper     0.9.0           0.9.0           A lightweight IoT edge analytic software
因为是云边集成环境,为了保证云端的 emqx 始终运行在云端节点,故使用 helm template 的方式部署
1# 导出 yaml 安装清单
2helm template  test emqx/emqx  > emqx.yaml
修改 yaml 文件,定义节点反亲和性
1      affinity:
2          nodeAffinity:
3            requiredDuringSchedulingIgnoredDuringExecution:
4              nodeSelectorTerms:
5                - matchExpressions:
6                    - key: node-role.kubernetes.io/edge
7                      operator: NotIn
8                      values:
9                      - ""
emqx service 对外使用 nodeport 类型
1---
2# Source: emqx/templates/service.yaml
3apiVersion: v1
4kind: Service
5metadata:
6  name: test-emqx-external
7  namespace: default
8  labels:
9    app.kubernetes.io/name: emqx
10    helm.sh/chart: emqx-4.2.7
11    app.kubernetes.io/instance: test
12    app.kubernetes.io/managed-by: Helm
13spec:
14  type: NodePort
15  ports:
16  - name: mqtt
17    port: 1883
18    protocol: TCP
19    targetPort: mqtt
20    nodePort: 1883
21  - name: mqttssl
22    port: 8883
23    protocol: TCP
24    targetPort: mqttssl
25    nodePort: 8883
26  - name: mgmt
27    port: 8081
28    protocol: TCP
29    targetPort: mgmt
30    nodePort: 8081
31  - name: ws
32    port: 8083
33    protocol: TCP
34    targetPort: ws
35    nodePort: 8083
36  - name: wss
37    port: 8084
38    protocol: TCP
39    targetPort: wss
40    nodePort: 8084
41  - name: dashboard
42    port: 18083
43    protocol: TCP
44    targetPort: dashboard
45    nodePort: 18083
46  selector:
47    app.kubernetes.io/name: emqx
48    app.kubernetes.io/instance: test
查看 emqx 集群状态
1[root@k8s-test-master01 ~]# kubectl get po -o wide --selector=app.kubernetes.io/name=emqx
2NAME          READY   STATUS    RESTARTS   AGE     IP               NODE                NOMINATED NODE   READINESS GATES
3test-emqx-0   1/1     Running   0          8m10s   192.168.57.195   k8s-test-master01   <none>           <none>
4test-emqx-1   1/1     Running   0          7m44s   192.168.116.68   k8s-test-node02     <none>           <none>
5test-emqx-2   1/1     Running   0          7m21s   192.168.85.196   k8s-test-node01     <none>           <none>
6[root@k8s-test-master01 ~]# kubectl exec -it test-emqx-0 -- emqx_ctl cluster status
7Cluster status: #{running_nodes =>
8                      ['test@test-emqx-0.test-emqx-headless.default.svc.cluster.local',
9                       'test@test-emqx-1.test-emqx-headless.default.svc.cluster.local',
10                       'test@test-emqx-2.test-emqx-headless.default.svc.cluster.local'],
11                  stopped_nodes => []}
EMQX 默认启用 Dashboard ,通过云端端 IP + 18083 端口访问,用户密码: admin/public

Kuiper 规则
创建 Kuiper 规则,把通过规则处理后的数据上传到云端的 mqtt 1.订阅云端 mqtt 的 demoSink topic ,用于验证 Kuiper 是否把数据上传到云端。
1# 47.242.xxx.xxx 是云端 mqtt 的地址
2# mosquitto_sub -i test_sub -h 47.242.xxx.xxx  -p 1883 -d -t demoSink
3Client test_sub sending CONNECT
4Client test_sub received CONNACK (0)
5Client test_sub sending SUBSCRIBE (Mid: 1, Topic: demoSink, QoS: 0, Options: 0x00)
6Client test_sub received SUBACK
7Subscribed (mid: 1): 0
2.在边缘端的 kuiper 中创建规则
1# 定义规则
2cat > /tmp/rule.yaml <<EOF
3{
4  "id": "rule1",
5  "sql": "select * from demo WHERE temperature > 30",
6  "actions": [
7    {
8      "log": {}
9    },
10    {
11      "mqtt": {
12        "server": "tcp://$云端IP:1883",
13        "topic": "demoSink"
14      }
15    }
16  ]
17}
18EOF
19# 创建规则
20/kuiper # bin/kuiper create rule rule1 -f /tmp/rule.yaml
21Connecting to 127.0.0.1:20498...
22Creating a new rule from file /tmp/rule.yaml.
23Rule rule1 was created successfully, please use 'bin/kuiper getstatus rule rule1' command to get rule status.
24# 查看规则
25/kuiper # bin/kuiper getstatus rule rule1
26Connecting to 127.0.0.1:20498...
27{
28  "source_demo_0_records_in_total": 0,
29  "source_demo_0_records_out_total": 0,
30  "source_demo_0_exceptions_total": 0,
31  "source_demo_0_process_latency_us": 0,
32  "source_demo_0_buffer_length": 0,
33  "source_demo_0_last_invocation": 0,
34  "op_1_preprocessor_demo_0_records_in_total": 0,
35  "op_1_preprocessor_demo_0_records_out_total": 0,
36  "op_1_preprocessor_demo_0_exceptions_total": 0,
37  "op_1_preprocessor_demo_0_process_latency_us": 0,
38  "op_1_preprocessor_demo_0_buffer_length": 0,
39  "op_1_preprocessor_demo_0_last_invocation": 0,
40  "op_2_filter_0_records_in_total": 0,
41  "op_2_filter_0_records_out_total": 0,
42  "op_2_filter_0_exceptions_total": 0,
43  "op_2_filter_0_process_latency_us": 0,
44  "op_2_filter_0_buffer_length": 0,
45  "op_2_filter_0_last_invocation": 0,
46  "op_3_project_0_records_in_total": 0,
47  "op_3_project_0_records_out_total": 0,
48  "op_3_project_0_exceptions_total": 0,
49  "op_3_project_0_process_latency_us": 0,
50  "op_3_project_0_buffer_length": 0,
51  "op_3_project_0_last_invocation": 0,
52  "sink_log_0_0_records_in_total": 0,
53  "sink_log_0_0_records_out_total": 0,
54  "sink_log_0_0_exceptions_total": 0,
55  "sink_log_0_0_process_latency_us": 0,
56  "sink_log_0_0_buffer_length": 0,
57  "sink_log_0_0_last_invocation": 0,
58  "sink_mqtt_1_0_records_in_total": 0,
59  "sink_mqtt_1_0_records_out_total": 0,
60  "sink_mqtt_1_0_exceptions_total": 0,
61  "sink_mqtt_1_0_process_latency_us": 0,
62  "sink_mqtt_1_0_buffer_length": 0,
63  "sink_mqtt_1_0_last_invocation": 0
64}
3.使用 mosquitto_pub 客户端发送一些数据
1/ # mosquitto_pub -i kubeedge-kuiper-test -h 127.0.0.1  -p 1883 -m '{"temperature": 30, "humidity" : 20}' -t devices/device_002/messages
2/ # mosquitto_pub -i kubeedge-kuiper-test -h 127.0.0.1  -p 1883 -m '{"temperature": 40, "humidity" : 20}' -t devices/device_002/messages
3/ # mosquitto_pub -i kubeedge-kuiper-test -h 127.0.0.1  -p 1883 -m '{"temperature": 30, "humidity" : 20}' -t devices/device_002/messages
4/ # mosquitto_pub -i kubeedge-kuiper-test -h 127.0.0.1  -p 1883 -m '{"temperature": 31, "humidity" : 20}' -t devices/device_002/messages
5/ # mosquitto_pub -i kubeedge-kuiper-test -h 127.0.0.1  -p 1883 -m '{"temperature": 21, "humidity" : 20}' -t devices/device_002/messages
6/ # mosquitto_pub -i kubeedge-kuiper-test -h 127.0.0.1  -p 1883 -m '{"temperature": 40, "humidity" : 20}' -t devices/device_001/messages
4.查看规则状态
1/kuiper # bin/kuiper getstatus rule rule1
2Connecting to 127.0.0.1:20498...
3{
4  "source_demo_0_records_in_total": 13,
5  "source_demo_0_records_out_total": 13,
6  "source_demo_0_exceptions_total": 0,
7  "source_demo_0_process_latency_us": 4,
8  "source_demo_0_buffer_length": 0,
9  "source_demo_0_last_invocation": "2021-02-17T09:15:25.79156",
10  "op_1_preprocessor_demo_0_records_in_total": 13,
11  "op_1_preprocessor_demo_0_records_out_total": 13,
12  "op_1_preprocessor_demo_0_exceptions_total": 0,
13  "op_1_preprocessor_demo_0_process_latency_us": 9,
14  "op_1_preprocessor_demo_0_buffer_length": 0,
15  "op_1_preprocessor_demo_0_last_invocation": "2021-02-17T09:15:25.791597",
16  "op_2_filter_0_records_in_total": 13,
17  "op_2_filter_0_records_out_total": 6,
18  "op_2_filter_0_exceptions_total": 0,
19  "op_2_filter_0_process_latency_us": 13,
20  "op_2_filter_0_buffer_length": 0,
21  "op_2_filter_0_last_invocation": "2021-02-17T09:15:25.791622",
22  "op_3_project_0_records_in_total": 6,
23  "op_3_project_0_records_out_total": 6,
24  "op_3_project_0_exceptions_total": 0,
25  "op_3_project_0_process_latency_us": 43,
26  "op_3_project_0_buffer_length": 0,
27  "op_3_project_0_last_invocation": "2021-02-17T09:15:25.791651",
28  "sink_log_0_0_records_in_total": 6,
29  "sink_log_0_0_records_out_total": 6,
30  "sink_log_0_0_exceptions_total": 0,
31  "sink_log_0_0_process_latency_us": 287,
32  "sink_log_0_0_buffer_length": 0,
33  "sink_log_0_0_last_invocation": "2021-02-17T09:15:25.791736",
34  "sink_mqtt_1_0_records_in_total": 6,
35  "sink_mqtt_1_0_records_out_total": 6,
36  "sink_mqtt_1_0_exceptions_total": 0,
37  "sink_mqtt_1_0_process_latency_us": 212,
38  "sink_mqtt_1_0_buffer_length": 0,
39  "sink_mqtt_1_0_last_invocation": "2021-02-17T09:15:25.79171"
40}
5.查看第一步订阅的 topic 有没有接收到数据。
1/ # mosquitto_sub -i test_sub -h 47.242.xxx.xxx -p 1883 -d -t demoSink
2Client test_sub sending CONNECT
3Client test_sub received CONNACK (0)
4Client test_sub sending SUBSCRIBE (Mid: 1, Topic: demoSink, QoS: 0, Options: 0x00)
5Client test_sub received SUBACK
6Subscribed (mid: 1): 0
7Client test_sub received PUBLISH (d0, q0, r0, m0, 'demoSink', ... (32 bytes))
8{"humidity":20,"temperature":40}
9Client test_sub received PUBLISH (d0, q0, r0, m0, 'demoSink', ... (32 bytes))
10{"humidity":20,"temperature":31}
11Client test_sub received PUBLISH (d0, q0, r0, m0, 'demoSink', ... (32 bytes))
12{"humidity":20,"temperature":40}
可以看到 temperature 大于 30 的数据,都推送到了云端。
小结
Kuiper 为 kubeedge 的计算下沉提供了边缘流式数据处理的能力,Kuiper 也有在做一些适配 kubeedge 的设计(如对接 KubeEdge 设备模型),KubeEdge 和 Kuiper 确实有点 “双剑合并” 的意思。Kuiper 扩展性很高,有很多有趣的插件,比如 influx 插件可以把数据存储到 InfluxDB 等。
本文只是简单地介绍了下 Kuiper ,我们也在研究试用中,包括与 Apache Flink 等大数据服务的集成,关于 Kuiper 的进一步使用,后续再更新啦。
感兴趣的读者可以关注下微信号