 Kong 是由 Mashape 公司开源的一个高性能、高可用、易扩展的 API Gateway 项目,基于OpenResty(Nginx + Lua模块),并提供了插件实现 API 的 AOP 功能。可以通过负载均衡、插件扩展等方式,来处理网络请求。
Kong 主要的概念
Service 服务,也称服务对象,是 Kong 管理的上游 API 和微服务,通过 Kong 转发后根据请求的协议,host,method,path 匹配到实际的服务地址。
Route 路由,作为客户端的入口,可以通过定义一些规则来匹配客户端的请求,每个路由都会关联一个 Service , 并且 Service 可以关联多个 Route,当匹配到客户端的请求时,每个请求都会被代理到其配置的 Service 中。
Upstream 相当于Kong提供了一个负载均衡的功能,基于 Nginx 的虚拟主机的方式做的负载功能,在 Service 中指定 host 的时候,也可以指定 upstream 。
Target 是 upstream 进行负载均衡的终端,当我们的服务是多节点时,那每个节点都是作为一个 target 。可以负载的权重,也可以通过 upstream 对 target 进行健康检查。
Consumer 可以代表一个 Service 的请求消费者,也可以代表对应到实际应用中的一个用户。
Plugin 在请求被代理到上游 API 之前或之后执行相关动作的插件,如限流插件。
Kong-ingress-controller 是对 Kubernetes Ingress API 的实现,通过和 Kubernetes API 交互,动态的去感知 Kubernetes 中 Ingress 规则变化。
整体的链路是 Route > Service > Upstream > Target 。
Kong 安装
Kong 在 1.1 版本后引入了一个新特性 DB-less 模式,即无 DB 运行 Kong,官方推荐在 Kubernetes 采用该模式运行,所有配置都存储在 Kubernetes 控制面板中。简化了 Kong 的操作,而无需再维护一个关系型数据库。
当然也可以根据自己的需求,采用数据库的模式运行 Kong, 官方推荐 Postgres。需要注意的是,如果采用了无 DB 模式,那么在 Konga 的管理页面是无法添加插件和证书等资源。
在 Kubernetes 环境下,Admin API 方式不是很适应 Kubernetes 声明式管理方式。所以 Kong Ingress Controller 定义了五个 CRDs,基本上涵盖了原 Admin API 的各个方面。
1[root@k8s-test01 ~]# kubectl get crds | grep konghq.com
2kongclusterplugins.configuration.konghq.com           2021-02-04T16:02:43Z
3kongconsumers.configuration.konghq.com                2021-02-04T16:02:43Z
4kongingresses.configuration.konghq.com                2021-02-04T16:02:43Z
5kongplugins.configuration.konghq.com                  2021-02-04T16:02:43Z
6tcpingresses.configuration.konghq.com                 2021-02-04T16:02:43Z
kongconsumers:给不同的API用户提供不同的消费者身份 kongcredentials:用户的认证凭证 kongplugins:插件的配置 kongingresses、tcpingresses:定义代理行为规则,是对 Ingress 的补充配置
安装普罗米修斯监控 Kong 网络请求,如果已经安装则跳过。
1# 创建 namespace
2kubectl create ns monitoring
3# 安装 namespace
4helm repo add prometheus-community https://prometheus-community.github.io/helm-charts
5helm search repo prometheus-community
6helm install  my-release prometheus-community/prometheus --namespace monitoring --values https://bit.ly/2RgzDtg --version 13.2.1 \
7--set alertmanager.persistentVolume.enabled=false \
8--set server.persistentVolume.enabled=false
9
10# 安装 grafana
11helm repo add grafana https://grafana.github.io/helm-charts
12helm repo update
13helm search repo grafana
14helm install my-grafana  grafana/grafana --namespace monitoring --values http://bit.ly/2FuFVfV --version 6.2.1 --set persistence.enabled=false --set service.type=NodePort --set service.nodePort=3000
15
16# 查看 grafana admin用户的密码
17kubectl get secret --namespace monitoring my-grafana -o jsonpath="{.data.admin-password}" | base64 --decode ; echo
Kong 可以使用环境变量的方式调整配置,但是 helm 的安装方式文档有点糟糕,这里使用 yaml 的方式安装,无 DB 模式运行。
1wget https://raw.githubusercontent.com/Kong/kubernetes-ingress-controller/master/deploy/single/all-in-one-dbless.yaml
2kubectl create -f all-in-one-dbless.yaml
3# service 改成 nodePort 模式
4---
5apiVersion: v1
6kind: Service
7metadata:
8  annotations:
9    service.beta.kubernetes.io/aws-load-balancer-backend-protocol: tcp
10    service.beta.kubernetes.io/aws-load-balancer-type: nlb
11  name: kong-proxy
12  namespace: kong
13spec:
14  ports:
15  - name: proxy
16    port: 80
17    protocol: TCP
18    targetPort: 8000
19    nodePort: 8000
20  - name: proxy-ssl
21    port: 443
22    protocol: TCP
23    targetPort: 8443
24    nodePort: 8443
25  - name: admin
26    port: 8444
27    protocol: TCP
28    targetPort: 8444
29    nodePort: 8444
30  selector:
31    app: ingress-kong
32  type: NodePort
33  externalTrafficPolicy: Local
Kong 的一些配置
1        # Kong 管理地址,这里使用的http,所以 kong-ingress-controller、Konga 只能用 http 连接
2        - name: KONG_ADMIN_LISTEN
3          value: 0.0.0.0:8444
4        # 无 DB 模式
5        - name: KONG_DATABASE
6          value: "off"
7        # nginx 工作进程数
8        - name: KONG_NGINX_WORKER_PROCESSES
9          value: "2"
10        # 开启压缩
11        - name: KONG_NGINX_HTTP_GZIP
12          value: "on"
13        - name: KONG_NGINX_HTTP_GZIP_TYPES
14          value: "*"
15        - name: KONG_NGINX_HTTP_GZIP_PROXIED
16          value: "any"
17        - name: KONG_NGINX_HTTP_GZIP_MIN_LENGTH
18          value: "1000"
19        # 日志级别
20        - name: KONG_LOG_LEVEL
21          value: debug
22        # 获取真实IP
23        - name: KONG_TRUSTED_IPS
24          value: "0.0.0.0/0,::/0"
25        - name: KONG_REAL_IP_HEADER
26          value: "X-Forwarded-For"
Konga 依赖 Postgres 数据库,如果已经有 Postgres 可以不用安装,创建一个用户和数据库即可。
1[root@k8s-test01 kong]# cat pg.yaml
2---
3apiVersion: apps/v1
4kind: StatefulSet
5metadata:
6  name: postgres
7spec:
8  selector:
9    matchLabels:
10      app: postgres
11  serviceName: postgres
12  replicas: 1
13  updateStrategy:
14    type: RollingUpdate
15  template:
16    metadata:
17      labels:
18        app: postgres
19    spec:
20      terminationGracePeriodSeconds: 60
21      containers:
22      - name: postgres
23        imagePullPolicy: IfNotPresent
24        image: docker.io/library/postgres:10-alpine
25        env:
26        - name: POSTGRES_PASSWORD
27          value: "PGadmin"
28        - name : PGTZ
29          value: "Asia/Shanghai"
30        resources:
31          requests:
32            cpu: 500m
33            memory: 500Mi
34          limits:
35            cpu: 3000m
36            memory: 3096Mi
37        ports:
38        - containerPort: 5432
39          name: tcp
40        livenessProbe:
41          tcpSocket:
42            port: 5432
43          initialDelaySeconds: 60
44          periodSeconds: 60
45        volumeMounts:
46        - mountPath: /var/lib/postgresql/data
47          readOnly: false
48          name: data
49        - mountPath: /etc/localtime
50          readOnly: false
51          name: time-data
52        - mountPath: /etc/timezone
53          readOnly: false
54          name: timezone
55      volumes:
56      - name: time-data
57        hostPath:
58          path: /usr/share/zoneinfo/Asia/Shanghai
59      - name: timezone
60        hostPath:
61          path: /etc/timezone
62      - name: data
63        emptyDir: {} # 注意!!! 数据没有持久化!
64---
65apiVersion: v1
66kind: Service
67metadata:
68  labels:
69    app: postgres
70  name: postgres
71spec:
72  type: ClusterIP
73  ports:
74  - port: 5432
75    targetPort: 5432
76    name: tcp
77  selector:
78    app: postgres
进入 Postgres 创建数据库和用户
1[root@k8s-test01 kong]# kubectl -n kong exec -it postgres-0 -- bash
2bash-5.1# psql -h 127.0.0.1 -p 5432 -U postgres
3psql (10.15)
4Type "help" for help.
5
6postgres=# CREATE USER konga WITH PASSWORD 'Konga2021';
7CREATE ROLE
8postgres=# CREATE DATABASE konga OWNER konga ENCODING UTF8;
9CREATE DATABASE
10postgres=# GRANT ALL PRIVILEGES ON DATABASE konga TO konga;
11GRANT
12postgres=# \l
13                                 List of databases
14   Name    |  Owner   | Encoding |  Collate   |   Ctype    |   Access privileges
15-----------+----------+----------+------------+------------+-----------------------
16 konga     | konga    | UTF8     | en_US.utf8 | en_US.utf8 | =Tc/konga            +
17           |          |          |            |            | konga=CTc/konga
18 postgres  | postgres | UTF8     | en_US.utf8 | en_US.utf8 |
19 template0 | postgres | UTF8     | en_US.utf8 | en_US.utf8 | =c/postgres          +
20           |          |          |            |            | postgres=CTc/postgres
21 template1 | postgres | UTF8     | en_US.utf8 | en_US.utf8 | =c/postgres          +
22           |          |          |            |            | postgres=CTc/postgres
23(4 rows)
24
25postgres=# \q
26bash-5.1#
安装 Konga
1---
2apiVersion: apps/v1
3kind: Deployment
4metadata:
5  labels:
6    app: konga
7  name: konga
8  namespace: kong
9spec:
10  replicas: 1
11  selector:
12    matchLabels:
13      app: konga
14  template:
15    metadata:
16      labels:
17        app: konga
18    spec:
19      restartPolicy: Always
20      containers:
21      - env:
22        - name: PORT
23          value: "1337"
24        - name: DB_ADAPTER
25          value: postgres
26        - name: DB_URI
27          value: "postgresql://konga:Konga2021@postgres:5432/konga"
28        image: pantsel/konga:0.14.9
29        name: konga
30        ports:
31        - containerPort: 1337
32          protocol: TCP
33          name: http
34---
35apiVersion: v1
36kind: Service
37metadata:
38  name: konga
39  namespace: kong
40spec:
41  type: NodePort
42  ports:
43  - name: http
44    port: 1337
45    targetPort: 1337
46    protocol: TCP
47    nodePort: 1337
48  selector:
49    app: konga
浏览器打开 nodeport 端口打开 Konga,配置 Kong 的管理地址即可。
至此,kong 环境已经部署完成,下面我们来简单测试下 Kong 在 Kubernetes 下的应用,使用 Kubernetes 声明式的方式配置。也可以在Konga 页面上配置,但笔者嫌麻烦,在页面配置的时间,yaml 文件早就编排好了....
Prometheus插件
创建测试的 pod
1apiVersion: apps/v1
2kind: Deployment
3metadata:
4  name: http-svc
5spec:
6  replicas: 1
7  selector:
8    matchLabels:
9      app: http-svc
10  template:
11    metadata:
12      labels:
13        app: http-svc
14    spec:
15      containers:
16      - name: http-svc
17        image: docker.io/kennethreitz/httpbin
18        ports:
19        - containerPort: 80
20        env:
21        - name: NODE_NAME
22          valueFrom:
23            fieldRef:
24              fieldPath: spec.nodeName
25        - name: POD_NAME
26          valueFrom:
27            fieldRef:
28              fieldPath: metadata.name
29        - name: POD_NAMESPACE
30          valueFrom:
31            fieldRef:
32              fieldPath: metadata.namespace
33        - name: POD_IP
34          valueFrom:
35            fieldRef:
36              fieldPath: status.podIP
在服务上创建普罗米修斯插件配置,global 为 true 时,全局网络请求都使用普罗米修斯插件。
1[root@k8s-test01 kong]# cat prometheus-plugin.yaml
2apiVersion: configuration.konghq.com/v1
3kind: KongClusterPlugin
4metadata:
5  name: prometheus
6  annotations:
7    kubernetes.io/ingress.class: kong
8  labels:
9    global: "false"
10plugin: prometheus
11[root@k8s-test01 kong]# kubectl get KongClusterPlugin
12NAME         PLUGIN-TYPE   AGE
13prometheus   prometheus    38h
14[root@k8s-test01 kong]#
创建测试 pod 的 service 和 ingress,通过 annotations 加载普罗米修斯插件。
1---
2apiVersion: v1
3kind: Service
4metadata:
5  name: billing
6  labels:
7    app: billing
8  annotations:
9    konghq.com/plugins: prometheus
10spec:
11  ports:
12  - port: 80
13    targetPort: 80
14    protocol: TCP
15    name: http
16  selector:
17    app: http-svc
18---
19apiVersion: v1
20kind: Service
21metadata:
22  name: invoice
23  labels:
24    app: invoice
25  annotations:
26    konghq.com/plugins: prometheus
27spec:
28  ports:
29  - port: 80
30    targetPort: 80
31    protocol: TCP
32    name: http
33  selector:
34    app: http-svc
35---
36apiVersion: v1
37kind: Service
38metadata:
39  name: comments
40  labels:
41    app: comments
42  annotations:
43    konghq.com/plugins: prometheus
44spec:
45  ports:
46  - port: 80
47    targetPort: 80
48    protocol: TCP
49    name: http
50  selector:
51    app: http-svc
52---
53apiVersion: networking.k8s.io/v1
54kind: Ingress
55metadata:
56  name: foo
57  annotations:
58    konghq.com/strip-path: "true"
59    kubernetes.io/ingress.class: kong
60spec:
61  rules:
62  - host: "foo.bar.com"
63    http:
64      paths:
65      - pathType: Prefix
66        path: /billing
67        backend:
68          service:
69            name: billing
70            port:
71              number: 80
72      - pathType: Prefix
73        path: /comments
74        backend:
75          service:
76            name: comments
77            port:
78              number: 80
79      - pathType: Prefix
80        path: /invoice
81        backend:
82          service:
83            name: invoice
84            port:
85              number: 80
创建完成后,可以在 Konga 查看详情
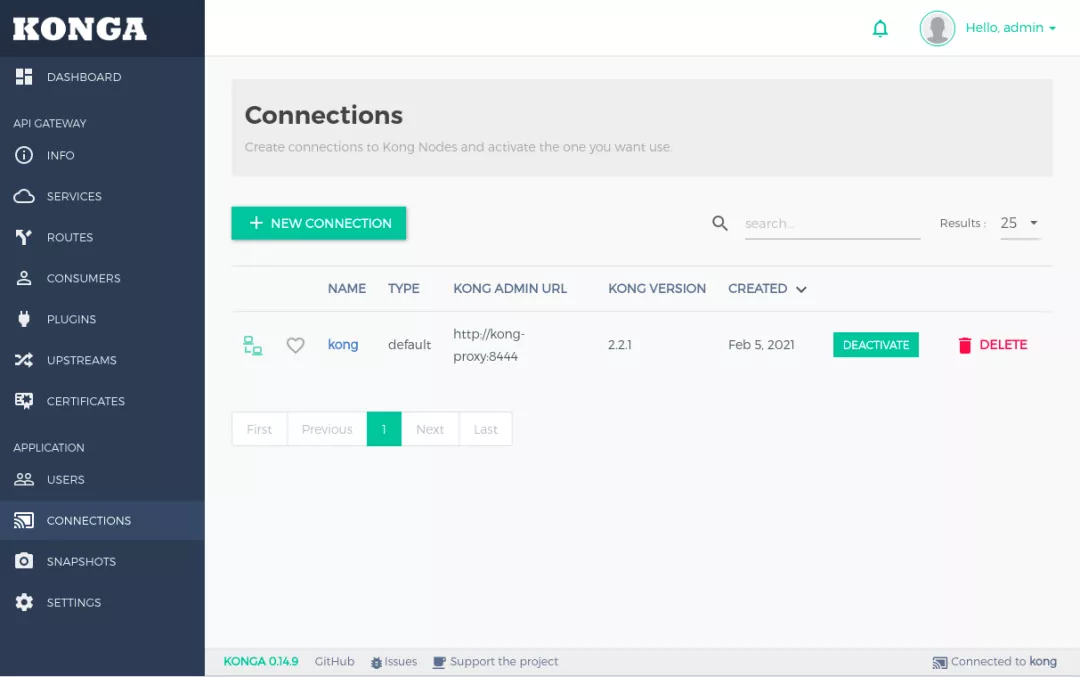
我们制造一些流量,查看效果。
1while true; do \
2curl http://foo.bar.com:8000/billing/status/200; \
3curl http://foo.bar.com:8000/billing/status/501; \
4curl http://foo.bar.com:8000/invoice/status/201; \
5curl http://foo.bar.com:8000/invoice/status/404; \
6curl http://foo.bar.com:8000/comments/status/200; \
7curl http://foo.bar.com:8000/comments/status/200; \
8sleep 0.01; \
9done
打开grafana
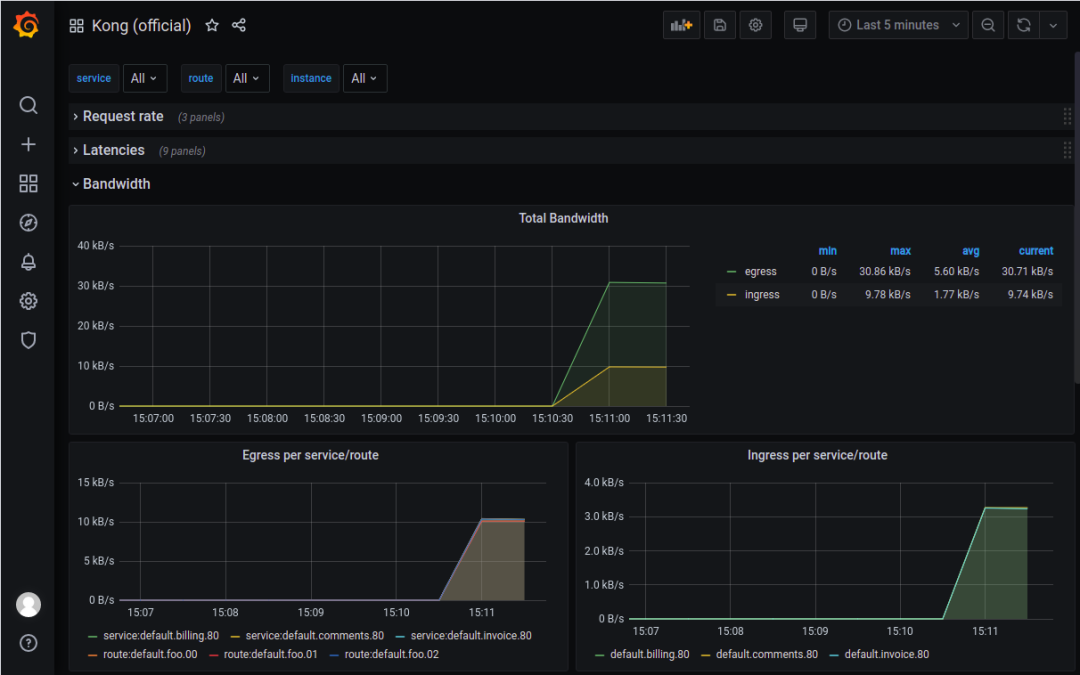 官方模板:https://grafana.com/grafana/dashboards/7424
我们可以根据这些网络指标配置普罗米修斯的告警规则。
key-auth 认证登录
key-auth 类似 nginx 的 auth_basic 认证登录。
开启前
1[root@k8s-test01 kong]# curl -i  http://foo.bar.com:8000/billing/status/200
2HTTP/1.1 200 OK
3Content-Type: text/html; charset=utf-8
4Content-Length: 0
5Connection: keep-alive
6Server: gunicorn/19.9.0
7Date: Sat, 06 Feb 2021 09:00:13 GMT
8Access-Control-Allow-Origin: *
9Access-Control-Allow-Credentials: true
10X-Kong-Upstream-Latency: 1
11X-Kong-Proxy-Latency: 0
12Via: kong/2.2.1
开启key-auth 验证
1# 在路由上创建 key-auth 插件,配置身份验证
2echo "
3apiVersion: configuration.konghq.com/v1
4kind: KongPlugin
5metadata:
6  name: httpbin-auth
7plugin: key-auth
8" | kubectl apply -f -
9
10# 创建一个消费者
11echo "apiVersion: configuration.konghq.com/v1
12kind: KongConsumer
13metadata:
14  name: harry
15  annotations:
16    kubernetes.io/ingress.class: kong
17username: harry" | kubectl apply -f -
18
19# 创建带有 API 密钥的 Secret 资源
20kubectl create secret generic harry-apikey  \
21  --from-literal=kongCredType=key-auth  \
22  --from-literal=key=my-sooper-secret-key
23
24# API密钥和消费者关联
25echo "apiVersion: configuration.konghq.com/v1
26kind: KongConsumer
27metadata:
28  name: harry
29  annotations:
30    kubernetes.io/ingress.class: kong
31username: harry
32credentials:
33- harry-apikey" | kubectl apply -f -
34更新 Ingress
35
36---
37apiVersion: networking.k8s.io/v1
38kind: Ingress
39metadata:
40  name: foo
41  annotations:
42    konghq.com/strip-path: "true"
43    kubernetes.io/ingress.class: kong
44    konghq.com/plugins: httpbin-auth
45spec:
46  rules:
47  - host: "foo.bar.com"
48    http:
49      paths:
50      - pathType: Prefix
51        path: /billing
52        backend:
53          service:
54            name: billing
55            port:
56              number: 80
57      - pathType: Prefix
58        path: /comments
59        backend:
60          service:
61            name: comments
62            port:
63              number: 80
64      - pathType: Prefix
65        path: /invoice
66        backend:
67          service:
68            name: invoice
69            port:
70              number: 80
测试
1# 不带 key 访问,401
2[root@k8s-test01 kong]# curl -i  http://foo.bar.com:8000/billing/status/200
3HTTP/1.1 401 Unauthorized
4Date: Sat, 06 Feb 2021 09:16:48 GMT
5Content-Type: application/json; charset=utf-8
6Connection: keep-alive
7WWW-Authenticate: Key realm="kong"
8Content-Length: 45
9X-Kong-Response-Latency: 0
10Server: kong/2.2.1
11
12{
13  "message":"No API key found in request"
14}
15# 带 key 访问,200
16[root@k8s-test01 kong]# curl -i -H 'apikey: my-sooper-secret-key' http://foo.bar.com:8000/billing/status/200
17HTTP/1.1 200 OK
18Content-Type: text/html; charset=utf-8
19Content-Length: 0
20Connection: keep-alive
21Server: gunicorn/19.9.0
22Date: Sat, 06 Feb 2021 09:17:02 GMT
23Access-Control-Allow-Origin: *
24Access-Control-Allow-Credentials: true
25X-Kong-Upstream-Latency: 1
26X-Kong-Proxy-Latency: 1
27Via: kong/2.2.1
28
rate-limiting 速率限制
没有限制之前
1[root@k8s-test01 kong]# while true; do curl -i -H 'apikey: my-sooper-secret-key' http://foo.bar.com:8000/billing/status/200; done
2HTTP/1.1 200 OK
3Content-Type: text/html; charset=utf-8
4Content-Length: 0
5Connection: keep-alive
6Server: gunicorn/19.9.0
7Date: Sat, 06 Feb 2021 09:27:18 GMT
8Access-Control-Allow-Origin: *
9Access-Control-Allow-Credentials: true
10X-Kong-Upstream-Latency: 1
11X-Kong-Proxy-Latency: 0
12Via: kong/2.2.1
13
14HTTP/1.1 200 OK
15Content-Type: text/html; charset=utf-8
16Content-Length: 0
17Connection: keep-alive
18Server: gunicorn/19.9.0
19Date: Sat, 06 Feb 2021 09:27:18 GMT
20Access-Control-Allow-Origin: *
21Access-Control-Allow-Credentials: true
22X-Kong-Upstream-Latency: 1
23X-Kong-Proxy-Latency: 0
24Via: kong/2.2.1
在服务上创建 rate-limiting 插件限制配置,
1echo "
2apiVersion: configuration.konghq.com/v1
3kind: KongClusterPlugin
4metadata:
5  name: http-ratelimit
6  annotations:
7    kubernetes.io/ingress.class: kong
8  labels:
9    global: \"false\"
10config:
11  policy: local
12  second: 1
13plugin: rate-limiting
14" | kubectl apply -f -
15更新 Service
16
17---
18apiVersion: v1
19kind: Service
20metadata:
21  name: billing
22  labels:
23    app: billing
24  annotations:
25    konghq.com/plugins: http-ratelimit, prometheus
26spec:
27  ports:
28  - port: 80
29    targetPort: 80
30    protocol: TCP
31    name: http
32  selector:
33    app: http-svc
测试
1[root@k8s-test01 kong]#  curl -i -H 'apikey: my-sooper-secret-key' http://foo.bar.com:8000/billing/status/200;
2HTTP/1.1 200 OK
3Content-Type: text/html; charset=utf-8
4Content-Length: 0
5Connection: keep-alive
6Server: gunicorn/19.9.0
7Date: Sat, 06 Feb 2021 09:55:02 GMT
8Access-Control-Allow-Origin: *
9Access-Control-Allow-Credentials: true
10X-RateLimit-Limit-Second: 1
11X-RateLimit-Remaining-Second: 0
12X-RateLimit-Remaining-Minute: 0
13RateLimit-Limit: 1
14RateLimit-Remaining: 0
15X-RateLimit-Limit-Minute: 1
16RateLimit-Reset: 58
17X-Kong-Upstream-Latency: 4
18X-Kong-Proxy-Latency: 1
19Via: kong/2.2.1
20
21[root@k8s-test01 kong]#  curl -i -H 'apikey: my-sooper-secret-key' http://foo.bar.com:8000/billing/status/200;
22HTTP/1.1 429 Too Many Requests
23Date: Sat, 06 Feb 2021 09:55:04 GMT
24Content-Type: application/json; charset=utf-8
25Connection: keep-alive
26Retry-After: 56
27Content-Length: 41
28X-RateLimit-Limit-Second: 1
29X-RateLimit-Remaining-Second: 1
30X-RateLimit-Remaining-Minute: 0
31RateLimit-Limit: 1
32RateLimit-Remaining: 0
33X-RateLimit-Limit-Minute: 1
34RateLimit-Reset: 56
35X-Kong-Response-Latency: 0
36Server: kong/2.2.1
37
38{
39  "message":"API rate limit exceeded"
40}
41
ip-restriction IP限制
在路由上创建 ip-restriction 插件配置,允许8.210.1.244 访问,拒绝 47.242.91.20 访问。
1echo "
2apiVersion: configuration.konghq.com/v1
3kind: KongPlugin
4metadata:
5  name: ip-restriction-test
6config:
7  allow:
8  - 8.210.1.244
9  deny:
10  - 47.242.91.20
11plugin: ip-restriction
12" | kubectl apply -f -
更新 Ingress
1---
2apiVersion: networking.k8s.io/v1
3kind: Ingress
4metadata:
5  name: foo
6  annotations:
7    konghq.com/strip-path: "true"
8    kubernetes.io/ingress.class: kong
9    konghq.com/plugins: httpbin-auth, ip-restriction-test
10spec:
11  rules:
12  - host: "foo.bar.com"
13    http:
14      paths:
15      - pathType: Prefix
16        path: /billing
17        backend:
18          service:
19            name: billing
20            port:
21              number: 80
22      - pathType: Prefix
23        path: /comments
24        backend:
25          service:
26            name: comments
27            port:
28              number: 80
29      - pathType: Prefix
30        path: /invoice
31        backend:
32          service:
33            name: invoice
34            port:
35              number: 80
在 47.242.91.20 上访问拒绝
1[root@k8s-test01 kong]# curl -i -H 'apikey: my-sooper-secret-key' http://foo.bar.com:8000/invoice/status/200
2HTTP/1.1 403 Forbidden
3Date: Sat, 06 Feb 2021 10:18:54 GMT
4Content-Type: application/json; charset=utf-8
5Connection: keep-alive
6Content-Length: 48
7X-Kong-Response-Latency: 1
8Server: kong/2.2.1
9
10{
11  "message":"Your IP address is not allowed"
12}
在 8.210.1.244 上正常访问
1---
2root@k8s-test02:~# curl -i -H 'apikey: my-sooper-secret-key' http://foo.bar.com:8000/invoice/status/200
3HTTP/1.1 200 OK
4Content-Type: text/html; charset=utf-8
5Content-Length: 0
6Connection: keep-alive
7Server: gunicorn/19.9.0
8Date: Sat, 06 Feb 2021 10:30:20 GMT
9Access-Control-Allow-Origin: *
10Access-Control-Allow-Credentials: true
11X-Kong-Upstream-Latency: 25
12X-Kong-Proxy-Latency: 0
13Via: kong/2.2.1
14
总结
通过上面的示例,我们大概了解了在 Kubernetes 环境下 Kong 与 Ingress 的结合使用,目前对 Consumer 没有太多的使用,后续有机会再跟大家介绍下。官方也有很多的示例,感兴趣的朋友可以去官网查看。
Kong 拥有很强的扩展能力,如果自带的插件不能满足我们的需求,我们可以写插件来实现。笔者的同事也写了一些插件在生产环境中运行。
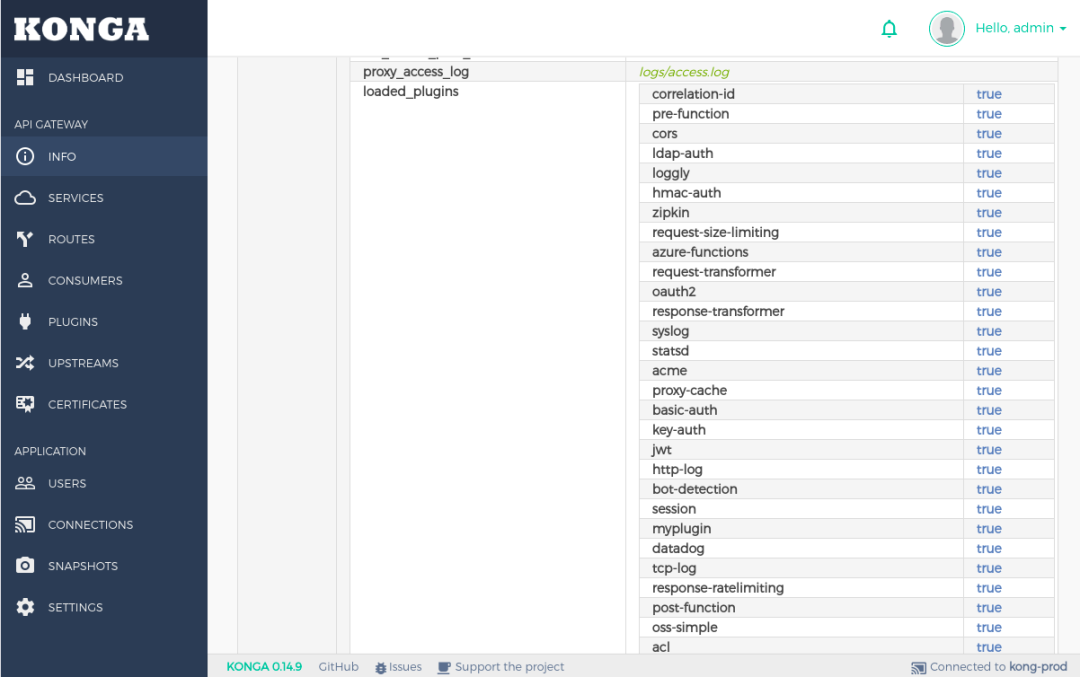
写好的插件,重新构建镜像,通过下面环境变量启用。
1  - name: KONG_LUA_PACKAGE_PATH
2  value: "/go/kong-lua/kong-plugin/?.lua;;"
3- name: KONG_PLUGINS
4  value: "bundled,myplugin,jwt-plus,oauth2-plus,oss-simple"
感兴趣的读者可以关注下微信号