
一个国家IT技术最被寄予厚望的人,就是这个国家的程序员,是心中有梦想、眼里有希望,致敬最可爱、最可敬的年轻一代程序猿和程序媛。 奔涌吧,程序员们,和1000万程序员一起,让中国变得更强。
一、结构体变量的基本使用
1.概述
引入:
有时需要将不同类型的数据组合成一个有机的整体,以便于引用。
例如,一个学生有学号、姓名、性别、年龄、地址等属性,需要定义int num; char name[20]; char sex; int age; int char addr[30];等属性,如下:
 定义结构体的一般形式为:
1struct 结构名{
2	成员表列
3};
成员表列由若干个成员组成,每个成员都是该结构的一个组成部分; 对每个成员也必须作类型说明,其形式为:
1类型说明符 成员名;
例如:
1struct student{
2	int num;
3	char name[20];
4	char sex;
5	int age;
6	float score;
7	char addr[30];
8}
9
2.定义结构体类型变量的方法
可以用3种方法定义结构体类型变量: (1)先声明结构体类型再定义变量名 例如:
1struct student{
2	int num;
3	char name[20];
4	char sex;
5	int age;
6	float score;
7	char addr[30];
8};
9
10struct  student        student1, student2;
11// |       |               |        |
12//类型名  结构体          变量名    变量名
定义了student1和student2为struct student类型的变量,即它们具有struct student类型的结构;
在定义了结构体变量后,系统会为之分配内存单元。
例如,student1和student2在内存中各占4 + 20 + 1 + 4 + 4 + 30 = 67个字节。
(2)在声明类型的同时定义变量
这种形式的定义的一般形式为:
1struct 结构体名{
2	成员表列
3}变量名表列;
例如:
1struct student{
2	int num;
3	char name[20];
4	char sex;
5	int age;
6	float score;
7	char addr[30];
8}student1, student2;
(3)直接定义结构体类型变量 其一般形式为:
1struct{
2	成员表列
3}变量名表列;
显然,即不出现结构体名。
练习:
定义如下的结构体(嵌套定义):
 实现思路:
首先定义一个结构date,由month(月)、day(日)、year(年) 三个成员组成,如下:
实现思路:
首先定义一个结构date,由month(月)、day(日)、year(年) 三个成员组成,如下:
1struct date{
2	int month;
3	int day;
4	int year;
5};
在定义并说明结构体变量时,其中的成员birthday被说明为data结构类型,如下:
1struct{
2	int num;
3	char name[20];
4	char sex;
5	struct date birthday;
6	float score;
7}boy1, boy2;
完整代码如下:
1#include <stdio.h>
2
3int main(){
4	struct date{
5		int month;
6		int day;
7		int year;
8	};
9
10	struct{
11		int num;
12		char name[20];
13		char sex;
14		struct date birthday;
15		float score;
16	}boy1, boy2;
17
18	printf("Please input birthday(YY:) ");
19	scanf("%d", &boy1.birthday.year);
20	printf("Please input birthday(MM:) ");
21	scanf("%d", &boy1.birthday.month);
22	printf("Please input birthday(DD:) ");
23	scanf("%d", &boy1.birthday.day);
24	printf("\n");
25
26	boy2 = boy1;
27
28	printf("boy1's birthday is %d-%d-%d\n", boy1.birthday.year, boy1.birthday.month, boy1.birthday.day);
29	printf("boy2's birthday is %d-%d-%d\n", boy2.birthday.year, boy2.birthday.month, boy2.birthday.day);
30
31
32	return 0;
33}
打印:
1Please input birthday(YY:) 2020
2Please input birthday(MM:) 5
3Please input birthday(DD:) 14
4
5boy1's birthday is 2020-5-14
6boy2's birthday is 2020-5-14
7
说明: 成员名可与程序中其它变量同名,互不干扰。
3.结构体变量的引用
在定义了结构体变量以后,可以引用这个变量。
规则如下:
(1)不能将一个结构体变量作为一个整体进行输入和输出。
例如,打印student1的各个变量的值不能写成printf("%d, %s, %c, %d,%f\n″,student1);。
正确引用结构体变量中成员的方式为结构体变量名.成员名。
例如student1.num表示student1变量中的num成员,即student1的num(学号)项;
可以对变量的成员赋值,例如student1.num = 100;。
. 是成员(分量)运算符,它在所有的运算符中优先级最高,因此可以把student1.num作为一个整体来看待;
上面赋值语句的作用是将整数100赋给student1变量中的成员num。
练习:
1#include <stdio.h>
2
3int main(){
4	struct student{
5		int num;
6		char *name;
7		char sex;
8		float score;
9	}boy1, boy2;
10
11	boy1.num = 007;
12	boy1.name = "Corley";
13	printf("Please input sex and score:\n");
14	scanf("%c %f", &boy1.sex, &boy1.score);
15
16	boy2 = boy1;
17	printf("Number = %d\nName = %s\nSex = %c\nScore = %f\n", boy2.num, boy2.name, boy2.sex, boy2.score);
18
19
20	return 0;
21}
打印:
1Please input sex and score:
2M 95
3Number = 7
4Name = Corley
5Sex = M
6Score = 95.000000
7
(2)如果成员本身又属一个结构体类型,则要用若干个成员运算符,一级一级地找到最低的一级的成员; 只能对最低级的成员进行赋值、存取和运算。
对上面定义的结构体变量student1, 可以这样访问各成员:
1student1.num
2student1.birthday.month
(3)对结构体变量的成员可以像普通变量一样进行各种运算(根据其类型决定可以进行的运算)。 例如:
1student2.score = student1.score;
2sum = student1.score + student2.score;
3student1.age++;
4++student2.age;
(4)可以引用结构体变量成员的地址,也可以引用结构体变量的地址; 但不能用以下语句整体读入结构体变量:
1scanf("%d, %s, %c, %d, %f, %s", &student);
结构体变量的地址主要用作函数参数,传递结构体变量的地址。
练习如下:
1#include <stdio.h>
2
3int main(){
4	struct student{
5		int num;
6		char *name;
7		char sex;
8		float score;
9	}boy;
10
11	boy.num = 007;
12	boy.name = "Corley";
13	printf("The address of struct is %o\n", &boy);
14	printf("The address of num is %o\n", &boy.num);
15
16	return 0;
17}
打印:
1The address of struct is 30577000
2The address of num is 30577000
3
4.结构体变量的初始化
初始化示例如下:
1#include <stdio.h>
2
3int main(){
4	struct student{
5		int num;
6		char *name;
7		char sex;
8		float score;
9	}boy1, boy2 = {123, "Corley", 'M', 99};
10
11	boy1 = boy2;
12	printf("boy1:Number = %d\nNmae = %s\nScore = %d\n", boy1.num, boy1.name, boy1.score);
13	printf("boy2:Number = %d\nNmae = %s\nScore = %d\n", boy2.num, boy2.name, boy2.score);
14
15	return 0;
16}
打印:
1boy1:Number = 123
2Nmae = Corley
3Score = 0
4boy2:Number = 123
5Nmae = Corley
6Score = 0
7
二、结构体的高级应用
1.结构体数组
一个结构体变量中可以存放一组数据(如一个学生的学号、姓名、成绩等数据),如果有10个学生的数据需要参加运算,显然应该用数组,这就是结构体数组。
结构体数组与之前的数值型数组不同之处在于每个数组元素都是一个结构体类型的数据,它们都分别包括各个成员(分量)项。
Ⅰ定义结构体数组
和定义结构体变量的方法相似,只需说明其为数组即可。 例如:
1struct student{
2	int num;
3	char name[20];
4	char sex;
5	int age;
6	float score;
7	char addr[30];
8};
9struct student student[3];
或者:
1struct student{
2	int num;
3	char name[20];
4	char sex;
5	int age;
6	float score;
7	char addr[30];
8}student[3];
9
练习如下:
1#include <stdio.h>
2#include <stdlib.h>
3
4#define NUM 3
5
6struct person{
7	char name[20];
8	char phone[11];
9};
10
11int main(){
12	struct person man[NUM];
13	int i;
14	for(i = 0; i < NUM; i++){
15		printf("Input name:\n");
16		gets(man[i].name);
17		printf("Input phone:\n");
18		gets(man[i].phone);
19	}
20	printf("name\t\t\tphone\n");
21	for(i = 0; i < NUM; i++){
22		printf("%s\t\t\t%s\n", man[i].name, man[i].phone);
23	}
24
25	return 0;
26}
打印:
1Input name:
2Corley
3Input phone:
4123123
5Input name:
6Jack
7Input phone:
8321321
9Input name:
10Jane
11Input phone:
12112233
13name                    phone
14Corley                  123123
15Jack                    321321
16Jane                    112233
17
Ⅱ结构体数组的初始化
与其他类型的数组一样,可以对结构体数组初始化。 例如:
1struct student{
2	int num;
3	char name[20];
4	char sex;
5  	int age;
6	float score;
7	char addr[30];
8}stu[2] = {
9	{101, "Corley", 'M', 18, 98, 'Beijing}, {102, "Shirley", 'F', 95, "Chengdu"}
10};
还可以如下:
1struct student{
2	int num;
3	char name[20];
4	char sex;
5  	int age;
6	float score;
7	char addr[30];
8};
9struct student stu[2] = {
10	{101, "Corley", 'M', 18, 98, 'Beijing}, {102, "Shirley", 'F', 95, "Chengdu"}
11};
即先声明结构体类型,然后定义数组为该结构体类型,在定义数组时初始化。
练习: 对候选人得票的统计程序: 设有3个候选人,每次输入一个得票的候选人的名字,要求最后输出各人得票结果。 代码如下:
1#include <stdio.h>
2#include <string.h>
3#include <stdlib.h>
4
5#define NUM 4
6struct person
7{
8      char name[20];
9      int count;
10}candidate[NUM] = {
11                  {"光头强", 0},
12                  {"灰太狼", 0},
13                  {"猪猪侠", 0},
14                  {"阿衰", 0}
15                };
16
17void main()
18{
19	char *winner();
20	int i, j;
21	char candidate_name[20];
22
23	printf("欢迎进入最爱动漫评选投票系统:\n\n");
24	printf("候选人有: 光头强, 灰太狼, 猪猪侠, 阿衰\n\n");
25
26	for( i=1; i <= 10; i++)
27	{
28	    printf("第 %2d 位投票, 请写下支持的候选人名字: ", i);
29	    scanf("%s", candidate_name);
30	    for( j=0; j < NUM; j++ )
31	    {
32			if(strcmp(candidate_name, candidate[j].name) == 0)
33			{
34			    candidate[j].count++;
35			}
36	    }
37	}
38	printf("\n");
39
40	for( i=0; i < 4; i++ )
41	{
42	    printf("%s 同学得票数为: %d\n", candidate[i].name, candidate[i].count );
43	}
44	printf("\n");
45	printf("本次投票活动的胜利者: %s", winner() );
46
47	printf("\n");
48	system("pause");
49}
50
51char *winner(){
52	int i = 0, winner = i;
53
54	for( i=1; i < NUM; i++ )
55	{
56	    if( candidate[winner].count < candidate[i].count )
57	    {
58	        winner = i;
59	    }
60	}
61
62	return candidate[winner].name;
63}
打印:
1欢迎进入最爱动漫评选投票系统:
2
3候选人有: 光头强, 灰太狼, 猪猪侠, 阿衰
4
5第  1 位投票, 请写下支持的候选人名字: 阿衰
6第  2 位投票, 请写下支持的候选人名字: 光头强
7第  3 位投票, 请写下支持的候选人名字: 猪猪侠
8第  4 位投票, 请写下支持的候选人名字: 大灰狼
9第  5 位投票, 请写下支持的候选人名字: 阿衰
10第  6 位投票, 请写下支持的候选人名字: 灰太狼
11第  7 位投票, 请写下支持的候选人名字: 猪猪侠
12第  8 位投票, 请写下支持的候选人名字: 光头强
13第  9 位投票, 请写下支持的候选人名字: 阿衰
14第 10 位投票, 请写下支持的候选人名字: 猪猪侠
15
16光头强 同学得票数为: 2
17灰太狼 同学得票数为: 1
18猪猪侠 同学得票数为: 3
19阿衰 同学得票数为: 3
20
21本次投票活动的胜利者: 猪猪侠
2.指向结构体变量的指针
一个结构体变量的指针就是该结构体变量所占据的内存段的起始地址; 可以定义一个指针变量,用来指向一个结构体变量,此时该指针变量的值是结构体变量的起始地址。
指针变量也可以用来指向结构体数组中的元素。
结构指针变量说明的一般形式为:
1struct 结构名 *结构指针变量名;
例如,在前面定义了student这个结构体,如要说明一个指向student的指针变量pstu,可写为:
1struct student *pstu;
也可在定义student结构时同时说明pstu。 与之前的各类指针变量相同,结构指针变量也必须要先赋值后才能使用。
赋值是把结构变量的首地址赋予该指针变量,不能把结构名赋予该指针变量。
如果boy是被说明为student类型的结构变量,则pstu=&boy是正确的,pstu=&student是错误的。
原因说明:
结构名和结构变量是两个不同的概念:
结构名只能表示一个结构形式,编译系统并不对它分配内存空间;
只有当某变量被说明为这种类型的结构时,才对该变量分配存储空间。
因此pstu=&student写法是错误的,不能这样去取一个结构名的首地址。
有了结构指针变量,就能更方便地访问结构变量的各个成员。
其访问的一般形式为:
(*结构指针变量).成员名或者结构指针变量->成员名。
例如(*pstu).num或者pstu->num。
指向结构体变量的指针变量练习如下:
1#include <stdio.h>
2
3struct stu{
4	int num;
5	char *name;
6	char sex;
7	float score;
8} boy = {123, "COrley", 'M', 95};
9
10
11int main(){
12	struct stu *pstu;
13	pstu = &boy;
14
15	printf("Number = %d\nName = %s\nScore = %f\n", boy.num, boy.name, boy.score);
16	printf("Number = %d\nName = %s\nScore = %f\n", (*pstu).num, (*pstu).name, (*pstu).score);
17	printf("Number = %d\nName = %s\nScore = %f\n", pstu->num, pstu->name, pstu->score);
18
19	return 0;
20}
打印:
1Number = 123
2Name = COrley
3Score = 95.000000
4Number = 123
5Name = COrley
6Score = 95.000000
7Number = 123
8Name = COrley
9Score = 95.000000
10
3.结构指针变量作函数参数
将一个结构体变量的值传递给另一个函数,有3种方式: (1)用结构体变量的成员作参数; (2)用结构体变量作实参 (3)用指向结构体变量(或数组)的指针作实参,将结构体变量(或数组)的地址传给形参
练习: 有一个结构体变量student,内含学生学号、姓名和3门课程的成绩,通过调用函数print中将它们输出。 用结构体变量作函数参数代码如下:
1#include <stdio.h>
2#include <string.h>
3
4struct student{
5	int num;
6	char name[20];
7	float score[3];
8};
9
10
11int main(){
12	void print(struct student);
13	struct student stu;
14	stu.num = 123;
15	strcpy(stu.name, "Corley");
16	stu.score[0] = 99;
17	stu.score[1] = 98;
18	stu.score[2] = 97;
19	print(stu);
20
21	return 0;
22}
23
24void print(struct student stu){
25	printf("num    : %d\n", stu.num);
26	printf("name   : %s\n", stu.name);
27	printf("score_1: %f\n", stu.score[0]);
28	printf("score_2: %f\n", stu.score[1]);
29	printf("score_3: %f\n", stu.score[2]);
30}
打印:
1num    : 123
2name   : Corley
3score_1: 99.000000
4score_2: 98.000000
5score_3: 97.000000
6
下面代码与之等效:
1#include <stdio.h>
2#include <string.h>
3
4struct student{
5	int num;
6	char *name;
7	float score[3];
8};
9
10
11int main(){
12	void print(struct student);
13	struct student stu;
14	stu.num = 123;
15	stu.name = "Corley";
16	stu.score[0] = 99;
17	stu.score[1] = 98;
18	stu.score[2] = 97;
19	print(stu);
20
21	return 0;
22}
23
24void print(struct student stu){
25	printf("num    : %d\n", stu.num);
26	printf("name   : %s\n", stu.name);
27	printf("score_1: %f\n", stu.score[0]);
28	printf("score_2: %f\n", stu.score[1]);
29	printf("score_3: %f\n", stu.score[2]);
30}
这种方式是将字符串常量的地址传递给name。
用指向结构体变量的指针作实参代码如下:
1#include <stdio.h>
2#include <string.h>
3
4struct student{
5	int num;
6	char *name;
7	float score[3];
8};
9
10
11int main(){
12	void print(struct student *);
13	struct student stu;
14	stu.num = 123;
15	stu.name = "Corley";
16	stu.score[0] = 99;
17	stu.score[1] = 98;
18	stu.score[2] = 97;
19	print(&stu);
20
21	return 0;
22}
23
24void print(struct student *p){
25	printf("num    : %d\n", p->num);
26	printf("name   : %s\n", p->name);
27	printf("score_1: %f\n", p->score[0]);
28	printf("score_2: %f\n", p->score[1]);
29	printf("score_3: %f\n", p->score[2]);
30}
三、结构体的应用——链表
1.动态存储分配
我们知道,C语言中不允许动态数组类型,数组的长度是预先定义好的,在整个程序中固定不变。
例如,int a[n];用变量表示长度,想对数组的大小作动态说明,是错误的。
但是在实际的编程中,往往会出现所需的内存空间取决于实际输入的数据、而无法预先确定的情况。 为了满足这个需求,C语言提供了一些内存管理函数,这些内存管理函数可以按需要动态地分配内存空间,也可把不再使用的空间回收待用,为有效地利用内存资源提供了手段。
常用的内存管理函数有以下三个:
(1)分配内存空间函数malloc、calloc;
(2)释放内存空间函数free。
malloc函数
函数原型为void *malloc(unsigned int size);,其作用是在内存的动态存储区中分配一个长度为size的连续空间(size是一个无符号数)。
此函数的返回值是一个指向分配域起始地址的指针(类型为void); 如果此函数未能成功地执行(例如内存空间不足),则返回空指针(NULL)。
calloc函数
函数原型为void *calloc(unsigned n, unsigned size);,其作用是在内存的动态存储区中分配n个长度为size的连续空间。
函数返回一个指向分配域起始地址的指针; 如果分配不成功,返回NULL。 用calloc函数可以为一维数组开辟动态存储空间,n为数组元素个数,每个元素长度为size。
free函数
函数原型为void free(void *p);,其作用是释放由p指向的内存区,使这部分内存区能被其他变量使用。
其中,p是最近一次调用calloc或malloc函数时返回的值; free函数无返回值。
2.链表
链表是一种常见的重要的数据结构,是动态地进行存储分配的一种结构。 链表的组成:
- 头指针 存放一个地址,该地址指向第一个元素。
- 结点 用户需要的实际数据和链接节点的指针。
示例如下:

练习:
根据下图建立链表:
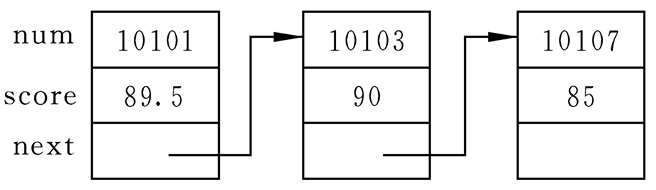 代码如下:
代码如下:
1#include <stdio.h>
2
3struct student{
4	long num;
5	float score;
6	struct student *next;
7};
8
9
10int main(){
11	struct student a, b, c, *head;
12	a.num = 10101;
13	a.score = 89.5;
14	b.num = 10103;
15	b.score = 90;
16	c.num = 10107;
17	c.score = 85;
18
19	head = &a;
20	a.next = &b;
21	b.next = &c;
22	c.next = NULL;
23
24	do{
25		printf("%ld %5.1f\n", head->num, head->score);
26		head = head->next;
27	}while(head);
28
29	return 0;
30}
打印:
110101  89.5
210103  90.0
310107  85.0
4
3.建立动态链表
创建链表
建立动态链表是指在程序执行过程中从无到有地建立起一个链表,即一个一个地开辟结点和输入各结点数据,并建立起前后相链的关系。
练习:
写一函数建立一个含有学生(学号,成绩)数据的单向动态链表。
实现思路:
约定:我们约定学号不会为零,如果输入的学号为0,则表示建立链表的过程完成,该结点不应连接到链表中。
如下:
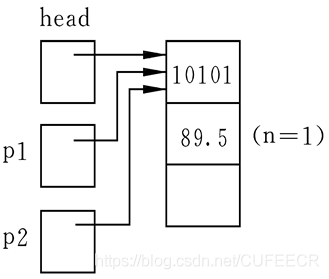
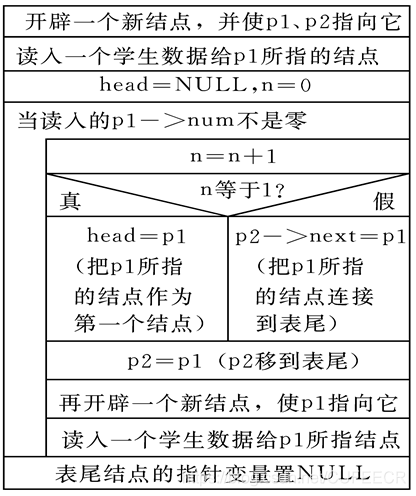 (1)如果输入的p1->num不等于0,则输入的是第一个结点数据(n=1),令head=p1,即把p1的值赋给head,也就是使head也指向新开辟的结点p1所指向的新开辟的结点就成为链表中第一个结点,如下:
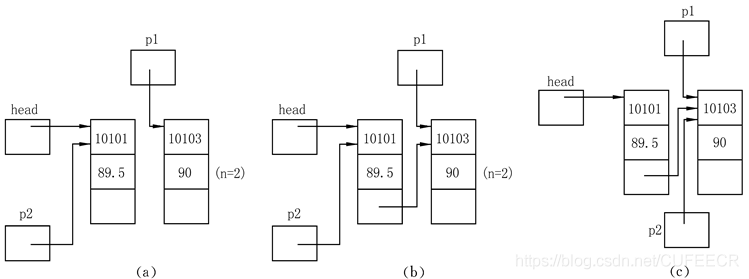
 (2)再开辟另一个结点并使p1指向它,接着输入该结点的数据,如果输入的p1->num≠0,则应链入第2个结点(n=2), 将新结点的地址赋给第一个结点的next成员,接着使p2=p1,也就是使p2指向刚才建立的结点,如下:
 (3)再开辟一个结点并使p1指向它,并输入该结点的数据,如下:
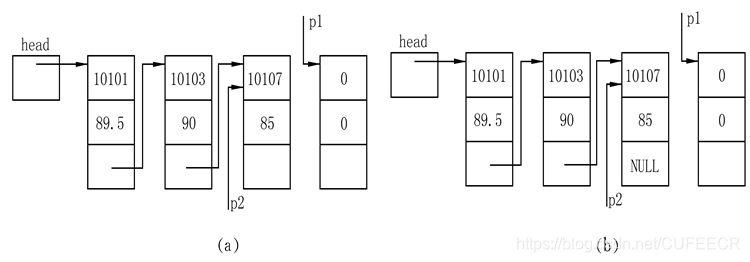
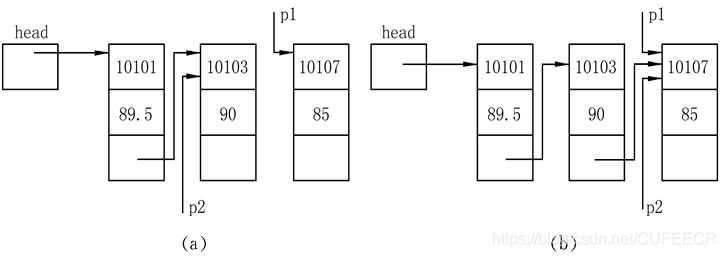 (4)再开辟一个新结点,并使p1指向它,输入该结点的数据,由于p1->num的值为0,不再执行循环,此新结点不应被连接到链表中,将NULL赋给p2->next,建立链表过程结束,p1最后所指的结点未链入链表中,第三个结点的next成员的值为NULL,它不指向任何结点,如下:
 链表输出实现思路如下:
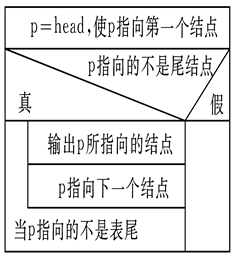 (1)首先要知道链表第一个结点的地址,也就是要知道head的值。
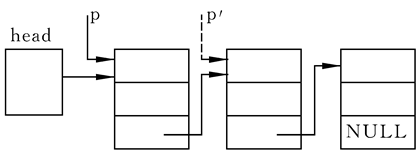
(2)然后设一个指针变量p,先指向第一个结点,输出p所指的结点,然后使p后移一个结点,再输出,直到链表的尾结点,如下:
(1)首先要知道链表第一个结点的地址,也就是要知道head的值。
(2)然后设一个指针变量p,先指向第一个结点,输出p所指的结点,然后使p后移一个结点,再输出,直到链表的尾结点,如下:
 代码如下:
代码如下:
1#include <stdio.h>
2#include <malloc.h>
3#include <stdlib.h>
4
5#define LEN sizeof(struct student)
6
7struct student{
8	int num;
9	float score;
10	struct student *next;
11};
12
13int n;
14
15int main(){
16	struct student *create();
17	void print(struct student *head);
18	struct student *stu;
19	stu = create();
20	print(stu);
21	printf("\n\n");
22
23	return 0;
24}
25
26struct student *create(){
27	struct student *head, *p1, *p2;
28	p1 = p2 = (struct student *)malloc(LEN);
29	printf("Please input the num:");
30	scanf("%d", &p1->num);
31	printf("Please input the score:");
32	scanf("%f", &p1->score);
33
34	head = NULL;
35	n = 0;
36	while(p1->num){
37		n++;
38		if(n == 1){
39			head = p1;
40		}
41		else{
42			p2->next = p1;
43		}
44		p2 = p1;
45		p1 = (struct student *)malloc(LEN);
46		printf("Please input the num:");
47		scanf("%d", &p1->num);
48		printf("Please input the score:");
49		scanf("%f", &p1->score);
50	}
51	p2->next = NULL;
52	return head;
53}
54
55void print(struct student *head){
56	struct student *p;
57	printf("\nThere are %d records.\n", n);
58	p = head;
59	if(head){
60		do{
61			printf("%d学号的成绩是:%5.2f\n", p->num, p->score);
62			p = p->next;
63		}while(p);
64	}
65}
打印:
1Please input the num:10101
2Please input the score:98
3Please input the num:10102
4Please input the score:97
5Please input the num:10103
6Please input the score:96
7Please input the num:0
8Please input the score:0
9
10There are 3 records.
1110101学号的成绩是:98.00
1210102学号的成绩是:97.00
1310103学号的成绩是:96.00
14
15
16
对链表的删除操作
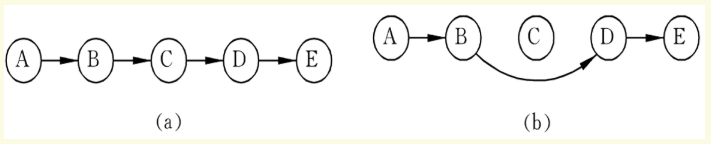
从一个动态链表中删去一个结点,并不是真正从内存中把它抹掉,而是把它从链表中分离开来,只要撤销原来的链接关系即可,如下:
 练习:
写一个函数以删除动态链表中指定的结点。
实现思路:
如下:
练习:
写一个函数以删除动态链表中指定的结点。
实现思路:
如下:
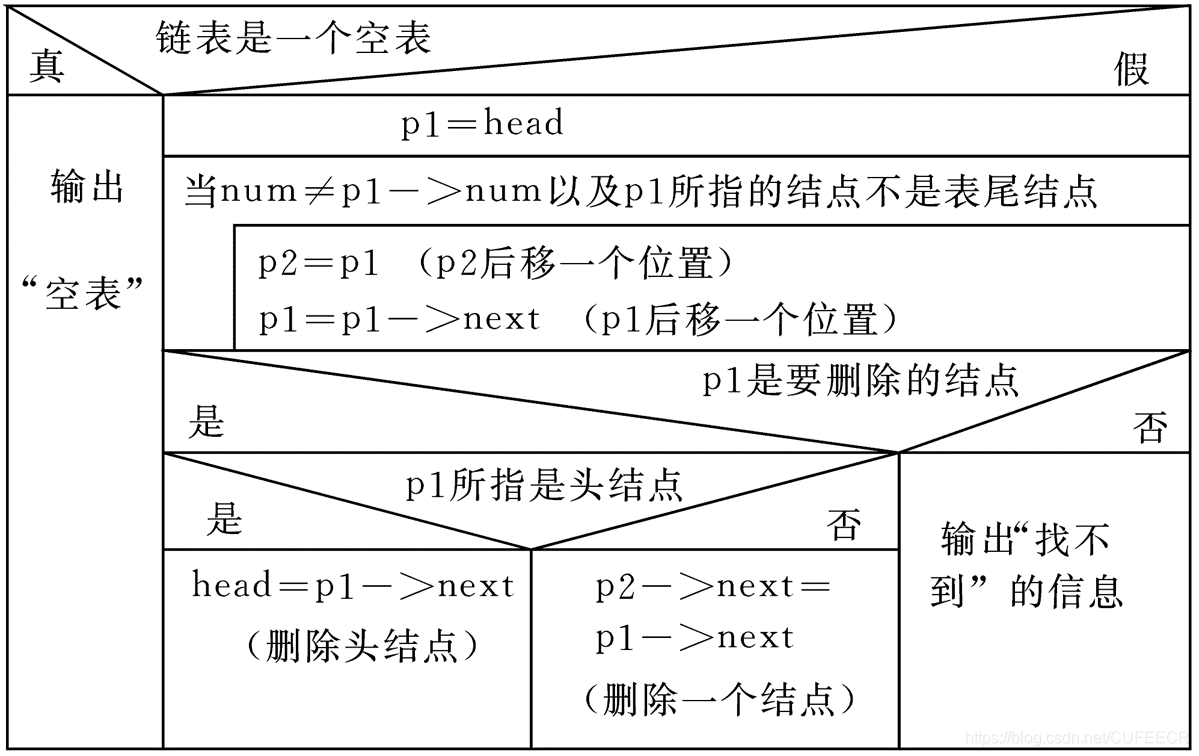 (1)从p指向的第一个结点开始,检查该结点中的num值是否等于输入的要求删除的那个学号。
(2)如果相等就将该结点删除,如不相等,就将p后移一个结点,再如此进行下去,直到遇到表尾为止。
(3)设两个指针变量p1和p2,先使p1指向第一个结点 。
(4)如果要删除的不是第一个结点,则使p1后移指向下一个结点(将p1->next赋给p1),在此之前应将p1的值赋给p2 ,使p2指向刚才检查过的那个结点。
(1)从p指向的第一个结点开始,检查该结点中的num值是否等于输入的要求删除的那个学号。
(2)如果相等就将该结点删除,如不相等,就将p后移一个结点,再如此进行下去,直到遇到表尾为止。
(3)设两个指针变量p1和p2,先使p1指向第一个结点 。
(4)如果要删除的不是第一个结点,则使p1后移指向下一个结点(将p1->next赋给p1),在此之前应将p1的值赋给p2 ,使p2指向刚才检查过的那个结点。
代码如下:
1#include <stdio.h>
2#include <malloc.h>
3#include <stdlib.h>
4
5#define LEN sizeof(struct student)
6
7struct student{
8	int num;
9	float score;
10	struct student *next;
11};
12
13int n, num;
14
15int main(){
16	struct student *create();
17	struct student *del(struct student *head, int num);
18	void print(struct student *head);
19	struct student *stu;
20	stu = create();
21	print(stu);
22
23	printf("\nPlease input the node to delete: ");
24	scanf("%d", &num);
25	print(del(stu, num));
26	printf("\n\n");
27
28	return 0;
29}
30
31struct student *create(){
32	struct student *head, *p1, *p2;
33	p1 = p2 = (struct student *)malloc(LEN);
34	printf("Please input the num:");
35	scanf("%d", &p1->num);
36	printf("Please input the score:");
37	scanf("%f", &p1->score);
38
39	head = NULL;
40	n = 0;
41	while(p1->num){
42		n++;
43		if(n == 1){
44			head = p1;
45		}
46		else{
47			p2->next = p1;
48		}
49		p2 = p1;
50		p1 = (struct student *)malloc(LEN);
51		printf("\nPlease input the num:");
52		scanf("%d", &p1->num);
53		printf("Please input the score:");
54		scanf("%f", &p1->score);
55	}
56	p2->next = NULL;
57	return head;
58}
59
60struct student *del(struct student *head, int num){
61	struct student *p1, *p2;
62	if(head == NULL){
63		printf("\n This list is null!\n");
64		goto end;
65	}
66	p1 = head;
67	while(p1->num != num && p1->next != NULL){
68		p2 = p1;
69		p1 = p1->next;
70	}
71	if(num == p1->num){
72		if(p1 == head){
73			head = p1->next;
74		}
75		else{
76			p2->next = p1->next;
77		}
78		printf("\nDelete No. %d succeed!\n", num);
79		n -= 1;
80	}
81	else{
82		printf("%d not found!\n", num);
83	}
84	end:return head;
85}
86
87void print(struct student *head){
88	struct student *p;
89	printf("\nThere are %d records.\n", n);
90	p = head;
91	if(head){
92		do{
93			printf("%d学号的成绩是:%5.2f\n", p->num, p->score);
94			p = p->next;
95		}while(p);
96	}
97}
打印:
1Please input the num:10101
2Please input the score:98
3
4Please input the num:10102
5Please input the score:97
6
7Please input the num:10103
8Please input the score:96
9
10Please input the num:0
11Please input the score:0
12
13There are 3 records.
1410101学号的成绩是:98.00
1510102学号的成绩是:97.00
1610103学号的成绩是:96.00
17
18Please input the node to delete: 10102
19
20Delete No. 10102 succeed!
21
22There are 2 records.
2310101学号的成绩是:98.00
2410103学号的成绩是:96.00
25
26
27
对链表的插入操作
对链表的插入是指将一个结点插入到一个已有的链表中。 为了能做到正确插入,必须解决两个问题:
- 怎样找到插入的位置;
- 怎样实现插入。
练习:
写一个函数在有序链表的指定位置添加元素。
实现思路如下:
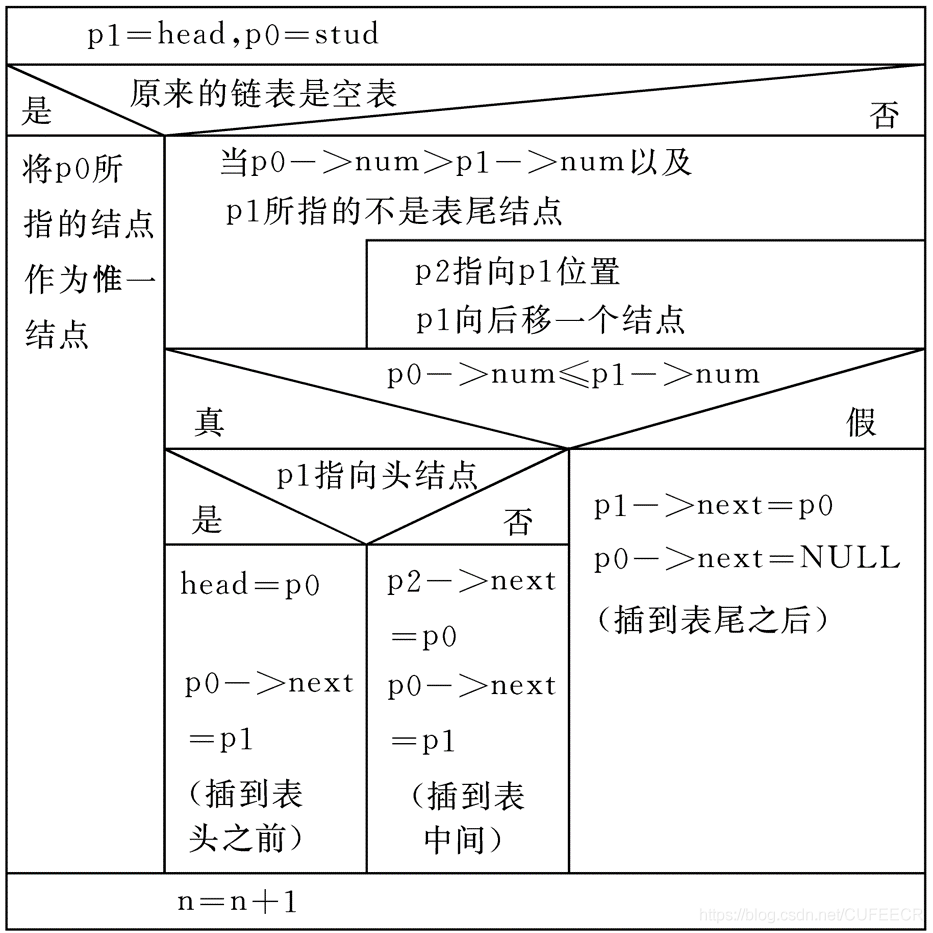 我们可以先用指针变量p0指向待插入的结点,p1指向第一个结点;
将p0->num与p1->num相比较,如果p0->num>p1->num,此时将p1后移,并使p2指向刚才p1所指的结点,如下:
我们可以先用指针变量p0指向待插入的结点,p1指向第一个结点;
将p0->num与p1->num相比较,如果p0->num>p1->num,此时将p1后移,并使p2指向刚才p1所指的结点,如下:
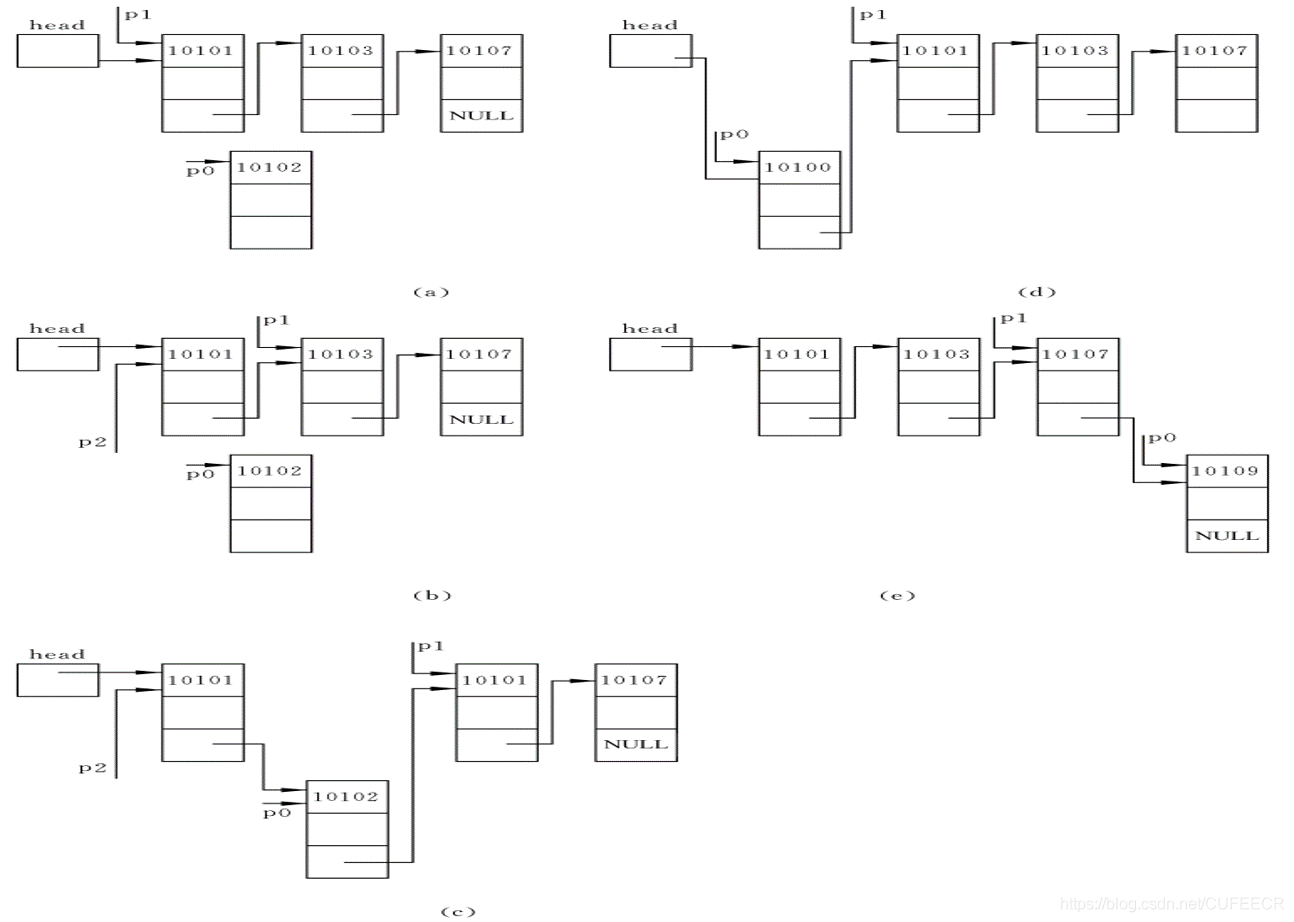 其中a、b、c代表一般情况,d代表链表头插入,e代表链表尾插入。
代码如下:
其中a、b、c代表一般情况,d代表链表头插入,e代表链表尾插入。
代码如下:
1#include <stdio.h>
2#include <malloc.h>
3#include <stdlib.h>
4
5#define LEN sizeof(struct student)
6
7struct student{
8	int num;
9	float score;
10	struct student *next;
11};
12
13int n, num;
14
15int main(){
16	struct student *create();
17	struct student *del(struct student *head, int num);
18	struct student *insert(struct student *head, struct student *stu);
19	void print(struct student *head);
20	struct student *stu, *p, stu_2;
21	stu = create();
22	print(stu);
23
24	printf("\nPlease input the node to delete: ");
25	scanf("%d", &num);
26	print(del(stu, num));
27
28	printf("\nPlease input the num to insert: ");
29	scanf("%d", &stu_2.num);
30	printf("Please input the score: ");
31	scanf("%f", &stu_2.score);
32	p = insert(stu, &stu_2);
33	print(p);
34	printf("\n\n");
35
36	return 0;
37}
38
39struct student *create(){
40	struct student *head, *p1, *p2;
41	p1 = p2 = (struct student *)malloc(LEN);
42	printf("Please input the num:");
43	scanf("%d", &p1->num);
44	printf("Please input the score:");
45	scanf("%f", &p1->score);
46
47	head = NULL;
48	n = 0;
49	while(p1->num){
50		n++;
51		if(n == 1){
52			head = p1;
53		}
54		else{
55			p2->next = p1;
56		}
57		p2 = p1;
58		p1 = (struct student *)malloc(LEN);
59		printf("\nPlease input the num:");
60		scanf("%d", &p1->num);
61		printf("Please input the score:");
62		scanf("%f", &p1->score);
63	}
64	p2->next = NULL;
65	return head;
66}
67
68struct student *del(struct student *head, int num){
69	struct student *p1, *p2;
70	if(head == NULL){
71		printf("\n This list is null!\n");
72		goto end;
73	}
74	p1 = head;
75	while(p1->num != num && p1->next != NULL){
76		p2 = p1;
77		p1 = p1->next;
78	}
79	if(num == p1->num){
80		if(p1 == head){
81			head = p1->next;
82		}
83		else{
84			p2->next = p1->next;
85		}
86		printf("\nDelete No. %d succeed!\n", num);
87		n -= 1;
88	}
89	else{
90		printf("%d not found!\n", num);
91	}
92	end:return head;
93}
94
95struct student *insert(struct student *head, struct student *stu){
96	struct student *p0, *p1, *p2;
97	p1 = head;
98	p0 = stu;
99	if(head == NULL){
100		head = p0;
101		p0->next = NULL;
102	}
103	else{
104		while(p0->num > p1->num && p1->next != NULL){
105			p2 = p1;
106			p1 = p1->next;
107		}
108		if(p0->num <= p1->num){
109			if(head == p1){
110				head = p0;
111			}
112			else{
113				p2->next = p0;
114			}
115			p0->next = p1;
116		}
117		else{
118			p1->next = p0;
119			p0->next = NULL;
120		}
121	}
122	n += 1;
123
124	return head;
125}
126
127void print(struct student *head){
128	struct student *p;
129	printf("\nThere are %d records.\n", n);
130	p = head;
131	if(head){
132		do{
133			printf("%d学号的成绩是:%5.2f\n", p->num, p->score);
134			p = p->next;
135		}while(p);
136	}
137}
打印:
1Please input the num:10101
2Please input the score:98
3
4Please input the num:10102
5Please input the score:99
6
7Please input the num:10103
8Please input the score:97
9
10Please input the num:0
11Please input the score:0
12
13There are 3 records.
1410101学号的成绩是:98.00
1510102学号的成绩是:99.00
1610103学号的成绩是:97.00
17
18Please input the node to delete: 10102
19
20Delete No. 10102 succeed!
21
22There are 2 records.
2310101学号的成绩是:98.00
2410103学号的成绩是:97.00
25
26Please input the num to insert: 10102
27Please input the score: 97.5
28
29There are 3 records.
3010101学号的成绩是:98.00
3110102学号的成绩是:97.50
3210103学号的成绩是:97.00
33
34
35
四、共用体
1.基本概念
使几个不同的变量共占同一段内存的结构称为共用体类型结构。 定义共用体类型变量的一般形式为:
1union 共用体名{
2    成员表列
3}变量表列;
例如:
1union data{
2	int i;
3	char ch;
4	flaot f;
5}a, b, c;
或者:
1union data{
2	int i;
3	char ch;
4	flaot f;
5};
6union data a, b, c;
共用体和结构体的比较: 结构体变量所占内存长度是各成员占的内存长度之和,每个成员分别占有其自己的内存单元; 共用体变量所占的内存长度等于最长的成员的长度。
例如,前面定义的共用体变量a、b、c各占4个字节(因为一个实/整型变量占4个字节),而不是各占4+1+4=9个字节。
2.共用体变量的引用
只有先定义了共用体变量才能引用它,而且不能引用共用体变量,而只能引用共用体变量中的成员。 例如,前面定义了a、b、c为共用体变量:
1a.i 	// 引用共用体变量中的整型变量i
2a.ch	// 引用共用体变量中的字符变量ch
3a.f 	// 引用共用体变量中的实型变量f
3.共用体类型数据的特点
(1)同一个内存段可以用来存放几种不同类型的成员,但在每一瞬时只能存放其中一种,而不是同时存放几种;
共用体变量中起作用的成员是最后一次存放的成员,在存入一个新的成员后原有的成员就失去作用;
共用体变量的地址和它的各成员的地址都是同一地址。
(2)不能对共用体变量名赋值,也不能企图引用变量名来得到一个值,还不能在定义共用体变量时对它初始化; 不能把共用体变量作为函数参数,也不能使函数带回共用体变量,但可以使用指向共用体变量的指针;
(3)共用体类型可以出现在结构体类型定义中,也可以定义共用体数组; 反之,结构体也可以出现在共用体类型定义中,数组也可以作为共用体的成员。
练习:
设有若干个人员的数据,其中有学生和教师。学生的数据中包括:姓名、号码、性别、职业、班级。教师的数据包括:姓名、号码、性别、职业、职务。可以看出,学生和教师所包含的数据是不同的。现要求把它们放在同一表格中,如下图:
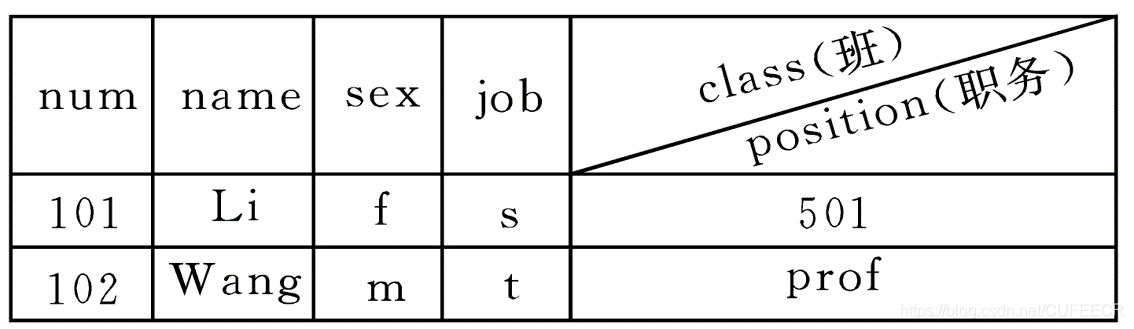 实现思路如下:
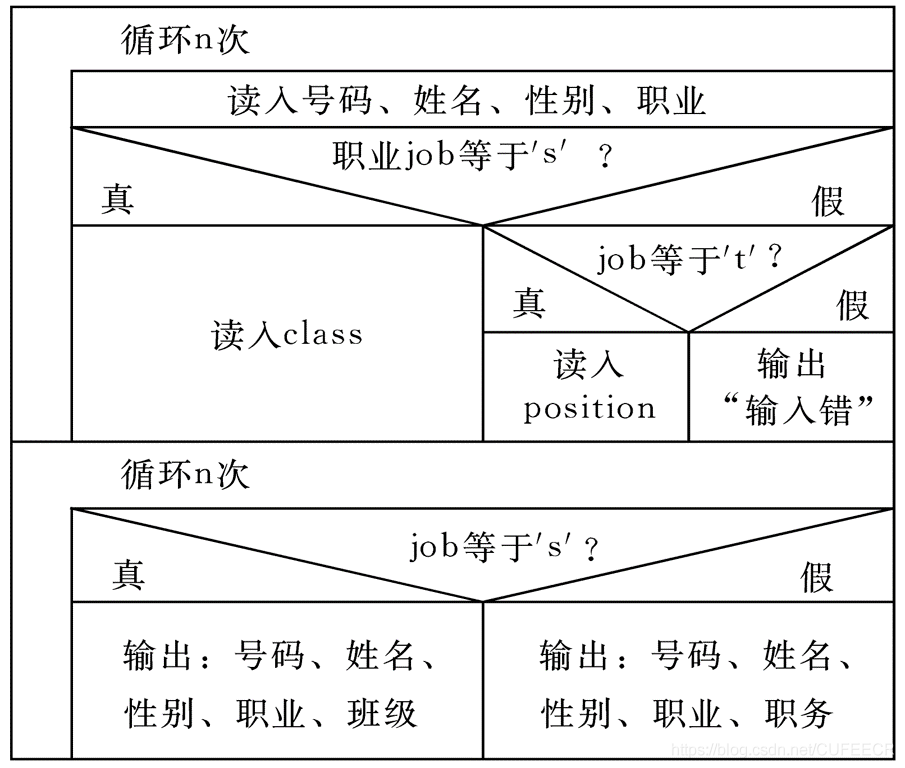 代码如下:
代码如下:
1#include <stdio.h>
2
3struct{
4	int num;
5	char name[10];
6	char sex;
7	char job;
8	union{
9		int gradeclass;
10		char position[10];
11	}category;
12}person[2];
13
14int n, num;
15
16int main(){
17	int i;
18	for(i = 0; i < 2; i++){
19		printf("Please input the num: ");
20        scanf("%d", &person[i].num);
21        printf("Please input the name: ");
22        scanf("%s", person[i].name);
23        fflush(stdin);
24        printf("Please input the sex(M/F): ");
25        scanf("%c", &person[i].sex);
26        fflush(stdin);
27        printf("Please input the job(s/t): ");
28        scanf("%c", &person[i].job);
29        fflush(stdin);
30
31        if(person[i].job == 's')
32        {
33            printf("Please input the class: ");
34            scanf("%d", &person[i].category.gradeclass);
35            fflush(stdin);
36        }
37        else if(person[i].job == 't')
38        {
39            printf("Please input the position: ");
40            scanf("%s", &person[i].category.position);
41            fflush(stdin);
42        }
43        else
44        {
45            printf("Input Error!!\n");
46        }
47
48        printf("\n");
49	}
50
51	printf("No.    name    sex job class/position\n");
52    for(i = 0; i < 2; i++){
53        if( person[i].job == 's'){
54            printf("%-6d%-10s%-3c%-3c%10d\n", person[i].num, person[i].name, person[i].sex, person[i].job, person[i].category.gradeclass);
55        }
56        else{
57            printf("%-6d%-10s%-3c%-3c%10s\n", person[i].num, person[i].name, person[i].sex, person[i].job, person[i].category.position);
58        }
59    }
60
61	return 0;
62}
打印:
1Please input the num: 10101
2Please input the name: Corley
3Please input the sex(M/F): M
4Please input the job(s/t): s
5Please input the class: 501
6
7Please input the num: 101
8Please input the name: Shirley
9Please input the sex(M/F): F
10Please input the job(s/t): t
11Please input the position: Prof
12
13No.    name    sex job class/position
1410101 Corley    M  s         501
15101   Shirley   F  t        Prof
16
五、枚举类型
在实际问题中,有些变量的取值被限定在一个有限的范围内,例如一个星期内只有七天,一年只有十二个月,一个班每周有六门课程等等。 如果把这些量说明为整型,字符型或其它类型显然是不妥当的。 为此,C语言提供了枚举类型。
枚举类型的声明: 设有变量a、b、c被说明为枚举类型weekday,可采用以下方式: 方式一:
1enum weekday{Sun, Mon, Tue, Wed, Thu, Fri, Sat};
2enum weekday a, b, c;
方式二:
1enum weekday{Sun, Mon, Tue, Wed, Thu, Fri, Sat}a, b, c;
方式三:
1enum {Sun, Mon, Tue, Wed, Thu, Fri, Sat}a, b, c;
需要注意: (1)在枚举类型的定义中列举出所有可能的取值,被说明为该枚举类型的变量取值不能超过定义的范围。
(2)枚举类型是一种基本数据类型,而不是一种构造类型,因为它不能再分解为任何基本类型。
(3)在枚举值表中应罗列出所有可用值,这些值也称为枚举元素。
(4)在C编译中,对枚举元素按常量处理,故称枚举常量,它们不是变量,不能对它们赋值; 枚举元素作为常量,它们是有值的,C语言编译按定义时的顺序使它们的值为0, 1, 2, ……
(5)枚举值可以用来作判断比较。
(6)一个整数不能直接赋给一个枚举变量。
练习1:
1#include <stdio.h>
2
3int main(){
4	enum weekday{Sun, Mon, Tue, Wed, Thu, Fri, Sat}a, b, c;
5	a = Sun;
6	b = 3;
7	c = Sat;
8	printf("a = %d, b = %d, c = %d\n", a, b, c);
9
10	return 0;
11}
打印:
1a = 0, b = 3, c = 6
2
练习2:
1#include <stdio.h>
2
3int main(){
4	enum boys{Corley, Jack, Tom, Sony}month[31], j;
5	j = Corley;
6	int i;
7	for(i = 1; i < 31; i++){
8		month[i] = j;
9		j++;
10		if(j > Sony){
11			j = Corley;
12		}
13	}
14	for(i = 1; i < 31; i++){
15		switch(month[i]){
16			case Corley:{
17				printf("%4d %s\t", i, "Corley");
18				break;
19			}
20			case Jack:{
21				printf("%4d %s\t", i, "Jack");
22				break;
23			}
24			case Tom:{
25				printf("%4d %s\t", i, "Tom");
26				break;
27			}
28			case Sony:{
29				printf("%4d %s\t", i, "Sony");
30				break;
31			}
32			default:
33				break;
34		}
35	}
36	printf("\n");
37
38	return 0;
39}
打印:
1   1 Corley        2 Jack          3 Tom           4 Sony          5 Corley        6 Jack          7 Tom           8 Sony          9 Corley       10 Jack         11 Tom          12 Sony         13 Corley       14 Jack         15 Tom
2          16 Sony         17 Corley       18 Jack         19 Tom          20 Sony         21 Corley       22 Jack
3          23 Tom          24 Sony         25 Corley       26 Jack         27 Tom          28 Sony         29 Corley
4          30 Jack
5
六、用typedef定义类型
用typedef声明新的类型名来代替已有的类型名。
具体使用方法如下:
(1)先按定义变量的方法写出定义体,如int i;
(2)将变量名换成新类型名,将i换成COUNT,在最前面加typedef,如typedef int COUNT;
(3)用新类型名去定义变量,如COUNT i, j;。
常见使用如下: (1)声明INTEGER为整型:
1typedef int INTEGER;
练习如下:
1#include <stdio.h>
2
3typedef int INTEGER;
4
5int main(){
6	INTEGER i = 1;
7	int j = 2;
8	printf("i = %d, j = %d", i, j);
9
10	return 0;
11}
打印:
1i = 1, j = 2
(2)声明结构体类型:
1typedef  struct{
2int month;
3int day;
4int year;}DATE;
typedef定义结构体类型练习如下:
1#include <stdio.h>
2
3typedef struct{
4	int month;
5	int day;
6	int year;
7}DATE;
8
9int main(){
10	DATE date;
11	date.day = 17;
12	date.month = 5;
13	date.year = 2020;
14	printf("%d - %d - %d", date.year, date.month, date.day);
15
16	return 0;
17}
打印:
12020 - 5 - 17
(3)声明NUM为整型数组类型
1typedef int NUM[100];
typedef定义数组测试:
1#include <stdio.h>
2
3typedef int NUM[100];
4
5int main(){
6	NUM num;
7	printf("%d\n", sizeof(num));
8
9	return 0;
10}
打印:
1400
2
(4)声明字符指针类型
1typedef char* STRING;
typedef定义字符指针测试:
1#include <stdio.h>
2
3typedef char* P;
4
5int main(){
6	P p;
7	p = "I love C!!";
8	printf("%s\n", p);
9
10	return 0;
11}
打印:
1I love C!!
2
(5)声明指向函数的指针类型,该函数返回整型值:
1typedef int (*POINTER)();
typedef定义指向函数的指针练习:
1#include <stdio.h>
2
3typedef void (*POINTER)();
4
5int main(){
6	void fun();
7	POINTER pf;
8	pf = fun;
9	pf();
10
11	return 0;
12}
13
14void fun(){
15	printf("I love C!!\n");
16}
打印:
1I love C!!
2
也可以为:
1#include <stdio.h>
2
3typedef void (*POINTER)();
4
5int main(){
6	void fun();
7	POINTER pf;
8	pf = &fun;
9	pf();
10
11	return 0;
12}
13
14void fun(){
15	printf("I love C!!\n");
16}
17运行效果是相同的。
区别在于pf = fun;和pf = &fun;,因为函数和函数的地址相同,所以是等效的。
关于typedef的一些说明; (1)用typedef可以声明各种类型名,但不能用来定义变量。
(2)用typedef只是对已经存在的类型增加一个类型名,而没有创造新的类型。
(3)当不同源文件中用到同一类型数据时,常用typedef声明一些数据类型,把它们单独放在一个文件中,然后在需要用到它们的文件中用#include命令把它们包含进来。
(4)使用typedef 有利于程序的通用与移植。
(5)typedef与#define有相似之处,例如typedef int COUNT;和#define COUNT int的作用都是用COUNT代表 int,但是,它们是不同的:
#define是在预编译时处理的,它只能作简单的字符串替换;
而typedef是在编译时处理的,它不是作简单的字符串替换,而是采用如同定义变量的方法那样来声明一个类型。
例如,已知有
1typedef  (int*)  p1;
2#define  p2  int*
p1 a1, a2等同于int *a1, *a2,是将a1、a2均声明为指针变量;
而p2 a1, a2等同于int* a1, a2即int *a1, a2,将a1声明为指针变量,而将a2声明为整型变量。
本文原文首发来自博客专栏C语言学习,由本人转发至https://www.helloworld.net/p/am6Hp0SzQFgP,其他平台均属侵权,可点击https://blog.csdn.net/CUFEECR/article/details/106180860查看原文,也可点击https://blog.csdn.net/CUFEECR浏览更多优质原创内容。