
uniCloud+uni-admin+electron实现 electron应用更新
搭建视频地址 https://www.bilibili.com/video/BV1u3411p7Qd?spm_id_from=333.999.0.0
从 https://gitee.com/dmhsq/react-ts-vite-electron 的仓库代码开始搭建
两种更新方式 1.资源替换 (还可以更换成其它框架开发打包的asar资源) 如下看效果 2.安装包
逻辑如下
应用启动时 调用 检查更新方法
检查更新方法 查询云数据库 获取版本信息
如果版本不一致 会提示是否更新
根据更新类型(exe安装包/asar资源包) 下载资源并存到本地
立即重启:替换 本地asar资源包 重启应用
稍后重启:关闭应用时 替换资源包 再次打开为新的
安装包模式 为下载安装包并弹出资源管理器标记安装包
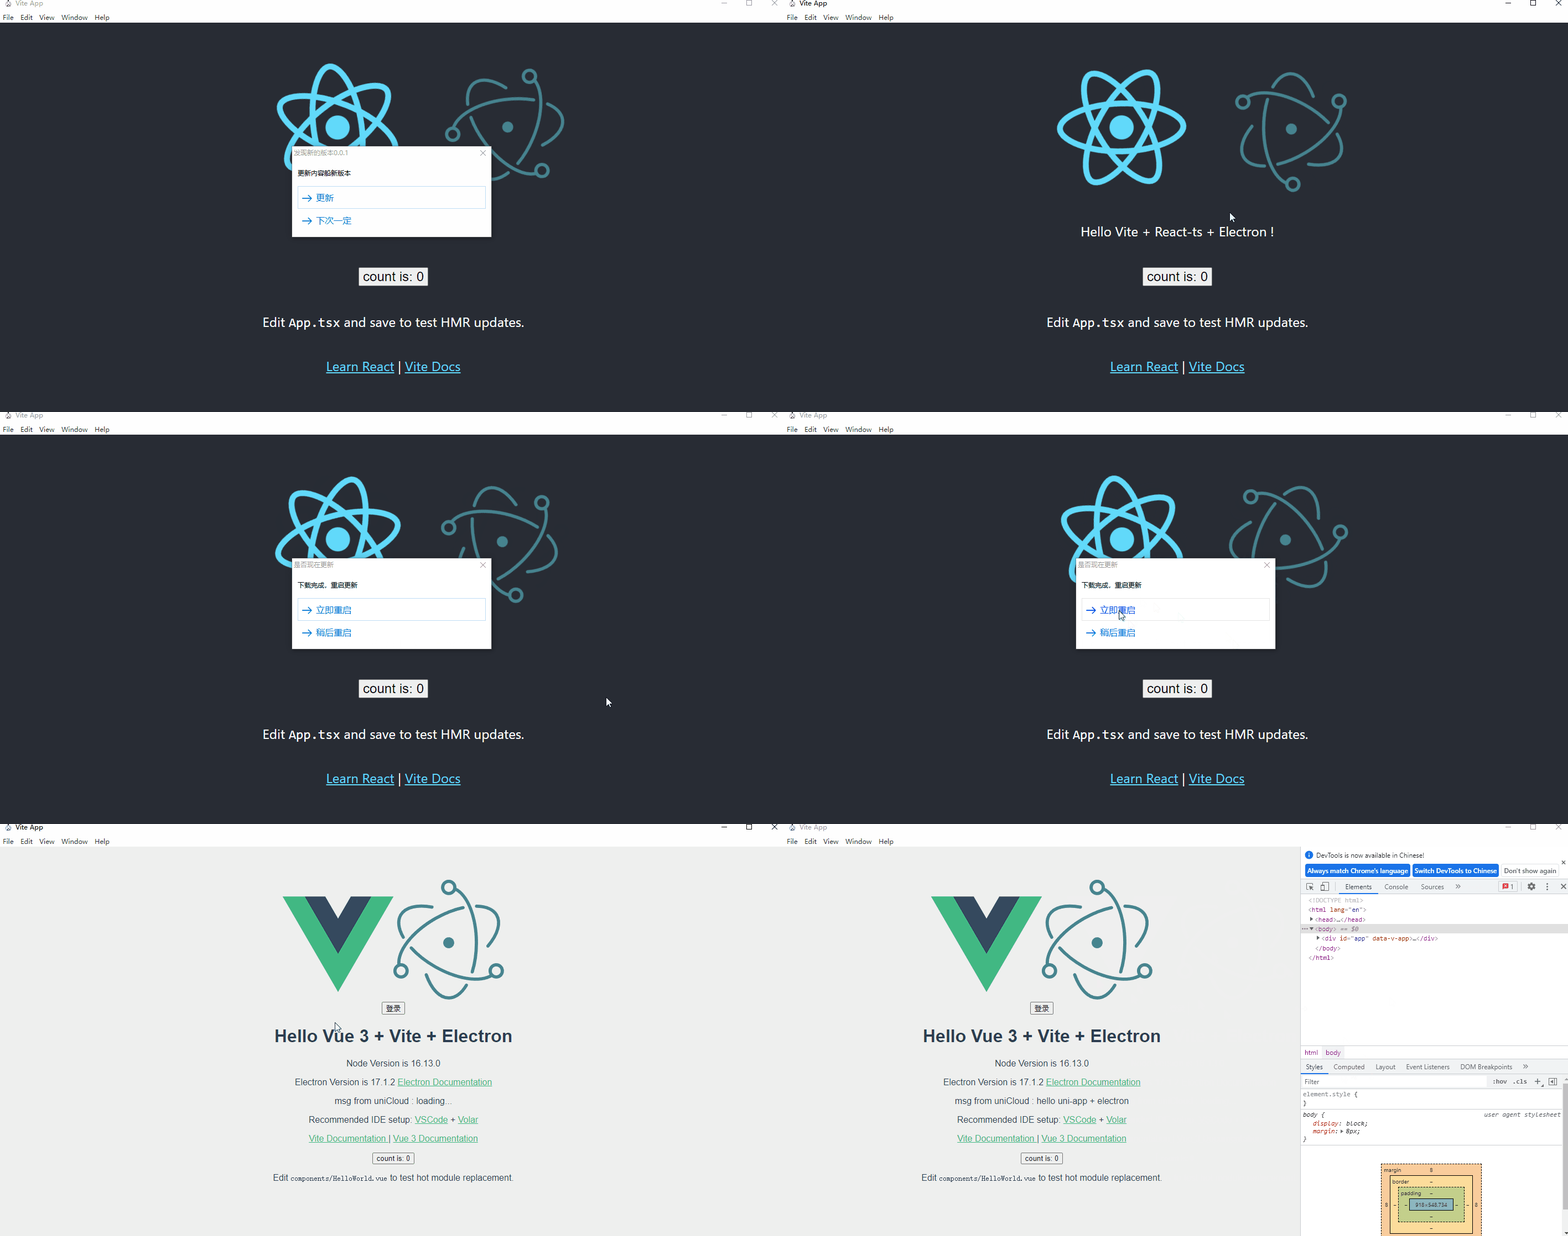
- 资源替换效果如下
原本react-ts开发的我们替换成了 vue开发的
其实只是替换了asar资源包
可以用 纯electron+html 开发 不使用框架 重点是asar包
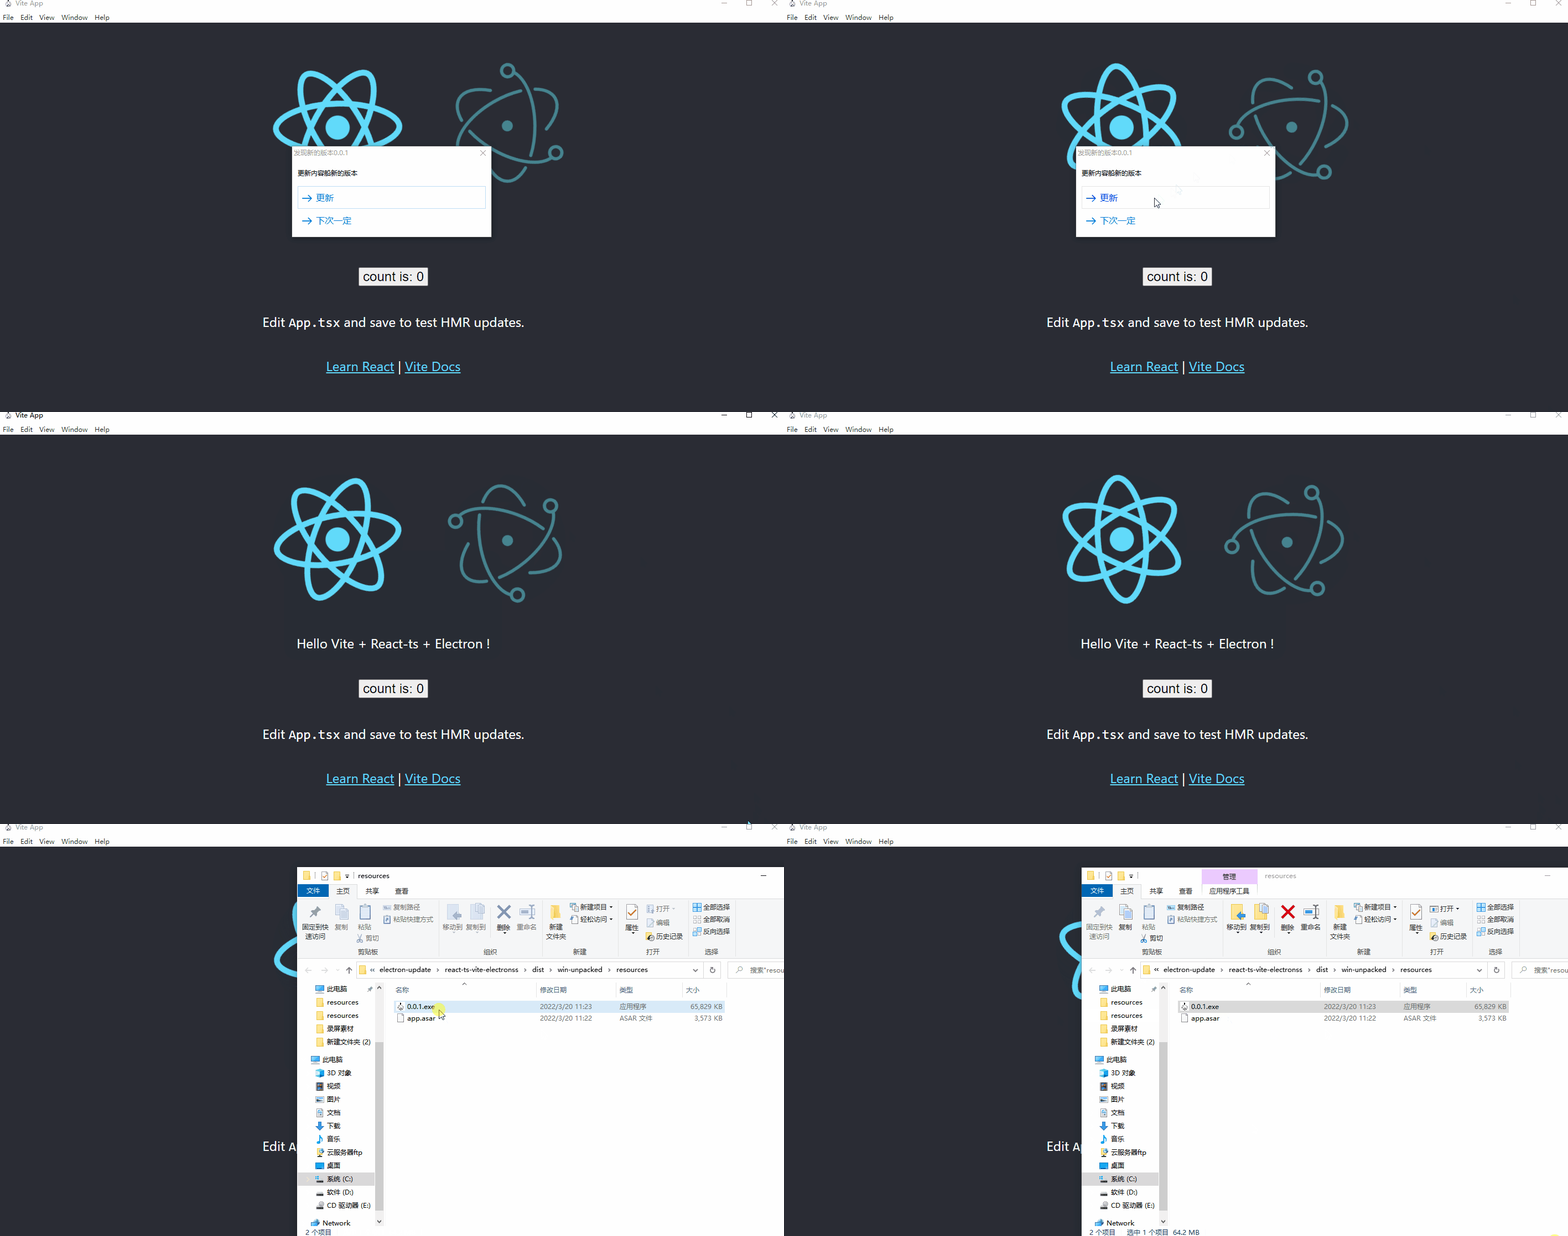
 2.安装包的效果如下
下载完成会弹出资源管理器 为安装包所在目录
搭建uni-admin环境和开发云函数
搭建uni-admin环境
hbuilder x 新建uni-admin模板项目
新建一个官方模板数据表 可以去uniCloud web控制台创建
opendb-app-versions
修改某些参数 修改完如下
1{
2	"bsonType": "object",
3	"required": ["appid", "platform", "version", "url", "contents", "type"],
4	"permission": {
5		"read": false,
6		"create": false,
7		"update": false,
8		"delete": false
9	},
10	"properties": {
11		"_id": {
12			"description": "记录id,自动生成"
13		},
14		"appid": {
15			"bsonType": "string",
16			"trim": "both",
17			"description": "应用的AppID",
18			"label": "AppID",
19			"componentForEdit": {
20				"name": "uni-easyinput",
21				"props": {
22					":disabled": false
23				}
24			}
25		},
26		"name": {
27			"bsonType": "string",
28			"trim": "both",
29			"description": "应用名称",
30			"label": "应用名称",
31			"componentForEdit": {
32				"name": "uni-easyinput",
33				"props": {
34					":disabled": false
35				}
36			}
37		},
38		"title": {
39			"bsonType": "string",
40			"description": "更新标题",
41			"label": "更新标题"
42		},
43		"contents": {
44			"bsonType": "string",
45			"description": "更新内容",
46			"label": "更新内容",
47			"componentForEdit": {
48				"name": "textarea"
49			},
50			"componentForShow": {
51				"name": "textarea",
52				"props": {
53					":disabled": false
54				}
55			}
56		},
57		"platform": {
58			"bsonType": "array",
59			"enum": [{
60				"value": "Android",
61				"text": "安卓"
62			}, {
63				"value": "iOS",
64				"text": "苹果"
65			}, {
66				"value": "window",
67				"text": "pc桌面端"
68			}],
69			"description": "更新平台,Android || iOS || window || [Android, iOS,window]",
70			"label": "平台"
71		},
72		"type": {
73			"bsonType": "string",
74			"enum": [{
75				"value": "exe",
76				"text": "exe安装包"
77			}, {
78				"value": "asar",
79				"text": "asar资源包"
80			}],
81			"description": "安装包类型,exe || asar",
82			"label": "安装包类型"
83		},
84		"version": {
85			"bsonType": "string",
86			"description": "当前包版本号,必须大于当前线上发行版本号",
87			"label": "版本号"
88		},
89		"min_uni_version": {
90			"bsonType": "string",
91			"description": "原生App最低版本",
92			"label": "原生App最低版本"
93		},
94		"url": {
95			"bsonType": "string",
96			"description": "可下载安装包地址",
97			"label": "包地址"
98		},
99		"stable_publish": {
100			"bsonType": "bool",
101			"description": "是否上线发行",
102			"label": "上线发行"
103		},
104		"is_silently": {
105			"bsonType": "bool",
106			"description": "是否静默更新",
107			"label": "静默更新",
108			"defaultValue": false
109		},
110		"is_mandatory": {
111			"bsonType": "bool",
112			"description": "是否强制更新",
113			"label": "强制更新",
114			"defaultValue": false
115		},
116		"create_date": {
117			"bsonType": "timestamp",
118			"label": "上传时间",
119			"forceDefaultValue": {
120				"$env": "now"
121			},
122			"componentForEdit": {
123				"name": "uni-dateformat"
124			}
125		}
126	}
127}
128
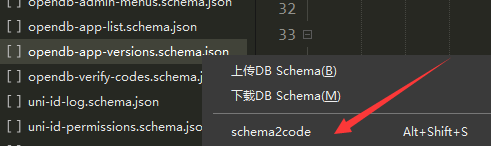
右键该表 如果本地database目录没有 需要去控制台创建 如果创建了 需要下载的本地
选择 uni-admin模式的项目模式
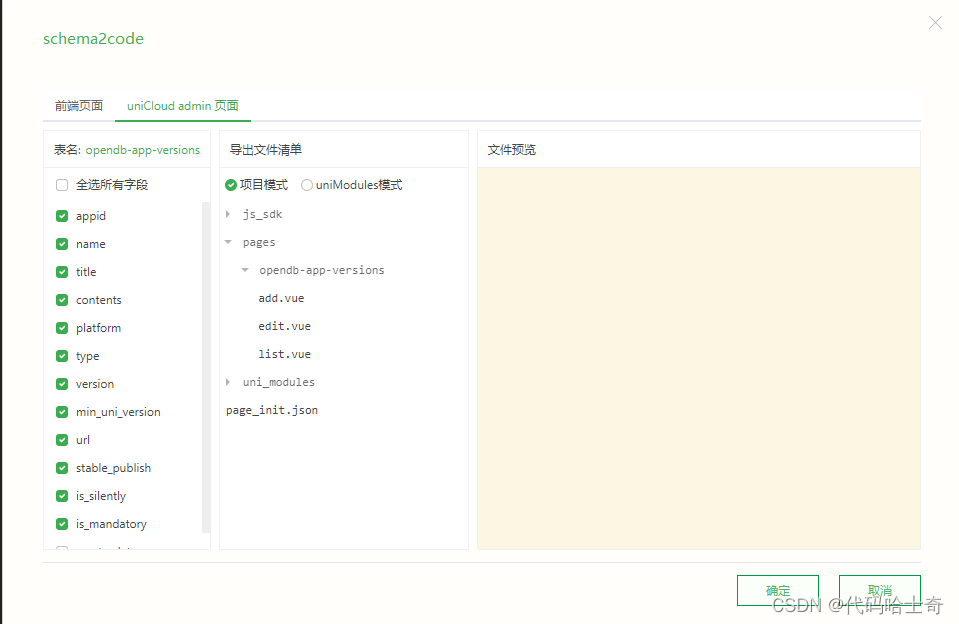 一路确定即可
然后 在pages.json可以找到 页面路径 一般为
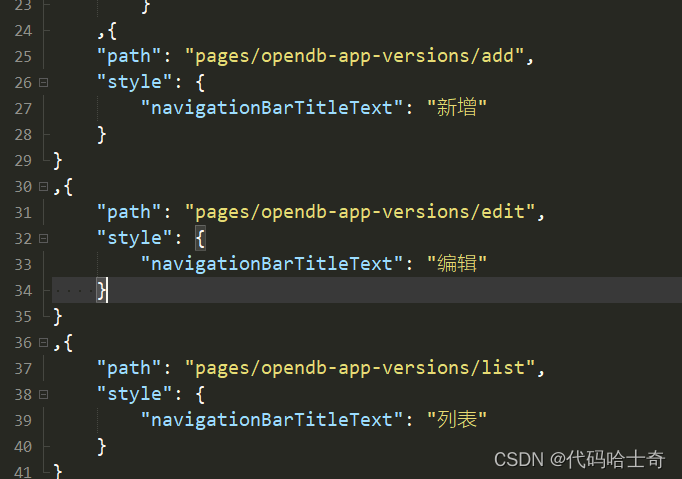
复制 pages/opendb-app-versions/list
启动uni-admin后 进入后配置菜单 注意路径前加/ 如下
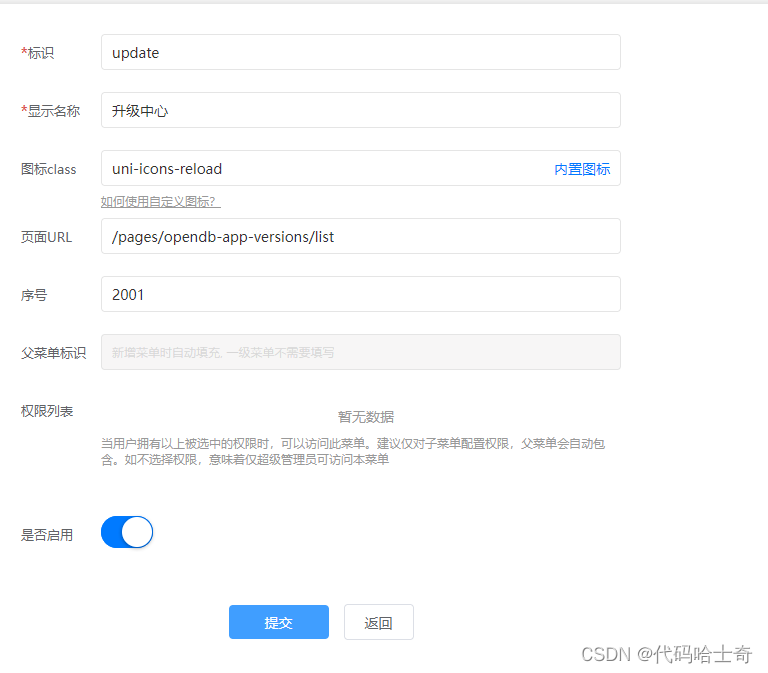 配置完成 刷新页面
进入配置中心
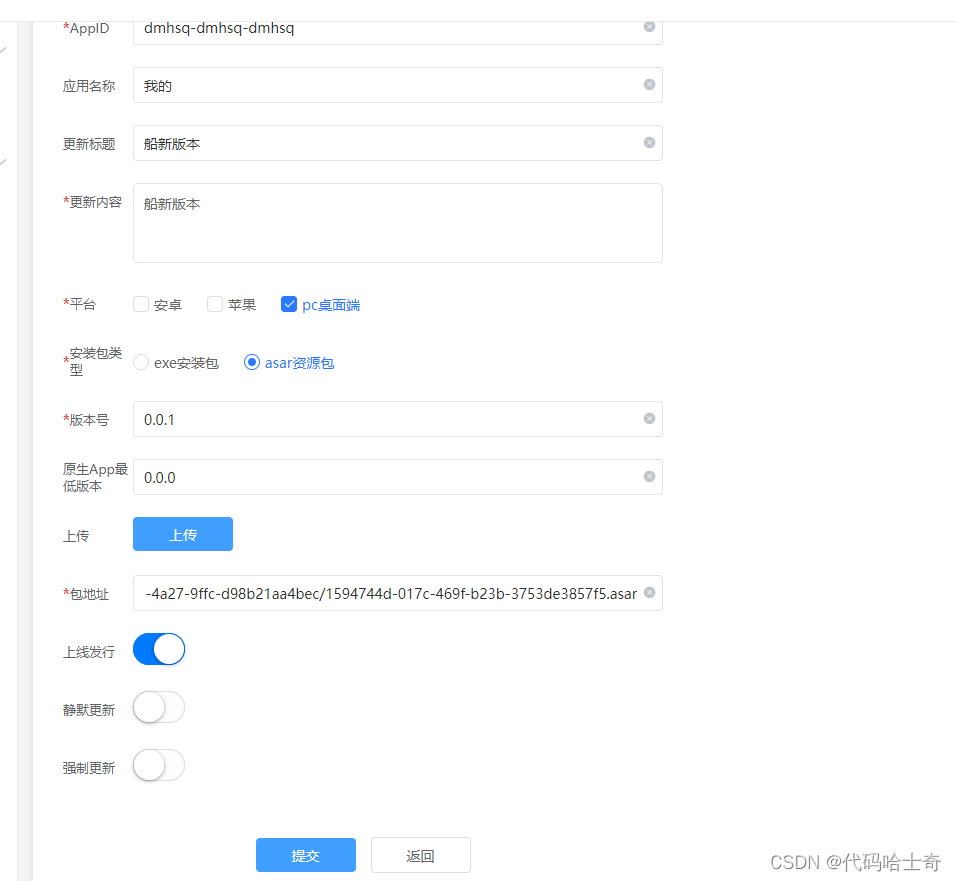
新增 注意 appid是和 你的 electron项目的 package.json的build下的appId 一致
然后 version参考 package.json 下的 version
ps : 这里使用的是asar资源包替换模式
这里的 包地址 需要自己上传
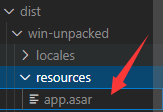
新的应用 执行 npm run dist可获得打包的asar资源 如下位置
编写云函数
云函数任务很简单 获取请求的参数 查询数据库
注意这里 取得event得queryxxxxx 要根据自己得请求来判断
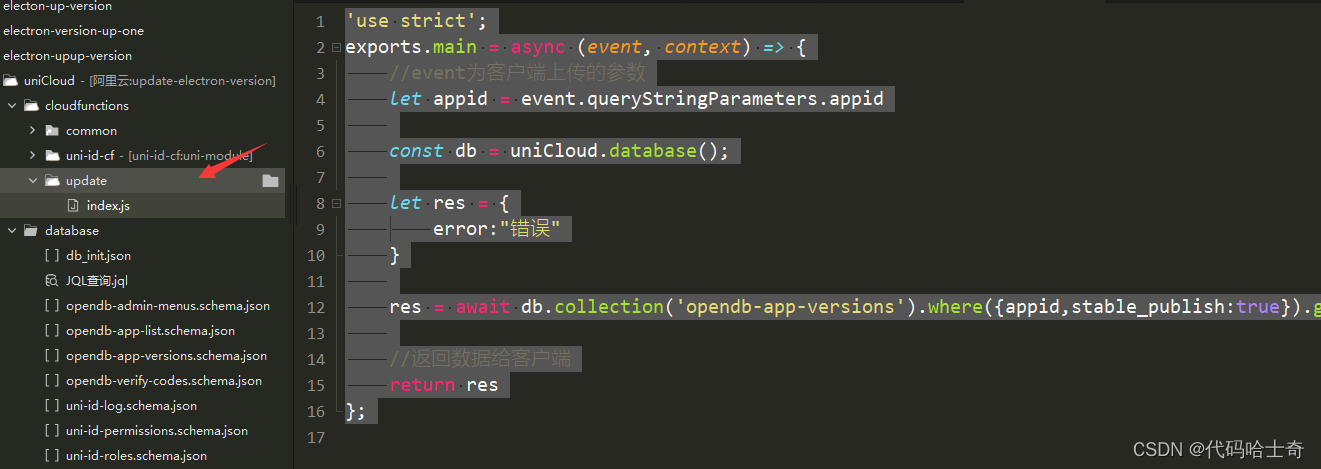
1
2'use strict';
3exports.main = async (event, context) => {
4	//event为客户端上传的参数
5	let appid = event.queryStringParameters.appid
6
7	const db = uniCloud.database();
8
9	let res = {
10		error:"错误"
11	}
12
13	res = await db.collection('opendb-app-versions').where({appid,stable_publish:true}).get()
14
15	//返回数据给客户端
16	return res
17};
上传部署
配置云函数url化

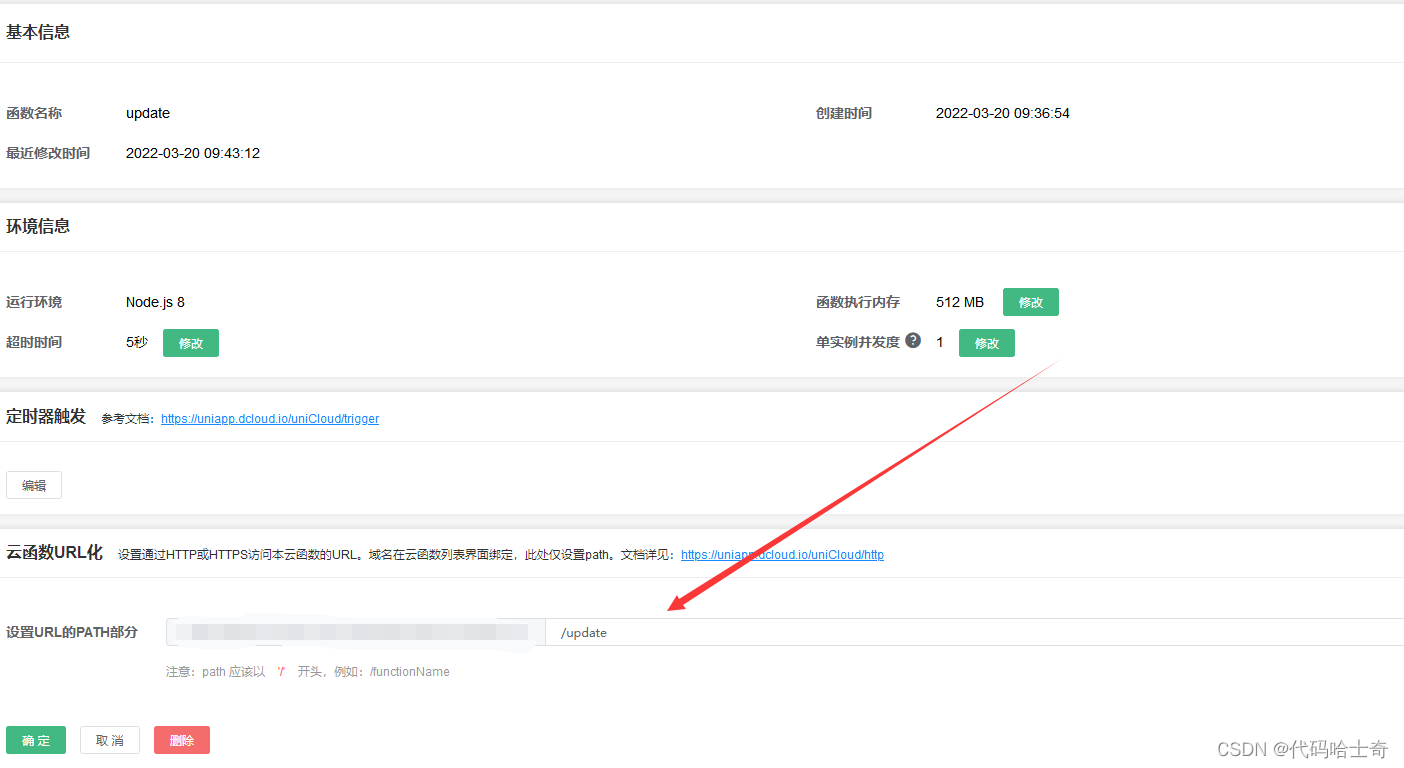 到此 hbuilder x 编写代码部分已经完成
electron项目
无论你用的什么框架开发的electron的web业务 都可以使用
只和 package.json和electron node 相关
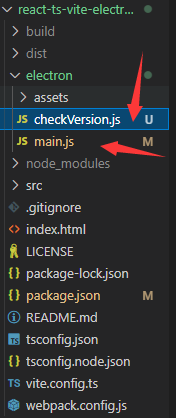
以我的项目为示例 checkVersion.js和 main.js的代码 复制更新
checkVersion.js
checkVersion.js 提供版本查询和下载更新资源
这里我默认 是一个在线版本 如果为 多个 可以加个选择 或者 选择最新的
1const axios = require('axios');
2
3async function checkVersion(appid) {
4  // 请求云函数 获取版本信息
5  let res = await axios.get(
6    'https://a0b5eb1a-8a51-4a27-9ffc-d98b21aa4bec.bspapp.com/update',
7    {
8      params: { appid },
9    }
10  );
11  // 返回查询的信息
12  return res.data.data[0];
13}
14
15async function getFile(url) {
16  // axios获取文件资源
17  let res = await axios.get(url, { responseType: 'arraybuffer' });
18  return res.data;
19}
20
21module.exports = { checkVersion, getFile };
22
main.js
更新的代码
1 let savePath = isDev
2    ? path.join(__dirname, './')
3    : path.join(__dirname, '../../');
4
5  // 拿到 appid
6  let appid = build.appId;
7  // 通过云函数获取最新版本
8  let newData = await checkVersion(appid);
9  let isOkUpdate = true;
10  let updateFileData = '';
11  console.log(newData);
12  // 对比版本
13  if (newData.version !== version) {
14    let want = await dialog.showMessageBox(mainWindow, {
15      title: '发现新的版本' + newData.version,
16      message: '更新内容' + newData.contents,
17      buttons: ['更新', '下次一定'],
18    });
19    if (want.response === 0) {
20      if (newData.type === 'asar') {
21        // 获取文件
22        let fileData = await getFile(newData.url);
23        // 询问啥时候更新
24        let nowUpdate = await dialog.showMessageBox(mainWindow, {
25          title: '是否现在更新',
26          message: '下载完成,重启更新',
27          buttons: ['立即重启', '稍后重启'],
28        });
29        if (nowUpdate.response === 0) {
30          dialog.showMessageBox(mainWindow, {
31            title: '资源保存中',
32            message: '资源保存中',
33          });
34          fs.writeFile(savePath + 'app.asar', fileData).then(() => {
35            mainWindow.close();
36            app.relaunch();
37          });
38        } else {
39          isOkUpdate = false;
40          updateFileData = fileData;
41        }
42      } else {
43        // 获取文件
44        let fileData = await getFile(newData.url);
45        // 路径
46        let exePath = savePath + newData.version + '.exe';
47        // 写入
48        await fs.writeFile(exePath, fileData);
49        // 弹出资源管理器 显示 exe安装包
50        shell.showItemInFolder(exePath);
51      }
52    }
53  }
54
55  mainWindow.on('closed', async () => {
56    mainWindow = null;
57  });
58  app.on('window-all-closed', async () => {
59    mainWindow = null;
60    // 关闭时更新 对应稍后更新
61    if (!isOkUpdate) {
62      await fs.writeFile(savePath + 'app.asar', updateFileData);
63    }
64    app.quit();
65  });
main.js完整代码
1const { app, BrowserWindow, dialog, shell } = require('electron');
2const path = require('path');
3const isDev = require('electron-is-dev');
4const { checkVersion, getFile } = require('./checkVersion');
5const { version, build } = require('../package.json');
6const fs = require('fs').promises;
7
8class AppWindow extends BrowserWindow {
9  constructor(config, urlLocation) {
10    const basicConfig = {
11      width: 800,
12      height: 600,
13      webPreferences: {
14        contextIsolation: false,
15        nodeIntegration: true,
16        enableRemoteModule: true,
17        nodeIntegrationInWorker: true,
18      },
19      show: false,
20      backgroundColor: '#efefef',
21    };
22    const finalConfig = { ...basicConfig, ...config };
23    super(finalConfig);
24    this.loadURL(urlLocation);
25    this.once('ready-to-show', () => {
26      this.show();
27    });
28  }
29}
30
31app.on('ready', async () => {
32  const mainWindowConfig = {
33    width: 1440,
34    height: 768,
35  };
36  const urlLocation = isDev
37    ? 'http://localhost:3000'
38    : `file://${path.join(__dirname, './index.html')}`;
39  let mainWindow = new AppWindow(mainWindowConfig, urlLocation);
40
41  let savePath = isDev
42    ? path.join(__dirname, './')
43    : path.join(__dirname, '../../');
44
45  // 拿到 appid
46  let appid = build.appId;
47  // 通过云函数获取最新版本
48  let newData = await checkVersion(appid);
49  let isOkUpdate = true;
50  let updateFileData = '';
51  console.log(newData);
52  // 对比版本
53  if (newData.version !== version) {
54    let want = await dialog.showMessageBox(mainWindow, {
55      title: '发现新的版本' + newData.version,
56      message: '更新内容' + newData.contents,
57      buttons: ['更新', '下次一定'],
58    });
59    if (want.response === 0) {
60      if (newData.type === 'asar') {
61        // 获取文件
62        let fileData = await getFile(newData.url);
63        // 询问啥时候更新
64        let nowUpdate = await dialog.showMessageBox(mainWindow, {
65          title: '是否现在更新',
66          message: '下载完成,重启更新',
67          buttons: ['立即重启', '稍后重启'],
68        });
69        if (nowUpdate.response === 0) {
70          dialog.showMessageBox(mainWindow, {
71            title: '资源保存中',
72            message: '资源保存中',
73          });
74          fs.writeFile(savePath + 'app.asar', fileData).then(() => {
75            mainWindow.close();
76            app.relaunch();
77          });
78        } else {
79          isOkUpdate = false;
80          updateFileData = fileData;
81        }
82      } else {
83        // 获取文件
84        let fileData = await getFile(newData.url);
85        // 路径
86        let exePath = savePath + newData.version + '.exe';
87        // 写入
88        await fs.writeFile(exePath, fileData);
89        // 弹出资源管理器 显示 exe安装包
90        shell.showItemInFolder(exePath);
91      }
92    }
93  }
94
95  mainWindow.on('closed', async () => {
96    mainWindow = null;
97  });
98  app.on('window-all-closed', async () => {
99    mainWindow = null;
100    // 关闭时更新 对应稍后更新
101    if (!isOkUpdate) {
102      await fs.writeFile(savePath + 'app.asar', updateFileData);
103    }
104    app.quit();
105  });
106});
107
108
执行 npm run build 打包应用并且生成安装包
拓展
...吃饭去喽