
到目前为止我们只学习了一种方法来更新UI。调用 ReactDOM.render( ) 方法来改变输出。
在前面博客中有一个时钟的例子代码:
1function tick() {
2  const element = (
3    <div>
4      <h1>Hello, world!</h1>
5      <h2>It is {new Date().toLocaleTimeString()}.</h2>
6    </div>
7  );
8  ReactDOM.render(
9    element,
10    document.getElementById('root')
11  );
12}
13
14setInterval(tick, 1000);
将时钟封装为Clock组件
1function Clock(props) {
2  return (
3    <div>
4      <h1>Hello, world!</h1>
5      <h2>It is {props.date.toLocaleTimeString()}.</h2>
6    </div>
7  );
8}
9
10function tick() {
11  ReactDOM.render(
12    <Clock date={new Date()} />,
13    document.getElementById('root')
14  );
15}
16
17setInterval(tick, 1000);
1. 将函数转换为类
可以通过5个步骤将函数组件 转换为 类组件
- 创建一个名称扩展为
React.Component的ES6 类 - 创建一个叫做
render()的空方法 - 将函数体移动到
render()方法中 - 在
render()方法中,使用this.props替换props - 删除剩余的空函数声明
使用类就允许我们使用其它特性,例如_局部状态_、生命周期钩子。
时钟组件被更改为
1class Clock extends React.Component {
2  render() {
3    return (
4      <div>
5        <h1>Hello, world!</h1>
6        <h2>It is {this.props.date.toLocaleTimeString()}.</h2>
7      </div>
8    );
9  }
10}
2. 为一个类添加局部状态
我们通过3个步骤将 date 从属性移动到状态中。
-
在 render( ) 方法中使用 this.state.date 替换 this.props.date;
-
添加一个类构造函数来初始化状态 this.state ;
class Clock extends React.Component { constructor(props) { super(props); this.state = {date: new Date()}; }
render() { return ( <div> <h1>Hello, world!</h1> <h2>It is {this.state.date.toLocaleTimeString()}.</h2> </div> ); } }
-
从 <Clock /> 元素中移除 date 属性
class Clock extends React.Component { constructor(props) { super(props); this.state = {date: new Date()}; }
render() { return ( <div> <h1>Hello, world!</h1> <h2>It is {this.state.date.toLocaleTimeString()}.</h2> </div> ); } }
ReactDOM.render( <Clock />, document.getElementById('root') );
接下来,我们将使 Clock 设置自己的计时器并每秒更新一次。
3. 将生命周期方法添加到类中
在具有许多组件的应用程序中,在销毁时释放组件所占用的资源非常重要。
挂载:每当 Clock 组件第一次加载到 DOM 中的时候,我们都会想生产定时器,这在React中被称为挂载(componentDidMount( ){....})
卸载:每当 Clock 生产的这个 DOM 被移除的时候,我们也会想要清除定时器,这在 React 中被称为卸载( componentWillUnmount( ){....} )。
这些方法被称作生命周期钩子函数。
在 componentDidMount( ) 钩子函数中建立定时器,在 componentWillUnmount( ) 钩子函数中卸载计时器。使用 this.setState( ) 来更新组件局部状态:
1class Clock extends React.Component {
2  constructor(props) {
3    super(props);
4    this.state = {date: new Date()};
5  }
6
7  componentDidMount() {
8    this.timerID = setInterval(
9      () => this.tick(),
10      1000
11    );
12  }
13
14  componentWillUnmount() {
15    clearInterval(this.timerID);
16  }
17
18  tick() {
19    this.setState({
20      date: new Date()
21    });
22  }
23
24  render() {
25    return (
26      <div>
27        <h1>Hello, world!</h1>
28        <h2>It is {this.state.date.toLocaleTimeString()}.</h2>
29      </div>
30    );
31  }
32}
33
34ReactDOM.render(
35  <Clock />,
36  document.getElementById('root')
37);
成功:
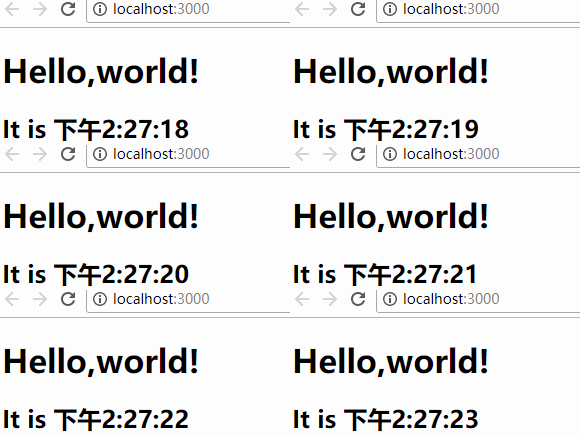
让我们快速回顾一下发生了什么以及调用方法的顺序:
当
<Clock />被传递给ReactDOM.render()时,React 调用Clock组件的构造函数。 由于Clock需要显示当前时间,所以使用包含当前时间的对象来初始化this.state。 我们稍后会更新此状态。React 然后调用
Clock组件的render()方法。这是 React 了解屏幕上应该显示什么内容,然后 React 更新 DOM 以匹配Clock的渲染输出。当
Clock的输出插入到 DOM 中时,React 调用componentDidMount()生命周期钩子。 在其中,Clock组件要求浏览器设置一个定时器,每秒钟调用一次tick()。浏览器每秒钟调用
tick()方法。 在其中,Clock组件通过使用包含当前时间的对象调用setState()来调度UI更新。 通过调用setState(),React 知道状态已经改变,并再次调用render()方法来确定屏幕上应当显示什么。 这一次,render()方法中的this.state.date将不同,所以渲染输出将包含更新的时间,并相应地更新DOM。一旦
Clock组件被从DOM中移除,React会调用componentWillUnmount()这个钩子函数,定时器也就会被清除。
4. 正确地使用状态
关于 setState( ) 这里有三件事情需要知道
4.1 不要直接更新状态
1//此代码不会重新渲染组件:
2this.state.comment = 'Hello';
3
4//应当使用 setState():
5this.setState({comment: 'Hello'});
构造函数是唯一能够初始化 this.state 的地方。
4.2 状态更新可能是异步的
React 可以将多个setState() 调用合并成一个调用来提高性能。
因为 this.props 和 this.state 可能是异步更新的,你不应该依靠它们的值来计算下一个状态。
1//此代码可能无法更新计数器:
2this.setState({
3  counter: this.state.counter + this.props.increment,
4});
5
6//正确方法是,请使用第二种形式的 setState() 来接受一个函数而不是一个对象。 该函数将接收
7//先前的状态作为第一个参数,将此次更新被应用时的props做为第二个参数:
8this.setState((prevState, props) => ({
9  counter: prevState.counter + props.increment
10}));
4.3 状态更新合并
当你调用 setState() 时,React 将你提供的对象合并到当前状态。
状态可能包含一些独立的变量:
1constructor(props) {
2    super(props);
3    this.state = {
4      posts: [],
5      comments: []
6    };
7  }
可以调用 setState()独立更新他们:
1 componentDidMount() {
2    fetchPosts().then(response => {
3      this.setState({
4        posts: response.posts
5      });
6    });
7
8    fetchComments().then(response => {
9      this.setState({
10        comments: response.comments
11      });
12    });
13  }
这里的合并是浅合并,也就是说this.setState({comments})完整保留了this.state.posts,但完全替换了this.state.comments。
5. 数据自顶向下流动
父组件或子组件都不能知道某个组件是有状态还是无状态,并且它们不应该关心某组件是被定义为一个函数还是一个类。
这就是为什么状态通常被称为局部或封装。 除了拥有并设置它的组件外,其它组件不可访问。
组件可以选择将其状态作为属性传递给其子组件。
这通常被称为 自顶向下 或 单向数据流。 任何状态始终由某些特定组件所有,并且从该状态导出的任何数据或 UI 只能影响树中下方的组件。