
前言
在此之前,你需要去npm官网注册一个属于自己的账号,记住自己的账户名以及密码、邮箱,后面会用的到。
第一步,安装webpack简易框架
1vue init webpack-simple marquee
2
这里会用到
vue init命令,如果你的cli版本是3或者以上,那么在此之前你需要安装vue/cli-init
npm install -g @vue/cli-init
vue init的运行效果将会跟vue-cli@2.x相同
第二步,封装Vue插件
1、安装完成后,会出现以下目录即可成功
1marquee/
2├── index.html
3├── package.json
4├── README.md
5├── .babelrc
6├── .editorconfig
7├── .gitignore
8├── src
9│   ├── App.vue
10│   ├── assets
11│   │   └── logo.png
12│   └── main.js
13└── webpack.config.js
14
15
2、接下来,我们在src文件夹下创建一个名叫marquee的文件夹,在文件夹里面创建marquee.vue和index.js
1marquee/
2├── index.html
3├── package.json
4├── README.md
5├── .babelrc
6├── .editorconfig
7├── .gitignore
8├── src
9│   ├── App.vue
10│   ├── marquee
11│   │   └── marquee.vue
12│   │   └── index.js
13│   ├── assets
14│   │   └── logo.png
15│   └── main.js
16└── webpack.config.js
17
18
3、开始在marquee.vue封装Vue插件了
1<template>
2  <div class="marquee-wrap">
3    <!-- 滚动内容 -->
4    <div class="scroll">
5      <p class="marquee">{{text}}</p>
6      <!-- 文字副本 -->
7      <p class="copy"></p>
8    </div>
9    <!-- 为了计算总文本宽度,通过css在页面中隐藏 -->
10    <p class="getWidth">{{text}}</p>
11  </div>
12</template>
13
14<script>
15export default {
16  name: 'marquee',
17  props: ['val'],
18  data () {
19    return {
20      timer: null,
21      text: ''
22    }
23  },
24  created () {
25    let timer = setTimeout(() => {
26      this.move()
27      clearTimeout(timer)
28    }, 1000)
29  },
30  // 把父组件传入的arr转化成字符串
31  mounted () {
32    for (let item of this.val) {
33      this.text += ' ' + item
34    }
35  },
36  methods: {
37    move () {
38      let maxWidth = document.querySelector('.marquee-wrap').clientWidth
39      // 获取文字text 的计算后宽度 (由于overflow的存在,直接获取不到,需要独立的node计算)
40      let width = document.querySelector('.getWidth').scrollWidth
41      // 如果文本内容的宽度小于页面宽度,则表示文字小于等于一行,则不需要滚动
42      if (width <= maxWidth) return
43      let scroll = document.querySelector('.scroll')
44      let copy = document.querySelector('.copy')
45      copy.innerText = this.text // 文字副本填充
46      let distance = 0 // 位移距离
47      // 设置位移
48      this.timer = setInterval(() => {
49        distance -= 1
50        // 如果位移超过文字宽度,则回到起点
51        if (-distance >= width) {
52          distance = 16 // 距离必须与marquee的margin宽度相同
53        }
54        scroll.style.transform = 'translateX(' + distance + 'px)'
55      }, 20)
56    }
57  },
58  beforeDestroy () {
59    // 清除计时器
60    clearInterval(this.timer)
61  }
62}
63</script>
64
65<style scoped> .marquee-wrap {
66    width: 100%;
67    overflow: hidden;
68    position: relative;
69  }
70  .marquee{
71    margin-right: 16px;
72  }
73  p {
74    word-break:keep-all;
75    white-space: nowrap;
76    font-size: 16px;
77    font-family: "微软雅黑 Light";
78  }
79  .scroll {
80    display: flex;
81  }
82  .getWidth {
83    word-break:keep-all;
84    white-space:nowrap;
85    position: absolute;
86    opacity: 0;
87    top: 0;
88  }</style>
89
90
4、为了方便查看效果,可以在App.vue先引入组件查看效果
1<template>
2  <div id="app">
3       <Marquee :val="msg"></Marquee>
4  </div>
5</template>
6
7<script>
8import Marquee from '../src/marquee/marquee.vue';
9export default {
10  name: 'app',
11  data () {
12    return {
13      msg: '啊啊啊啊啊啊啊啊啊啊啊啊啊啊啊啊啊啊啊啊啊啊啊啊啊啊啊啊啊啊啊啊啊啊啊啊啊啊啊啊啊啊啊啊啊啊啊啊啊啊啊啊啊啊啊啊啊啊啊啊啊'
14    }
15  },
16  components:{
17    Marquee
18  }
19}
20</script>
21
22<style>
23#app {
24  font-family: 'Avenir', Helvetica, Arial, sans-serif;
25  -webkit-font-smoothing: antialiased;
26  -moz-osx-font-smoothing: grayscale;
27  text-align: center;
28  color: #2c3e50;
29  margin-top: 60px;
30}
31
32h1, h2 {
33  font-weight: normal;
34}
35
36ul {
37  list-style-type: none;
38  padding: 0;
39}
40
41li {
42  display: inline-block;
43  margin: 0 10px;
44}
45
46a {
47  color: #42b983;
48}
49</style>
50
51
5、启动命令,查看效果
1npm install
2npm run dev
3
第三步,发布Vue插件前配置
1、编辑marquee文件夹下的index.js
1marquee/
2├── index.html
3├── package.json
4├── README.md
5├── .babelrc
6├── .editorconfig
7├── .gitignore
8├── src
9│   ├── App.vue
10│   ├── marquee
11│   │   └── marquee.vue
12│   │   └── index.js
13│   ├── assets
14│   │   └── logo.png
15│   └── main.js
16└── webpack.config.js
17
index.js
1// index.js
2
3// 引入组件
4import marquee from './marquee';
5// 组件需要添加name属性,代表注册的组件名称,也可以修改成其他的
6marquee.install = Vue => Vue.component(marquee.name, marquee); //注册组件
7
8export default marquee;
9
10
2、修改webpack.config.js
1const NODE_ENV = process.env.NODE_ENV;
2module.exports = {
3  entry: NODE_ENV == 'development' ? './src/main.js' : './src/marquee/index.js',
4  output: {
5    path: path.resolve(__dirname, './dist'),
6    publicPath: '/dist/',
7    filename: 'marquee.js', //输出文件名
8    library: 'marquee', // 指定的就是你使用require时的模块名
9    libraryTarget: 'umd', // 指定输出格式, UMD 同时支持两种执行环境:node环境、浏览器环境。
10    umdNamedDefine: true // 会对 UMD 的构建过程中的 AMD 模块进行命名。否则就使用匿名的 define
11  },
12}
13
3、打包
1npm run build
2
如果成功的话,根目录下会出现dist文件夹,里面分别是marquee.js和marquee.js.map
1marquee/
2├── dist
3│   ├── marquee.js
4│   ├── marquee.js.map
5├── index.html
6├── package.json
7├── README.md
8├── .babelrc
9├── .editorconfig
10├── .gitignore
11├── src
12│   ├── App.vue
13│   ├── marquee
14│   │   └── marquee.vue
15│   │   └── index.js
16│   ├── assets
17│   │   └── logo.png
18│   └── main.js
19└── webpack.config.js
20
4、修改package.json
1{
2 "author": "maomincoding",
3  "main": "dist/marquee.js",
4  "license": "ISC",
5  "keywords": ["marquee"],
6  "private": false,
7}
8
author的值为npm用户名,这里一定要注意。main的值为你刚才打包的路径文件license的值按照以上即可keywords为用户搜索的关键词private设为false, 开源因此需要将这个字段改为 false
5、修改.gitignore
可以 删除 dist/字段,提交的时候一并上传上去。
1.DS_Store
2node_modules/
3dist/
4npm-debug.log
5yarn-error.log
6
7# Editor directories and files
8.idea
9*.suo
10*.ntvs*
11*.njsproj
12*.sln
13
6、编辑README.md
这是你上传之后的自述文件,可以在网页上显示,用的也是md语法,这里就不显示代码了,来张网页图示范,也可以直接去marquee查看说明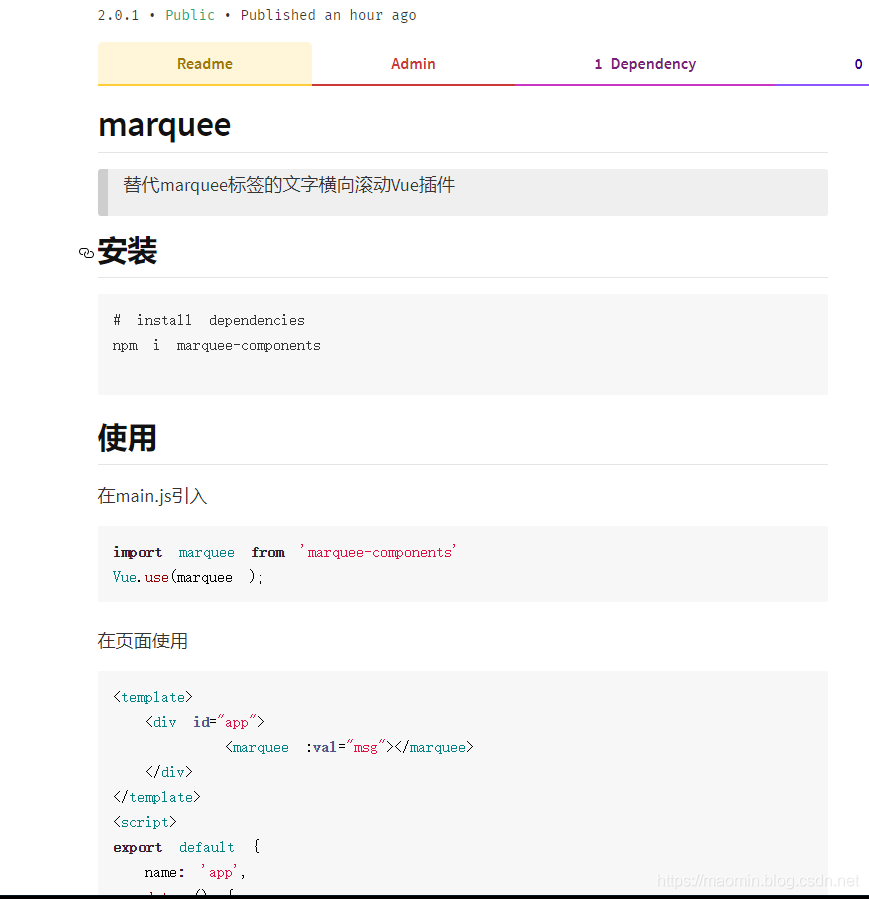
第四步,npm包发布
1、在此之前,你一定要注意先查看登录源,切换到根目录下marquee/
1npm config get registry
2
如果是 https://registry.npm.taobao.org 那么,输入以下命令,切换到http://registry.npmjs.org
1npm config set registry=http://registry.npmjs.org
2
切换淘宝源
1npm config set registry=https://registry.npm.taobao.org
2
2、登录,输入命令
1npm login
2
相继输入用户名、密码、邮箱。回车出现
Logged in as maomincoding on http://registry.npmjs.org,那么就登陆成功了
3、上传发布
1npm publish
2
第五步,插件下载使用
替代marquee标签的文字横向滚动Vue插件
1、安装
1# install dependencies
2npm i marquee-components
3
4
2、使用
在main.js引入
1import marquee from 'marquee-components'
2Vue.use(marquee );
3
在页面使用
1<template>
2  <div id="app">
3       <marquee :val="msg"></marquee>
4  </div>
5</template>
6<script>
7export default {
8  name: 'app',
9  data () {
10    return {
11      msg: 'vuevuevuevuevuevuevuevuevuevuevuevuevuevuevuevuevue'
12    }
13  }
14}
15</script>
16
val后加文字即可,当超过文本容器长度时,触动横向滚动效果。
第六步,npm包更新和撤销
1、撤销包
当你想撤销上传的包时,你可以看看下面的说明:撤销的坏处:
-
1、根据规范,只有在发包的24小时内才允许撤销发布的包。
-
2、即使你撤销了发布的包,发包的时候也不能再和被撤销的包的名称和版本重复了(即不能名称相同,版本相同,因为这两者构成的唯一标识已经被“占用”了)
-
3、这里要说一点,取消发布包可能并不像你想象得那么容易,这种操作是受到诸多限制的,撤销发布的包被认为是一种不好的行为(试想一下你撤销了发布的包[假设它已经在社区内有了一定程度的影响],这对那些已经深度使用并依赖你发布的包的团队是件多么崩溃的事情!)
所以,慎行!!!
撤销命令:
1npm unpublish 包名 --force
2
送给你一句官方说的话
1I sure hope you know what you are doing
2
2、更新包
看到了撤销的坏处,所以我推荐你更新包。更新包很简单,只需两步:
(1)、打开根目录下的package.json找到version字段
具体体现为:"version":"a.b.c"
1.修复bug,小改动,c加1 2.增加了新特性,但仍能向后兼容,b加1 3.有很大的改动,无法向后兼容,a加1
(2)、根目录下输入npm publish
1npm publish
2
结语
这里是以发布Vue插件为例,你也可以单独发布一个包。
1、输入命令
1npm init
2
根据自己的情况输入然后回车,会自动生成一个package.json文件
1{
2  "name": "vue-cli-configjs",
3  "version": "2.0.0",
4  "description": "vue.config.js by vue-cli3+",
5  "main": "vue.config.js",
6  "scripts": {
7    "test": "echo \"Error: no test specified\" && exit 1"
8  },
9  "keywords": [
10    "vue-cli-config"
11  ],
12  "author": "maomincoding",
13  "license": "ISC"
14}
15
2、然后建一个readme.md自述文件,用于说明
3、最后发布即可
1npm publish
2
点击下方公众号,领取最新版红宝书

本文转转自微信公众号** 前端历劫之路**原创https://mp.weixin.qq.com/s/7tGMTOHCkq5BirTs1iEx6g,如有侵权,请联系删除。