
前言
本文主要介绍uni-app提供的一些基础接口,包括:网络请求接口,用于通过指定的请求方法,携带特定的数据,向特定的地址请求并返回请求结果;图片处理接口,包括选择、预览、获取信息、保存到本地等接口;文件处理接口,包括文件上传和下载接口;数据缓存接口,包括以同步或异步的方式保存、获取或删除数据的接口。
一、网络请求
小程序要想正常运转,都需要与服务器端进行数据交互,一般都通过接口实现。 数据交互一般都会通过网络请求接口实现。
uni.request(OBJECT)是用于发起网络请求的接口。
OBJECT常见参数如下:
| 参数名 | 类型 | 必填与否 | 默认值 | 说明 |
|---|---|---|---|---|
| url | String | 是 | 无 | 开发者服务器接口地址 |
| data | Object/String/ArrayBuffer | 否 | 无 | 请求的参数 |
| header | Object | 否 | 无 | 设置请求的 header,不能设置 Referer |
| method | String | 否 | GET | 请求方法,包括GET、POST、PUT、DELETE等方法 |
| timeout | Number | 否 | 60000 | 超时时间,单位 ms |
| dataType | String | 否 | json | 如果设为 json,会尝试对返回的数据做一次 JSON.parse |
| responseType | String | 否 | text | 设置响应的数据类型。合法值:text、arraybuffer |
| success | Function | 否 | 无 | 收到开发者服务器成功返回的回调函数 |
| fail | Function | 否 | 无 | 接口调用失败的回调函数 |
| complete | Function | 否 | 无 | 接口调用结束的回调函数(调用成功、失败都会执行) |
使用GET方法进行普通请求,index.vue如下:
1<template>
2	<view>
3		{{res}}
4	</view>
5</template>
6
7<script>
8	export default {
9		data() {
10			return {
11				res:''
12			}
13		},
14		onLoad() {
15			uni.request({
16				url:'https://demo.hcoder.net',
17				method: 'GET',
18				success:function(res){
19					console.log(res)
20				}
21			})
22		},
23		onShow() {
24			console.log('index onshow')
25		},
26		onHide() {
27			console.log('index onhide')
28		},
29		methods: {
30		}
31	}
32</script>
33
34<style>
35
36</style>
37
显示:
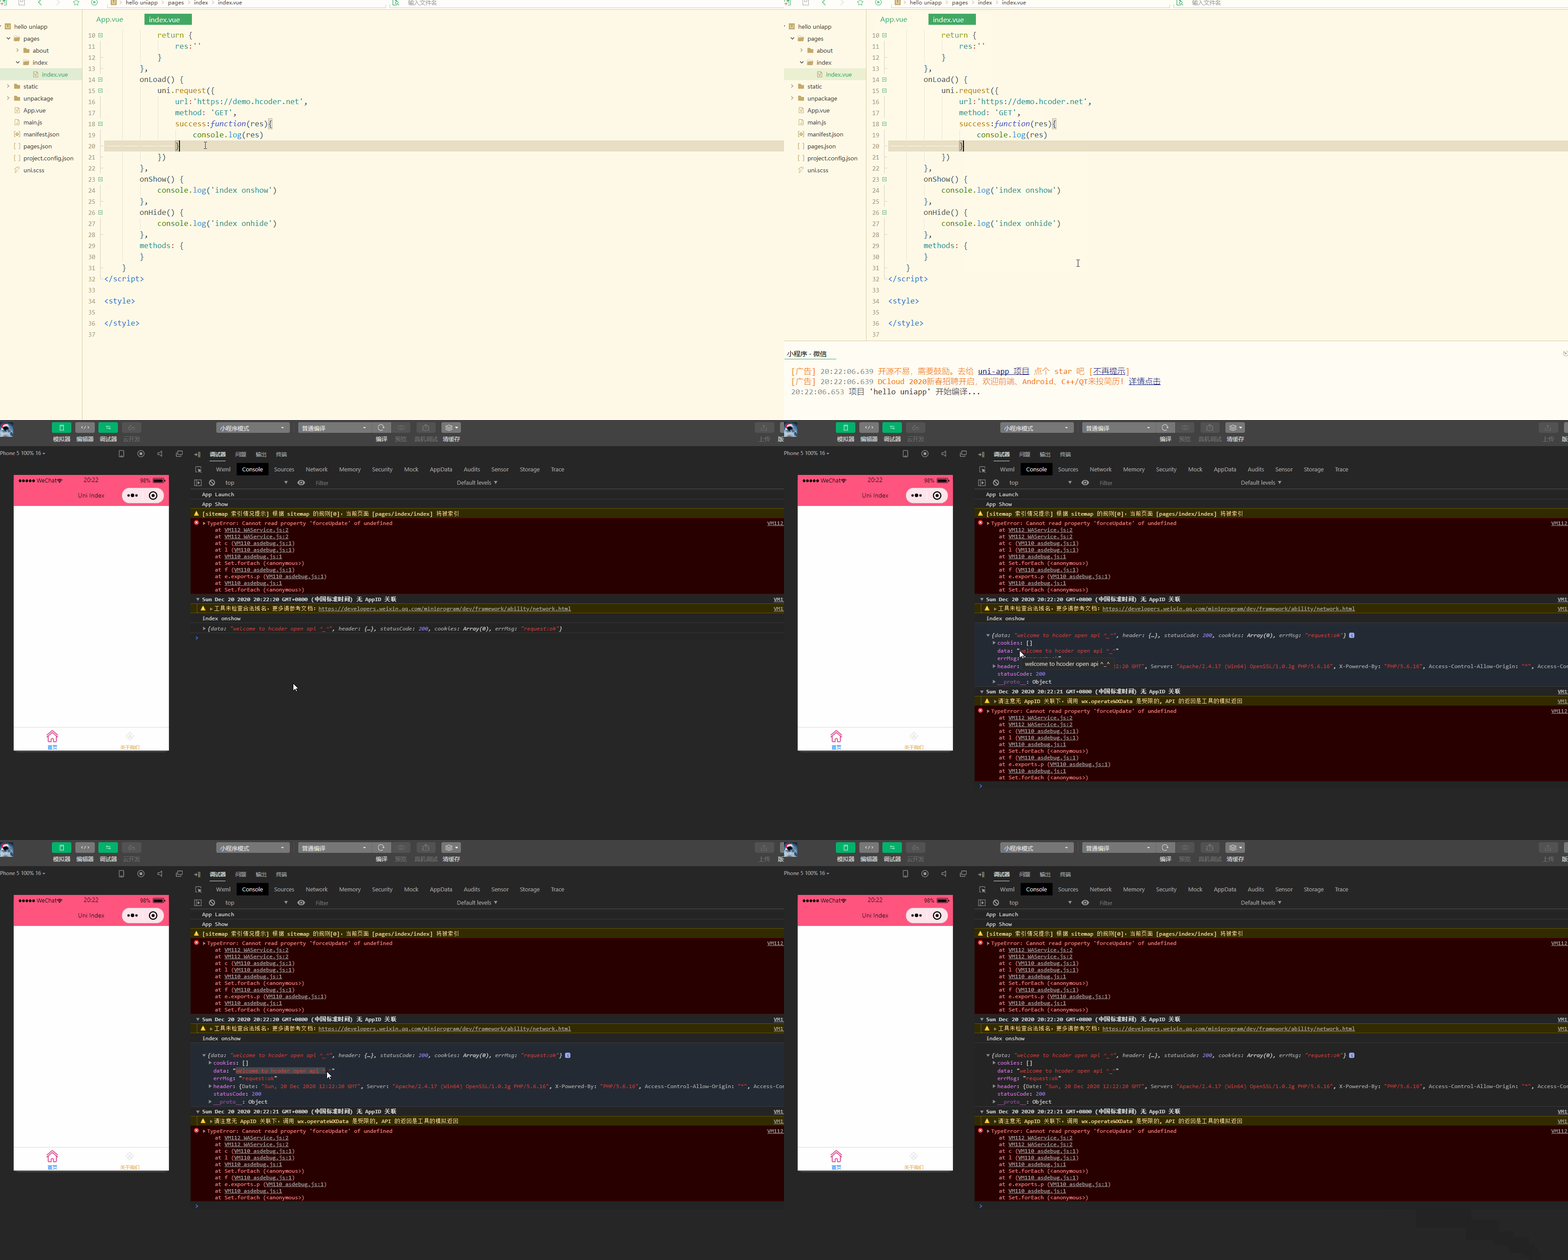
可以看到,请求后返回了data数据。
说明:
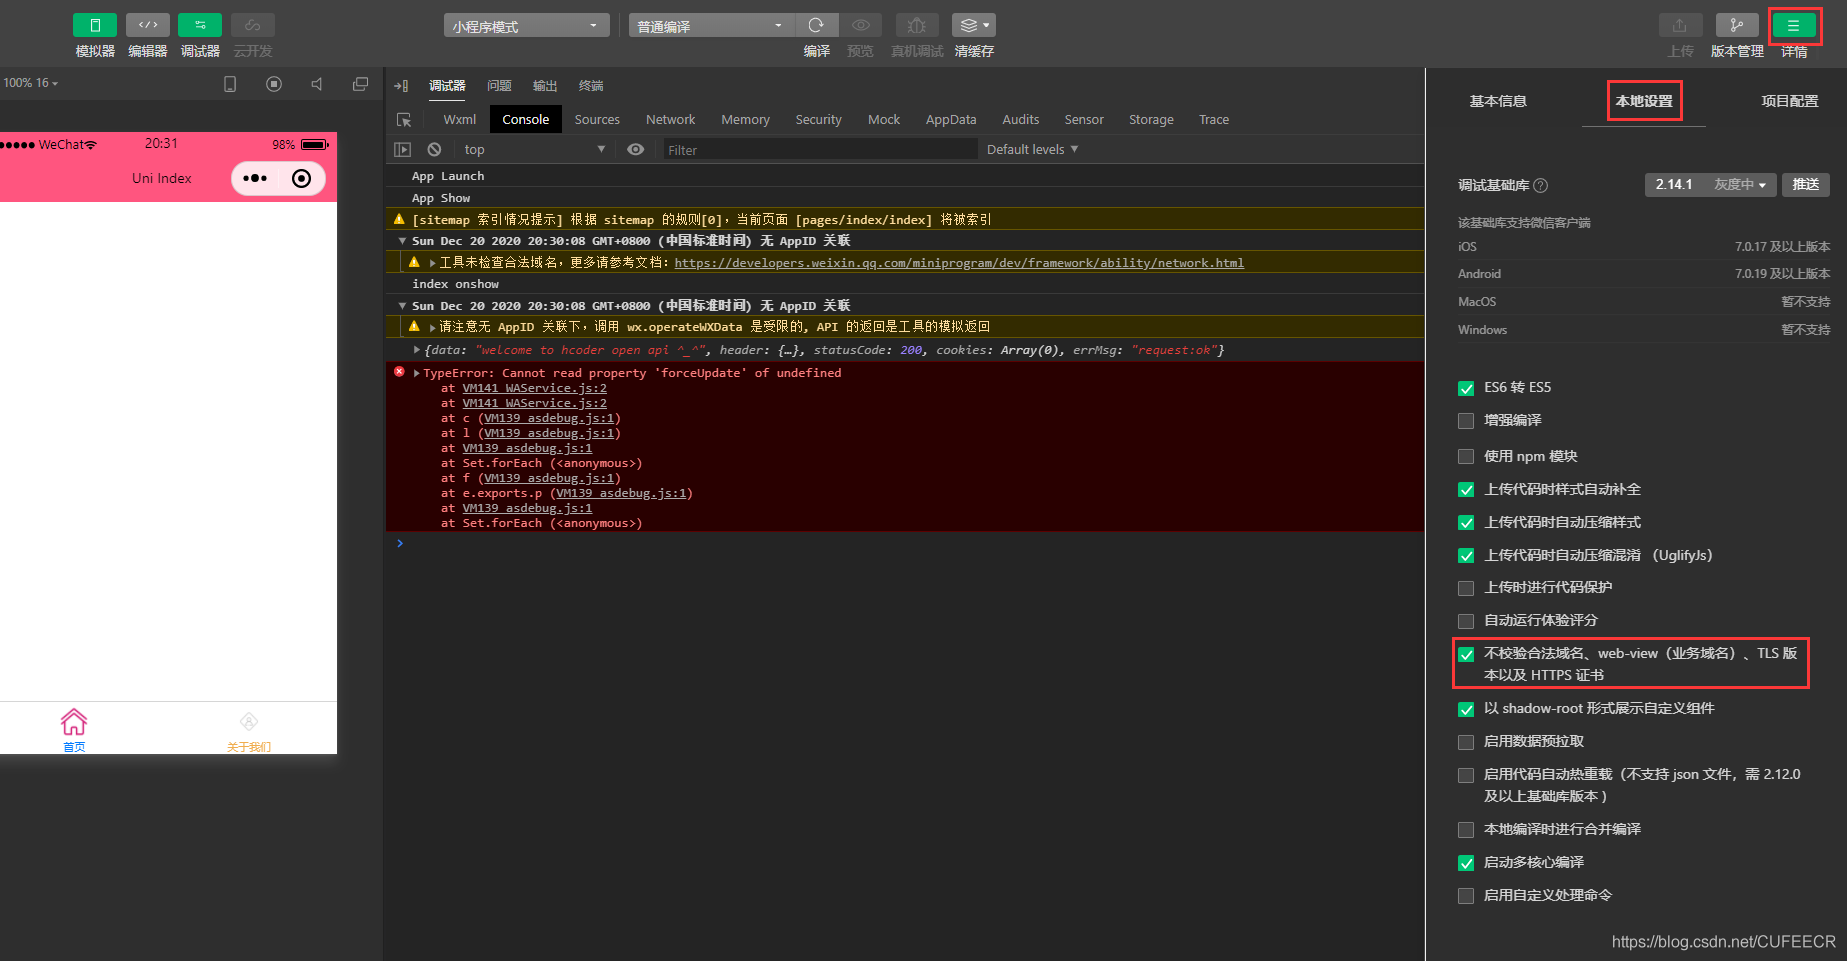
在各个小程序平台运行时,网络相关的API在使用前需要配置域名白名单,因此在使用小程序进行测试时,需要在微信开发者中心设置域名,或者在项目的本地配置中不校验合法域名,如下:
再请求json数据和使用POST方法请求,如下:
1<template>
2	<view>
3		{{res}}
4	</view>
5</template>
6
7<script>
8	export default {
9		data() {
10			return {
11				res: ''
12			}
13		},
14		onLoad() {
15			const request1 = uni.request({
16				url: 'https://demo.hcoder.net/index.php?m=getJson',
17				success: function(res) {
18					console.log(res.data);
19				}
20			});
21			//
22			const request2 = uni.request({
23				url: 'https://demo.hcoder.net/index.php',
24				data: {
25					name: 'Corley',
26					'age': 18
27				},
28				method: "POST",
29				header: {
30					'content-type': 'application/x-www-form-urlencoded'
31				},
32				success: function(res) {
33					console.log(res.data);
34				}
35			});
36		},
37		onShow() {
38			console.log('index onshow')
39		},
40		onHide() {
41			console.log('index onhide')
42		},
43		methods: {}
44	}
45</script>
46
47<style>
48
49</style>
50
显示:
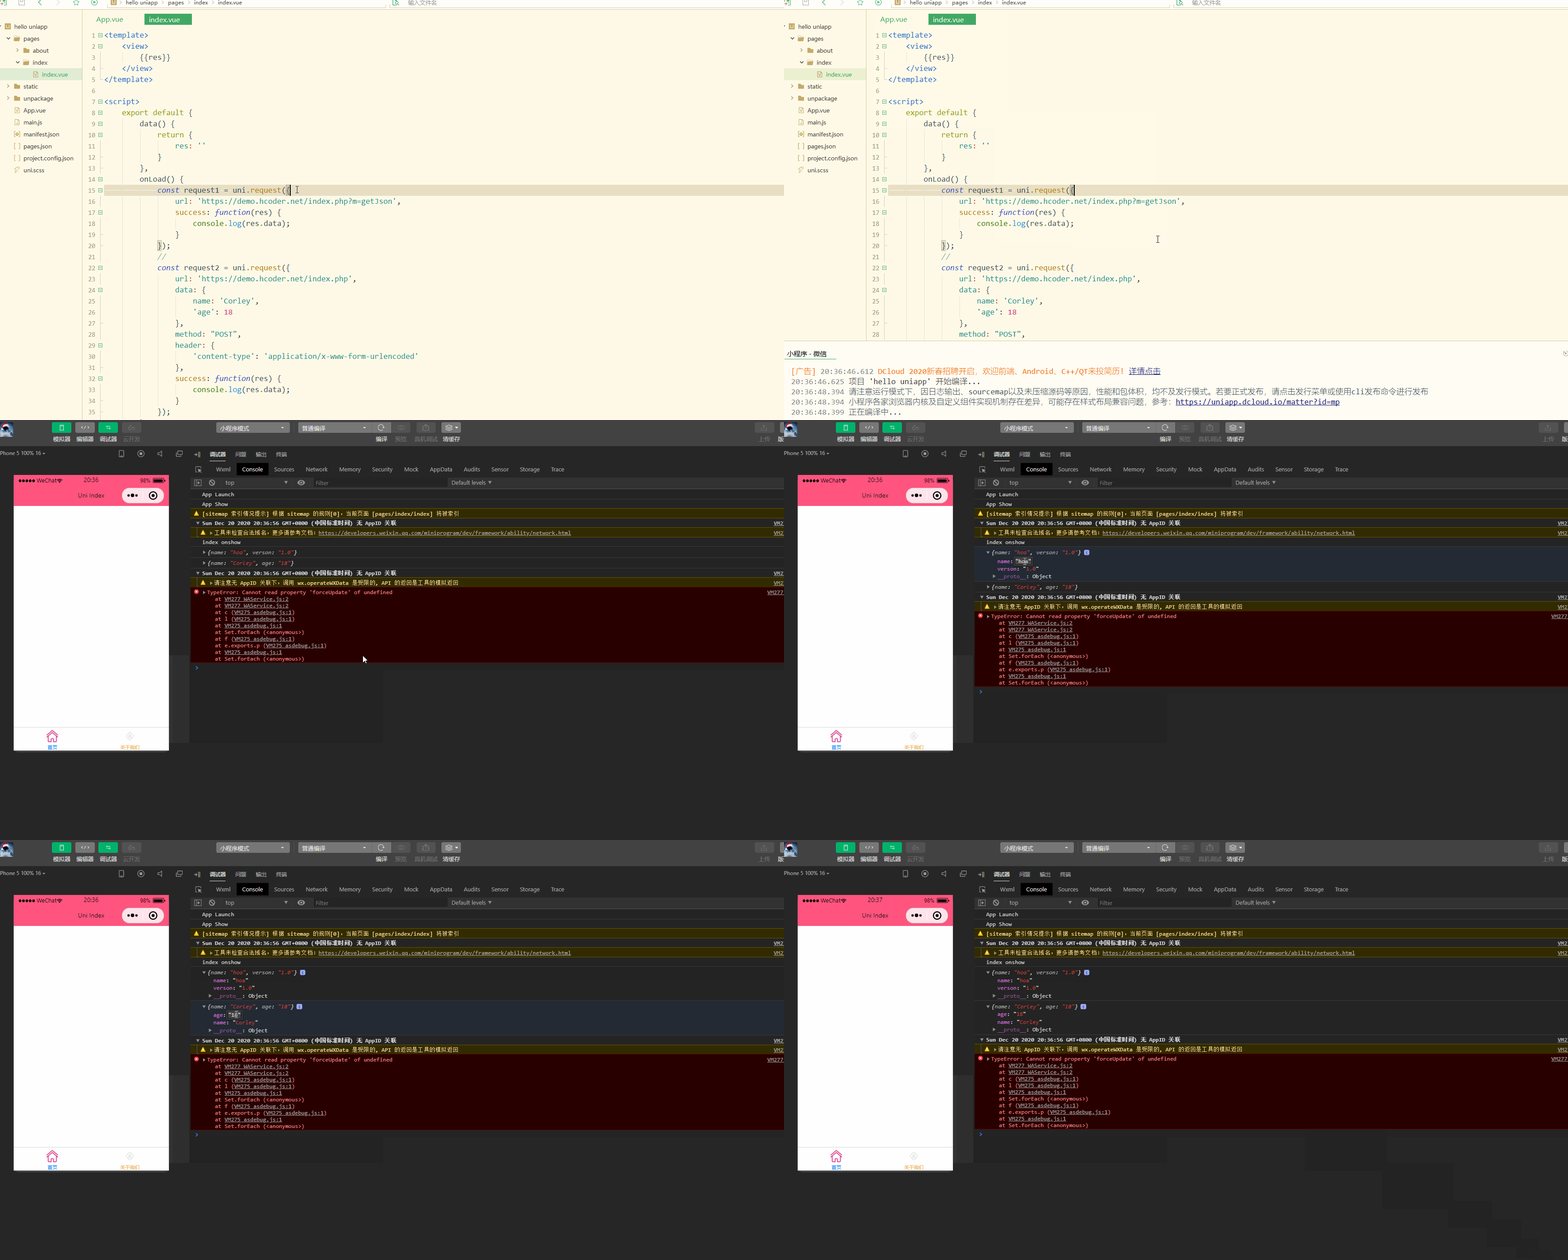
可以看到,也返回了数据。
二、图片处理
1.chooseImage(OBJECT)
从本地相册选择图片或使用相机拍照。
OBJECT常见参数如下:
| 参数名 | 类型 | 必填与否 | 说明 |
|---|---|---|---|
| count | Number | 否 | 最多可以选择的图片张数,默认9 |
| sizeType | Array<String> | 否 original 原图,compressed 压缩图,默认二者都有 | |
| extension | Array<String> | 否 | 根据文件拓展名过滤,每一项都不能是空字符串。默认不过滤。 |
| sourceType | Array<String> | 否 | album 从相册选图,camera 使用相机,默认二者都有。如需直接开相机或直接选相册,请只使用一个选项 |
| success | Function | 是 | 成功则返回图片的本地文件路径列表 tempFilePaths |
| fail | Function | 否 | 接口调用失败的回调函数 小程序、App |
| complete | Function | 否 | 接口调用结束的回调函数(调用成功、失败都会执行) |
index.vue如下:
1<template>
2	<view>
3		<button type="primary" @click="img">上传图片</button>
4	</view>
5</template>
6
7<script>
8	export default {
9		data() {
10			return {
11			}
12		},
13		onLoad() {
14
15		},
16		onShow() {
17			console.log('index onshow')
18		},
19		onHide() {
20			console.log('index onhide')
21		},
22		methods: {
23			img: function(){
24				uni.chooseImage({
25					count: 9,
26					sizeType:"compressed",
27					success:function(res){
28						console.log(res)
29					}
30				})
31			}
32		}
33	}
34</script>
35
36<style>
37
38</style>
39
显示:
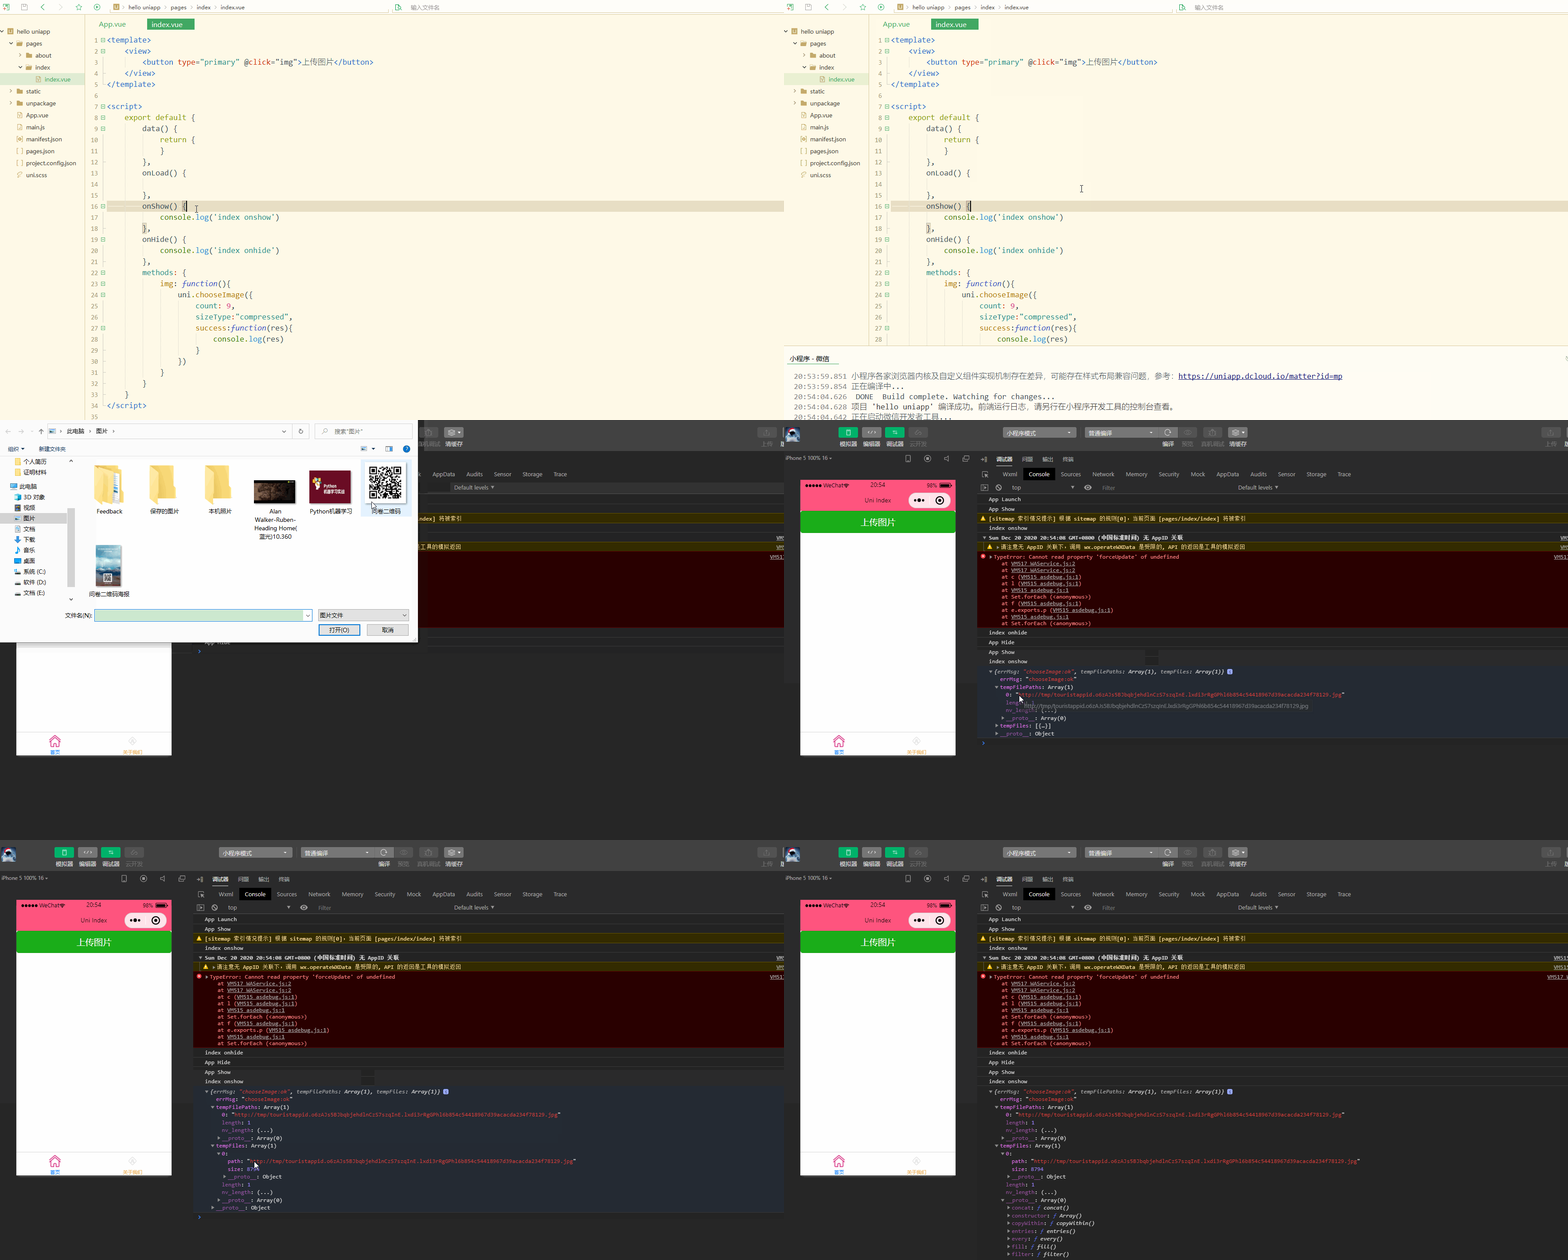
可以看到,上传成功后,结果返回了临时图片的路径链接。
2.previewImage(OBJECT)
预览图片。
OBJECT常见参数如下:
| 参数名 | 类型 | 必填 | 说明 |
|---|---|---|---|
| current | String/Number | 因情况而定 | 当前显示图片的链接/索引值,不填或填写的值无效则为 urls 的第一张 |
| urls | Array<String> | 是 | 需要预览的图片链接列表 |
| indicator | String | 否 | 图片指示器样式,可取值:"default" - 底部圆点指示器; "number" - 顶部数字指示器; "none" - 不显示指示器 |
| loop | Boolean | 否 | 是否可循环预览,默认值为 false |
| longPressActions | Object | 否 | 长按图片显示操作菜单,如不填默认为保存相册 |
| success | Function | 否 | 接口调用成功的回调函数 |
| fail | Function | 否 | 接口调用失败的回调函数 |
| complete | Function | 否 | 接口调用结束的回调函数(调用成功、失败都会执行) |
index.vue如下:
1<template>
2	<view>
3		<button type="primary" @click="img">上传图片</button>
4	</view>
5</template>
6
7<script>
8	export default {
9		data() {
10			return {
11			}
12		},
13		onLoad() {
14
15		},
16		onShow() {
17			console.log('index onshow')
18		},
19		onHide() {
20			console.log('index onhide')
21		},
22		methods: {
23			img: function(){
24				uni.chooseImage({
25					count: 9,
26					sizeType:"compressed",
27					success:function(res){
28						console.log(res);
29						uni.previewImage({
30							urls: res.tempFilePaths,
31						})
32					}
33				})
34			}
35		}
36	}
37</script>
38
39<style>
40
41</style>
42
显示:
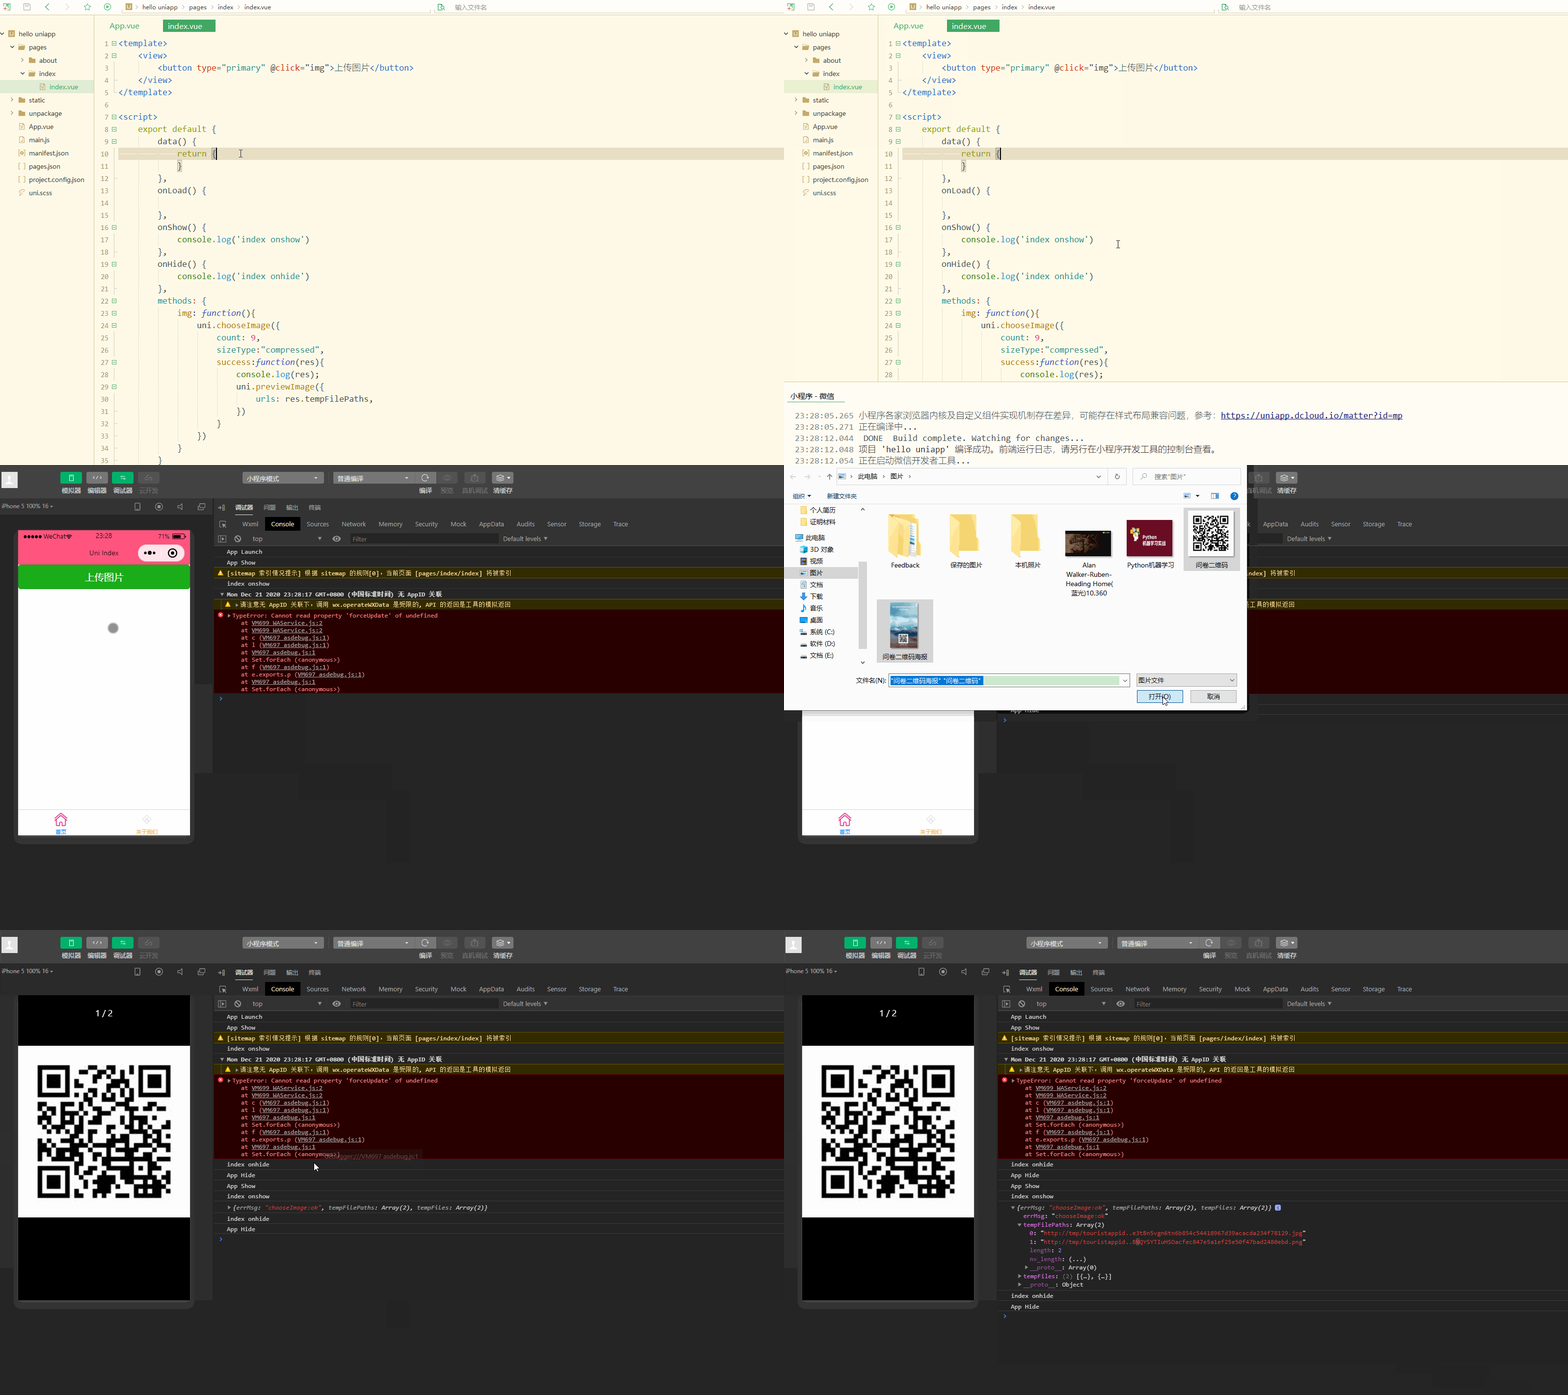
可以看到,在调用uni.chooseImage上传图片后,成功时的回调函数中再调用uni.previewImage,即可实现预览。
被预览的图片链接,除了可以是uni.chooseImage上传生成的内部临时图片,还可以是自定义的外部图片,如下:
1<template>
2	<view>
3		<button type="primary" @click="img">显示图片</button>
4	</view>
5</template>
6
7<script>
8	export default {
9		data() {
10			return {
11			}
12		},
13		onLoad() {
14
15		},
16		onShow() {
17			console.log('index onshow')
18		},
19		onHide() {
20			console.log('index onhide')
21		},
22		methods: {
23			img: function(){
24				uni.previewImage({
25					urls: ['https://bkimg.cdn.bcebos.com/pic/95eef01f3a292df56f9e63a6b2315c6034a87320?x-bce-process=image/resize,m_lfit,w_220,h_220,limit_1', 'https://bkimg.cdn.bcebos.com/pic/83025aafa40f4bfb112d51e70d4f78f0f6361880?x-bce-process=image/resize,m_lfit,w_220,h_220,limit_1', 'https://bkimg.cdn.bcebos.com/pic/622762d0f703918f8453f4795f3d269758eec487?x-bce-process=image/resize,m_lfit,w_220,h_220,limit_1']
26				})
27			}
28		}
29	}
30</script>
31
32<style>
33
34</style>
35
显示:
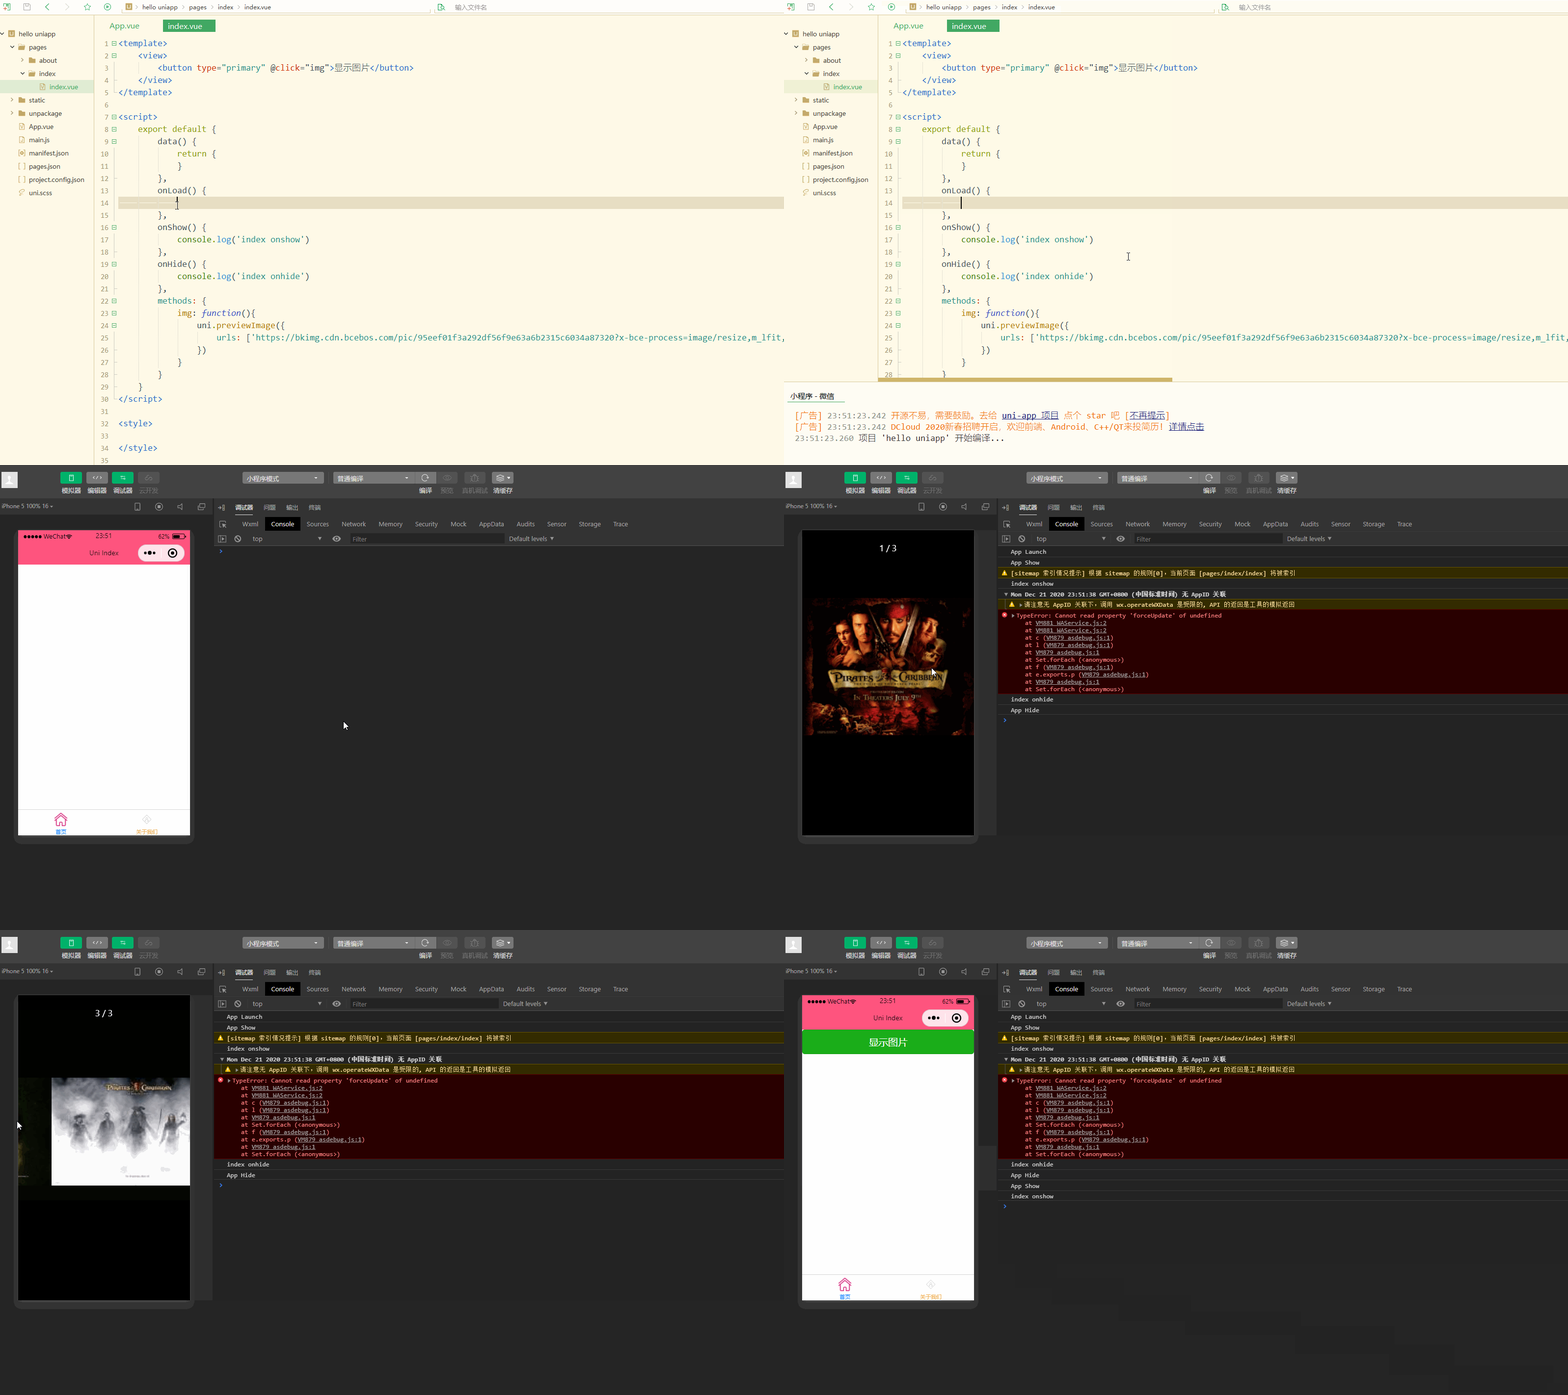
可以看到,外部图片也可以正常显示。
3.getImageInfo(OBJECT)
获取图片信息。
OBJECT常见参数和含义如下:
| 参数名 | 类型 | 必填 | 说明 |
|---|---|---|---|
| src | String | 是 | 图片的路径,可以是相对路径、临时文件路径、存储文件路径、网络图片路径 |
| success | Function | 否 | 接口调用成功的回调函数 |
| fail | Function | 否 | 接口调用失败的回调函数 |
| complete | Function | 否 | 接口调用结束的回调函数(调用成功、失败都会执行) |
index.vue如下:
1<template>
2	<view>
3		<button type="primary" @click="img">获取图片信息</button>
4	</view>
5</template>
6
7<script>
8	export default {
9		data() {
10			return {
11			}
12		},
13		onLoad() {
14
15		},
16		onShow() {
17			console.log('index onshow')
18		},
19		onHide() {
20			console.log('index onhide')
21		},
22		methods: {
23			img: function(){
24				uni.getImageInfo({
25					src: 'https://cn.bing.com/th?id=OHR.HolidayNubble_ZH-CN8122183595_1920x1080.jpg&rf=LaDigue_1920x1080.jpg&pid=hp',
26					success: function(res){
27						console.log(res)
28					}
29				})
30			}
31		}
32	}
33</script>
34
35<style>
36
37</style>
38
显示:
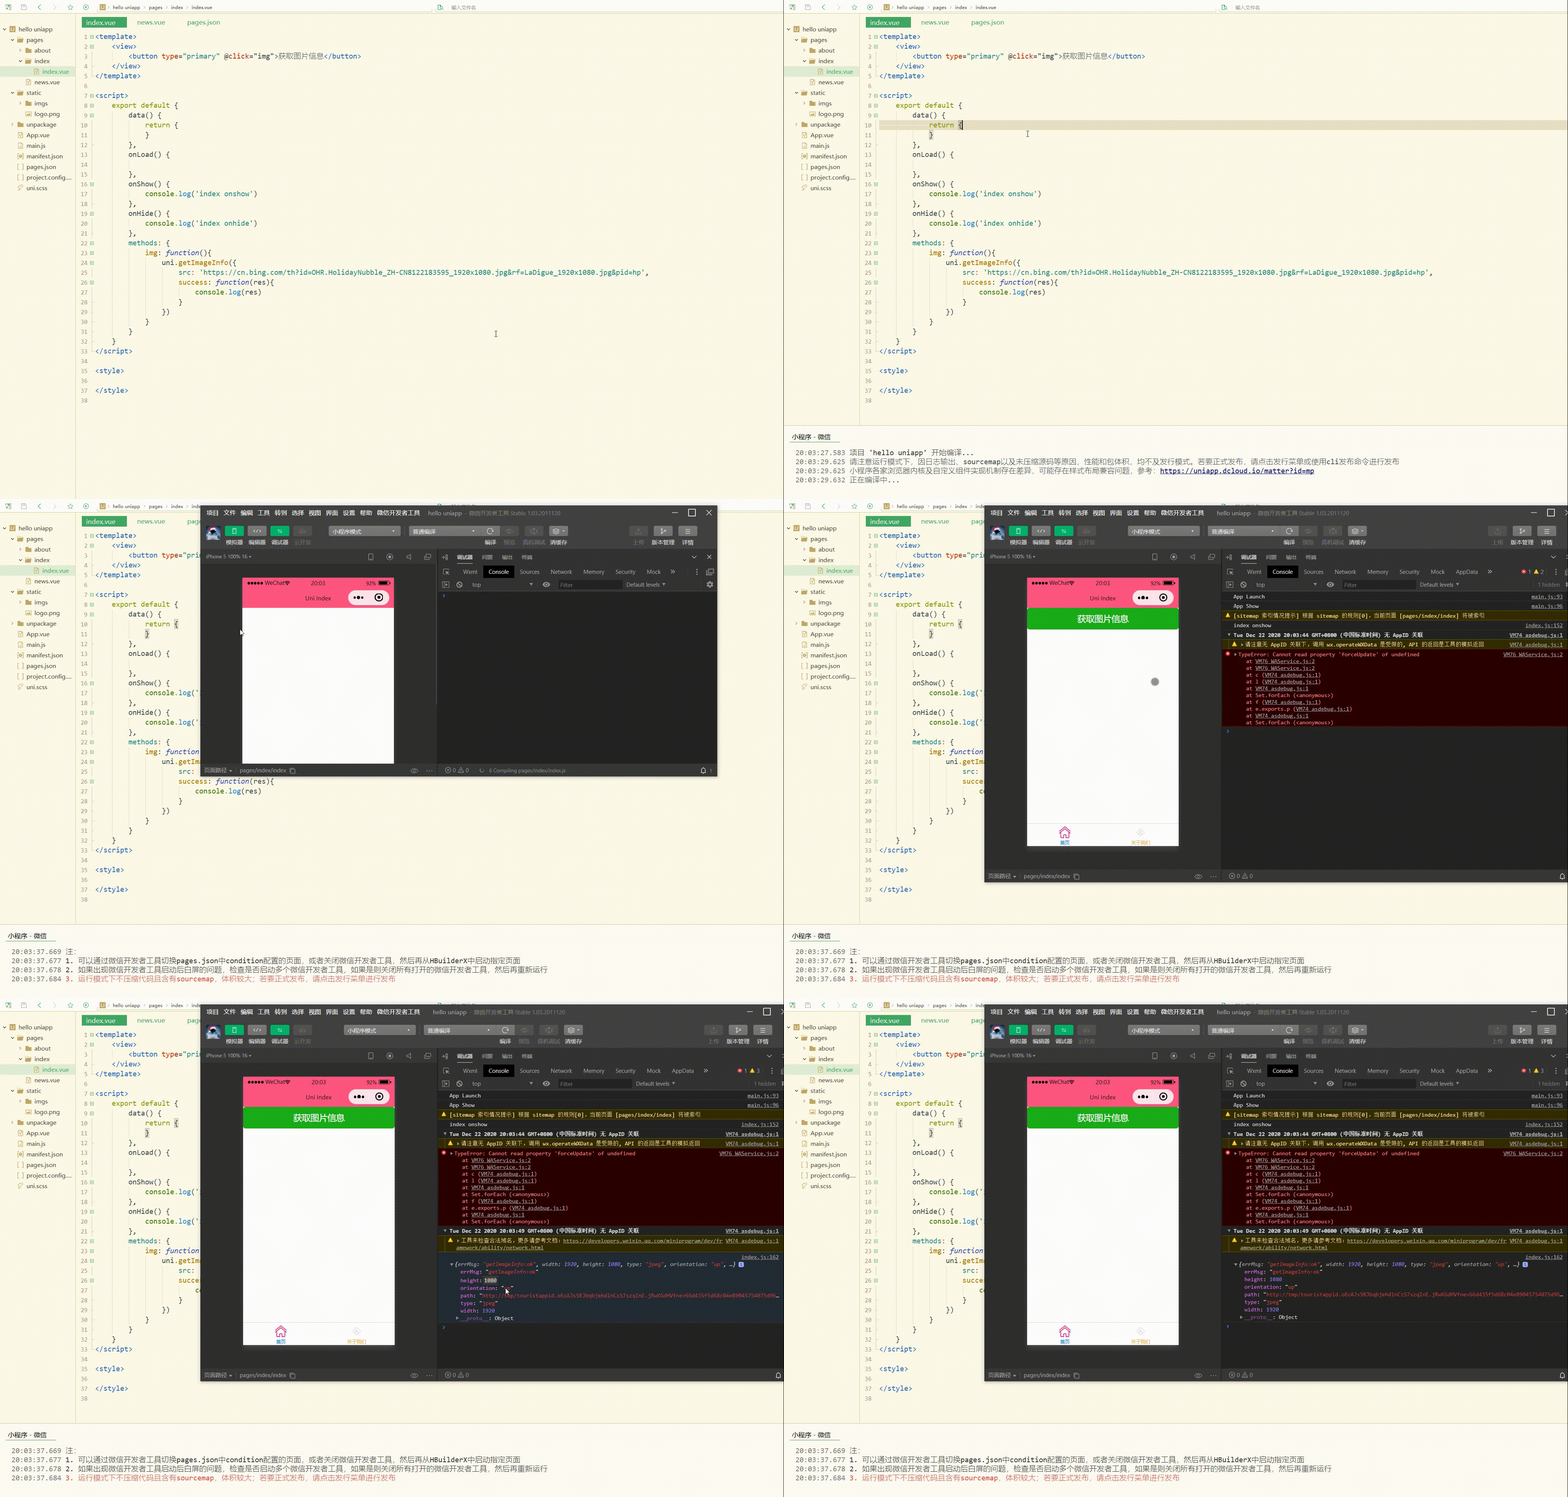
可以看到,获取到了图片的大小、类型和方向等信息。
4.saveImageToPhotosAlbum(OBJECT)
保存图片到系统相册。
OBJECT常见参数如下:
| 参数名 | 类型 | 必填 | 说明 |
|---|---|---|---|
| filePath | String | 是 | 图片文件路径,可以是临时文件路径也可以是永久文件路径,不支持网络图片路径 |
| success | Function | 否 | 接口调用成功的回调函数 |
| fail | Function | 否 | 接口调用失败的回调函数 |
| complete | Function | 否 | 接口调用结束的回调函数(调用成功、失败都会执行) |
index.vue如下:
1<template>
2	<view>
3		<button type="primary" @click="img">上传图片并下载</button>
4	</view>
5</template>
6
7<script>
8	export default {
9		data() {
10			return {}
11		},
12		onLoad() {
13
14		},
15		onShow() {
16			console.log('index onshow')
17		},
18		onHide() {
19			console.log('index onhide')
20		},
21		methods: {
22			img: function() {
23				uni.chooseImage({
24					count: 9,
25					sizeType: "compressed",
26					success: function(res) {
27						console.log(res);
28						uni.saveImageToPhotosAlbum({
29							filePath: res.tempFilePaths[0],
30							success:function(){
31								console.log('save success');
32							}
33						})
34					}
35				})
36			}
37		}
38	}
39</script>
40
41<style>
42
43</style>
44
显示:
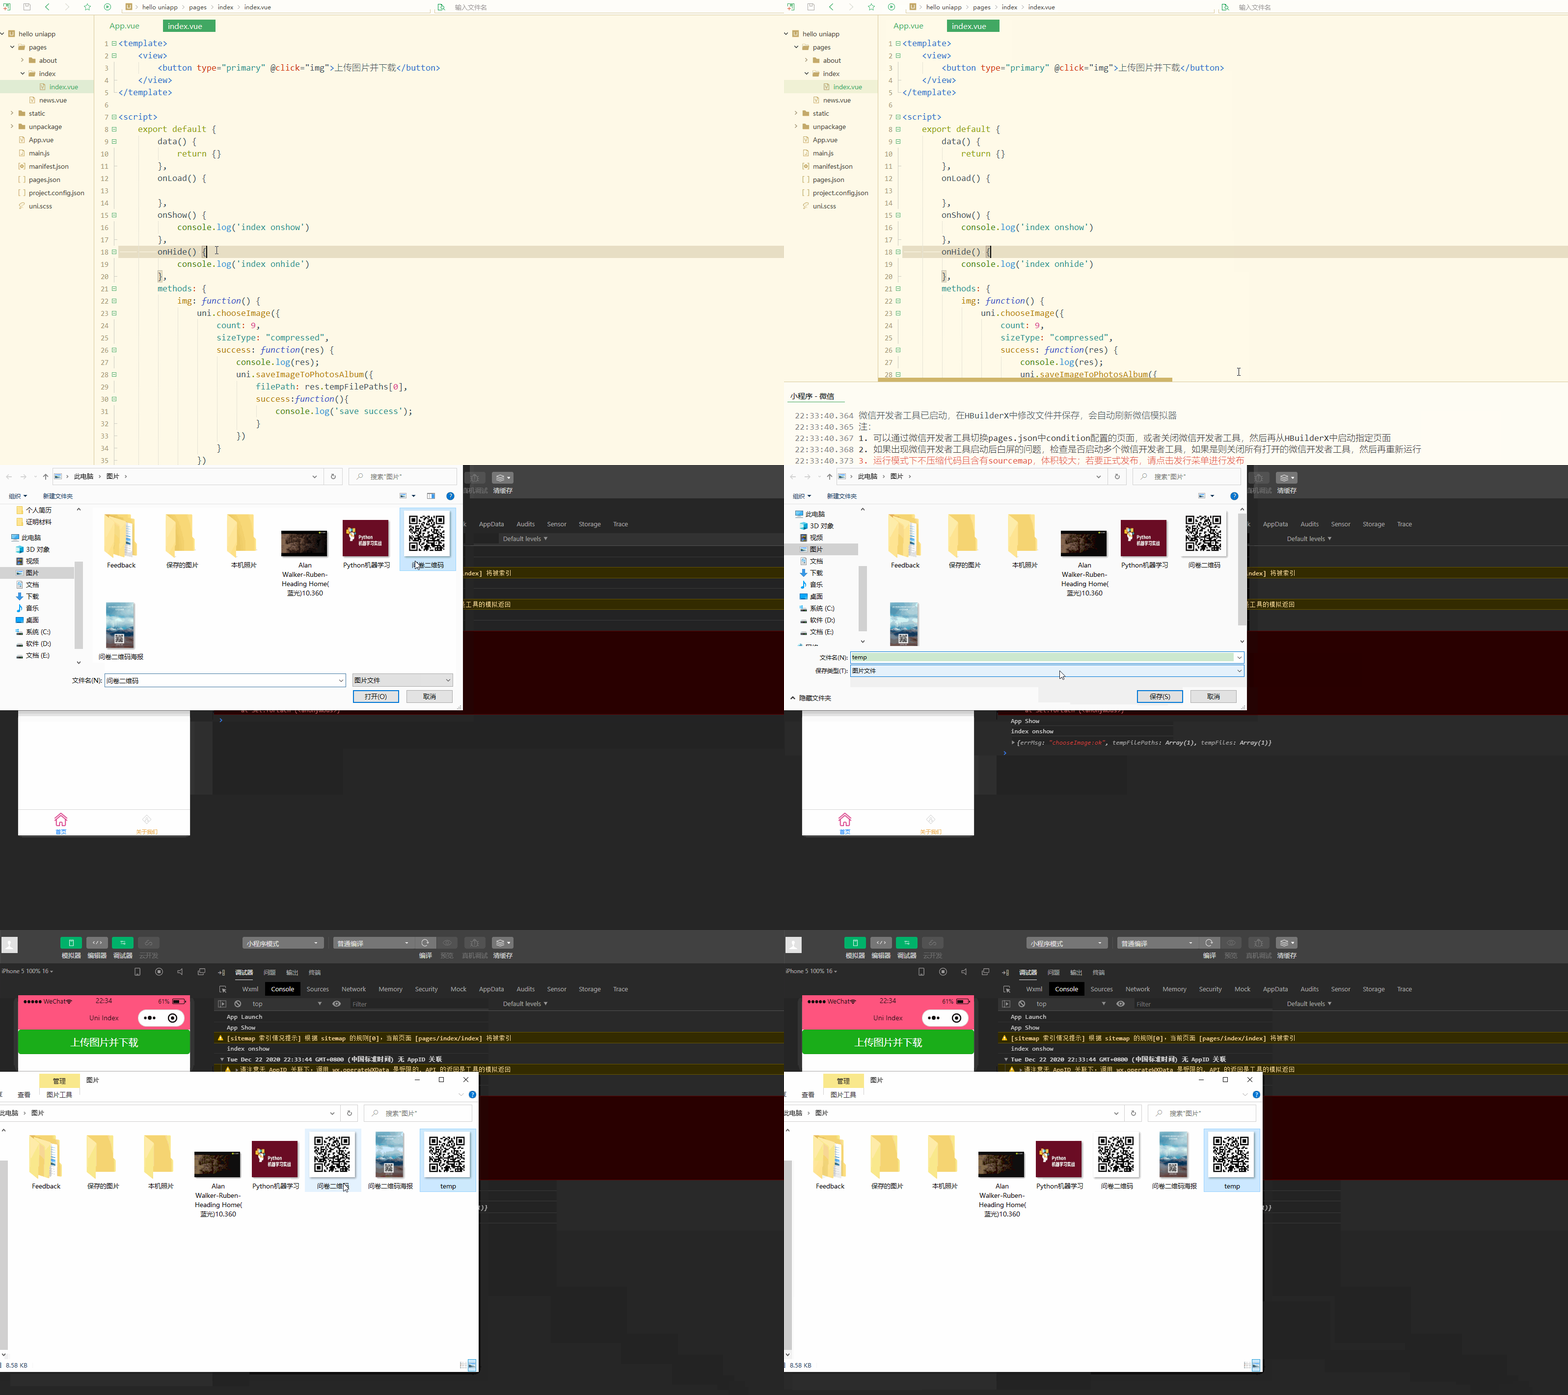
可以看到,可以实现将图片保存到本地,并且图片信息一致。
三、文件上传和下载
1.uploadFile(OBJECT)
将本地资源上传到开发者服务器,客户端发起一个 POST 请求,其中 content-type 为 multipart/form-data。
OBJECT常见参数如下:
| 参数名 | 类型 | 必填 | 说明 |
|---|---|---|---|
| url | String | 是 | 开发者服务器 url |
| files | Array | 否 | 需要上传的文件列表。使用 files 时,filePath 和 name 不生效 |
| fileType | String | 平台之间存在关系 | 文件类型,image/video/audio |
| file | File | 否 | 要上传的文件对象 |
| filePath | String | 是 | 要上传文件资源的路径 |
| name | String | 是 | 文件对应的 key , 开发者在服务器端通过这个 key 可以获取到文件二进制内容 |
| header | Object | 否 | HTTP 请求 Header, header 中不能设置 Referer |
| timeout | Number | 否 | 超时时间,单位 ms |
| formData | Object | 否 | HTTP 请求中其他额外的 form data |
| success | Function | 否 | 接口调用成功的回调函数 |
| fail | Function | 否 | 接口调用失败的回调函数 |
| complete | Function | 否 | 接口调用结束的回调函数(调用成功、失败都会执行) |
index.vue如下:
1<template>
2	<view>
3		<button type="primary" @click="img">上传文件</button>
4		<progress :percent="percent" stroke-width="20" />
5	</view>
6</template>
7
8<script>
9	var _self;
10	export default {
11		data() {
12			return {
13				percent: 0
14			}
15		},
16		onLoad() {
17			_self = this;
18		},
19		onShow() {
20			console.log('index onshow')
21		},
22		onHide() {
23			console.log('index onhide')
24		},
25		methods: {
26			img: function() {
27				uni.chooseImage({
28					count: 1,
29					sizeType: ["compressed"],
30					success: function(res) {
31						var imgFile = res.tempFilePaths[0];
32						console.log(imgFile);
33						var uper = uni.uploadFile({
34							url: "https://demo.hcoder.net/index.php?c=uperTest",
35							filePath: imgFile,
36							name: 'file',
37							success:function(upres){
38								console.log(upres)
39							}
40						});
41						uper.onProgressUpdate(function(prores){
42							_self.percent = prores.progress;
43							console.log('上传进度'+prores.progress);
44							console.log('已上传数据长度'+prores.totalBytesSent);
45							console.log('预期需要上传数据总长度'+prores.totalBytesExpectedToSend);
46						})
47					}
48				})
49			}
50		}
51	}
52</script>
53
54<style>
55
56</style>
57
显示:

可以看到,在上传图片文件之后,获取到了实时的上传进度、并在进度条中同步显示。
除了使用uni.uploadFile(OBJECT),还可以使用更好的APIuniCloud.uploadFile,uniCloud提供了免费CDN和更好的易用性,包括安全的cdn直传。
2.downloadFile(OBJECT)
下载文件资源到本地,客户端直接发起一个 HTTP GET 请求,返回文件的本地临时路径。
OBJECT常见参数如下:
| 参数名 | 类型 | 必填与否 | 说明 |
|---|---|---|---|
| url | String | 是 | 下载资源的 url |
| header | Object | 否 | HTTP 请求 Header, header 中不能设置 Referer |
| timeout | Number | 否 | 超时时间,单位 ms |
| success | Function | 否 | 下载成功后以 tempFilePath 的形式传给页面,res = {tempFilePath: '文件的临时路径'} |
| fail | Function | 否 | 接口调用失败的回调函数 |
| complete | Function | 否 | 接口调用结束的回调函数(调用成功、失败都会执行) |
index.vue如下:
1<template>
2	<view>
3		<button type="primary" @click="img">下载文件</button>
4		<progress :percent="percent" stroke-width="20" />
5	</view>
6</template>
7
8<script>
9	var _self;
10	export default {
11		data() {
12			return {
13				percent: 0,
14			}
15		},
16		onLoad() {
17			_self = this;
18		},
19		onShow() {
20			console.log('index onshow')
21		},
22		onHide() {
23			console.log('index onhide')
24		},
25		methods: {
26			img: function() {
27				const down = uni.downloadFile({
28					url: 'https://bkimg.cdn.bcebos.com/pic/95eef01f3a292df56f9e63a6b2315c6034a87320?x-bce-process=image/resize,m_lfit,w_220,h_220,limit_1',
29					success: function(res) {
30						if (res.statusCode === 200) {
31							console.log(res);
32							uni.saveImageToPhotosAlbum({
33								filePath: res.tempFilePath,
34								success: function() {
35									console.log('save success');
36								}
37							})
38						}
39					}
40				});
41				down.onProgressUpdate((prores) => {
42					_self.percent = prores.progress;
43					console.log('下载进度' + prores.progress);
44					console.log('已下载数据长度' + prores.totalBytesWritten);
45					console.log('预期下载数据总长度' + prores.totalBytesExpectedToWrite);
46				});
47			}
48		}
49	}
50</script>
51
52<style>
53
54</style>
55
显示:
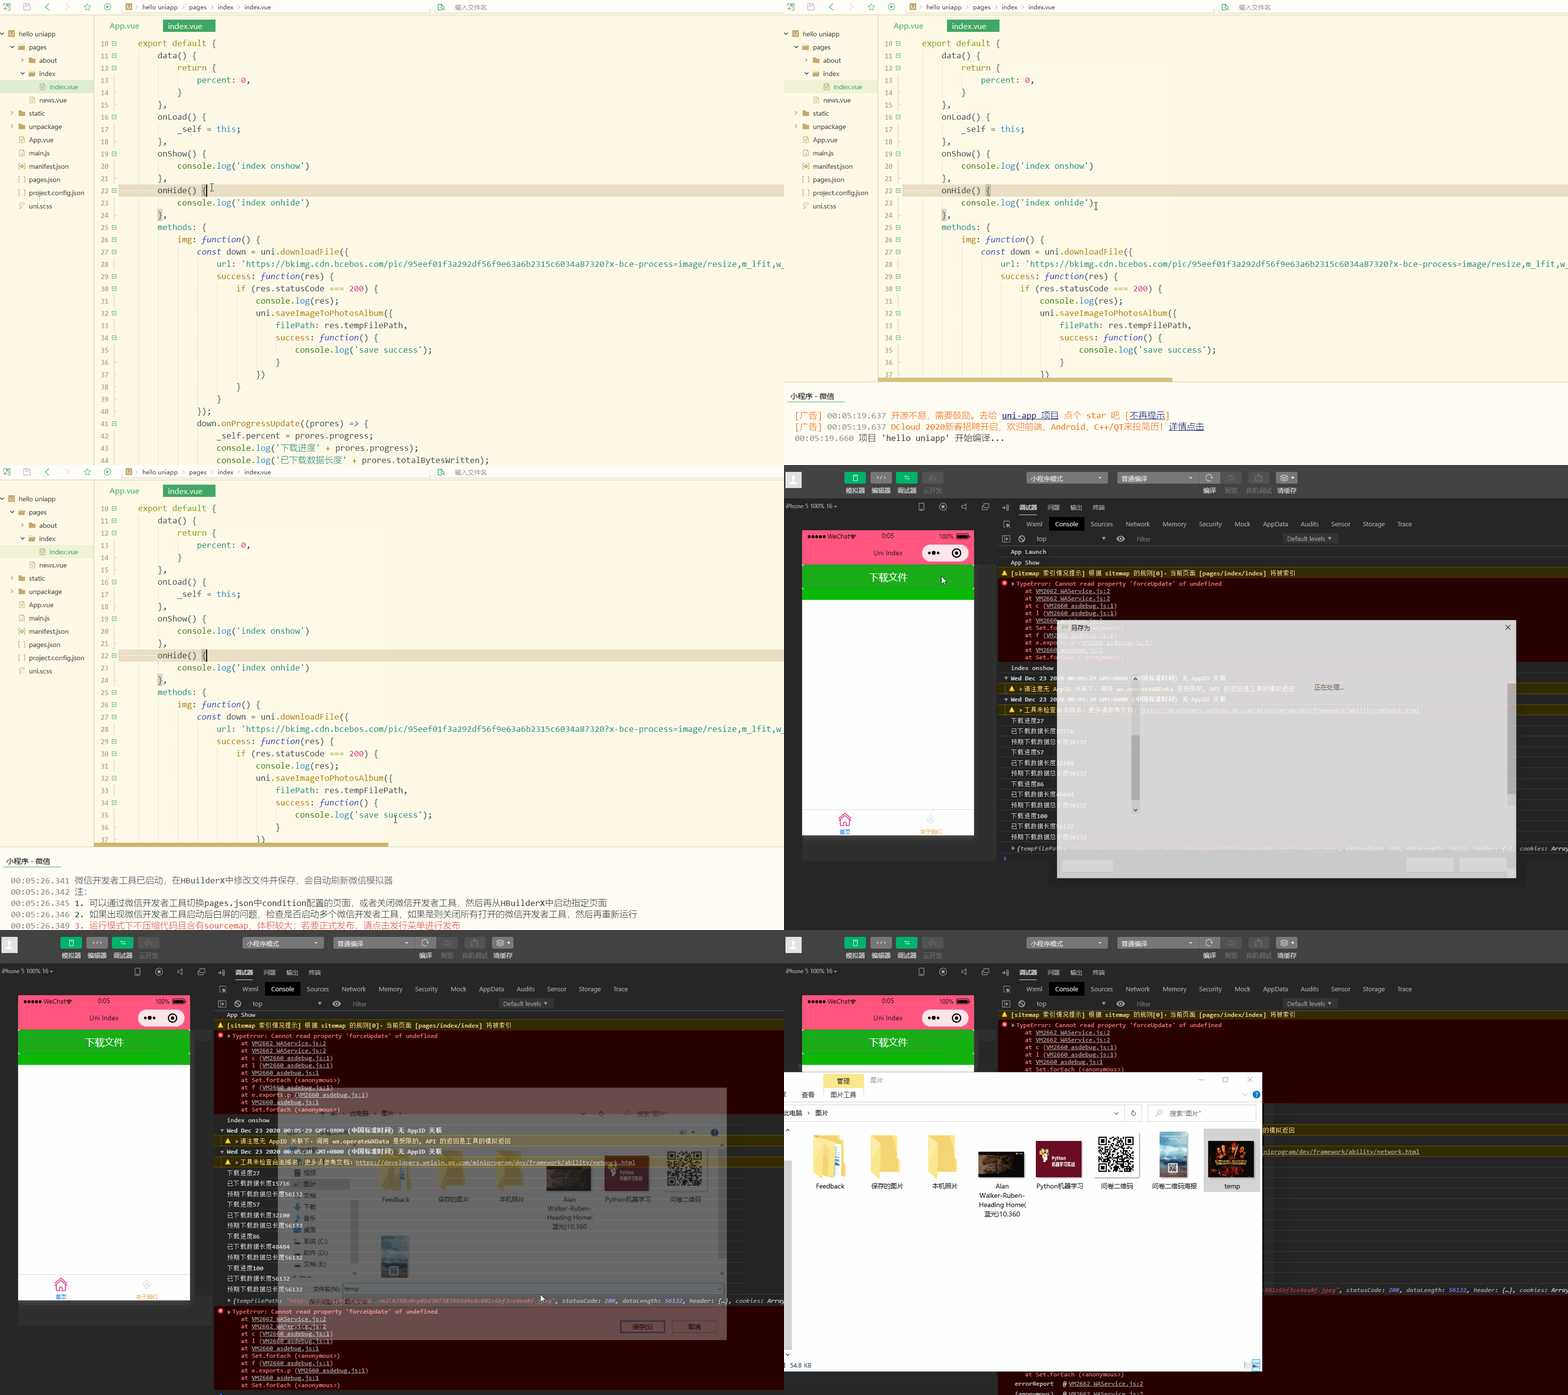
可以下载图片到本地并保存。
四、数据缓存
在APP或者小程序中,可以利用本地存储来保存一些数据,比如用户登录数据,在使用用户名密码或者第三方登录方式进行登录后,会将用户信息保存到服务器端,会将用户id和用户随机码(与用户匹配)以键值对的形式到本地,每次与远程进行交互时,都会将保存下来的用户数据发送到远程进行校验。
1.setStorage(OBJECT)
将数据存储在本地缓存中指定的 key 中,会覆盖掉原来该 key 对应的内容,这是一个异步接口,可以在存储的同时进行其他操作。
OBJECT参数及其意义如下:
| 参数名 | 类型 | 必填与否 | 说明 |
|---|---|---|---|
| key | String | 是 | 本地缓存中的指定的 key |
| data | Any | 是 | 需要存储的内容,只支持原生类型、及能够通过 JSON.stringify 序列化的对象 |
| success | Function | 否 | 接口调用成功的回调函数 |
| fail | Function | 否 | 接口调用失败的回调函数 |
| complete | Function | 否 | 接口调用结束的回调函数(调用成功、失败都会执行) |
2.setStorageSync(KEY,DATA)
将 data 存储在本地缓存中指定的 key 中,会覆盖掉原来该 key 对应的内容,这是一个同步接口,需要在数据存储完成之后才能进行其他操作。
参数及其意义如下:
| 参数名 | 类型 | 必填与否 | 说明 |
|---|---|---|---|
| key | String | 是 | 本地缓存中的指定的 key |
| data | Any | 是 | 需要存储的内容,只支持原生类型、及能够通过 JSON.stringify 序列化的对象 |
在使用uni.setStorageSync(KEY,DATA)存储数据时,需要使用try...catch...语句块捕捉异常。
setStorage和setStorageSync的简单使用如下:
1<template>
2	<view>
3		<button type="primary" @click="asyncsave">异步保存数据</button>
4		<button type="primary" @click="syncsave">同步保存数据</button>
5	</view>
6</template>
7
8<script>
9	export default {
10		data() {
11			return {}
12		},
13		onLoad() {
14		},
15		onShow() {
16			console.log('index onshow')
17		},
18		onHide() {
19			console.log('index onhide')
20		},
21		methods: {
22			asyncsave: function(){
23				uni.setStorage({
24					key: 'name',
25					data: 'Corley',
26					fail:function(){
27						console.log('Save failed')
28					}
29				});
30			},
31			syncsave: function(){
32				try{
33					uni.setStorageSync('age', '18')
34				}catch(e){
35					console.log(e)
36				}
37			}
38		}
39	}
40</script>
41
42<style>
43
44</style>
45
显示:
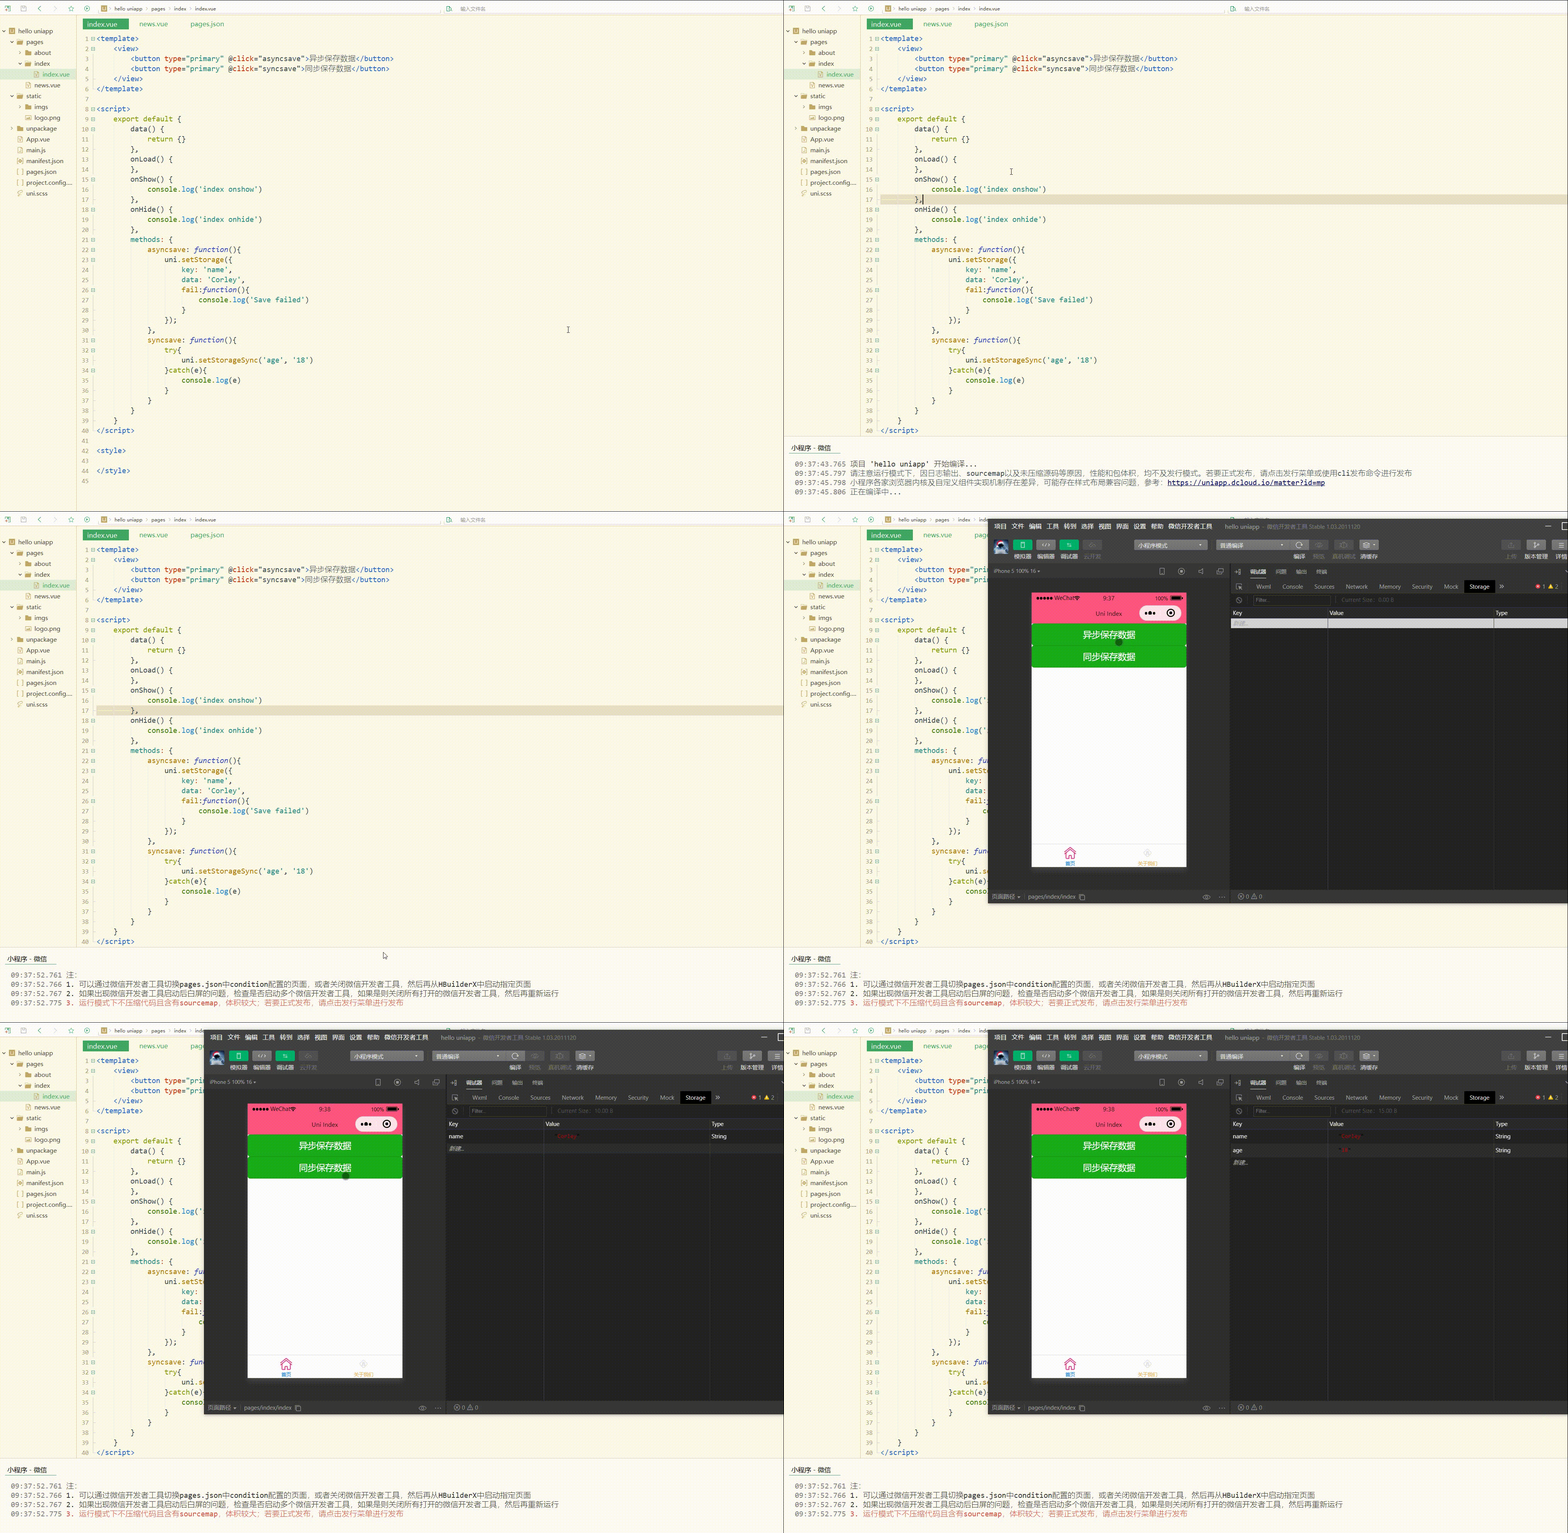
可以看到,两种方式都将数据保存下来。
3.getStorage(OBJECT)
从本地缓存中异步获取指定 key 对应的内容。
OBJECT 参数及其含义如下:
| 参数名 | 类型 | 必填与否 | 说明 |
|---|---|---|---|
| key | String | 是 | 本地缓存中的指定的 key |
| success | Function | 是 | 接口调用的回调函数,res = {data: key对应的内容} |
| fail | Function | 否 | 接口调用失败的回调函数 |
| complete | Function | 否 | 接口调用结束的回调函数(调用成功、失败都会执行) |
4.getStorageSync(KEY)
从本地缓存中同步获取指定 key 对应的内容。
参数及其含义如下:
| 参数名 | 类型 | 必填与否 | 说明 |
|---|---|---|---|
| key | String | 是 | 本地缓存中的指定的 key |
getStorageSync也需要使用try...catch...语句块捕捉异常。
getStorage和getStorageSync的简单使用如下:
1<template>
2	<view>
3		<button type="primary" @click="asyncget">异步获取数据</button>
4		<button type="primary" @click="syncget">同步获取数据</button>
5	</view>
6</template>
7
8<script>
9	export default {
10		data() {
11			return {}
12		},
13		onLoad() {
14			uni.setStorage({
15				key: 'name',
16				data: 'Corley',
17				fail:function(){
18					console.log('Save failed')
19				}
20			});
21			try{
22				uni.setStorageSync('age', '18')
23			}catch(e){
24				console.log(e)
25			}
26		},
27		onShow() {
28			console.log('index onshow')
29		},
30		onHide() {
31			console.log('index onhide')
32		},
33		methods: {
34			asyncget: function(){
35				uni.getStorage({
36					key: 'age',
37					success: function (res) {
38						console.log('age:'+res.data);
39					}
40				})
41			},
42			syncget: function(){
43				try{
44					const name = uni.getStorageSync('name');
45					if (name){
46						console.log('name:'+name);
47					}
48				}catch(e){
49					console.log(e);
50				}
51			}
52		}
53	}
54</script>
55
56<style>
57
58</style>
59
显示:
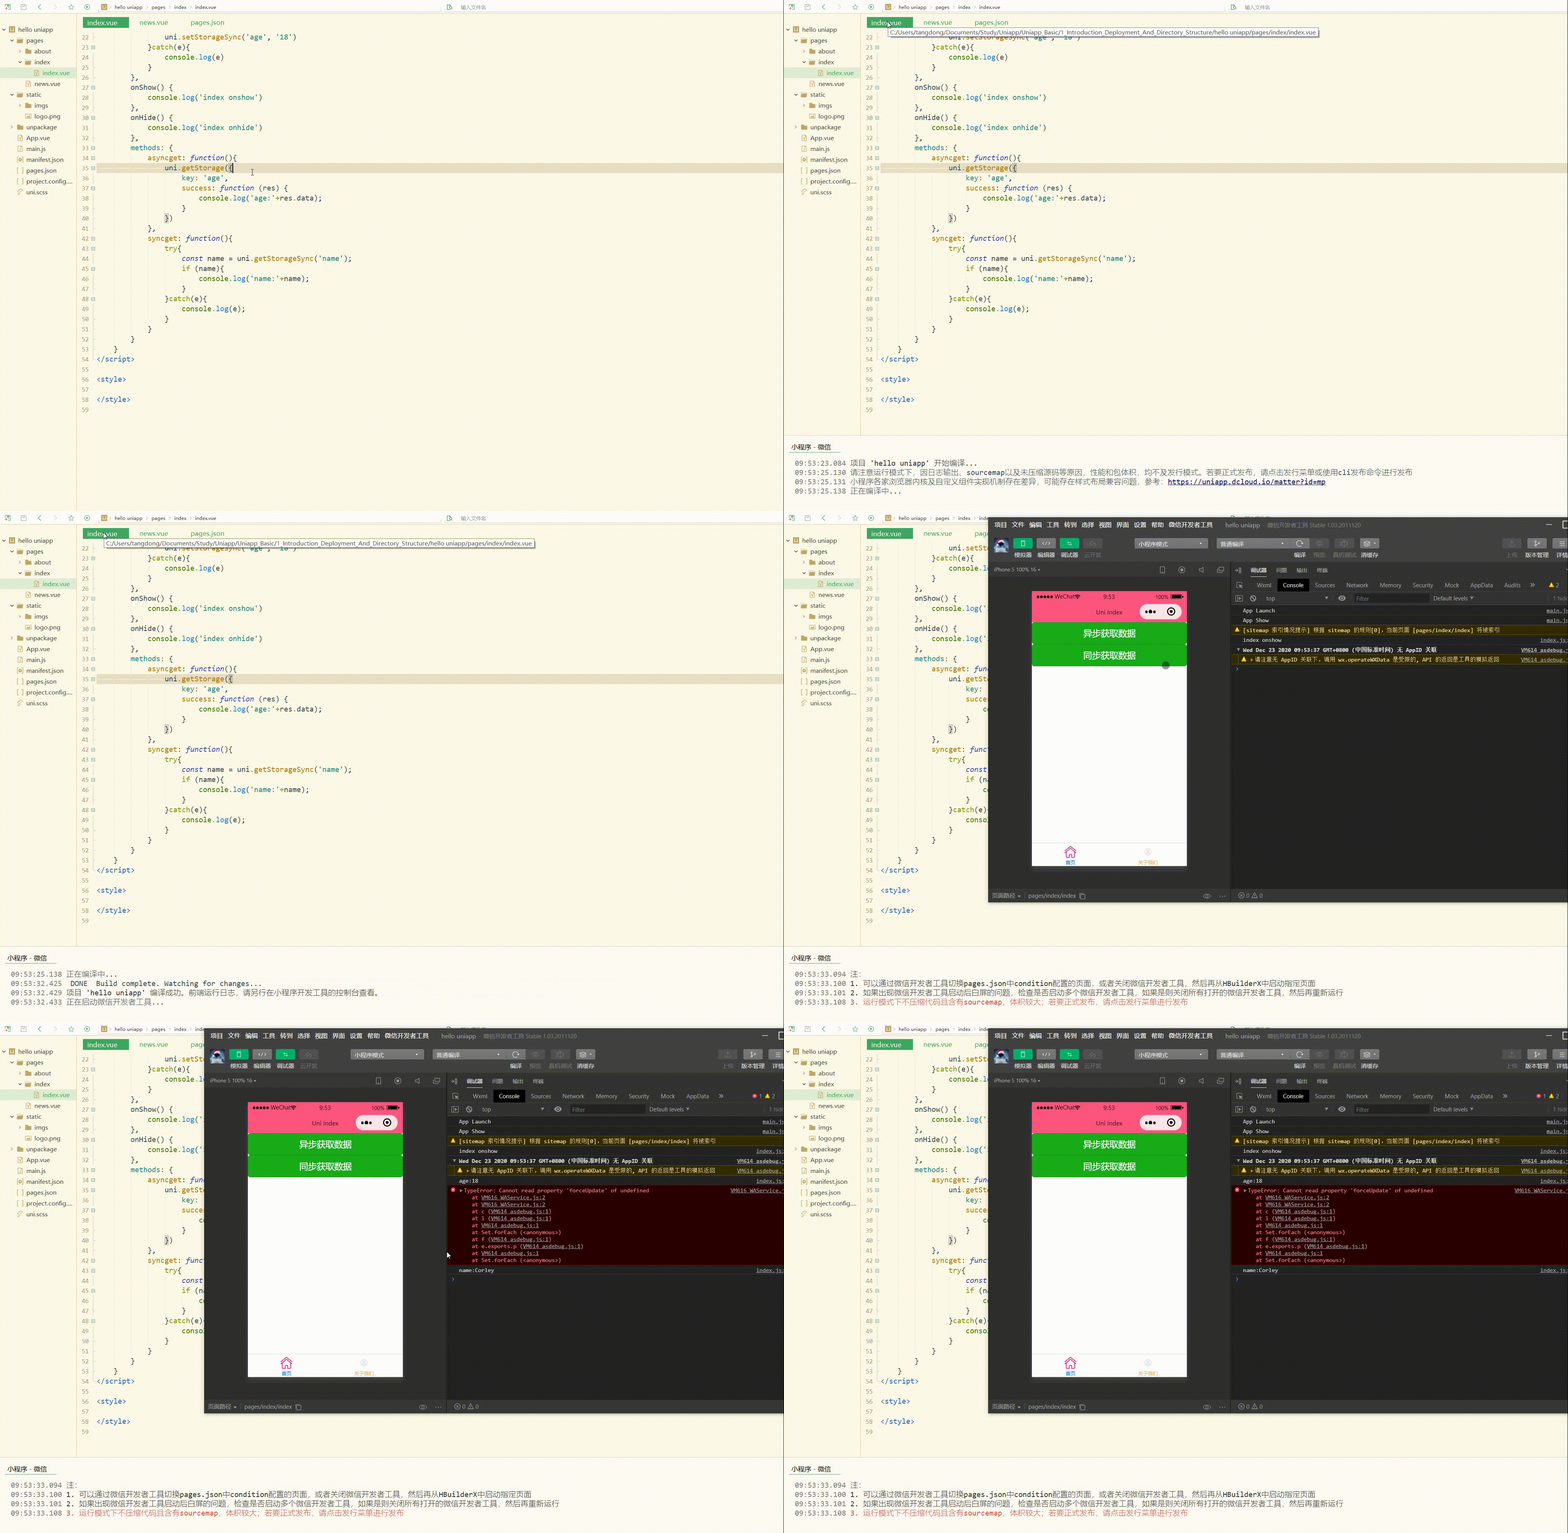
可以获取到之前保存下来的数据。
5.removeStorage(OBJECT)
从本地缓存中异步移除指定 key。
OBJECT 参数及其含义如下:
| 参数名 | 类型 | 必填与否 | 说明 |
|---|---|---|---|
| key | String | 是 | 本地缓存中的指定的 key |
| success | Function | 是 | 接口调用的回调函数 |
| fail | Function | 否 | 接口调用失败的回调函数 |
| complete | Function | 否 | 接口调用结束的回调函数(调用成功、失败都会执行) |
6.removeStorageSync(KEY)
从本地缓存中同步移除指定 key。
参数说明:
| 参数名 | 类型 | 必填与否 | 说明 |
|---|---|---|---|
| key | String | 是 | 本地缓存中的指定的 key |
removeStorage和removeStorageSync的简单使用如下:
1<template>
2	<view>
3		<button type="primary" @click="asyncremove">异步删除数据</button>
4		<button type="primary" @click="syncremove">同步删除数据</button>
5	</view>
6</template>
7
8<script>
9	export default {
10		data() {
11			return {}
12		},
13		onLoad() {
14			uni.setStorage({
15				key: 'name',
16				data: 'Corley',
17				fail:function(){
18					console.log('Save failed')
19				}
20			});
21			try{
22				uni.setStorageSync('age', '18')
23			}catch(e){
24				console.log(e)
25			}
26		},
27		onShow() {
28			console.log('index onshow')
29		},
30		onHide() {
31			console.log('index onhide')
32		},
33		methods: {
34			asyncremove: function(){
35				uni.removeStorage({
36					key: 'age',
37					success: function (res) {
38						console.log('async remove success');
39					}
40				})
41			},
42			syncremove: function(){
43				try{
44					uni.removeStorageSync('name');
45					console.log('sync remove success');
46				}catch(e){
47					console.log(e);
48				}
49			}
50		}
51	}
52</script>
53
54<style>
55
56</style>
57
显示:
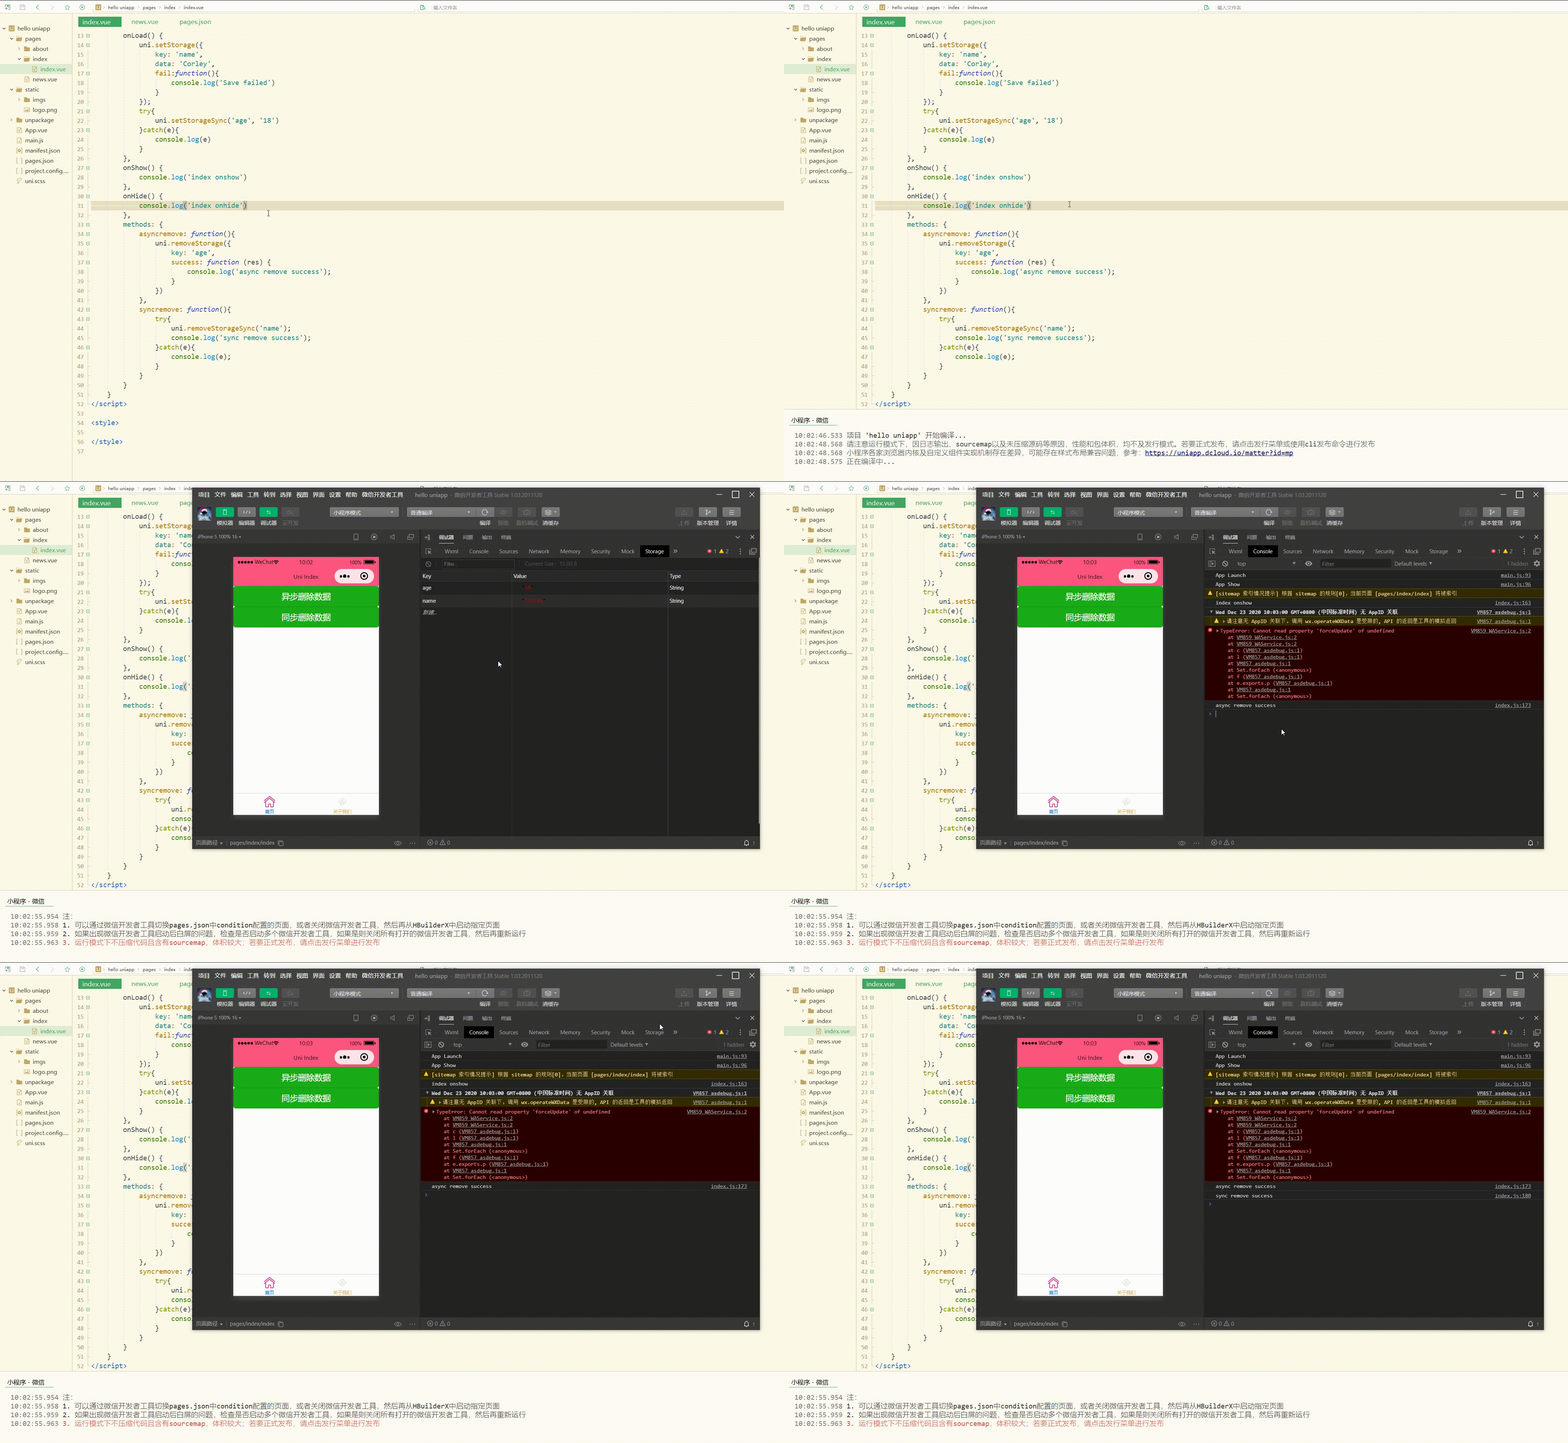
此时可以删除指定的数据。
uni.getStorageInfo(OBJECT)和uni.getStorageInfoSync()用于异步和同步获取当前 storage 的相关信息,uni.clearStorage()和uni.clearStorageSync()用于异步和同步清理本地数据缓存,它们的用法与前3组接口类似。
总结
uni-app提供的的js接口包括标准ECMAScript的js API 和 uni 扩展 API 两部分,每个接口都能实现特定的功能,可以根据具体需要选择使用,来进一步加快开发效率。
本文原文首发来自博客专栏移动应用开发,由本人转发至https://www.helloworld.net/p/gKOlTa3hzOF2P,其他平台均属侵权,可点击https://blog.csdn.net/CUFEECR/article/details/111579924查看原文,也可点击https://blog.csdn.net/CUFEECR浏览更多优质原创内容。