
11月13~15日,KubeCon 上海大会召开,云原生是这个秋天最火热的技术。很多同学来问如何上手 Kubernetes和Istio 服务网格开发。本文将帮助你利用Docker CE桌面版,15分钟在笔记本上从零搭建 Kubernetes + Istio开发环境,开启云原生之旅。
说明:本文测试通过环境 Docker CE 18.09 (Kubernetes 1.10.3) 以及 Istio 1.0.4
先决条件,你需要一个 Docker for Mac或者Docker for Windows的安装包,如果没有请下载下载 Docker CE最新版本。由于Kubernetes大量的容器镜像在 gcr.io, 无法在国内保证稳定的访问。我们提供了一些工具脚本,帮助从阿里云镜像服务下载所需镜像
首先,
1git clone https://github.com/AliyunContainerService/k8s-for-docker-desktop
2cd k8s-for-docker-desktop
Docker for Mac 开启 Kubernetes
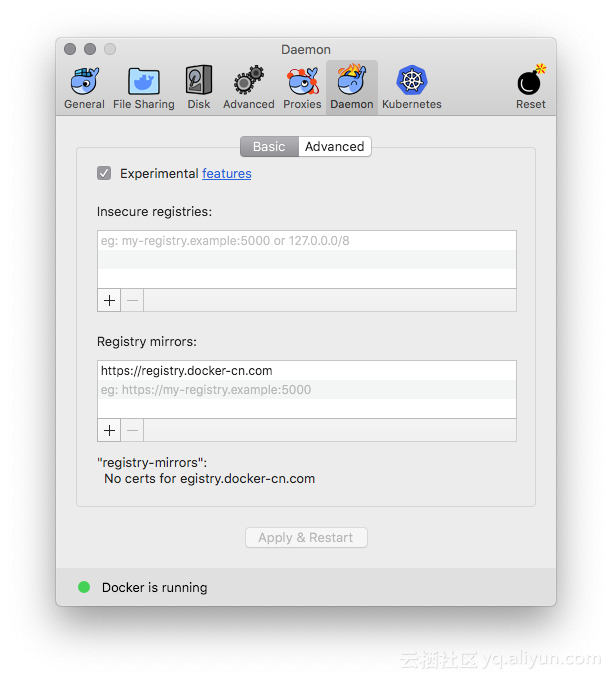
为 Docker daemon 配置 Docker Hub 的中国官方镜像加速 https://registry.docker-cn.com
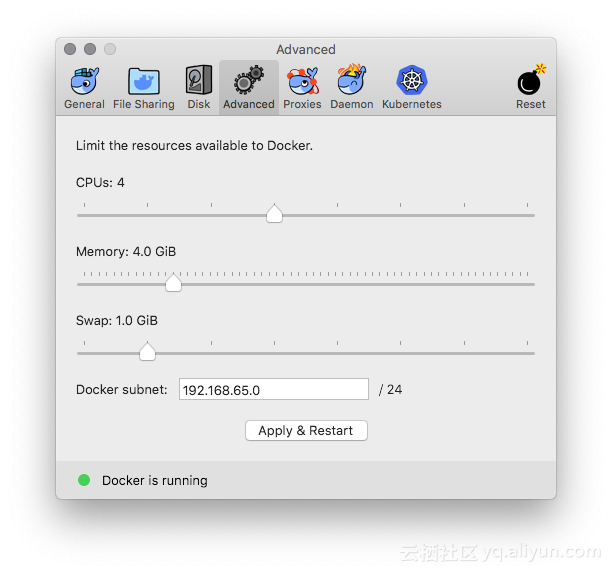
可选操作: 为 Kubernetes 配置 CPU 和 内存资源,建议分配 4GB 或更多内存。
预先从阿里云Docker镜像服务下载 Kubernetes 所需要的镜像, 可以通过修改 images.properties 文件加载你自己需要的镜像
./load_images.sh
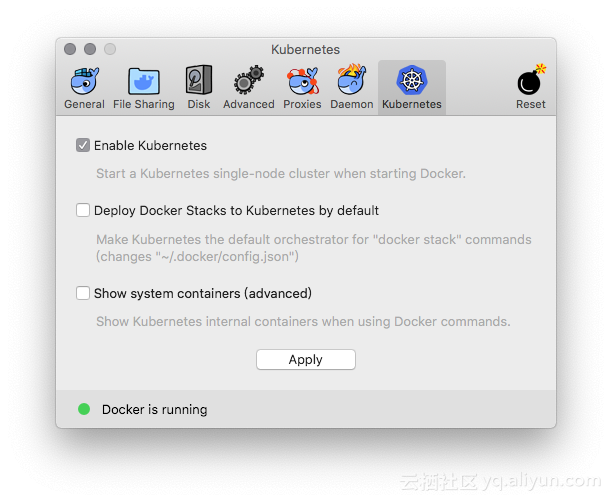
开启 Kubernetes,并等待 Kubernetes 开始运行
Docker for Windows 开启 Kubernetes
为 Docker daemon 配置 Docker Hub 的中国官方镜像加速 https://registry.docker-cn.com
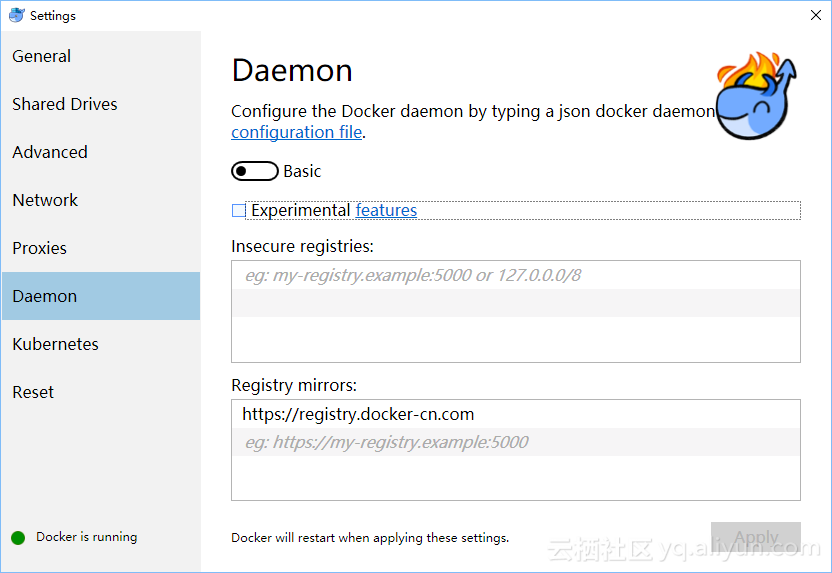
可选操作: 为 Kubernetes 配置 CPU 和 内存资源,建议分配 4GB 或更多内存。
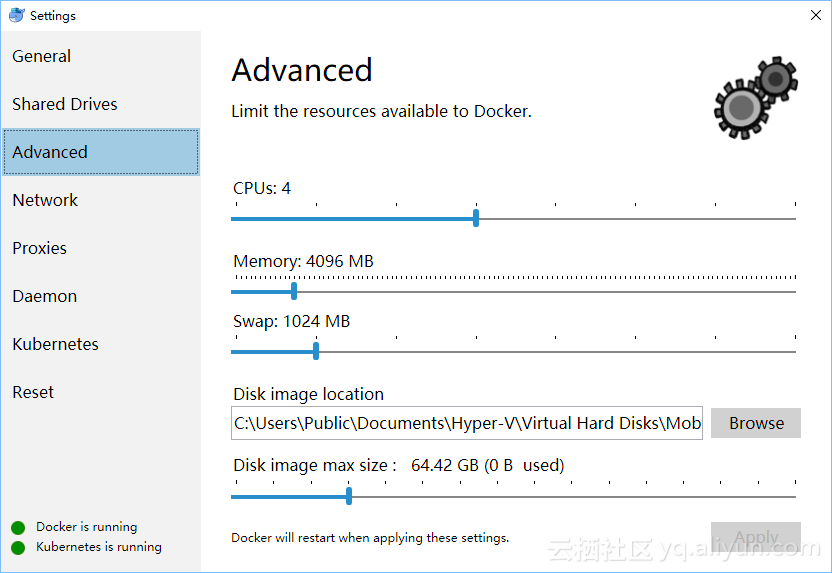
预先从阿里云Docker镜像服务下载 Kubernetes 所需要的镜像, 可以通过修改 images.properties 文件加载你自己需要的镜像
使用 Bash shell
./load_images.sh
使用 PowerShell
.\load_images.ps1
说明: 如果因为安全策略无法执行 PowerShell 脚本,请在 “以管理员身份运行” 的 PowerShell 中执行 Set-ExecutionPolicy RemoteSigned 命令。
开启 Kubernetes,并等待 Kubernetes 开始运行
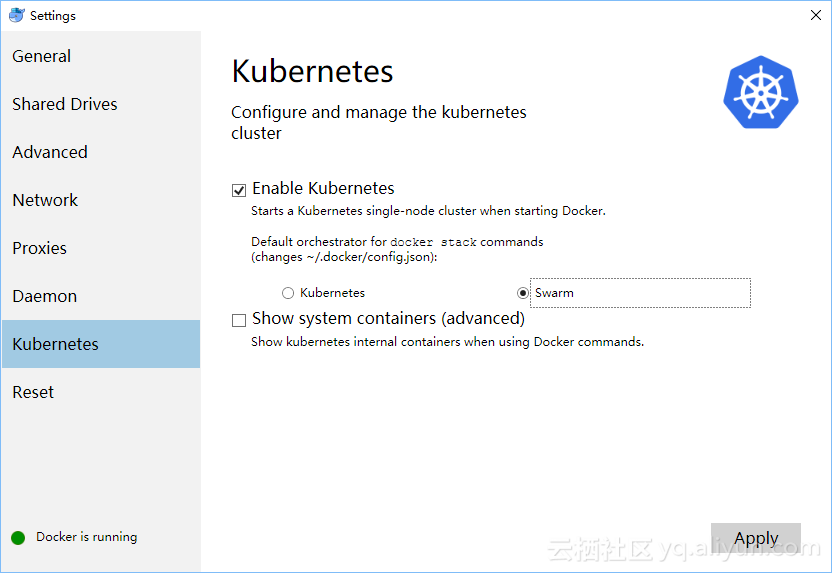
配置 Kubernetes
可选操作: 切换Kubernetes运行上下文至 docker-for-desktop
kubectl config use-context docker-for-desktop
验证 Kubernetes 集群状态
1kubectl cluster-info
2kubectl get nodes
部署 Kubernetes dashboard
kubectl create -f https://raw.githubusercontent.com/kubernetes/dashboard/master/src/deploy/recommended/kubernetes-dashboard.yaml
或
kubectl create -f kubernetes-dashboard.yaml
开启 API Server 访问代理
kubectl proxy
通过如下 URL 访问 Kubernetes dashboard
说明:如果测试 Istio,不需要安装 Ingress,如果需要 Ingress 可以参考 https://github.com/AliyunContainerService/k8s-for-docker-desktop 中 Ingress相关章节
安装 Helm
可以根据文档安装 helm https://github.com/helm/helm/blob/master/docs/install.md
在 Mac OS 上安装
1# Use homebrew on Mac
2brew install kubernetes-helm
3
4# Install Tiller into your Kubernetes cluster
5helm init --upgrade -i registry.cn-hangzhou.aliyuncs.com/google_containers/tiller:v2.11.0 --skip-refresh
6
7# update charts repo (Optional)
8helm repo update
在Windows上安装
1# Use Chocolatey on Windows
2choco install kubernetes-helm
3
4# Install Tiller into your Kubernetes cluster
5helm init --upgrade -i registry.cn-hangzhou.aliyuncs.com/google_containers/tiller:v2.11.0 --skip-refresh
6
7# update charts repo (Optional)
8helm repo update
配置 Istio
可以根据文档安装 Istio https://istio.io/docs/setup/kubernetes/
下载 Istio 1.0.4 并安装 CLI
1curl -L https://git.io/getLatestIstio | sh -
2cd istio-1.0.4/
3export PATH=$PWD/bin:$PATH
在Windows上,您可以手工下载Istio安装包,或者把getLatestIstio.ps1拷贝到你希望下载 Istio 的目录,并执行 - 说明:根据社区提供的安装脚本修改而来
.\getLatestIstio.ps1
通过 Helm chart 安装 Istio
helm install install/kubernetes/helm/istio --name istio --namespace istio-system
查看 istio 发布状态
helm status istio
为 default 名空间开启自动 sidecar 注入
1kubectl label namespace default istio-injection=enabled
2kubectl get namespace -L istio-injection
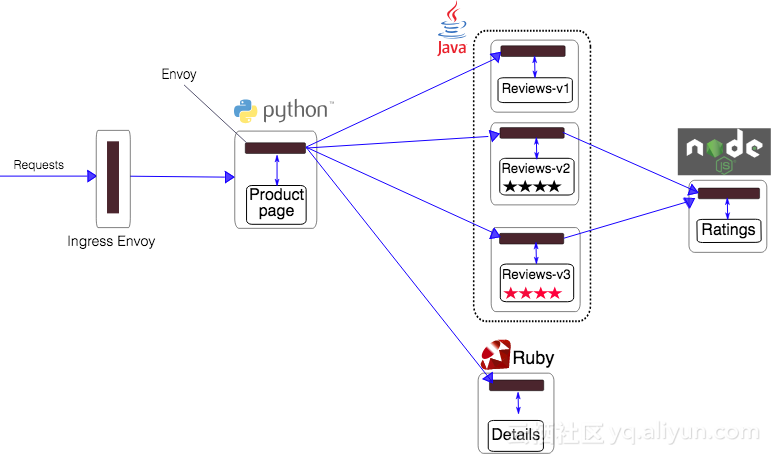
安装 Book Info 示例
1kubectl apply -f samples/bookinfo/platform/kube/bookinfo.yaml
2kubectl apply -f samples/bookinfo/networking/bookinfo-gateway.yaml
确认示例应用在运行中
1export GATEWAY_URL=localhost:80
2curl -o /dev/null -s -w "%{http_code}\n" http://${GATEWAY_URL}/productpage
可以通过浏览器访问
说明:如果当前80端口已经被占用或保留,我们可以编辑 install/kubernetes/helm/istio/values.yaml 文件中
Gateway 端口进行调整,比如将 80 端口替换为 8888 端口
1      ## You can add custom gateway ports
2    - port: 8888  # Changed from 80
3      targetPort: 80
4      name: http2
5      nodePort: 31380
然后执行如下命令并生效
1kubectl delete service istio-ingressgateway -n istio-system
2helm upgrade istio install/kubernetes/helm/istio
学习 Istio
大家参照 Istio 开始学习吧, https://istio.io/zh/docs/examples/bookinfo/
删除实例应用
samples/bookinfo/platform/kube/cleanup.sh
卸载 Istio
1helm del --purge istio
2kubectl delete -f install/kubernetes/helm/istio/templates/crds.yaml -n istio-system
总结
阿里云Kubernetes服务 (ACK) 已经对 Istio提供了支持,并将Istio和阿里云进行了深度整合,比如可以通过阿里云日志服务支持基于Jaeger的全链路监控,基于云监控提升Istio可观测性和报警能力等。后续也将进一步简化Kubernetes和Istio的开发者体验,让大家方便地把 Kubernetes + Istio 应用无缝迁移上云。