1.前言
之前在做项目的时候,需要实现一个文件上传组件并且需要有文件上传进度条,现将之前的实现过程简单记录一下,希望可以帮助到有需要的人。
项目用的是Vue框架,UI库使用的是element UI,前后端交互请求使用的是Vue官方推荐的axios。其中,UI方面主要使用了element UI库中的Upload文件上传组件、Progress 进度条组件。
2.文件上传
文件上传功能使用element UI库中的Upload文件上传组件实现,代码如下:
1<div class="uploadfile">
2      <el-upload
3        ref="upload"
4        class="upload-demo"
5        :before-upload="beforeUpload"
6        drag
7        :auto-upload="false"
8        :on-exceed="handleExceed"
9      >
10        <i class="el-icon-upload"></i>
11        <div class="el-upload__text">将文件拖到此处,或<em>点击选择文件</em></div>
12      </el-upload>
13      <el-button style="margin-left: 10px;" size="small" type="success" @click="submitUpload">上传</el-button>
14    </div>
当点击上传按钮,会触发submitUpload函数,同时该函数也会触发beforeUpload函数:
1beforeUpload(file){
2            let fd = new FormData();
3            fd.append('file', file);
4            let config = {
5              onUploadProgress: progressEvent => {
6                let complete = (progressEvent.loaded / progressEvent.total ).toFixed(2) * 100 ;
7                this.percentage = complete;
8                if (this.percentage >= 100){
9                  this.dialogVisible = true
10                }
11              },
12              headers: {
13                'Content-Type': 'multipart/form-data'
14              }
15            };
16            this.$axios.post(this.url,fd,config)
17              .then((res)=>{
18
19              })
20              .catch((err)=>{
21
22              })
23          },
24          submitUpload(){
25            this.loading = true;
26            this.tips = '正在上传中。。。';
27            this.$refs.upload.submit();
28          },
3.进度条
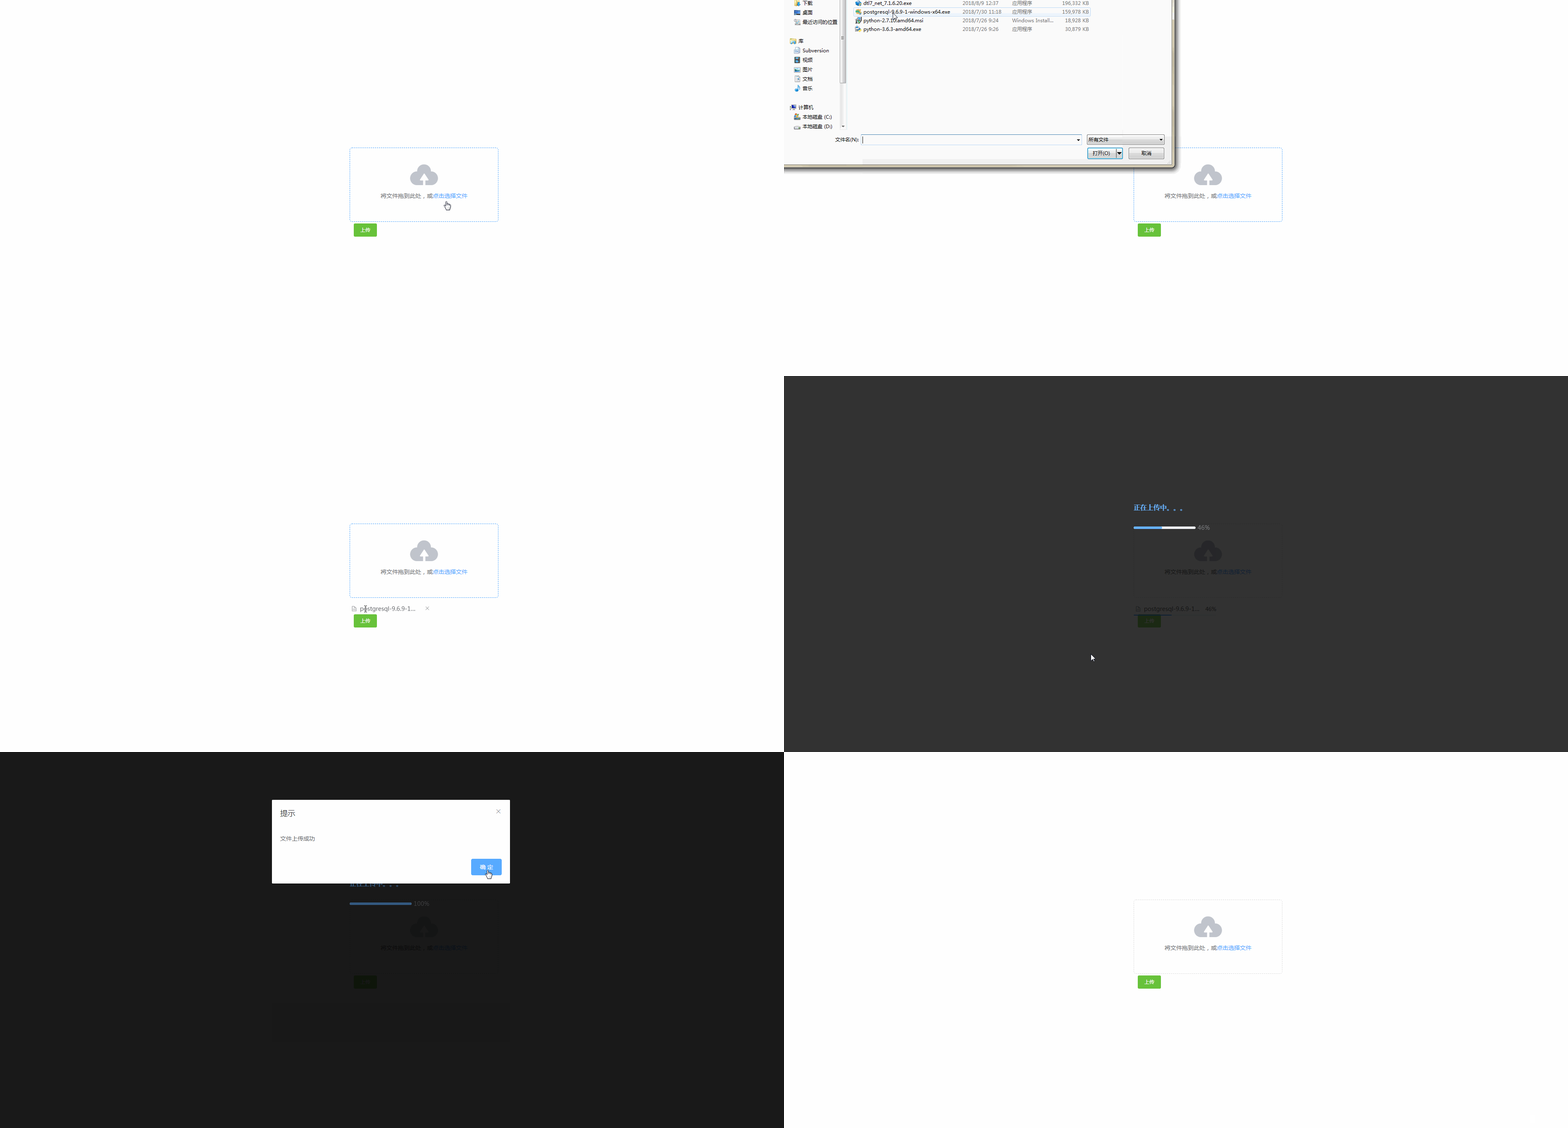
当点击上传后,整个页面被遮罩层遮挡,并显示上传进度:
1<!--遮罩层-->
2    <div class="loading" v-if="loading" >
3      <h4 class="tips">{{tips}}</h4>
4      <!--进度条-->
5      <el-progress type="line" :percentage="percentage" class="progress" :show-text="true"></el-progress>
6    </div>
进度条关键代码:
进度条的实现主要依靠axios中提供的onUploadProgress函数,该函数提供了文件已上传部分的大小progressEvent.loaded和文件总大小progressEvent.total,利用这两个数据我们就可以计算出已经上传文件的进度。
1beforeUpload(file){
2            let fd = new FormData();
3            fd.append('file', file);
4            let config = {
5              onUploadProgress: progressEvent => {
6                //progressEvent.loaded:已上传文件大小
7                //progressEvent.total:被上传文件的总大小
8                let complete = (progressEvent.loaded / progressEvent.total ).toFixed(2) * 100 ;
9                this.percentage = complete;
10                if (this.percentage >= 100){
11                  this.dialogVisible = true
12                }
13              },
14              headers: {
15                'Content-Type': 'multipart/form-data'
16              }
17            };
18            this.$axios.post(this.url,fd,config)
19              .then((res)=>{
20
21              })
22              .catch((err)=>{
23
24              })
25          },
4.全部代码
封装好组件后,我们只需在父组件中调用该组件并传入文件上传到的目的url即可。
<UploadFile :url="/test/"/>
以下是该组件UploadFile.vue的全部代码:
1<template>
2  <div>
3    <!--文件上传入口-->
4    <div class="uploadfile">
5      <el-upload
6        ref="upload"
7        class="upload-demo"
8        :before-upload="beforeUpload"
9        drag
10        :auto-upload="false"
11        :on-exceed="handleExceed"
12      >
13        <i class="el-icon-upload"></i>
14        <div class="el-upload__text">将文件拖到此处,或<em>点击选择文件</em></div>
15      </el-upload>
16      <el-button style="margin-left: 10px;" size="small" type="success" @click="submitUpload">上传</el-button>
17    </div>
18    <!--遮罩层-->
19    <div class="loading" v-if="loading" >
20      <h4 class="tips">{{tips}}</h4>
21      <!--进度条-->
22      <el-progress type="line" :percentage="percentage" class="progress" :show-text="true"></el-progress>
23    </div>
24    <!--上传完成提示对话框-->
25    <el-dialog
26      title="提示"
27      :visible="dialogVisible"
28      width="30%"
29      :modal-append-to-body='false'
30    >
31      <span>文件上传成功</span>
32      <span slot="footer" class="dialog-footer">
33        <el-button type="primary" @click="ensure">确 定</el-button>
34      </span>
35    </el-dialog>
36
37  </div>
38</template>
39
40<script>
41    import Vue from 'vue'
42    import {Upload,Button,Progress,Dialog} from 'element-ui';
43    Vue.use(Upload);
44    Vue.use(Button);
45    Vue.use(Progress);
46    Vue.use(Dialog);
47
48    export default {
49        name: "UploadFile",
50        data(){
51          return {
52            loading:false,
53            percentage:0,
54            tips:'',
55            dialogVisible:false
56          }
57        },
58        props:['url'],
59        methods:{
60          beforeUpload(file){
61            let fd = new FormData();
62            fd.append('file', file);
63            let config = {
64              onUploadProgress: progressEvent => {
65                //progressEvent.loaded:已上传文件大小
66                //progressEvent.total:被上传文件的总大小
67                let complete = (progressEvent.loaded / progressEvent.total ).toFixed(2) * 100 ;
68                this.percentage = complete;
69                if (this.percentage >= 100){
70                  this.dialogVisible = true
71                }
72              },
73              headers: {
74                'Content-Type': 'multipart/form-data'
75              }
76            };
77            this.$axios.post(this.url,fd,config)
78              .then((res)=>{
79
80              })
81              .catch((err)=>{
82
83              })
84          },
85          handleExceed(){
86
87          },
88          submitUpload(){
89            this.loading = true;
90            this.tips = '正在上传中。。。';
91            this.$refs.upload.submit();
92          },
93          ensure(){
94            this.dialogVisible = false;
95            this.loading = false;
96          }
97        }
98    }
99</script>
100
101<style scoped>
102  .uploadfile{
103    width: 200px;
104    height: 200px;
105    position: absolute;
106    top: 50%;
107    left: 50%;
108    margin-left: -100px;
109    margin-top: -100px;
110  }
111   .loading{
112    position: absolute;
113    left: 0;
114    top: 0;
115    right: 0;
116    bottom: 0;
117    background: black;
118    opacity: 0.8;
119  }
120  .progress{
121    width: 200px;
122    height: 200px;
123    position: absolute;
124    top: 50%;
125    left: 50%;
126    margin-left: -100px;
127    margin-top: -100px;
128  }
129  .tips{
130    color: #409eff;
131    position: absolute;
132    top: 50%;
133    left: 50%;
134    margin-left: -100px;
135    margin-top: -150px;
136  }
137
138</style>
139
5.效果演示
主要说明原理,UI就自行发挥吧。