
❝
欢迎阅读本博文,本文主要讲述【使用Vue封装一个实用的人脸识别组件】,文字通俗易懂,如有不妥,还请多多指正。
❞

在这里插入图片描述
前言
人脸识别技术现在越来越火,那么我们今天教大家实现一个人脸识别组件。
资源
-
element UI
-
Vue.js
-
tracking-min.js
-
face-min.js
源码
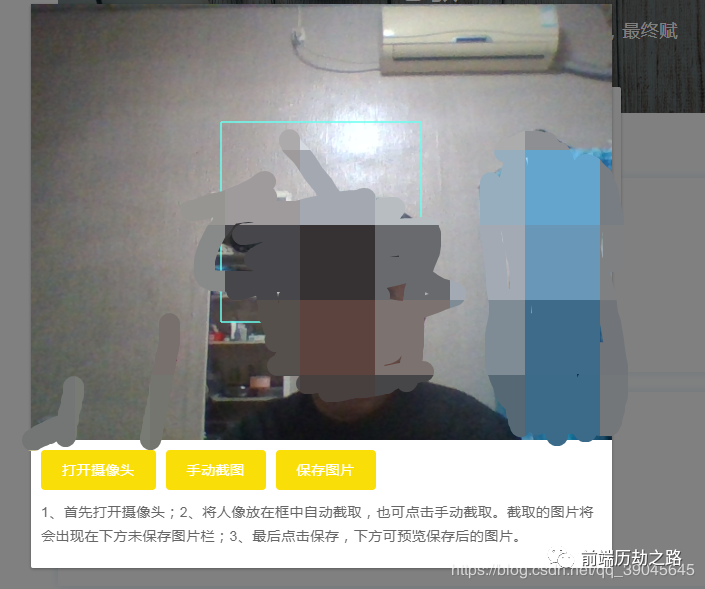
由于我们的电脑有的有摄像头,有的没有摄像头,所以我们需要根据不同的场景来封装这个组件。先放个图吧,大家可以看得更加直观一些。
有摄像头的话,我们就显示(需要人像识别组件): 没有摄像头的话,我们就显示(这个直接上传人像即可):
 判断有无摄像头,我们可以使用这个方法:
1// 判断有无摄像头,推荐放在created里
2    var deviceList = [];
3    navigator.mediaDevices
4      .enumerateDevices()
5      .then(devices => {
6        devices.forEach(device => {
7          deviceList.push(device.kind);
8        });
9        if (deviceList.indexOf("videoinput") == "-1") {
10          console.info("没有摄像头");
11          return false;
12        } else {
13          console.info("有摄像头");
14          this.videoinput = true; // 这是我自定义的一个状态,初始值为false
15        }
16      })
17      .catch(function(err) {
18        alert(err.name + ": " + err.message);
19      });
20
21
完整代码:
「index.vue」
1<template>
2<!-- 人脸识别 -->
3    <el-dialog
4      :visible.sync="openFaceView"
5      width="581px"
6      :show-close="false"
7      v-loading="faceloading"
8      element-loading-text="人脸识别中"
9    >
10      <div class="ovf" style="padding:20px;">
11        <el-upload
12          v-if="!videoinput"
13          class="upload-demo"
14          action
15          multiple
16          :limit="1"
17          :file-list="fileList"
18          :on-change="handleChange"
19          :on-exceed="handleExceed"
20          :before-remove="beforeRemove"
21          :auto-upload="false"
22        >
23          <el-button size="small" type="primary">点击上传人像图片</el-button>
24        </el-upload>
25        <div v-if="videoinput">
26          <el-button size="small" type="primary" @click="checkFace">点击进行人脸识别</el-button>
27          <div slot="tip" class="el-upload__tip">此功能需到非IE浏览器进行</div>
28        </div>
29        <div class="dialog-footer">
30          <el-button @click="openFaceView = false">取 消</el-button>
31          <el-button type="primary" @click="postFace()">确 定</el-button>
32        </div>
33      </div>
34    </el-dialog>
35    <el-dialog :visible.sync="checkFaceView" width="581px" :show-close="false">
36      <Face :faceView="checkFaceView" @canvasToImage="getImgFile"></Face>
37    </el-dialog>
38</template>
39<script>
40import { verifyFace } from "../../request/api"; //引入人脸识别接口
41import Face from "./Face"; // 引入人脸识别组件
42export default {
43  name: "MyClassRoom",
44  data() {
45    return {
46     openFaceView:true,
47     faceloading: false,
48     videoinput: false,
49     fileList: [],
50     face: "",
51 }
52  },
53  components: {
54    Face
55  },
56
57  methods: {
58  // 弹出人脸识别框
59    checkFace() {
60      this.checkFaceView = true;
61    },
62    // 限制上传照片
63    handleExceed() {
64      this.$message.warning({
65        message: "不要重复上传!",
66        offset: 380,
67        duration: 1000
68      });
69    },
70    // 移除人像图片
71    beforeRemove(file) {
72      return this.$confirm(`确定移除 ${file.name}?`);
73    },
74    // 上传的文件
75    handleChange(file) {
76      this.face = file.raw;
77    },
78    // 获取截取图片
79    getImgFile(d) {
80      this.face = d;
81      this.checkFaceView = false;
82    },
83    // 人脸识别完毕
84    postFace() {
85      this.faceloading = true;
86      this.checkFaceView=false;
87      let formData = new FormData();
88      formData.append("face", this.face);
89      /*人脸识别接口,把获取到的照片传到后台,我这里使用了封装axios。需要注意使用   config.headers = {'Content-Type':'multipart/form-data'} 传照片
90      */
91      verifyFace(formData, { isUpload: true })
92        .then(res => {
93          console.log(res);
94          if (res.code == 0) {
95            this.faceloading = false;
96            this.$message.success({
97              message: "人脸识别成功!",
98              offset: 380,
99              duration: 1000
100            });
101          } else {
102            this.$message.error({
103              message: "人脸识别失败!",
104              offset: 380,
105              duration: 1000
106            });
107            this.faceloading = false;
108          }
109        })
110        .catch(err => {
111          console.log(err);
112        });
113    }
114  },
115  created() {
116    // 判断有无摄像头
117    var deviceList = [];
118    navigator.mediaDevices
119      .enumerateDevices()
120      .then(devices => {
121        devices.forEach(device => {
122          deviceList.push(device.kind);
123        });
124        if (deviceList.indexOf("videoinput") == "-1") {
125          console.info("没有摄像头");
126          return false;
127        } else {
128          console.info("有摄像头");
129          this.videoinput = true;
130        }
131      })
132      .catch(function(err) {
133        alert(err.name + ": " + err.message);
134      });
135  },
136
137}
138</script>
139
「Face.vue」
1<!-- 人脸识别 -->
2<template>
3  <div class="face">
4    <div class="container">
5      <video id="video" preload autoplay loop muted></video>
6      <canvas id="canvas" width="581" height="436"></canvas>
7      <canvas id="canvas1" width="581" height="436"></canvas>
8    </div>
9    <div class="btns">
10      <el-button type="primary" @click="start">打开摄像头</el-button>
11      <el-button type="primary" @click="screenshot">手动截图</el-button>
12      <el-button type="primary" @click="keepImg">保存图片</el-button>
13      <p class="tips">1、首先打开摄像头;2、将人像放在框中自动截取,也可点击手动截取。截取的图片将会出现在下方未保存图片栏;3、最后点击保存,下方可预览保存后的图片。</p>
14    </div>
15    <div class="imgs" v-show="imgView">
16      <p>未保存图片</p>
17      <canvas id="shortCut" width="140" height="140"></canvas>
18      <p>已保存图片</p>
19      <div id="img"></div>
20    </div>
21  </div>
22</template>
23<script>
24import "../../assets/js/tracking-min.js"; // 需要引入(下载链接在文末)
25import "../../assets/js/face-min.js"; // // 需要引入(下载链接在文末)
26export default {
27  name: "testTracking",
28  props: ["faceView"],
29  data() {
30    return {
31      saveArray: {},
32      imgView: false
33    };
34  },
35  methods: {
36    // 打开摄像头
37    start() {
38      var saveArray = {};
39      var canvas = document.getElementById("canvas");
40      var context = canvas.getContext("2d");
41      // eslint-disable-next-line no-undef
42      var tracker = new window.tracking.ObjectTracker("face");
43      tracker.setInitialScale(4);
44      tracker.setStepSize(2);
45      tracker.setEdgesDensity(0.1);
46      // eslint-disable-next-line no-undef
47      this.trackerTask = window.tracking.track("#video", tracker, {
48        camera: true
49      });
50      tracker.on("track", function(event) {
51        context.clearRect(0, 0, canvas.width, canvas.height);
52        event.data.forEach(function(rect) {
53          context.strokeStyle = "#fff";
54          context.strokeRect(rect.x, rect.y, rect.width, rect.height);
55          context.fillStyle = "#fff";
56          saveArray.x = rect.x;
57          saveArray.y = rect.y;
58          saveArray.width = rect.width;
59          saveArray.height = rect.height;
60        });
61      });
62      var canvas1 = document.getElementById("canvas1");
63      var context1 = canvas1.getContext("2d");
64      context1.strokeStyle = "#69fff1";
65      context1.moveTo(190, 118);
66      context1.lineTo(390, 118);
67      context1.lineTo(390, 318);
68      context1.lineTo(190, 318);
69      context1.lineTo(190, 118);
70      context1.stroke();
71      setInterval(() => {
72        if (
73          saveArray.x > 200 &&
74          saveArray.x + saveArray.width < 400 &&
75          saveArray.y > 120 &&
76          saveArray.y + saveArray.height < 320 &&
77          saveArray.width < 180 &&
78          saveArray.height < 180
79        ) {
80          console.log(saveArray);
81          this.getPhoto();
82          for (var key in saveArray) {
83            delete saveArray[key];
84          }
85        }
86      }, 2000);
87    },
88    // 获取人像照片
89    getPhoto() {
90      var video = document.getElementById("video");
91      var can = document.getElementById("shortCut");
92      var context2 = can.getContext("2d");
93      context2.drawImage(video, 210, 130, 210, 210, 0, 0, 140, 140);
94      this.imgView = true;
95    },
96    // 截屏
97    screenshot() {
98      this.getPhoto();
99    },
100    // 将canvas转化为图片
101    convertCanvasToImage(canvas) {
102      var image = new Image();
103      image.src = canvas.toDataURL("image/png");
104      return image;
105    },
106    //将base64转换为文件,dataurl为base64字符串,filename为文件名(必须带后缀名,如.jpg,.png)
107    dataURLtoFile(dataurl, filename) {
108      var arr = dataurl.split(","),
109        mime = arr[0].match(/:(.*?);/)[1],
110        bstr = atob(arr[1]),
111        n = bstr.length,
112        u8arr = new Uint8Array(n);
113      while (n--) {
114        u8arr[n] = bstr.charCodeAt(n);
115      }
116      return new File([u8arr], filename, { type: mime });
117    },
118    // 保存图片
119    keepImg() {
120      var can = document.getElementById("shortCut");
121      var img = document.getElementById("img");
122      var photoImg = document.createElement("img");
123      photoImg.src = this.convertCanvasToImage(can).src;
124      img.appendChild(photoImg);
125      //获取到转化为base64的图片地址
126        this.$emit(
127          "canvasToImage",
128          this.dataURLtoFile(this.convertCanvasToImage(can).src, "person.jpg")
129        );
130
131      console.log(
132        this.dataURLtoFile(this.convertCanvasToImage(can).src, "person.jpg")
133      );
134    },
135    clearCanvas() {
136      var c = document.getElementById("canvas");
137      var c1 = document.getElementById("canvas1");
138      var cxt = c.getContext("2d");
139      var cxt1 = c1.getContext("2d");
140      cxt.clearRect(0, 0, 581, 436);
141      cxt1.clearRect(0, 0, 581, 436);
142    },
143    closeFace() {
144      console.log("关闭人脸识别窗口");
145      this.imgView = false;
146      this.clearCanvas();
147      // 停止侦测
148      this.trackerTask.stop();
149      console.log(this.trackerTask);
150      // 关闭摄像头
151      var video = document.getElementById("video");
152      video.srcObject.getTracks()[0].stop();
153    }
154  },
155  watch: {
156    faceView(v) {
157      if (v == false) {
158        this.closeFace();
159      }
160    },
161    imgView(v) {
162      if (v == true) {
163        this.$message.success({
164          message: "截取成功!点击保存图片",
165          offset: 380,
166          duration: 1000
167        });
168      }
169    }
170  },
171  destroyed() {}
172};
173</script>
174<style scoped lang="scss">
175.face {
176  .container {
177    background: #000;
178    position: relative;
179    width: 581px;
180    height: 436px;
181    #canvas1 {
182      position: absolute;
183    }
184    video,
185    #canvas,
186    #canvas1 {
187      position: absolute;
188      width: 581px;
189      height: 436px;
190    }
191  }
192  .btns {
193    padding: 10px;
194    .tips {
195      font-size: 14px;
196      color: #666;
197      margin: 10px 0;
198      line-height: 24px;
199    }
200  }
201  .imgs {
202    padding: 10px;
203    p {
204      font-size: 16px;
205    }
206  }
207}
208</style>
209
210
在这里插入图片描述
结语
这样,一个简单又实用的人像识别就这样完成了。下面是库文件链接:
face-min.js「链接:」 https://pan.baidu.com/s/1gB0Yd178a\_8a\_Bp3zKunHg**「提取码:」** 9q7q
tracking-min.js「链接:」 https://pan.baidu.com/s/1LP7pZIbAgfYdAqp-NchQLw**「提取码:」** qx75
❝
作者:「Vam的金豆之路」
主要领域:「前端开发」
我的微信:「maomin9761」
微信公众号:「前端历劫之路」
❞
本文转转自微信公众号前端历劫之路原创https://mp.weixin.qq.com/s/6bQdDGh6iK4YChot2Xwkgw,如有侵权,请联系删除。