
GitHub Action 是 GitHub 官方的 CI/CD 工具,相较于 Travis CI 和 Circle CI,更轻量和易于扩展,marketplace 中有大量社区贡献的插件。各大开源项目都纷纷转向使用 GitHub Action 作为持续集成的工具,比如本文的主角 Deno。
GitHub 的文档中有很多概念写的十分晦涩,有些翻译很僵硬影响理解。截止发稿时,Deno 的 ci.yml 文件有 323 行,是一个很好的学习范本。想要对 GitHub Action 有个了解或对 Deno 的持续集成部分感兴趣的同学都可以一起来探究下。
Action 结构
注意:GitHub Action 的 ci 脚本需要放在
.github/workflows文件夹下
1name: ci
2
3on: [push, pull_request]
4
5jobs:
name:工作流程的名称。GitHub 在仓库的操作页面上显示工作流程的名称。如果省略 name,GitHub 将其设置为相对于仓库根目录的工作流程文件路径。on:必填。是触发工作流程的事件。Deno 中 的[push,pull_request]代表有主分支有提交代码或 pull_request 时触发 CI 流程。jobs:工作流程运行包括一项或多项作业。作业默认是并行运行。Deno 中只有一个 job ——build
build job
1jobs:
2  build:
3    name: ${{ matrix.kind }} ${{ matrix.os }}
4    if: |
5      github.event_name == 'push' ||
6      !startsWith(github.event.pull_request.head.label, 'denoland:')
7    runs-on: ${{ matrix.os }}
8    timeout-minutes: 60
9    strategy:
10      # ...
11    env:
12      # ...
13    steps:
14      # ...
- `name:作业显示在 GitHub 上的名称。
matrix:用于访问为当前作业配置的矩阵参数。例如,Deno 使用 kind 和 os 版本配置矩阵构建,matrix 上下文对象将包含当前作业的 kind 和 os 版本。
if:您可以使用 if 条件阻止作业在条件得到满足之前运行。Deno 中判断github.event_name等于"push"或label以"denoland:"开头的pull_request事件runs-on:必填。 任务运行的机器。机器可以是 GitHub 托管的运行器或自托管的运行器。定义操作系统矩阵时,必须将runs-on的值设置为您定义的matrix.os上下文属性。Deno 是跨平台的,因此创建了矩阵以在多个运行器操作系统上运行构建工作流程。timeout-minutes: 在 GitHub 自动取消运行之前可让作业运行的最大分钟数。 默认值:360。Deno 中设置为 60 来尽早暴露问题。strategy:策略,用于创建作业的构建矩阵。您可以定义要在其中运行每项作业的不同变种。这可能不太好理解,在 Deno 中,其实就是为了同时构建出多个平台的产物。后面的章节我们单独解析 Deno 中具体的应用。env:环境变量的map可用于作业中的所有步骤。 您也可以设置整个工作流程或单个步骤的环境变量。后面章节我们单独解析 Deno 中具体的应用。steps:作业包含一系列任务,称为 steps。步骤可以运行命令、运行设置任务,或者运行您的仓库、公共仓库中的操作或 Docker 注册表中发布的操作。后面章节我们单独解析 Deno 中具体的应用。
strategy 策略
1strategy:
2  matrix:
3    include:
4      - os: macos-10.15
5        kind: test_release
6      - os: windows-2019
7        kind: test_release
8      - os: ${{ github.repository == 'denoland/deno' && 'ubuntu-latest' || 'ubuntu-18.04' }}
9        kind: test_release
10      - os: ${{ github.repository == 'denoland/deno' && 'ubuntu-latest' || 'ubuntu-18.04' }}
11        kind: test_debug
12      - os: ${{ github.repository == 'denoland/deno' && 'ubuntu-latest' || 'ubuntu-18.04' }}
13        kind: bench
14      - os: ${{ github.repository == 'denoland/deno' && 'ubuntu-latest' || 'ubuntu-18.04' }}
15        kind: lint
16
17  # Always run master branch builds to completion. This allows the cache to
18  # stay mostly up-to-date in situations where a single job fails due to
19  # e.g. a flaky test.
20  # Don't fast-fail on tag build because publishing binaries shouldn't be
21  # prevented if 'cargo publish' fails (which can be a false negative).
22  fail-fast: ${{ github.event_name == 'pull_request' || (github.ref !=
23    'refs/heads/master' && !startsWith(github.ref, 'refs/tags/')) }}
strategy:策略会为您的工作创建构建矩阵。您可以定义不同的变体来运行每个作业。这可能不太好理解,在 Deno 中,其实就是为了同时构建出多个平台的产物。
插曲
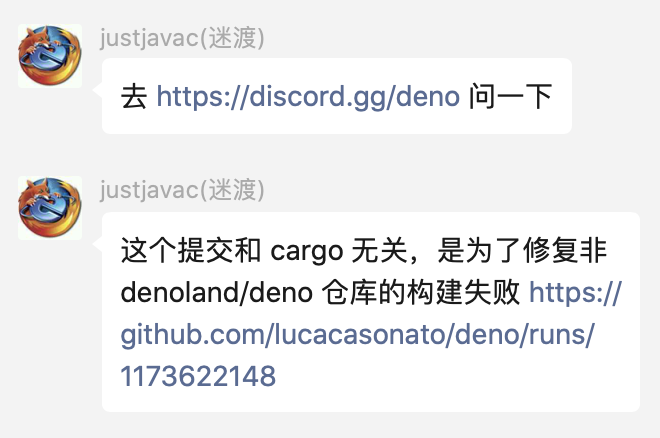
${{ github.repository == 'denoland/deno' && 'ubuntu-latest' || 'ubuntu-18.04' }} 这种写法我看到时很疑惑,直接取 'ubuntu-latest' 不行吗?如果不行是为什么呢?抱着求真的态度,我翻阅到是在这个 commit 加入的这个判断,在一番询问后得到了下面的答案:
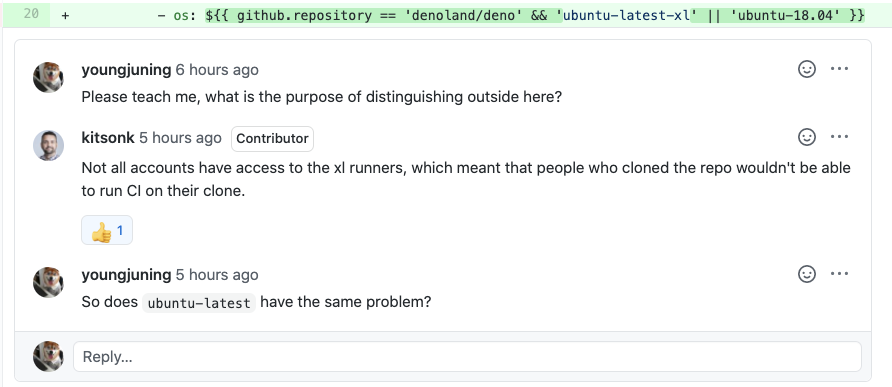
在 justjavac 大佬那里也得到了印证:
然后我还有个疑问是为什么不使用三元表达式,是 YAML 语法不支持吗?
也许是我语法不对,按照 JS 的经验不管用,有知道的大佬可以评论教学一下!

env 环境变量
1env:
2  CARGO_INCREMENTAL: 0
3  RUST_BACKTRACE: full
4  CARGO_TERM_COLOR: always
env:环境变量的map可用于作业中的所有步骤。您也可以设置整个工作流程或单个步骤的环境变量。代码中的三个变量是整个流程的环境变量。CARGO_INCREMENTAL、CARGO_TERM_COLOR、RUST_BACKTRACE是配置给 Cargo 用的,具体的参考environment-variables-cargo-reads,这里不展开解读了。
steps 步骤
Deno 的 CI 中截止写下这段话时有 35 个步骤,相当考验我继续解读的勇气。。。
作业包含一系列任务,称为
steps。步骤可以运行命令、运行设置任务,或者运行您的仓库、公共仓库中的操作或 Docker 注册表中发布的操作。并非所有步骤都会运行操作,但所有操作都会作为步骤运行。每个步骤在运行器环境中以其自己的进程运行,且可以访问工作区和文件系统。因为步骤以自己的进程运行,所以步骤之间不会保留环境变量的更改。 GitHub 提供内置的步骤来设置和完成作业。—— 文档
1、Configure git
1- name: Configure git
2  run: git config --global core.symlinks true
git config --global core.symlinks true:克隆一个包含子模块和符号链接的存储库。这里是为了兼容 windows,详细的解释请查看 git bash symbolic links on windows
2、Clone repository
1- name: Clone repository
2  uses: actions/checkout@v2
3  with:
4    # 使用 `depth> 1`,因为有时我们需要重新构建 master 分支,如果 checkout 太浅,其他 commits push 之后将不可能重新构建。
5    fetch-depth: 5
6    submodules: true
actions/checkout@v2:checkout action 很常用fetch-depth: 5:默认情况下,仅提取一次提交。这里设置的 5,就会提取最近的 5 次提交。submodules: true:构建需要把子模块也获取到,Deno 中包含了子模块。
3、Create source tarballs (release, linux)
创建源文件压缩包 (release, linux)
1- name: Create source tarballs (release, linux)
2  if: |
3    startsWith(matrix.os, 'ubuntu') &&
4    matrix.kind == 'test_release' &&
5    github.repository == 'denoland/deno' &&
6    startsWith(github.ref, 'refs/tags/')
7  run: |
8    mkdir -p target/release
9    tar --exclude=.cargo_home --exclude=".git*" --exclude=target --exclude=third_party/prebuilt -czvf target/release/deno_src.tar.gz -C .. deno
- 执行条件:构建矩阵 os 是
'ubuntu'、kind 是'test_release'、仓库是'denoland/deno'、本地执行git push --tags或git push origin v0.0.1 run:其实发 release 的时候会自动打包源文件,这里之所以多打一个,是因为要忽略很多文件夹,打出纯 deno 的源文件
4、Install rust
安装 rust
1- name: Install rust
2  uses: hecrj/setup-rust-action@v1
3  with:
4    rust-version: 1.49.0
- Deno 源码是 RUST 编写的,所以是用
hecrj/setup-rust-action@v1,每个语言都有自己的setup,商店里能搜到 358 条记录。
5、Install clippy and rustfmt
1- name: Install clippy and rustfmt
2  if: matrix.kind == 'lint'
3  run: |
4    rustup component add clippy
5    rustup component add rustfmt
6、Install Deno(非 Windows)
1- name: Install Deno
2  if: |
3    !startsWith(matrix.os, 'windows')
4  run: |-
5    curl -fsSL https://deno.land/x/install/install.sh | sh -s v1.5.1
6    echo "$HOME/.deno/bin" >> $GITHUB_PATH
- 执行条件:构建矩阵 os 不是 windows
run|-和|是 yaml 的语法。这样,您就可以有效地声明多行 yaml 字符串。语法详情查看这里curl -fsSL https://deno.land/x/install/install.sh | sh -s v1.5.1安装 deno(这里应该可以 pr)echo "$HOME/.deno/bin" >> $GITHUB_PATH:设置环境变量,设置的指向文件系统上某个位置的任何新环境变量都应该有_PATH后缀。
7、Install Deno (Windows)
1- name: Install Deno (Windows)
2  if: startsWith(matrix.os, 'windows')
3  run: |-
4    curl -fsSL https://deno.land/x/install/install.sh | sh -s v1.5.1
5    echo "$HOME/.deno/bin" >> $env:GITHUB_PATH
- 执行条件:构建矩阵 os 是 windows
run:和上文一样
8、Install Python
安装 python
1- name: Install Python
2  uses: actions/setup-python@v1
3  with:
4    python-version: '3.8'
5    architecture: x64
9、Install Node
安装 Node
1- name: Install Node
2  uses: actions/setup-node@v2
3  with:
4    node-version: '14'
5    check-latest: true
10、Remove unused versions of Python
删除没有用到的 Python 版本
1- name: Remove unused versions of Python
2  if: startsWith(matrix.os, 'windows')
3  run: |-
4    $env:PATH -split ";" |
5      Where-Object { Test-Path "$_\python.exe" } |
6      Select-Object -Skip 1 |
7      ForEach-Object { Move-Item "$_" "$_.disabled" }
11、Setup gcloud (unix)
安装 Google Cloud SDK(unix)
1- name: Setup gcloud (unix)
2  if: |
3    runner.os != 'Windows' &&
4    matrix.kind == 'test_release' &&
5    github.repository == 'denoland/deno' &&
6    (github.ref == 'refs/heads/master' ||
7    startsWith(github.ref, 'refs/tags/'))
8  uses: google-github-actions/setup-gcloud@master
9  with:
10    project_id: denoland
11    service_account_key: ${{ secrets.GCP_SA_KEY }}
12    export_default_credentials: true
- 执行条件:运行系统不是 'Windows'、构建矩阵 kind 是
'test_release'、仓库是'denoland/deno'、分支是 master 或是 tag 提交 google-github-actions/setup-gcloud:与 Google Cloud Platform 交互的 GitHub Actions 的集合。
12、Setup gcloud (windows)
同 11 作用一样,不过是为 windows 设置 gcloud
1- name: Setup gcloud (windows)
2  if: |
3    runner.os == 'Windows' &&
4    matrix.kind == 'test_release' &&
5    github.repository == 'denoland/deno' &&
6    (github.ref == 'refs/heads/master' ||
7    startsWith(github.ref, 'refs/tags/'))
8  uses: google-github-actions/setup-gcloud@master
9  env:
10    CLOUDSDK_PYTHON: ${{env.pythonLocation}}\python.exe
11  with:
12    project_id: denoland
13    service_account_key: ${{ secrets.GCP_SA_KEY }}
14    export_default_credentials: true
13、Configure canary build
配置 canary 渠道的 build(Deno 发布氛围 canary 和 release 渠道)
1- name: Configure canary build
2  if: |
3    matrix.kind == 'test_release' &&
4    github.repository == 'denoland/deno' &&
5    github.ref == 'refs/heads/master'
6  shell: bash
7  run: |
8    echo "DENO_CANARY=true" >> $GITHUB_ENV
- 执行条件:构建矩阵
kind为'test_release'、github repo 是'denoland/deno'、master 分支 run将"DENO_CANARY=true"设置进环境变量。
您也可以使用
GITHUB_ENVenvironment file 设置工作流程中的以下步骤可以使用的环境变量。 —— 文档
14、Log versions
检查前面安装的程序的版本
1- name: Log versions
2  run: |
3    node -v
4    python --version
5    rustc --version
6    cargo --version
7    deno --version
15、lint.js
执行 lint
1- name: lint.js
2  if: matrix.kind == 'lint'
3  run: deno run --unstable --allow-write --allow-read --allow-run ./tools/lint.js
- 执行条件:构建矩阵
kind类型 为'lint'
16、test_format.js
测试格式化程序
1- name: test_format.js
2  if: matrix.kind == 'lint'
3  run: deno run --unstable --allow-write --allow-read --allow-run ./tools/format.js --check
- 执行条件:构建矩阵
kind类型 为'lint'
17、Build release
1- name: Build release
2  if: |
3    matrix.kind == 'test_release' ||
4    matrix.kind == 'bench'
5  run: cargo build --release --locked --all-targets -vv
- 执行条件:构建矩阵
kind类型 为'test_release'或'bench'
18、Build debug
1- name: Build debug
2  if: matrix.kind == 'test_debug'
3  run: cargo build --locked --all-targets
- 执行条件:构建矩阵
kind类型 为'test_debug'
19、Pre-release (linux)
发布之前的准备工作(linux)
1- name: Pre-release (linux)
2  if: |
3    startsWith(matrix.os, 'ubuntu') &&
4    matrix.kind == 'test_release'
5  run: |
6    cd target/release
7    zip -r deno-x86_64-unknown-linux-gnu.zip deno
8    zip -r denort-x86_64-unknown-linux-gnu.zip denort
9    ./deno types > lib.deno.d.ts
- 执行条件:构建矩阵 os 为
'ubuntu'、构建矩阵kind为'test_release' run:做的事情其实就是打压缩包,这些压缩包最终会发布在 GitHub Release 中供安装脚本使用
20、Pre-release (mac)
和 19 作用一样,这里没有
./deno types > lib.deno.d.ts,私以为漏了。
1- name: Pre-release (mac)
2  if: |
3    startsWith(matrix.os, 'macOS') &&
4    matrix.kind == 'test_release'
5  run: |
6    cd target/release
7    zip -r deno-x86_64-apple-darwin.zip deno
8    zip -r denort-x86_64-apple-darwin.zip denort
21、Pre-release (windows)
和 19、20 一样,just for windows,可以学习一下 Windows 下的压缩命令怎么写!
1- name: Pre-release (windows)
2  if: |
3    startsWith(matrix.os, 'windows') &&
4    matrix.kind == 'test_release'
5  run: |
6    Compress-Archive -CompressionLevel Optimal -Force -Path target/release/deno.exe -DestinationPath target/release/deno-x86_64-pc-windows-msvc.zip
7    Compress-Archive -CompressionLevel Optimal -Force -Path target/release/denort.exe -DestinationPath target/release/denort-x86_64-pc-windows-msvc.zip
22、Upload canary to dl.deno.land (unix)
上传 canary 包到 dl.deno.land(unix)(我们只要知道托管在 Google 云就好了)
1- name: Upload canary to dl.deno.land (unix)
2  if: |
3    runner.os != 'Windows' &&
4    matrix.kind == 'test_release' &&
5    github.repository == 'denoland/deno' &&
6    github.ref == 'refs/heads/master'
7  run: |
8    gsutil cp ./target/release/*.zip gs://dl.deno.land/canary/$(git rev-parse HEAD)/
9    echo $(git rev-parse HEAD) > canary-latest.txt
10    gsutil cp canary-latest.txt gs://dl.deno.land/canary-latest.txt
- 执行条件:操作系统不是 Windows、构建矩阵 kind 是
'test_release'、github repo 是'denoland/deno'、master 分支 rungsutil cp ./target/release/*.zip gs://dl.deno.land/canary/$(git rev-parse HEAD)/:上传压缩包到服务器$(git rev-parse HEAD):获取最新的 git commit hash,你可以再任一 git 库中执行echo $(git rev-parse HEAD)验证
echo $(git rev-parse HEAD) > canary-latest.txt:将 commit hash 值作为版本写入 canary-latest.txtgsutil cp canary-latest.txt gs://dl.deno.land/canary-latest.txt:上传canary-latest.txt到服务器
23、Upload canary to dl.deno.land (windows)
和 22 作用一样,just for windows
1- name: Upload canary to dl.deno.land (windows)
2  if: |
3    runner.os == 'Windows' &&
4    matrix.kind == 'test_release' &&
5    github.repository == 'denoland/deno' &&
6    github.ref == 'refs/heads/master'
7  env:
8    CLOUDSDK_PYTHON: ${{env.pythonLocation}}\python.exe
9  shell: bash
10  run: |
11    gsutil cp ./target/release/*.zip gs://dl.deno.land/canary/$(git rev-parse HEAD)/
12    echo $(git rev-parse HEAD) > canary-latest.txt
13    gsutil cp canary-latest.txt gs://dl.deno.land/canary-latest.txt
CLOUDSDK_PYTHON: ${{env.pythonLocation}}\python.exe:从这里可以看到 Python 环境是给 google cloud sdk 用的
24、Test release
测试发布
1- name: Test release
2  if: matrix.kind == 'test_release'
3  run: cargo test --release --locked --all-targets
25、Test debug
测试 debug
1- name: Test debug
2  if: matrix.kind == 'test_debug'
3  run: |
4    cargo test --locked --doc
5    cargo test --locked --all-targets
26、Configure hosts file for WPT (unix)
WPT 是 Web Platform Test 的意思,对应仓库 denoland/wpt
1 - name: Configure hosts file for WPT (unix)
2  if: runner.os != 'Windows'
3  run: ./wpt make-hosts-file | sudo tee -a /etc/hosts
4  working-directory: test_util/wpt/
27、Configure hosts file for WPT (windows)
和 26 作用一样,just for windows
1- name: Configure hosts file for WPT (windows)
2  if: runner.os == 'Windows'
3  working-directory: test_util/wpt/
4  run: python wpt make-hosts-file | Out-File $env:SystemRoot\System32\drivers\etc\hosts -Encoding ascii -Append
28、Run web platform tests (release)
在 web 平台下运行测试(release)
1- name: Run web platform tests (release)
2  if: matrix.kind == 'test_release'
3  run: |
4    deno run --unstable --allow-write --allow-read --allow-net --allow-env --allow-run ./tools/wpt.ts setup
5    deno run --unstable --allow-write --allow-read --allow-net --allow-env --allow-run ./tools/wpt.ts run --quiet --release
29、Run web platform tests (debug)
在 web 平台下运行测试(debug)
1 - name: Run web platform tests (debug)
2  if: matrix.kind == 'test_debug'
3  run: |
4    deno run --unstable --allow-write --allow-read --allow-net --allow-env --allow-run ./tools/wpt.ts setup
5    deno run --unstable --allow-write --allow-read --allow-net --allow-env --allow-run ./tools/wpt.ts run --quiet
30、Run Benchmarks
压力测试
1- name: Run Benchmarks
2  if: matrix.kind == 'bench'
3  run: cargo bench
- 执行条件:构建矩阵 kind 为
'bench'
31、Post Benchmarks
看起来是把压测数据存到
denoland/benchmark_data
1- name: Post Benchmarks
2  if: |
3    matrix.kind == 'bench' &&
4    github.repository == 'denoland/deno' &&
5    github.ref == 'refs/heads/master'
6  env:
7    DENOBOT_PAT: ${{ secrets.DENOBOT_PAT }}
8  run: |
9    git clone --depth 1 -b gh-pages https://${DENOBOT_PAT}@github.com/denoland/benchmark_data.git gh-pages
10    deno run --unstable -A ./tools/build_benchmark_jsons.js --release
11    cd gh-pages
12    git config user.email "propelml@gmail.com"
13    git config user.name "denobot"
14    git add .
15    git commit --message "Update benchmarks"
16    git push origin gh-pages
- 执行条件:
denoland/deno库的 master 分支且构建矩阵的 kind 是'bench'
32、Worker info
1- name: Worker info
2  if: matrix.kind == 'bench'
3  run: |
4    cat /proc/cpuinfo
5    cat /proc/meminfo
- 执行条件:构建矩阵 kind 是
bench - run
cat /proc/cpuinfo:查看 cpu 信息cat /proc/meminfo:查看内存信息
33、Upload release to dl.deno.land (unix)
上传 unix release 到 dl.deno.land
1- name: Upload release to dl.deno.land (unix)
2  if: |
3    runner.os != 'Windows' &&
4    matrix.kind == 'test_release' &&
5    github.repository == 'denoland/deno' &&
6    startsWith(github.ref, 'refs/tags/')
7  run: |
8    gsutil cp ./target/release/*.zip gs://dl.deno.land/release/${GITHUB_REF#refs/*/}/
9    echo ${GITHUB_REF#refs/*/} > release-latest.txt
10    gsutil cp release-latest.txt gs://dl.deno.land/release-latest.txt
34、Upload release to dl.deno.land (windows)
上传 windows release 到 dl.deno.land
1- name: Upload release to dl.deno.land (windows)
2  if: |
3    runner.os == 'Windows' &&
4    matrix.kind == 'test_release' &&
5    github.repository == 'denoland/deno' &&
6    startsWith(github.ref, 'refs/tags/')
7  env:
8    CLOUDSDK_PYTHON: ${{env.pythonLocation}}\python.exe
9  shell: bash
10  run: |
11    gsutil cp ./target/release/*.zip gs://dl.deno.land/release/${GITHUB_REF#refs/*/}/
12    echo ${GITHUB_REF#refs/*/} > release-latest.txt
13    gsutil cp release-latest.txt gs://dl.deno.land/release-latest.txt
35、Upload release to GitHub
上传 release 到 GitHub
1- name: Upload release to GitHub
2  uses: softprops/action-gh-release@v1
3  if: |
4    matrix.kind == 'test_release' &&
5    github.repository == 'denoland/deno' &&
6    startsWith(github.ref, 'refs/tags/')
7  env:
8    GITHUB_TOKEN: ${{ secrets.GITHUB_TOKEN }}
9  with:
10    files: |
11      target/release/deno-x86_64-pc-windows-msvc.zip
12      target/release/deno-x86_64-unknown-linux-gnu.zip
13      target/release/deno-x86_64-apple-darwin.zip
14      target/release/deno_src.tar.gz
15      target/release/lib.deno.d.ts
16    draft: true
softprops/action-gh-release@v1:发布 github release 用的 action,这个确实很棒,可以执行直接上传 release asset 等高级操作。我在 tuya-panel-demo 中使用了该插件。
