
C++20 如何以 Bazel & Clang 进行构建呢?
本文将介绍:
- Bazel 构建系统的安装
- LLVM 编译系统的安装
- Clang is an "LLVM native" C/C++/Objective-C compiler
- Bazel Clang 工具链的配置
- C++20 库与应用的构建
本文示例可见: https://github.com/ikuokuo/start-cpp20
本文是于 Ubuntu 20 上进行的实践,Windows 可以用 WSL 准备环境。
安装 Bazel,以二进制方式
Bazelisk 是安装 Bazel 的推荐方式,我们安装它的二进制发布即可:
1cd ~
2wget https://github.com/bazelbuild/bazelisk/releases/download/v1.12.0/bazelisk-linux-amd64 -O bazelisk-1.12.0-linux-amd64
3chmod a+x bazelisk-*
4
5sudo ln -s $(pwd)/bazelisk-1.12.0-linux-amd64 /usr/local/bin/bazel
6
7touch WORKSPACE
8# 国内下载 Bazel 可能遇到如下问题,配置 .bazeliskrc 解决
9# could not resolve the version 'latest' to an actual version number
10#  https://github.com/bazelbuild/bazelisk/issues/220
11cat <<-EOF > .bazeliskrc
12BAZELISK_BASE_URL=https://github.com/bazelbuild/bazel/releases/download
13USE_BAZEL_VERSION=5.2.0
14EOF
15
16bazel version
更多方式,可见官方文档。进一步,推荐安装 buildtools,下载后软链一下:
1sudo ln -s $(pwd)/buildifier-5.1.0-linux-amd64 /usr/local/bin/buildifier
2sudo ln -s $(pwd)/buildozer-5.1.0-linux-amd64 /usr/local/bin/buildozer
Bazel 如何构建 C++ 项目,可见我的 Start Bazel 笔记。
安装 LLVM,以源码方式
Clang 有关 std::fromat 文本格式化的特性,默认未开启:
The paper is implemented but still marked as an incomplete feature (the feature-test macro is not set and the libary is only available when built with LIBCXX_ENABLE_INCOMPLETE_FEATURES). Not yet implemented LWG-issues will cause API and ABI breakage.
C++20 特性,编译器支持情况:
因此,这里以源码方式安装 LLVM,需要构建 Clang & libc++:
1git clone -b llvmorg-14.0.6 --depth 1 https://github.com/llvm/llvm-project.git
2
3cd llvm-project
4mkdir _build
5cd _build
6
7# llvm install path, such as /usr/local/llvm
8LLVM_PREFIX=$HOME/Apps/llvm-14.0.6
9
10cmake -DCMAKE_BUILD_TYPE=Release \
11-DCMAKE_INSTALL_PREFIX=$LLVM_PREFIX \
12-DLLVM_ENABLE_PROJECTS=clang \
13-DLLVM_ENABLE_RUNTIMES="libcxx;libcxxabi" \
14-DLIBCXX_ENABLE_INCOMPLETE_FEATURES=ON \
15../llvm
16
17make -j`nproc`
18make install
19
20sudo ln -s $LLVM_PREFIX /usr/local/llvm
21
22cat <<-EOF >> ~/.bashrc
23# llvm
24export LLVM_HOME=/usr/local/llvm
25export PATH=\$LLVM_HOME/bin:\$PATH
26export LD_LIBRARY_PATH=\$LLVM_HOME/lib/x86_64-unknown-linux-gnu:\$LD_LIBRARY_PATH
27EOF
28
29llvm-config --version
30clang --version
LLVM_PREFIX 安装路径自己决定。最后,编译测试:
1cat <<-EOF > hello.cc
2#include <format>
3#include <iostream>
4
5int main() {
6  std::string message = std::format("The answer is {}.", 42);
7  std::cout << message << std::endl;
8}
9EOF
10
11clang++ -std=c++20 -stdlib=libc++ hello.cc -o hello
12
13./hello
安装 LLVM,以二进制方式
可省略该节。本文实践未用此方式,因为想开启更多 C++20 特性。这里仅作记录,有需要可参考。
方式 1. 安装二进制发布:
1cd ~
2wget https://github.com/llvm/llvm-project/releases/download/llvmorg-13.0.0/clang+llvm-13.0.0-x86_64-linux-gnu-ubuntu-20.04.tar.xz
3tar -xf clang+llvm-*.tar.xz
4
5sudo ln -s $(pwd)/clang+llvm-13.0.0-x86_64-linux-gnu-ubuntu-20.04 /usr/local/llvm
6
7cat <<-EOF >> ~/.bashrc
8# llvm
9export LLVM_HOME=/usr/local/llvm
10export PATH=\$LLVM_HOME/bin:\$PATH
11EOF
12
13llvm-config --version
14clang --version
方式 2. 用 apt 进行安装: https://apt.llvm.org/
方式 3. 用已配好的工具链: LLVM toolchain for Bazel
配置 Clang 工具链
本文依照 Bazel Tutorial: Configure C++ Toolchains 步骤配置的 Clang 工具链,最后项目根目录会多如下文件:
WORKSPACE 表示 Bazel 工作区,内容空。
.bazelrc 允许 --config=clang_config 启用 Clang 工具链:
1# Use our custom-configured c++ toolchain.
2build:clang_config --crosstool_top=//toolchain:clang_suite
3
4# Use --cpu as a differentiator.
5build:clang_config --cpu=linux_x86_64
6
7# Use the default Bazel C++ toolchain to build the tools used during the build.
8build:clang_config --host_crosstool_top=@bazel_tools//tools/cpp:toolchain
toolchain/BUILD 配置 Clang 工具链信息:
1load(":cc_toolchain_config.bzl", "cc_toolchain_config")
2
3package(default_visibility = ["//visibility:public"])
4
5#filegroup(name = "clang_suite")
6
7cc_toolchain_suite(
8    name = "clang_suite",
9    toolchains = {
10        "linux_x86_64": ":linux_x86_64_toolchain",
11    },
12)
13
14filegroup(name = "empty")
15
16cc_toolchain(
17    name = "linux_x86_64_toolchain",
18    toolchain_identifier = "linux_x86_64-toolchain",
19    toolchain_config = ":linux_x86_64_toolchain_config",
20    all_files = ":empty",
21    compiler_files = ":empty",
22    dwp_files = ":empty",
23    linker_files = ":empty",
24    objcopy_files = ":empty",
25    strip_files = ":empty",
26    supports_param_files = 0,
27)
28
29#filegroup(name = "linux_x86_64_toolchain_config")
30
31cc_toolchain_config(name = "linux_x86_64_toolchain_config")
toolchain/cc_toolchain_config.bzl 配置 Clang 工具链规则:
1# C++ Toolchain Configuration
2#  https://bazel.build/docs/cc-toolchain-config-reference
3#  https://github.com/bazelbuild/bazel/blob/master/tools/build_defs/cc/action_names.bzl
4load("@bazel_tools//tools/build_defs/cc:action_names.bzl", "ACTION_NAMES")
5load(
6    "@bazel_tools//tools/cpp:cc_toolchain_config_lib.bzl",
7    "feature",
8    "flag_group",
9    "flag_set",
10    "tool_path",
11)
12
13all_compile_actions = [
14    ACTION_NAMES.c_compile,
15    ACTION_NAMES.cpp_compile,
16    ACTION_NAMES.linkstamp_compile,
17    ACTION_NAMES.assemble,
18    ACTION_NAMES.preprocess_assemble,
19    ACTION_NAMES.cpp_header_parsing,
20    ACTION_NAMES.cpp_module_compile,
21    ACTION_NAMES.cpp_module_codegen,
22]
23
24all_link_actions = [
25    ACTION_NAMES.cpp_link_executable,
26    ACTION_NAMES.cpp_link_dynamic_library,
27    ACTION_NAMES.cpp_link_nodeps_dynamic_library,
28]
29
30def _impl(ctx):
31    llvm_version = "14.0.6"
32    llvm_prefix = "/home/john/Apps/llvm-{}".format(llvm_version)
33    llvm_bindir = llvm_prefix + "/bin"
34
35    tool_paths = [
36        tool_path(
37            name = "gcc",
38            path = llvm_bindir + "/clang",
39        ),
40        tool_path(
41            name = "ld",
42            path = llvm_bindir + "/ld.lld",
43        ),
44        tool_path(
45            name = "ar",
46            path = llvm_bindir + "/llvm-ar",
47        ),
48        tool_path(
49            name = "cpp",
50            path = llvm_bindir + "/clang-cpp",
51        ),
52        tool_path(
53            name = "gcov",
54            path = llvm_bindir + "/llvm-cov",
55        ),
56        tool_path(
57            name = "nm",
58            path = llvm_bindir + "/llvm-nm",
59        ),
60        tool_path(
61            name = "objdump",
62            path = llvm_bindir + "/llvm-objdump",
63        ),
64        tool_path(
65            name = "strip",
66            path = llvm_bindir + "/llvm-strip",
67        ),
68    ]
69
70    features = [
71        feature(
72            name = "default_compiler_flags",
73            enabled = True,
74            flag_sets = [
75                flag_set(
76                    actions = all_compile_actions,
77                    flag_groups = ([
78                        flag_group(
79                            flags = [
80                                "-O2", "-DNDEBUG",
81                                "-Wall", "-Wextra", "-Wpedantic", "-fPIC",
82                                "-std=c++20", "-stdlib=libc++",
83                            ],
84                        ),
85                    ]),
86                ),
87            ],
88        ),
89        feature(
90            name = "default_linker_flags",
91            enabled = True,
92            flag_sets = [
93                flag_set(
94                    actions = all_link_actions,
95                    flag_groups = ([
96                        flag_group(
97                            flags = [
98                                "-lc++", "-lc++abi",
99                                "-lm", "-ldl", "-lpthread",
100                            ],
101                        ),
102                    ]),
103                ),
104            ],
105        ),
106    ]
107
108    return cc_common.create_cc_toolchain_config_info(
109        ctx = ctx,
110        features = features,
111        cxx_builtin_include_directories = [
112            llvm_prefix + "/lib/clang/{}/include".format(llvm_version),
113            llvm_prefix + "/include/x86_64-unknown-linux-gnu/c++/v1",
114            llvm_prefix + "/include/c++/v1",
115            "/usr/local/include",
116            "/usr/include/x86_64-linux-gnu",
117            "/usr/include",
118        ],
119        toolchain_identifier = "local",
120        host_system_name = "local",
121        target_system_name = "local",
122        target_cpu = "linux_x86_64",
123        target_libc = "unknown",
124        compiler = "clang",
125        abi_version = "unknown",
126        abi_libc_version = "unknown",
127        tool_paths = tool_paths,
128    )
129
130cc_toolchain_config = rule(
131    implementation = _impl,
132    attrs = {},
133    provides = [CcToolchainConfigInfo],
134)
llvm_prefix 给到自己的 LLVM 安装路径。
构建 C++20 库与应用
本文示例的 code/00/ 路径下准备了 C++20 的库与应用:
1code/00/
2├── BUILD
3├── greet
4│   ├── BUILD
5│   ├── greet.cc
6│   └── greet.h
7└── main.cc
编写 binary
main.cc:
1#include <format>
2#include <iostream>
3#include <string>
4#include <string_view>
5
6#include "greet/greet.h"
7
8template <typename... Args>
9std::string dyna_print(std::string_view rt_fmt_str, Args&&... args) {
10  return std::vformat(rt_fmt_str, std::make_format_args(args...));
11}
12
13int main() {
14  std::cout << greet::hello("world") << std::endl;
15
16  std::string fmt;
17  for (int i{}; i != 3; ++i) {
18    fmt += "{} ";  // constructs the formatting string
19    std::cout << fmt << " : ";
20    std::cout << dyna_print(fmt, "alpha", 'Z', 3.14, "unused");
21    std::cout << '\n';
22  }
23}
BUILD:
1load("@rules_cc//cc:defs.bzl", "cc_binary")
2
3cc_binary(
4    name = "main",
5    srcs = ["main.cc"],
6    deps = [
7        "//code/00/greet:greet",
8    ],
9)
编写 library
greet.h:
1#pragma once
2
3#include <string>
4#include <string_view>
5
6namespace greet {
7
8std::string hello(std::string_view who);
9
10}  // namespace greet
greet.cc:
1#include "greet.h"
2
3#include <format>
4#include <utility>
5
6namespace greet {
7
8std::string hello(std::string_view who) {
9  return std::format("Hello {}!", std::move(who));
10}
11
12}  // namespace greet
BUILD:
1load("@rules_cc//cc:defs.bzl", "cc_library")
2
3package(default_visibility = ["//visibility:public"])
4
5cc_library(
6    name = "greet",
7    srcs = [
8        "greet.cc",
9    ],
10    hdrs = [
11        "greet.h",
12    ],
13)
Bazel 构建
1bazel build --config=clang_config //code/00:main
运行测试
1$ bazel-bin/code/00/main
2Hello world!
3{}  : alpha
4{} {}  : alpha Z
5{} {} {}  : alpha Z 3.14
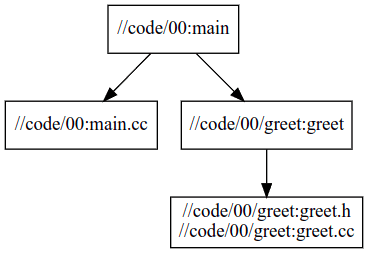
查看依赖
1sudo apt update && sudo apt install graphviz xdot -y
2# view
3xdot <(bazel query --notool_deps --noimplicit_deps "deps(//code/00:main)" --output graph)
4# to svg
5dot -Tsvg <(bazel query --notool_deps --noimplicit_deps "deps(//code/00:main)" --output graph) -o 00_main.svg
更多参考
- Bazel Tutorial
- Bazel Issue
- Project Example
GoCoding 个人实践的经验分享,可关注公众号!