
MySQL入门——在Linux下安装和卸载MySQL
摘要:本文主要学习了如何在Linux系统中安装和卸载MySQL数据库。
查看有没有安装过MySQL
使用命令查看有没有安装过:
11 [root@localhost ~]# yum list installed | grep mysql
22 [root@localhost ~]#
从CentOS版本6开始,官方版本的yum源中用MariaDB替换了MySQL,新的Linux系统中将不会默认安装MySQL,安装MySQL一般需要去官网下载rpm包或者源码包等方式。
安装MySQL源码包
查看yum可用的软件包
因为如果没有源码包,yum的仓库里是没有MySQL的安装包的,使用命令查看yum仓库里有关MySQL的软件包:
11 [root@localhost ~]# yum repolist all | grep mysql
22 [root@localhost ~]#
找到源码包下载链接
MySQL的官网地址如下:
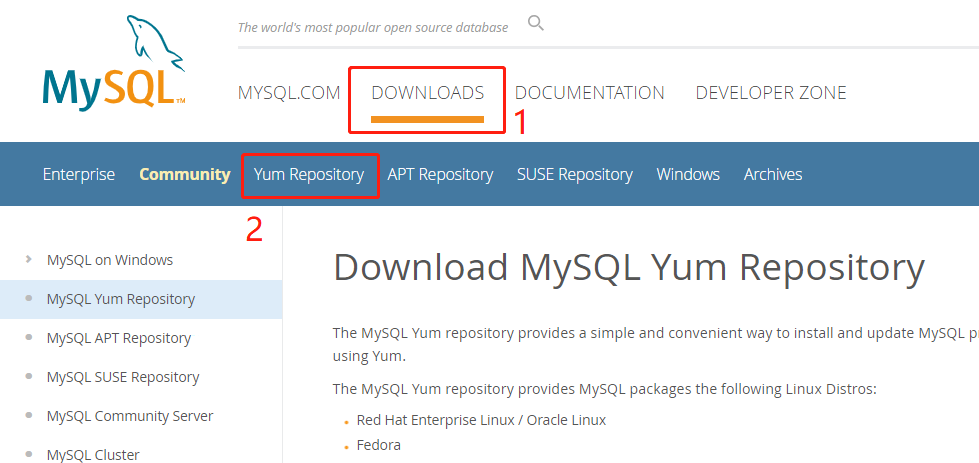
登录官网如图:
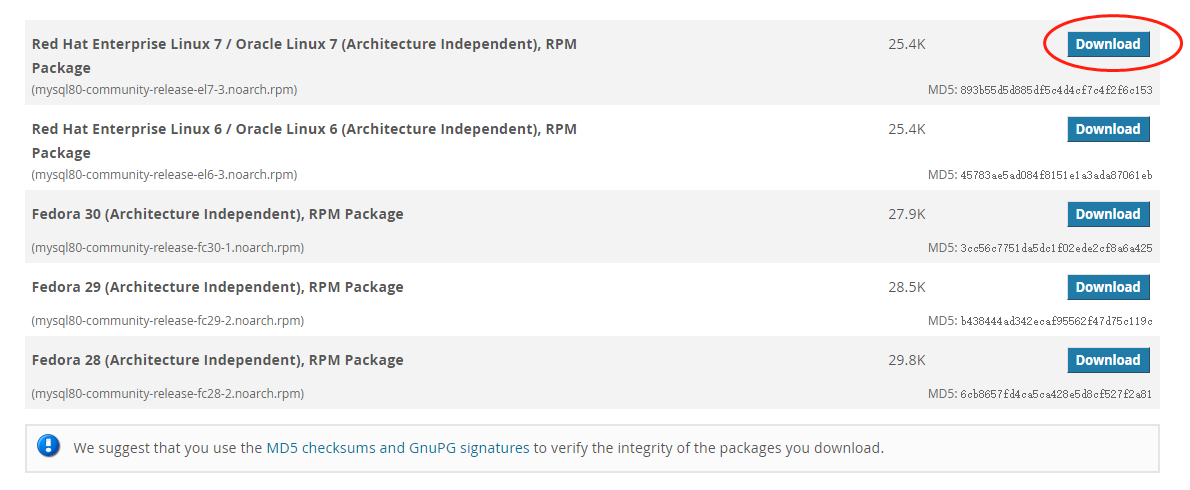
将页面滑动到下面,点击Red Hat Enterprise Linux 7对应的Download下载按钮:
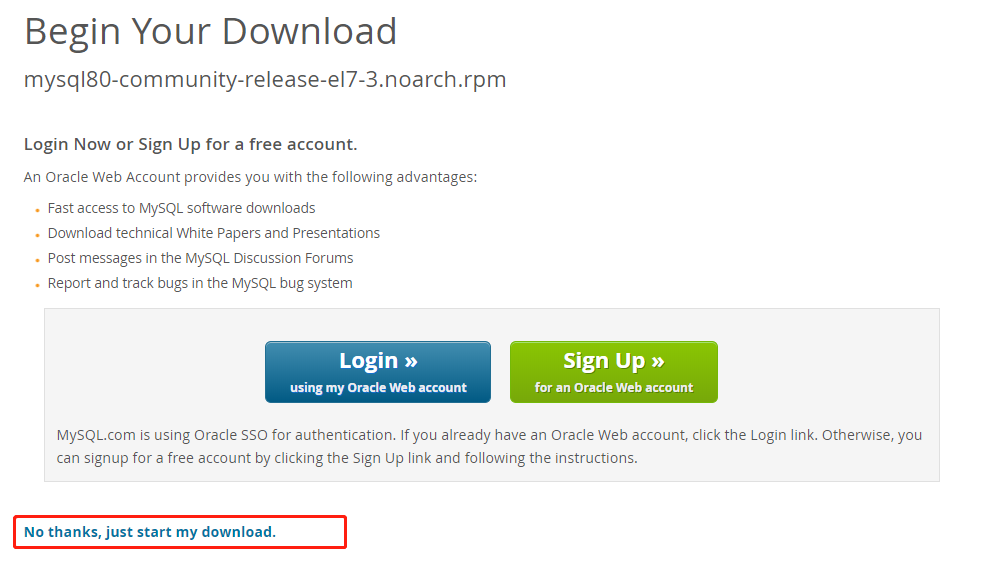
在新的页面找到下方的地址链接,右键复制链接地址:
下载源码包
在Linux系统中使用wget命令下载rpm包,地址即为刚刚在MySQL官网复制的链接地址:
1 1 [root@localhost ~]# wget https://dev.mysql.com/get/mysql80-community-release-el7-3.noarch.rpm
2 2 --2019-07-13 16:19:14--  https://dev.mysql.com/get/mysql80-community-release-el7-3.noarch.rpm
3 3 正在解析主机 dev.mysql.com (dev.mysql.com)... 137.254.60.11
4 4 正在连接 dev.mysql.com (dev.mysql.com)|137.254.60.11|:443... 已连接。
5 5 已发出 HTTP 请求,正在等待回应... 302 Found
6 6 位置:https://repo.mysql.com//mysql80-community-release-el7-3.noarch.rpm [跟随至新的 URL]
7 7 --2019-07-13 16:19:15--  https://repo.mysql.com//mysql80-community-release-el7-3.noarch.rpm
8 8 正在解析主机 repo.mysql.com (repo.mysql.com)... 184.26.157.95
9 9 正在连接 repo.mysql.com (repo.mysql.com)|184.26.157.95|:443... 已连接。
1010 已发出 HTTP 请求,正在等待回应... 200 OK
1111 长度:26024 (25K) [application/x-redhat-package-manager]
1212 正在保存至: “mysql80-community-release-el7-3.noarch.rpm.1”
1313
1414 100%[=====================================================================================================>] 26,024      88.9KB/s 用时 0.3s
1515
1616 2019-07-13 16:19:17 (88.9 KB/s) - 已保存 “mysql80-community-release-el7-3.noarch.rpm.1” [26024/26024])
1717
1818 [root@localhost ~]#
安装源码包
使用命令安装MySQL的源码包:
1 1 [root@localhost ~]# yum install -y mysql80-community-release-el7-3.noarch.rpm
2 2 已加载插件:fastestmirror
3 3 正在检查 mysql80-community-release-el7-3.noarch.rpm: mysql80-community-release-el7-3.noarch
4 4 mysql80-community-release-el7-3.noarch.rpm 将被安装
5 5 正在解决依赖关系
6 6 --> 正在检查事务
7 7 ---> 软件包 mysql80-community-release.noarch.0.el7-3 将被 安装
8 8 --> 解决依赖关系完成
9 9
1010 依赖关系解决
1111 ...
1212 完毕!
1313 [root@localhost ~]#
再次查看yum仓库中的源码包
使用命令查看yum仓库中有关MySQL的软件包:
1 1 [root@localhost ~]# yum repolist all | grep mysql
2 2 mysql-cluster-7.5-community/x86_64 MySQL Cluster 7.5 Community      禁用
3 3 mysql-cluster-7.5-community-source MySQL Cluster 7.5 Community - So 禁用
4 4 mysql-cluster-7.6-community/x86_64 MySQL Cluster 7.6 Community      禁用
5 5 mysql-cluster-7.6-community-source MySQL Cluster 7.6 Community - So 禁用
6 6 mysql-cluster-8.0-community/x86_64 MySQL Cluster 8.0 Community      禁用
7 7 mysql-cluster-8.0-community-source MySQL Cluster 8.0 Community - So 禁用
8 8 !mysql-connectors-community/x86_64 MySQL Connectors Community       启用:    118
9 9 mysql-connectors-community-source  MySQL Connectors Community - Sou 禁用
1010 !mysql-tools-community/x86_64      MySQL Tools Community            启用:     95
1111 mysql-tools-community-source       MySQL Tools Community - Source   禁用
1212 mysql-tools-preview/x86_64         MySQL Tools Preview              禁用
1313 mysql-tools-preview-source         MySQL Tools Preview - Source     禁用
1414 mysql55-community/x86_64           MySQL 5.5 Community Server       禁用
1515 mysql55-community-source           MySQL 5.5 Community Server - Sou 禁用
1616 mysql56-community/x86_64           MySQL 5.6 Community Server       禁用
1717 mysql56-community-source           MySQL 5.6 Community Server - Sou 禁用
1818 mysql57-community/x86_64           MySQL 5.7 Community Server       禁用
1919 mysql57-community-source           MySQL 5.7 Community Server - Sou 禁用
2020 !mysql80-community/x86_64          MySQL 8.0 Community Server       启用:    129
2121 mysql80-community-source           MySQL 8.0 Community Server - Sou 禁用
2222 [root@localhost ~]#
可以看到,目前默认安装版本是8.0。
修改安装版本
如果要修改MySQL的安装版本,可以通过修改repo配置文件或者通过执行修改命令来实现。
1)修改文件
编辑mysql-community.repo文件,将 [mysql80-community] 下面的enable设置为0表示关闭8.0版本,然后将 [mysql56-community] 下面的enable设置为1表示开启5.6版本。
命令如下:
1 [root@localhost ~]# vim /etc/yum.repos.d/mysql-community.repo
2)修改命令
关闭8.0版本:
11 [root@localhost ~]# yum-config-manager --disable mysql80-community
22 已加载插件:fastestmirror
33 ====================================================== repo: mysql80-community =======================================================
44 [mysql80-community]
55 ...
66 enabled = 0
77 ...
88 [root@localhost ~]#
开启5.6版本:
11 [root@localhost ~]# yum-config-manager --enable mysql56-community
22 已加载插件:fastestmirror
33 ====================================================== repo: mysql56-community =======================================================
44 [mysql56-community]
55 ...
66 enabled = 1
77 ...
88 [root@localhost ~]#
安装MySQL
安装
使用yum命令安装:
1 1 [root@localhost ~]# yum install -y mysql-community-server
2 2 ...
3 3 ======================================================================================================================================
4 4  Package                             架构                版本                                    源                              大小
5 5 ======================================================================================================================================
6 6 正在安装:
7 7  mysql-community-server              x86_64              5.6.45-2.el7                            mysql56-community               60 M
8 8 为依赖而安装:
9 9  mysql-community-client              x86_64              5.6.45-2.el7                            mysql56-community               20 M
1010  mysql-community-common              x86_64              5.6.45-2.el7                            mysql56-community              257 k
1111  mysql-community-libs                x86_64              5.6.45-2.el7                            mysql56-community              2.0 M
1212  net-tools                           x86_64              2.0-0.24.20131004git.el7                base                           306 k
1313 ...
1414 完毕!
1515 [root@localhost ~]#
查看安装版本
使用命令查看MySQL的安装版本:
11 [root@localhost ~]# mysql -V
22 mysql  Ver 14.14 Distrib 5.6.45, for Linux (x86_64) using  EditLine wrapper
33 [root@localhost ~]#
启动服务
使用systemctl命令启动并查看MySQL的服务状态:
1 1 [root@localhost ~]# systemctl start mysqld
2 2 [root@localhost ~]# systemctl status mysqld
3 3 ● mysqld.service - MySQL Community Server
4 4    Loaded: loaded (/usr/lib/systemd/system/mysqld.service; enabled; vendor preset: disabled)
5 5    Active: active (running) since 三 2019-08-14 17:18:54 CST; 23s ago
6 6   Process: 1851 ExecStartPost=/usr/bin/mysql-systemd-start post (code=exited, status=0/SUCCESS)
7 7   Process: 1791 ExecStartPre=/usr/bin/mysql-systemd-start pre (code=exited, status=0/SUCCESS)
8 8  Main PID: 1850 (mysqld_safe)
9 9    CGroup: /system.slice/mysqld.service
1010            ├─1850 /bin/sh /usr/bin/mysqld_safe --basedir=/usr
1111            └─2016 /usr/sbin/mysqld --basedir=/usr --datadir=/var/lib/mysql --plugin-dir=/usr/lib64/mysql/plugin --log-error=/var/log/mysqld.log...
1212
1313 8月 14 17:18:53 localhost.localdomain mysql-systemd-start[1791]: PLEASE REMEMBER TO SET A PASSWORD FOR THE MySQL root USER !
1414 8月 14 17:18:53 localhost.localdomain mysql-systemd-start[1791]: To do so, start the server, then issue the following commands:
1515 8月 14 17:18:53 localhost.localdomain mysql-systemd-start[1791]: /usr/bin/mysqladmin -u root password 'new-password'
1616 8月 14 17:18:53 localhost.localdomain mysql-systemd-start[1791]: /usr/bin/mysqladmin -u root -h localhost.localdomain password 'new-password'
1717 8月 14 17:18:53 localhost.localdomain mysql-systemd-start[1791]: Alternatively you can run:
1818 8月 14 17:18:53 localhost.localdomain mysql-systemd-start[1791]: /usr/bin/mysql_secure_installation
1919 8月 14 17:18:53 localhost.localdomain mysql-systemd-start[1791]: which will also give you the option of removing the test
2020 8月 14 17:18:53 localhost.localdomain mysqld_safe[1850]: 190814 17:18:53 mysqld_safe Logging to '/var/log/mysqld.log'.
2121 8月 14 17:18:53 localhost.localdomain mysqld_safe[1850]: 190814 17:18:53 mysqld_safe Starting mysqld daemon with databases from /var/lib/mysql
2222 8月 14 17:18:54 localhost.localdomain systemd[1]: Started MySQL Community Server.
2323 [root@localhost ~]#
连接数据库
MySQL的5.6版本安装完成后,默认root用户是没有密码的,使用命令登录:
1 1 [root@localhost ~]# mysql -uroot
2 2 Welcome to the MySQL monitor.  Commands end with ; or \g.
3 3 Your MySQL connection id is 4
4 4 Server version: 5.6.45 MySQL Community Server (GPL)
5 5
6 6 Copyright (c) 2000, 2019, Oracle and/or its affiliates. All rights reserved.
7 7
8 8 Oracle is a registered trademark of Oracle Corporation and/or its
9 9 affiliates. Other names may be trademarks of their respective
1010 owners.
1111
1212 Type 'help;' or '\h' for help. Type '\c' to clear the current input statement.
1313
1414 mysql>
查看版本号
使用 select version(); 命令可以查询MySQL的版本:
11 mysql> select version();
22 +-----------+
33 | version() |
44 +-----------+
55 | 5.6.45    |
66 +-----------+
77 1 row in set (0.00 sec)
88
99 mysql>
简单配置
使用命令对MySQL进行简单配置:
11 [root@localhost ~]# mysql_secure_installation
22
33 NOTE: RUNNING ALL PARTS OF THIS SCRIPT IS RECOMMENDED FOR ALL MySQL
44       SERVERS IN PRODUCTION USE!  PLEASE READ EACH STEP CAREFULLY!
输入当前的密码,如果没有设置就回车:
11 In order to log into MySQL to secure it, we'll need the current
22 password for the root user.  If you've just installed MySQL, and
33 you haven't set the root password yet, the password will be blank,
44 so you should just press enter here.
55
66 Enter current password for root (enter for none):
77 OK, successfully used password, moving on...
是否为root用户设置密码:
11 Setting the root password ensures that nobody can log into the MySQL
22 root user without the proper authorisation.
33
44 Set root password? [Y/n] y
55 New password:
66 Re-enter new password:
77 Password updated successfully!
88 Reloading privilege tables..
99  ... Success!
是否删除匿名用户:
11 By default, a MySQL installation has an anonymous user, allowing anyone
22 to log into MySQL without having to have a user account created for
33 them.  This is intended only for testing, and to make the installation
44 go a bit smoother.  You should remove them before moving into a
55 production environment.
66
77 Remove anonymous users? [Y/n]
88  ... Success!
是否允许root用户远程登录:
11 Normally, root should only be allowed to connect from 'localhost'.  This
22 ensures that someone cannot guess at the root password from the network.
33
44 Disallow root login remotely? [Y/n]
55  ... Success!
是否删除test数据库:
1 1 By default, MySQL comes with a database named 'test' that anyone can
2 2 access.  This is also intended only for testing, and should be removed
3 3 before moving into a production environment.
4 4
5 5 Remove test database and access to it? [Y/n]
6 6  - Dropping test database...
7 7 ERROR 1008 (HY000) at line 1: Can't drop database 'test'; database doesn't exist
8 8  ... Failed!  Not critical, keep moving...
9 9  - Removing privileges on test database...
1010  ... Success!
是否重新加载权限表:
11 Reloading the privilege tables will ensure that all changes made so far
22 will take effect immediately.
33
44 Reload privilege tables now? [Y/n]
55  ... Success!
设置完成:
11 All done!  If you've completed all of the above steps, your MySQL
22 installation should now be secure.
33
44 Thanks for using MySQL!
55
66
77 Cleaning up...
88 [root@localhost ~]#
卸载MySQL
查看MySQL已安装的软件包:
11 [root@localhost ~]# yum list installed | grep mysql
22 mysql-community-client.x86_64        5.6.45-2.el7                   @mysql56-community
33 mysql-community-common.x86_64        5.6.45-2.el7                   @mysql56-community
44 mysql-community-libs.x86_64          5.6.45-2.el7                   @mysql56-community
55 mysql-community-server.x86_64        5.6.45-2.el7                   @mysql56-community
66 mysql80-community-release.noarch     el7-3                          installed
77 [root@localhost ~]#
使用yum命令卸载:
1 1 [root@localhost ~]# yum remove -y mysql80-community-release.noarch mysql-community-client mysql-community-server mysql-community-common mysql-community-libs
2 2 ...
3 3 ======================================================================================================================================
4 4  Package                                  架构                  版本                          源                                 大小
5 5 ======================================================================================================================================
6 6 正在删除:
7 7  mysql-community-client                   x86_64                5.6.45-2.el7                  @mysql56-community                 89 M
8 8  mysql-community-common                   x86_64                5.6.45-2.el7                  @mysql56-community                2.1 M
9 9  mysql-community-libs                     x86_64                5.6.45-2.el7                  @mysql56-community                9.2 M
1010  mysql-community-server                   x86_64                5.6.45-2.el7                  @mysql56-community                252 M
1111  mysql80-community-release                noarch                el7-3                         installed                          31 k
1212 ...
1313 完毕!
1414 [root@localhost ~]#