
1. 应用测试的介绍
一般我们在写完代码之后,代码的测试是会给专门的测试人员来测试的,如果一个测试跑到你的工位上对你说,你的代码好像有Bug,你肯定会不爽,反正我就是这样的🙃。所以为了显示自己的代码质量高一点,在功能提交给测试之前,我们会自己测试一下,接下来给大家介绍一下 Spring Boot Test 应用测试框架。
Spring Boot Test 其实就是Spring Test,只是在Spring Boot 中集成变得更简单了,像我们开发自己测试,一般都是单元测试Junit测试,不出bug就谢天谢地啦,Spring Test与JUnit结合起来提供了高效便捷的测试解决方案,而Spring Boot Test是在Spring Test之上增加了切片测试并增强了Mock能力。
Spring Boot Test支持的测试种类,主要分为以下三类:
-
单元测试,面向方法的测试,常用注解有@Test。(一般都是用这个)
-
功能测试,面向业务的测试,同时也可以使用切面测试中的Mock能力,常用的注解有@RunWith,@SpringBootTest等。(这个也用得多)
-
切片测试,面向难于测试的边界功能,介于单元测试和功能测试之间,常用注解有@RunWith,@WebMvcTest等。
测试过程中的关键要素及支撑方式如下:
- 测试运行环境,通过@RunWith和@SpringBootTest启动Spring容器。
- Mock能力,Mockito提供Mock能力。
- 断言能力,AssertJ、Hamcrest、JsonPath提供断言能力。
接下来我带领大家学习如何简单使用Spring Boot Test框架。
2. Spring Boot Test 的使用
- 2.1 引入依赖
在Spring Boot中开启测试只需要引入spring-boot-starter-test依赖,使用@RunWith和@SpringBootTest注解就可以开始测试。我们就简单测试一下接口,首先我们引入pom依赖:
pom.xml:
1<!--springboot父工程-->
2    <parent>
3        <groupId>org.springframework.boot</groupId>
4        <artifactId>spring-boot-starter-parent</artifactId>
5        <version>2.2.2.RELEASE</version>
6        <relativePath/> <!-- lookup parent from repository -->
7    </parent>
8
9    <dependencies>
10        <!--springboot框架web组件-->
11        <dependency>
12            <groupId>org.springframework.boot</groupId>
13            <artifactId>spring-boot-starter-web</artifactId>
14            <version>2.2.2.RELEASE</version>
15        </dependency>
16        <!--mybatis整合springboot组件-->
17        <dependency>
18            <groupId>org.mybatis.spring.boot</groupId>
19            <artifactId>mybatis-spring-boot-starter</artifactId>
20            <version>2.1.0</version>
21        </dependency>
22        <!--mysql数据库连接驱动-->
23        <dependency>
24            <groupId>mysql</groupId>
25            <artifactId>mysql-connector-java</artifactId>
26            <version>8.0.18</version>
27        </dependency>
28        <!--lombok组件-->
29        <dependency>
30            <groupId>org.projectlombok</groupId>
31            <artifactId>lombok</artifactId>
32            <version>1.18.10</version>
33        </dependency>
34        <!--spring boot-test组件-->
35        <dependency>
36            <groupId>org.springframework.boot</groupId>
37            <artifactId>spring-boot-test</artifactId>
38        </dependency>
39        <!--单元测试junit组件-->
40        <dependency>
41            <groupId>junit</groupId>
42            <artifactId>junit</artifactId>
43            <version>4.12</version>
44            <scope>test</scope>
45        </dependency>
46        <!--spring-test组件-->
47        <dependency>
48            <groupId>org.springframework</groupId>
49            <artifactId>spring-test</artifactId>
50            <version>5.2.2.RELEASE</version>
51            <scope>test</scope>
52        </dependency>
53    </dependencies>
54
55    <build>
56        <!--springboot的maven插件-->
57        <plugins>
58            <plugin>
59                <groupId>org.springframework.boot</groupId>
60                <artifactId>spring-boot-maven-plugin</artifactId>
61            </plugin>
62            <plugin>
63                <groupId>org.apache.maven.plugins</groupId>
64                <artifactId>maven-compiler-plugin</artifactId>
65                <configuration>
66                    <compilerArgs>
67                        <arg>-parameters</arg>
68                    </compilerArgs>
69                </configuration>
70            </plugin>
71        </plugins>
72    </build>
-
2.2 代码编写
测试代码我们一般都写在与main文件夹平级的test文件夹下,建议文件夹的名称和main文件夹下的文件夹对应好,测试类的名称也要对应好,就像下面这样,当然这只是建议。
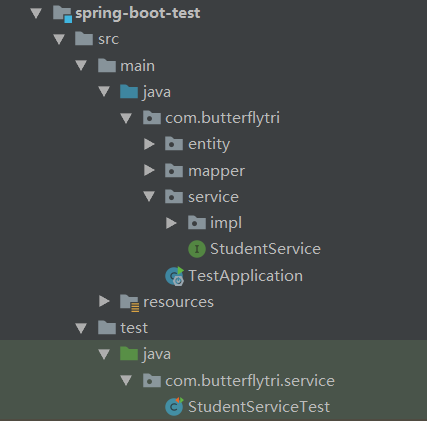
Spring Boot 的启动类我就不再写了,没有加什么特别的内容,直接上测试类吧。
StudentServiceTest.java:对了,这里测试的每一个方法都和
StudentService.java这个服务类的方法名对应着的,建议大家也是这样。1package com.butterflytri.service; 2 3import com.butterflytri.TestApplication; 4import com.butterflytri.entity.Student; 5import org.junit.Test; 6import org.junit.runner.RunWith; 7import org.springframework.boot.test.context.SpringBootTest; 8import org.springframework.test.context.junit4.SpringRunner; 9 10import javax.annotation.Resource; 11import java.util.List; 12 13/** 14 * @author: WJF 15 * @date: 2020/5/23 16 * @description: StudentServiceTest 17 */ 18 19/** 20 * {@link SpringBootTest}:配置文件属性的读取。读取classes标志的启动类的配置文件和运行环境,并加载。 21 * {@link RunWith}:'RunWith'注解就是一个运行器,加载value的Class测试环境。 22 */ 23@SpringBootTest(classes = TestApplication.class) 24@RunWith(SpringRunner.class) 25public class StudentServiceTest { 26 27 @Resource 28 private StudentService studentService; 29 30 @Test 31 public void findAllTest() { 32 List<Student> list = studentService.findAll(); 33 for (Student student : list) { 34 System.out.println(student); 35 } 36 } 37 38 @Test 39 public void findOneTest() { 40 Student student = studentService.findOne(1L); 41 System.out.println(student); 42 } 43 44 @Test 45 public void findByStudentNoTest() { 46 Student student = studentService.findByStudentNo("G030511"); 47 System.out.println(student); 48 } 49 50}每一个测试方法都是可以独立运行的,因为在运行的时候会加载Spring Test的测试环境,同时会将你测试的工程的运行环境的配置加载进来,使用的都是工程的配置和环境,方便我们自己进行测试。
3. 项目地址
本项目传送门:spring-boot-test
此教程会一直更新下去,觉得博主写的可以的话,关注一下,也可以更方便下次来学习。