
作者|冬岛 阿里云技术专家
本篇主要介绍 Knative Serving 的流量灰度,通过一个 rest-api 的例子演示如何创建不同的 Revision、如何在不同的 Revision 之间按照流量比例灰度。
部署 rest-api v1
- 代码
测试之前我们需要写一段 rest-api 的代码,并且还要能够区分不同的版本。下面我基于官方的例子进行了修改,为了使用方便去掉了 github.com/gorilla/mux 依赖,直接使用 Golang 系统包 net/http 替代。这段代码可以通过 RESOURCE 环境变量来区分不同的版本。
1package main
2
3import (
4	"fmt"
5	"io/ioutil"
6	"log"
7	"net/http"
8	"net/url"
9	"os"
10
11	"flag"
12)
13
14var resource string
15
16func main() {
17	flag.Parse()
18	//router := mux.NewRouter().StrictSlash(true)
19
20	resource = os.Getenv("RESOURCE")
21	if resource == "" {
22		resource = "NOT SPECIFIED"
23	}
24
25	root := "/" + resource
26	path := root + "/{stockId}"
27
28	http.HandleFunc("/", Index)
29	http.HandleFunc(root, StockIndex)
30	http.HandleFunc(path, StockPrice)
31
32	if err := http.ListenAndServe(fmt.Sprintf(":%s", "8080"), nil); err != nil {
33		log.Fatalf("ListenAndServe error:%s ", err.Error())
34	}
35}
36
37func Index(w http.ResponseWriter, r *http.Request) {
38	fmt.Fprintf(w, "Welcome to the %s app! \n", resource)
39}
40
41func StockIndex(w http.ResponseWriter, r *http.Request) {
42	fmt.Fprintf(w, "%s ticker not found!, require /%s/{ticker}\n", resource, resource)
43}
44
45func StockPrice(w http.ResponseWriter, r *http.Request) {
46	stockId := r.URL.Query().Get("stockId")
47
48	url := url.URL{
49		Scheme: "https",
50		Host:   "api.iextrading.com",
51		Path:   "/1.0/stock/" + stockId + "/price",
52	}
53
54	log.Print(url)
55
56	resp, err := http.Get(url.String())
57	if err != nil {
58		fmt.Fprintf(w, "%s not found for ticker : %s \n", resource, stockId)
59		return
60	}
61
62	defer resp.Body.Close()
63
64	body, err := ioutil.ReadAll(resp.Body)
65
66	fmt.Fprintf(w, "%s price for ticker %s is %s\n", resource, stockId, string(body))
67}
- Dockerfile
创建一个叫做 Dockerfile 的文件,把下面这些内容复制到文件中。执行 docker build --tag registry.cn-hangzhou.aliyuncs.com/knative-sample/rest-api-go:v1 --file ./Dockerfile . 命令即可完成镜像的编译。
你在测试的时候请把 registry.cn-hangzhou.aliyuncs.com/knative-sample/rest-api-go:v1 换成你自己的镜像仓库地址。
编译好镜像以后执行 docker push registry.cn-hangzhou.aliyuncs.com/knative-sample/rest-api-go:v1 把镜像推送到镜像仓库。
1FROM registry.cn-hangzhou.aliyuncs.com/knative-sample/golang:1.12 as builder
2
3WORKDIR /go/src/github.com/knative-sample/rest-api-go
4COPY . .
5
6RUN CGO_ENABLED=0 GOOS=linux go build -v -o rest-api-go
7FROM registry.cn-hangzhou.aliyuncs.com/knative-sample/alpine-sh:3.9
8COPY --from=builder /go/src/github.com/knative-sample/rest-api-go/rest-api-go /rest-api-go
9
10CMD ["/rest-api-go"]
- Service 配置
镜像已经有了,我们开始部署 Knative Service。把下面的内容保存到 revision-v1.yaml 中,然后执行 kubectl apply -f revision-v1.yaml 即可完成 Knative Service 的部署。
1apiVersion: serving.knative.dev/v1alpha1
2kind: Service
3metadata:
4 name: stock-service-example
5 namespace: default
6spec:
7 template:
8   metadata:
9     name: stock-service-example-v1
10   spec:
11     containers:
12     - image: registry.cn-hangzhou.aliyuncs.com/knative-sample/rest-api-go:v1
13       env:
14         - name: RESOURCE
15           value: v1
16       readinessProbe:
17         httpGet:
18           path: /
19         initialDelaySeconds: 0
20         periodSeconds: 3
首次安装会创建出一个叫做 stock-service-example-v1 的 Revision,并且是把 100% 的流量都打到 stock-service-example-v1 上。
验证 Serving 的各个资源
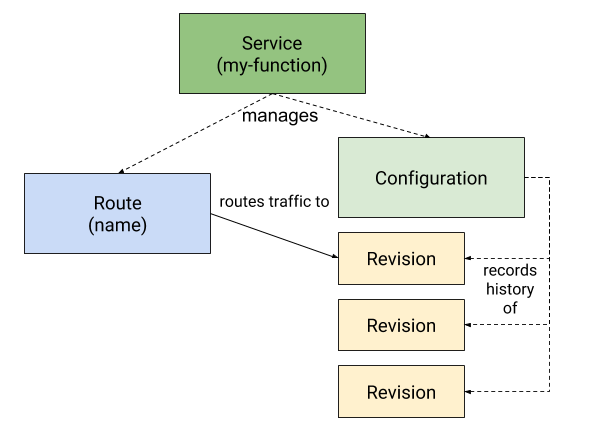
如下图所示,我们先回顾一下 Serving 涉及到的各种资源。接下来我们分别看一下刚才部署的 revision-v1.yaml 各个资源配置。
-
Knative Service
kubectl get ksvc stock-service-example --output yaml
-
Knative Configuration
kubectl get configuration -l
"serving.knative.dev/service=stock-service-example" --output yaml -
Knative Revision
kubectl get revision -l
"serving.knative.dev/service=stock-service-example" --output yaml -
Knative Route
kubectl get route -l
"serving.knative.dev/service=stock-service-example" --output yaml
访问 rest-api 服务
我们部署的 Service 名称是: stock-service-example。访问这个 Service 需要获取 Istio Gateway 的 IP,然后使用 stock-service-example Domain 绑定 Host 的方式发起 curl 请求。为了方便测试我写成了一个脚本。创建一个 run-test.sh 文件,把下面这些内容复制到文件内,然后赋予文件可执行权限。执行执行此脚本就能得到测试结果。
1#!/bin/bash
2
3SVC_NAME="stock-service-example"
4export INGRESSGATEWAY=istio-ingressgateway
5export GATEWAY_IP=`kubectl get svc $INGRESSGATEWAY --namespace istio-system --output jsonpath="{.status.loadBalancer.ingress[*]['ip']}"`
6export DOMAIN_NAME=`kubectl get route ${SVC_NAME} --output jsonpath="{.status.url}"| awk -F/ '{print $3}'`
7
8curl -H "Host: ${DOMAIN_NAME}" http://${GATEWAY_IP}
测试结果:
从下面的命令输出结果可以看到现在返回的是 v1 的信息,说明请求打到 v1 上面了。
1└─# ./run-test.sh
2Welcome to the v1 app!
灰度 50% 的流量到 v2
修改 Service 创建 v2 revision , 创建一个 revision-v2.yaml 文件,内容如下:
1apiVersion: serving.knative.dev/v1alpha1
2kind: Service
3metadata:
4  name: stock-service-example
5  namespace: default
6spec:
7  template:
8    metadata:
9      name: stock-service-example-v2
10    spec:
11      containers:
12      - image: registry.cn-hangzhou.aliyuncs.com/knative-sample/rest-api-go:v1
13        env:
14          - name: RESOURCE
15            value: v2
16        readinessProbe:
17          httpGet:
18            path: /
19          initialDelaySeconds: 0
20          periodSeconds: 3
21  traffic:
22  - tag: v1
23    revisionName: stock-service-example-v1
24    percent: 50
25  - tag: v2
26    revisionName: stock-service-example-v2
27    percent: 50
28  - tag: latest
29    latestRevision: true
30    percent: 0
我们对比一下 v1 版本和 v2 版本可以发现,v2 版本的 Service 中增加了 traffic: 的配置。在 traffic 中指定了每一个 Revision。 执行 kubectl apply -f revision-v2.yaml 安装 v2 版本的配置。然后执行测试脚本就能看到现在返回的结果中 v1 和 v2 基本上是各占 50% 的比例。下面这是我真实测试的结果。
1└─# ./run-test.sh
2Welcome to the v2 app!
3└─# ./run-test.sh
4Welcome to the v1 app!
5└─# ./run-test.sh
6Welcome to the v2 app!
7└─# ./run-test.sh
8Welcome to the v1 app!
提前验证 Revision
上面展示的 v2 的例子,在创建 v2 的时候直接就把流量分发到 v2 ,如果此时 v2 有问题就会导致有 50% 的流量异常。下面我们就展示一下如何在转发流量之前验证新的 revision 服务是否正常。我们再创建一个 v3 版本。
创建一个 revision-v3.yaml 的文件,内容如下:
1apiVersion: serving.knative.dev/v1alpha1
2kind: Service
3metadata:
4  name: stock-service-example
5  namespace: default
6spec:
7  template:
8    metadata:
9      name: stock-service-example-v3
10    spec:
11      containers:
12      - image: registry.cn-hangzhou.aliyuncs.com/knative-sample/rest-api-go:v1
13        env:
14          - name: RESOURCE
15            value: v3
16        readinessProbe:
17          httpGet:
18            path: /
19          initialDelaySeconds: 0
20          periodSeconds: 3
21  traffic:
22  - tag: v1
23    revisionName: stock-service-example-v1
24    percent: 50
25  - tag: v2
26    revisionName: stock-service-example-v2
27    percent: 50
28  - tag: latest
29    latestRevision: true
30    percent: 0
执行 kubectl apply -f revision-v3.yaml 部署 v3 版本。然后查看一下 Revision 情况:
1└─# kubectl get revision
2NAME                       SERVICE NAME               GENERATION   READY   REASON
3stock-service-example-v1   stock-service-example-v1   1            True
4stock-service-example-v2   stock-service-example-v2   2            True
5stock-service-example-v3   stock-service-example-v3   3            True
可以看到现在已经创建出来了三个 Revision 。
此时我们再看一下 stock-service-example 的真实生效:
1└─# kubectl get ksvc stock-service-example -o yaml
2apiVersion: serving.knative.dev/v1beta1
3kind: Service
4metadata:
5  annotations:
6...
7status:
8...
9  traffic:
10  - latestRevision: false
11    percent: 50
12    revisionName: stock-service-example-v1
13    tag: v1
14    url: http://v1-stock-service-example.default.example.com
15  - latestRevision: false
16    percent: 50
17    revisionName: stock-service-example-v2
18    tag: v2
19    url: http://v2-stock-service-example.default.example.com
20  - latestRevision: true
21    percent: 0
22    revisionName: stock-service-example-v3
23    tag: latest
24    url: http://latest-stock-service-example.default.example.com
25  url: http://stock-service-example.default.example.com
可以看到 v3 Revision 虽然创建出来了,但是因为没有设置 traffic,所以并不会有流量转发。此时你执行多少次 ./run-test.sh 都不会得到 v3 的输出。
在 Service 的 status.traffic 配置中可以看到 latest Revision 的配置:
1- latestRevision: true
2    percent: 0
3    revisionName: stock-service-example-v3
4    tag: latest
5    url: http://latest-stock-service-example.default.example.com
每一个 Revision 都有一个自己的 URL,所以只需要基于 v3 Revision 的 URL 发起请求就能开始测试了。
我已经写好了一个测试脚本,你可以把下面这段脚本保存在 latest-run-test.sh 文件中,然后执行这个脚本就能直接发起到 latest 版本的请求:
1#!/bin/bash
2export INGRESSGATEWAY=istio-ingressgateway
3export GATEWAY_IP=`kubectl get svc $INGRESSGATEWAY --namespace istio-system --output jsonpath="{.status.loadBalancer.ingress[*]['ip']}"`
4export DOMAIN_NAME=`kubectl get route ${SVC_NAME} --output jsonpath="{.status.url}"| awk -F/ '{print $3}'`
5
6export LAST_DOMAIN=`kubectl get ksvc stock-service-example --output jsonpath="{.status.traffic[?(@.tag=='latest')].url}"| cut -d'/' -f 3`
7
8curl -H "Host: ${LAST_DOMAIN}" http://${GATEWAY_IP}
测试 v3 版本如果没问题就可以把流量分发到 v3 版本了。
下面我们再创建一个文件 revision-v3-2.yaml , 内容如下:
1apiVersion: serving.knative.dev/v1alpha1
2kind: Service
3metadata:
4  name: stock-service-example
5  namespace: default
6spec:
7  template:
8    metadata:
9      name: stock-service-example-v3
10    spec:
11      containers:
12      - image: registry.cn-hangzhou.aliyuncs.com/knative-sample/rest-api-go:v1
13        env:
14          - name: RESOURCE
15            value: v3
16        readinessProbe:
17          httpGet:
18            path: /
19          initialDelaySeconds: 0
20          periodSeconds: 3
21  traffic:
22  - tag: v1
23    revisionName: stock-service-example-v1
24    percent: 40
25  - tag: v2
26    revisionName: stock-service-example-v2
27    percent: 30
28  - tag: v3
29    revisionName: stock-service-example-v3
30    percent: 30
31  - tag: latest
32    latestRevision: true
33    percent: 0
用 vimdiff 看一下 revision-v3.yaml 和 revision-v3-2.yaml 的区别:
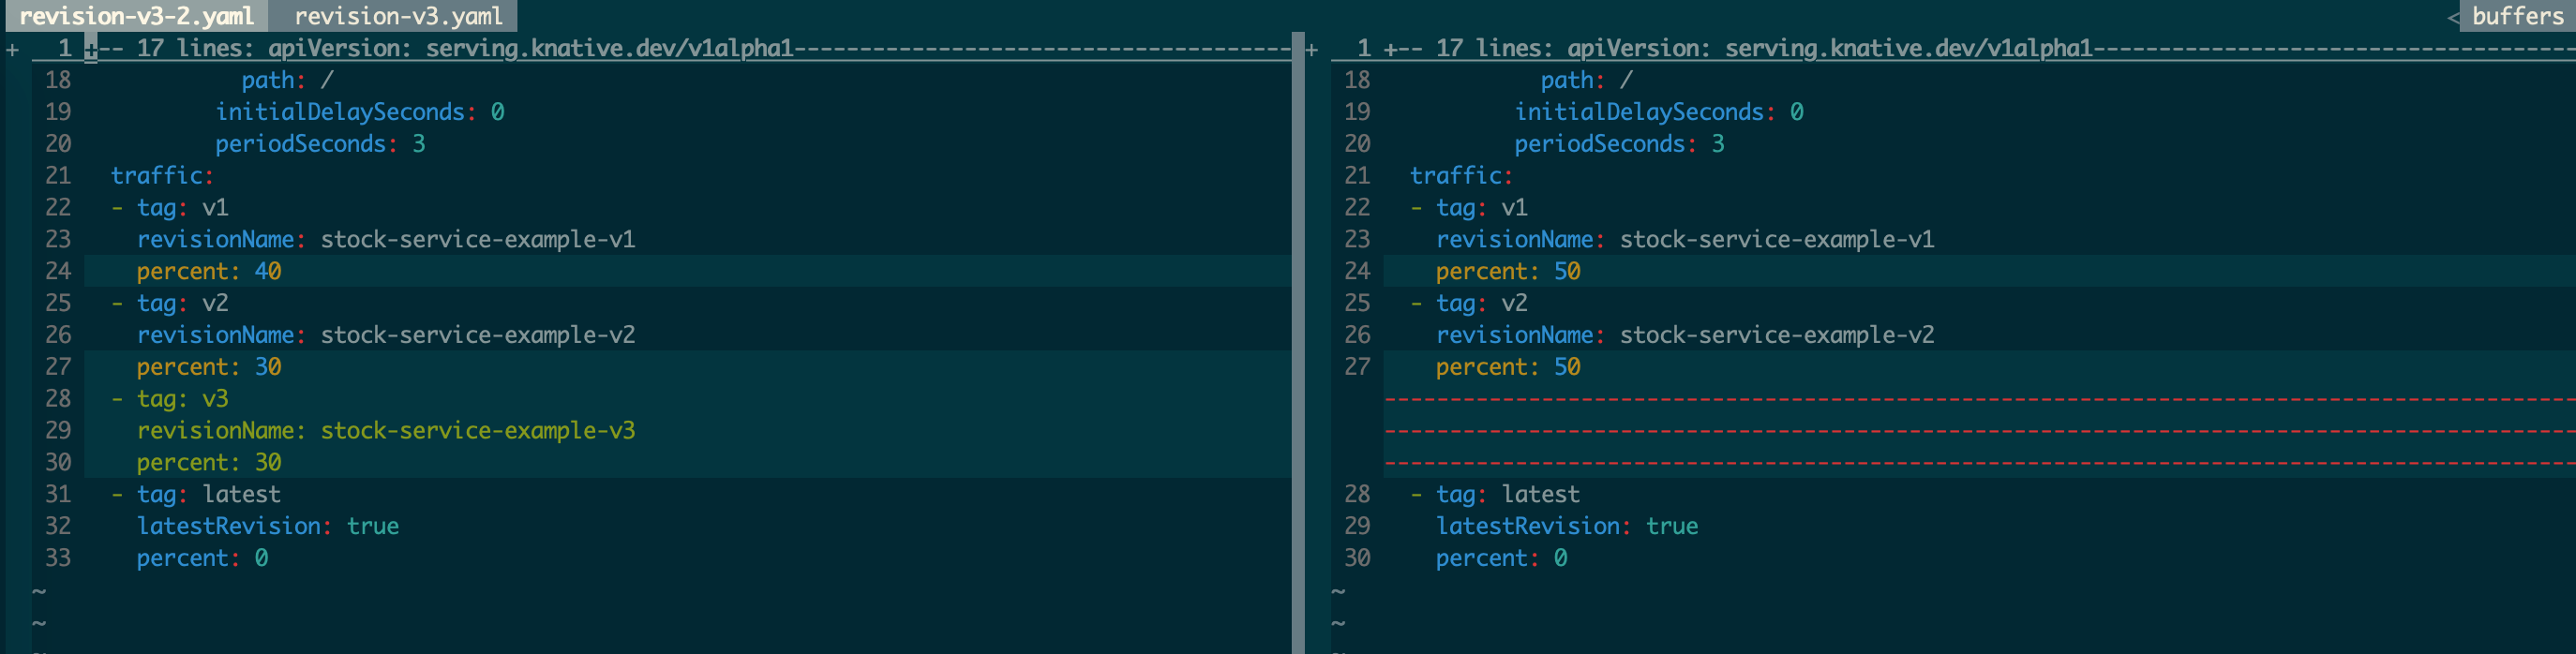
revision-v3-2.yaml 增加了到 v3 的流量转发。此时执行 ./run-test.sh 可以看到 v1、v2 和 v3 的比例基本是:4:3:3
1└─# ./run-test.sh
2Welcome to the v1 app!
3└─# ./run-test.sh
4Welcome to the v2 app!
5└─# ./run-test.sh
6Welcome to the v1 app!
7└─# ./run-test.sh
8Welcome to the v2 app!
9└─# ./run-test.sh
10Welcome to the v3 app!
11... ...
版本回滚
Knative Service 的 Revision 是不能修改的,每次 Service Spec 的更新创建的 Revision 都会保留在 kube-apiserver 中。如果应用发布到某个新版本发现有问题想要回滚到老版本的时候只需要指定相应的 Revision,然后把流量转发过去就行了。
小结
Knative Service 的灰度、回滚都是基于流量的。Workload(Pod) 是根据过来的流量自动创建出来的。所以在 Knative Serving 模型中流量是核心驱动。这和传统的应用发布、灰度模型是有区别的。
假设有一个应用 app1 ,传统的做法首先是设置应用的实例个数( Kubernetes 体系中就是 Pod ),我们假设实例个数是 10 个。如果要进行灰度发布,那么传统的做法就是先发布一个 Pod,此时 v1 和 v2 的分布方式是:v1 的 Pod 9个,v2 的 Pod 1 个。如果要继续扩大灰度范围的话那就是 v2 的 Pod 数量变多,v1 的 Pod 数量变少,但总的 Pod 数量维持 10 个不变。
在 Knative Serving 模型中 Pod 数量永远都是根据流量自适应的,不需要提前指定。在灰度的时候只需要指定流量在不同版本之间的灰度比例即可。每一个 Revision 的实例数都是根据流量的大小自适应,不需要提前指定。
从上面的对比中可以发现 Knative Serving 模型是可以精准的控制灰度影响的范围的,保证只灰度一部分流量。而传统的模型中 Pod 灰度的比例并不能真实的代表流量的比例,是一个间接的灰度方法。