
QTextEdit描述:
前面,我们学的是QLineEdit ,它是纯文本单行输入,
这里要看的是QTextEdit 它是纯文本多行输入。
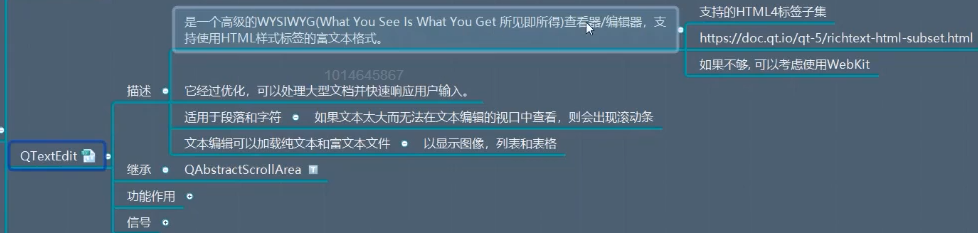
它支持的是html 4 的部分标签,具体查看看上图!
它既可以加载纯文本,也可以加载富文本(图像,表格,超链接) 文件!
QTextEdit继承图:

因为它的继承图中的QFrame 和 QAbstractScrollArea我们没有学过,
先看QFrame https://www.cnblogs.com/zach0812/p/11377442.html
再看QAbstractScrollArea https://www.cnblogs.com/zach0812/p/11377455.html
接下来继续看QTextEdit !
QTextEdit继承:
它直接继承的是QAbstractScrollArea !


1from PyQt5.Qt import * #刚开始学习可以这样一下导入
2import sys
3
4class Window(QWidget):
5    def __init__(self):
6        super().__init__()
7        self.setWindowTitle("QTextEdit的学习")
8        self.resize(400,400)
9        self.set_ui()
10
11
12    def set_ui(self):
13        textEdit = QTextEdit(self)
14        textEdit.move(50,50)
15        textEdit.resize(300,300)
16        textEdit.setText("Python!")
17        textEdit.setStyleSheet("background-color:cyan;")
18
19if __name__ == '__main__':
20    app =QApplication(sys.argv)
21
22    window = Window()
23    window.show()
24
25    sys.exit(app.exec_())
View Code
QTextEdit功能:
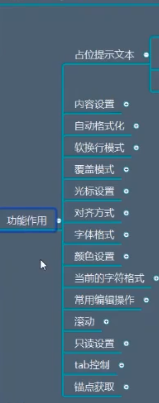
QTextEdit功能之占位提示文本:
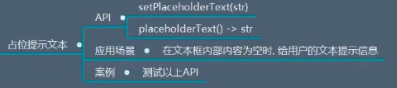


1from PyQt5.Qt import * #刚开始学习可以这样一下导入
2import sys
3
4class Window(QWidget):
5    def __init__(self):
6        super().__init__()
7        self.setWindowTitle("QTextEdit的学习")
8        self.resize(400,400)
9        self.set_ui()
10
11
12    def set_ui(self):
13        self.textEdit = QTextEdit(self)
14        self.textEdit.move(50,50)
15        self.textEdit.resize(300,300)
16        self.textEdit.setStyleSheet("background-color:cyan;")
17
18        self.placeHodler()
19
20    ############################占位文本的设置###############################
21    def placeHodler(self):
22        self.textEdit.setPlaceholderText("请输入您的个人简介")
23
24        print(self.textEdit.placeholderText())
25
26    ############################占位文本的设置###############################
27
28if __name__ == '__main__':
29    app =QApplication(sys.argv)
30
31    window = Window()
32    window.show()
33
34    sys.exit(app.exec_())
View Code
QTextEdit功能之内容设置:
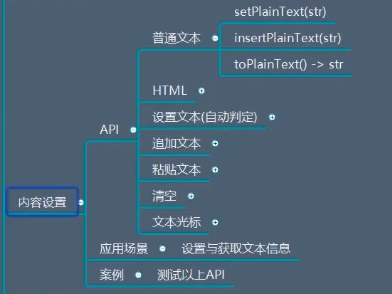




1from PyQt5.Qt import * #刚开始学习可以这样一下导入
2import sys
3
4class Window(QWidget):
5    def __init__(self):
6        super().__init__()
7        self.setWindowTitle("QTextEdit的学习")
8        self.resize(400,400)
9        self.set_ui()
10
11
12    def set_ui(self):
13        self.textEdit = QTextEdit(self)
14        self.textEdit.move(50,50)
15        self.textEdit.resize(300,300)
16        self.textEdit.setStyleSheet("background-color:cyan;")
17
18        self.setup_conent()
19
20    ############################文本内容的设置###############################
21    def setup_conent(self) :
22        #设置普通文本
23        # self.textEdit.setPlainText("<h1>Life is short,")  #第一次设置完之后,光标在最前面
24        # self.textEdit.insertPlainText("I learn Python!</h1>")
25        # print(self.textEdit.toHtml())  #  输出的是html的框架
26
27        #设置富文本
28        # self.textEdit.setHtml("<h1>Life is short,")   #第一次设置完之后,光标在最前面
29        # self.textEdit.insertHtml("I learn Python!</h1>")
30        # print(self.textEdit.toPlainText())
31
32        #自动识别
33        self.textEdit.setText("<h1>Life is short,I learn Python!</h1>")
34
35
36    ############################文本内容的设置###############################
37
38
39
40
41if __name__ == '__main__':
42    app =QApplication(sys.argv)
43
44    window = Window()
45    window.show()
46
47    sys.exit(app.exec_())
View Code
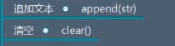
追加文本是不看光标位置的,它直接在最后追加!


1from PyQt5.Qt import * #刚开始学习可以这样一下导入
2import sys
3
4class Window(QWidget):
5    def __init__(self):
6        super().__init__()
7        self.setWindowTitle("QTextEdit的学习")
8        self.resize(400,400)
9        self.set_ui()
10
11
12    def set_ui(self):
13        self.textEdit = QTextEdit(self)
14        self.textEdit.move(50,50)
15        self.textEdit.resize(300,300)
16        self.textEdit.setStyleSheet("background-color:cyan;")
17
18        self.setup_conent()
19
20    ############################文本内容的设置###############################
21    def setup_conent(self) :
22        self.textEdit.setText("hhhhhhhh")
23        self.textEdit.append("Hello world")  #但是此时光标的位置仍然是开始
24
25    ############################文本内容的设置###############################
26
27
28
29
30if __name__ == '__main__':
31    app =QApplication(sys.argv)
32
33    window = Window()
34    window.show()
35
36    sys.exit(app.exec_())
View Code


1from PyQt5.Qt import * #刚开始学习可以这样一下导入
2import sys
3
4class Window(QWidget):
5    def __init__(self):
6        super().__init__()
7        self.setWindowTitle("QTextEdit的学习")
8        self.resize(400,400)
9        self.set_ui()
10
11
12    def set_ui(self):
13        self.textEdit = QTextEdit(self)
14        self.textEdit.move(50,50)
15        self.textEdit.resize(300,300)
16        self.textEdit.setStyleSheet("background-color:cyan;")
17
18        btn = QPushButton(self)
19        btn.setText("按钮")
20        btn.move(0,300)
21        btn.clicked.connect(self.btn_clicked_slot)
22        self.setup_conent()
23############################清空编辑框###############################
24    def btn_clicked_slot(self):
25        # self.textEdit.setText("") #清空内容
26        self.textEdit.clear()  # 它也可以
27############################清空编辑框###############################
28
29    def setup_conent(self) :
30        self.textEdit.setText("hhhhhhhh")
31        self.textEdit.append("Hello world")  #但是此时光标的位置仍然是开始
32
33
34
35
36
37if __name__ == '__main__':
38    app =QApplication(sys.argv)
39
40    window = Window()
41    window.show()
42
43    sys.exit(app.exec_())
清空编辑框

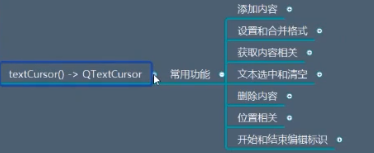
上面都是通过文本编辑器去写内容,下面是通过文本光标来进行操作!
这两种方式操作的都是个文本文档对象,
可以通过textEdit.document() 获取它
它的类时QTextDocument 它是直接继承自QObject 故不是可视化的东西


1from PyQt5.Qt import * #刚开始学习可以这样一下导入
2import sys
3
4class Window(QWidget):
5    def __init__(self):
6        super().__init__()
7        self.setWindowTitle("QTextEdit的学习")
8        self.resize(400,400)
9        self.set_ui()
10
11
12    def set_ui(self):
13        self.textEdit = QTextEdit(self)
14        self.textEdit.move(50,50)
15        self.textEdit.resize(300,300)
16        self.textEdit.setStyleSheet("background-color:cyan;")
17
18        btn = QPushButton(self)
19        btn.setText("按钮")
20        btn.move(0,300)
21        self.setup_conent()
22
23
24    def setup_conent(self) :
25        self.textEdit.setText("hhhhhhhh")
26        self.textEdit.append("Hello world")  #但是此时光标的位置仍然是开始
27
28############################文本文档对象###############################
29        print(self.textEdit.document())
30                    #<PyQt5.QtGui.QTextDocument object at 0x000002A45A01AD38>
31
32############################文本文档对象###############################
33
34
35
36
37if __name__ == '__main__':
38    app =QApplication(sys.argv)
39
40    window = Window()
41    window.show()
42
43    sys.exit(app.exec_())
获取文本文档对象
下面我们使用文本光标来操作文本对象。
使用.textCursor() 获取文本光标对象


1from PyQt5.Qt import * #刚开始学习可以这样一下导入
2import sys
3
4class Window(QWidget):
5    def __init__(self):
6        super().__init__()
7        self.setWindowTitle("QTextEdit的学习")
8        self.resize(400,400)
9        self.set_ui()
10
11
12    def set_ui(self):
13        self.textEdit = QTextEdit(self)
14        self.textEdit.move(50,50)
15        self.textEdit.resize(300,300)
16        self.textEdit.setStyleSheet("background-color:cyan;")
17
18        btn = QPushButton(self)
19        btn.setText("按钮")
20        btn.move(0,300)
21        self.setup_conent()
22
23
24    def setup_conent(self) :
25        self.textEdit.setText("hhhhhhhh")
26        self.textEdit.append("Hello world")  #但是此时光标的位置仍然是开始
27
28    ############################获取文本光标对象###############################
29        print(self.textEdit.textCursor()) #<PyQt5.QtGui.QTextCursor object at 0x000001C8CB85A358>
30
31    ############################获取文本光标对象###############################
32
33
34
35
36if __name__ == '__main__':
37    app =QApplication(sys.argv)
38
39    window = Window()
40    window.show()
41
42    sys.exit(app.exec_())
View Code
文本光标对象里面有很多的方法供我们使用:
================================================================
1,添加内容
下面就通过操作文本光标对象的方法从而达到操作文本文档对象的目的!
文本光标对象方法之插入文本:
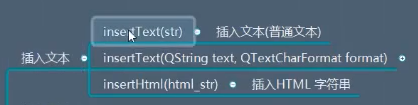


1from PyQt5.Qt import * #刚开始学习可以这样一下导入
2import sys
3
4class Window(QWidget):
5    def __init__(self):
6        super().__init__()
7        self.setWindowTitle("QTextEdit的学习")
8        self.resize(400,400)
9        self.set_ui()
10
11
12    def set_ui(self):
13        self.textEdit = QTextEdit(self)
14        self.textEdit.move(50,50)
15        self.textEdit.resize(300,300)
16        self.textEdit.setStyleSheet("background-color:cyan;")
17
18        btn = QPushButton(self)
19        btn.setText("按钮")
20        btn.move(0,300)
21        self.setup_conent()
22        self.cursor_object()
23
24    def setup_conent(self) :
25        # self.textEdit.setText("hhhhhhhh")
26        # self.textEdit.append("Hello world")
27        pass
28
29    ############################文本光标对象方法之插入文本###############################
30    def cursor_object(self):
31        # QTextCursor   #它的对象方法,编辑器不能很好识别,需要我们自己点进去去找
32
33        cursor_obj =self.textEdit.textCursor()
34        #1  插入文本
35
36        # cursor_obj.insertText("I learn Python")
37
38
39        ############################文本字符格式###############################
40        #QTextCharFormat
41        textCharFormat = QTextCharFormat()
42        textCharFormat.setToolTip("哈哈")
43        textCharFormat.setFontFamily("隶书")
44        textCharFormat.setFontPointSize(16)
45        ############################文本字符格式###############################
46        cursor_obj.insertText("我要学Python",textCharFormat)
47
48        #插入html
49        cursor_obj.insertHtml("<a href = 'https:python123.io'> Python123</a>")
50
51        #2
52
53        #3
54
55
56    ############################文本光标对象方法之插入文本###############################
57
58
59if __name__ == '__main__':
60    app =QApplication(sys.argv)
61
62    window = Window()
63    window.show()
64
65    sys.exit(app.exec_())
View Code
文本光标对象方法之插入图片:
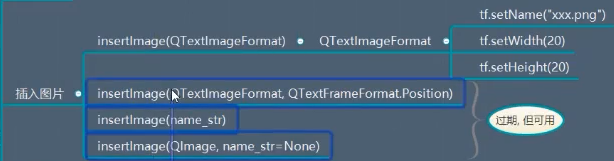


1from PyQt5.Qt import * #刚开始学习可以这样一下导入
2import sys
3
4class Window(QWidget):
5    def __init__(self):
6        super().__init__()
7        self.setWindowTitle("QTextEdit的学习")
8        self.resize(400,400)
9        self.set_ui()
10
11
12    def set_ui(self):
13        self.textEdit = QTextEdit(self)
14        self.textEdit.move(50,50)
15        self.textEdit.resize(300,300)
16        self.textEdit.setStyleSheet("background-color:cyan;")
17
18        btn = QPushButton(self)
19        btn.setText("按钮")
20        btn.move(0,300)
21        self.setup_conent()
22        self.cursor_object()
23
24    def setup_conent(self) :
25        # self.textEdit.setText("hhhhhhhh")
26        # self.textEdit.append("Hello world")
27        pass
28
29    ############################文本光标对象方法之插入图片###############################
30    def cursor_object(self):
31        # QTextCursor   #它的对象方法,编辑器不能很好识别,需要我们自己点进去去找
32        QTextCursor
33        cursor_obj =self.textEdit.textCursor()
34
35        # 用第一种就好了
36        # insertImage(self, QTextImageFormat)
37        textImageFormat = QTextImageFormat()
38        ############################QtextImageFormat 格式设置###############################
39        textImageFormat.setName("icon/icon.ico")
40        textImageFormat.setWidth(100)
41        textImageFormat.setHeight(100)
42        ############################QtextImageFormat 格式设置###############################
43        cursor_obj.insertImage(textImageFormat)
44
45        #其他三个过时的方法
46        #1
47        # # insertImage(self, QTextImageFormat,QTextFrameFormat(Position))
48        # QTextFrameFormat.FloatLeft
49        # textImageFormat = QTextImageFormat()
50        # ############################QtextImageFormat 格式设置###############################
51        # textImageFormat.setName("icon/icon.ico")
52        # textImageFormat.setWidth(100)
53        # textImageFormat.setHeight(100)
54        # ############################QtextImageFormat 格式设置###############################
55        # cursor_obj.insertImage(textImageFormat,QTextFrameFormat.FloatRight)
56        #2
57        # cursor_obj.insertImage("icon/icon.ico")
58
59
60
61    ############################文本光标对象方法之插入图片###############################
62
63
64if __name__ == '__main__':
65    app =QApplication(sys.argv)
66
67    window = Window()
68    window.show()
69
70    sys.exit(app.exec_())
View Code
文本光标对象方法之插入句子:



1from PyQt5.Qt import * #刚开始学习可以这样一下导入
2import sys
3
4class Window(QWidget):
5    def __init__(self):
6        super().__init__()
7        self.setWindowTitle("QTextEdit的学习")
8        self.resize(400,400)
9        self.set_ui()
10
11
12    def set_ui(self):
13        self.textEdit = QTextEdit(self)
14        self.textEdit.move(50,50)
15        self.textEdit.resize(300,300)
16        self.textEdit.setStyleSheet("background-color:cyan;")
17
18        btn = QPushButton(self)
19        btn.setText("按钮")
20        btn.move(0,300)
21        self.setup_conent()
22        self.cursor_object()
23
24    def setup_conent(self) :
25        # self.textEdit.setText("hhhhhhhh")
26        # self.textEdit.append("Hello world")
27        pass
28
29    ############################文本光标对象方法之插入句子###############################
30    def cursor_object(self):
31        # QTextCursor   #它的对象方法,编辑器不能很好识别,需要我们自己点进去去找
32        QTextCursor
33        cursor_obj =self.textEdit.textCursor()
34
35        ############################QTextDocumentFragment 的使用###############################
36        # textDocumentFragment = QTextDocumentFragment.fromHtml("<h1>hello</h1>")
37                #这里要注意的是,虽然 fromHtml 的说明中是个self 但是它是个类方法,直接可以用类名调用
38
39        textDocumentFragment = QTextDocumentFragment.fromPlainText("<h1>hello</h1>")
40        ############################QTextDocumentFragment 的使用###############################
41
42
43        cursor_obj.insertFragment(textDocumentFragment)
44
45
46    ############################文本光标对象方法之插入句子###############################
47
48
49if __name__ == '__main__':
50    app =QApplication(sys.argv)
51
52    window = Window()
53    window.show()
54
55    sys.exit(app.exec_())
View Code
文本光标对象方法之插入列表:
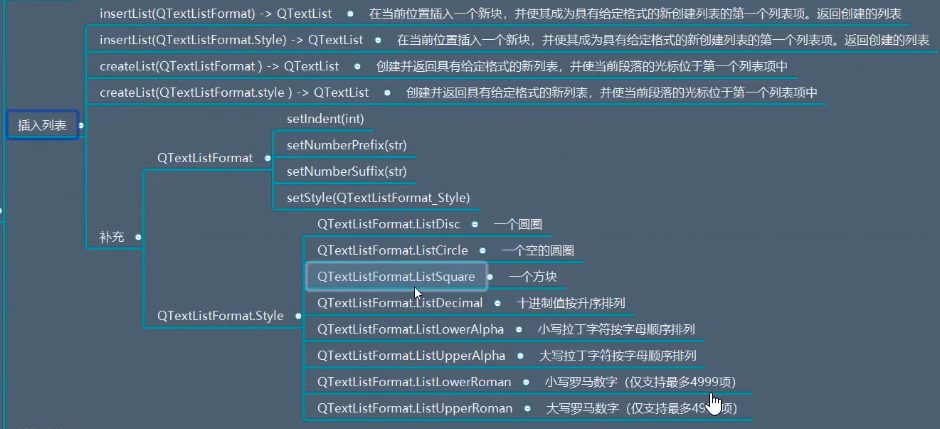
我们先用 QTextListFormatStyle 枚举值来做参数:


1from PyQt5.Qt import * #刚开始学习可以这样一下导入
2import sys
3
4class Window(QWidget):
5    def __init__(self):
6        super().__init__()
7        self.setWindowTitle("QTextEdit的学习")
8        self.resize(400,400)
9        self.set_ui()
10
11
12    def set_ui(self):
13        self.textEdit = QTextEdit(self)
14        self.textEdit.move(50,50)
15        self.textEdit.resize(300,300)
16        self.textEdit.setStyleSheet("background-color:cyan;")
17
18        btn = QPushButton(self)
19        btn.setText("按钮")
20        btn.move(0,300)
21        self.setup_conent()
22        self.cursor_object()
23
24    def setup_conent(self) :
25        # self.textEdit.setText("hhhhhhhh")
26        # self.textEdit.append("Hello world")
27        pass
28
29    ############################文本光标对象方法之插入列表###############################
30    def cursor_object(self):
31        # QTextCursor   #它的对象方法,编辑器不能很好识别,需要我们自己点进去去找
32        QTextCursor
33        cursor_obj =self.textEdit.textCursor()
34
35        ##插入  它是在光标位置直接插入,如果光标后有文本直接当做第一项
36        # textList = cursor_obj.insertList(QTextListFormat.ListCircle)  #枚举值
37        # # 它的返回值是  QTextList
38        # print(textList)  #可以根据这个查看列表中的具体信息
39
40        #创建  它是直接将光标所在的行作为第一项
41        textList = cursor_obj.createList(QTextListFormat.ListCircle)  #枚举值
42        print(textList)
43
44    ############################文本光标对象方法之插入列表###############################
45
46
47if __name__ == '__main__':
48    app =QApplication(sys.argv)
49
50    window = Window()
51    window.show()
52
53    sys.exit(app.exec_())
View Code
下面用 QTextListFormat 对象来做参数:


1from PyQt5.Qt import * #刚开始学习可以这样一下导入
2import sys
3
4class Window(QWidget):
5    def __init__(self):
6        super().__init__()
7        self.setWindowTitle("QTextEdit的学习")
8        self.resize(400,400)
9        self.set_ui()
10
11
12    def set_ui(self):
13        self.textEdit = QTextEdit(self)
14        self.textEdit.move(50,50)
15        self.textEdit.resize(300,300)
16        self.textEdit.setStyleSheet("background-color:cyan;")
17
18        btn = QPushButton(self)
19        btn.setText("按钮")
20        btn.move(0,300)
21        self.setup_conent()
22        self.cursor_object()
23
24    def setup_conent(self) :
25        # self.textEdit.setText("hhhhhhhh")
26        # self.textEdit.append("Hello world")
27        pass
28
29    ############################文本光标对象方法之插入列表###############################
30    def cursor_object(self):
31        # QTextCursor   #它的对象方法,编辑器不能很好识别,需要我们自己点进去去找
32        QTextCursor
33        cursor_obj =self.textEdit.textCursor()
34
35        QTextListFormat
36        textListFormat = QTextListFormat()
37        ############################QTextListFormat  的设置###############################
38        textListFormat.setIndent(3)  # 缩进三个tab
39
40        textListFormat.setStyle(QTextListFormat.ListDecimal)  #数字
41        textListFormat.setNumberPrefix("<")   #前缀  注:前缀和后缀是配合数字使用的,其他样式不行
42        textListFormat.setNumberSuffix(">")  #后缀
43
44        ############################QTextListFormat  的设置###############################
45
46
47
48        cursor_obj.createList(textListFormat)
49
50    ############################文本光标对象方法之插入列表###############################
51
52
53if __name__ == '__main__':
54    app =QApplication(sys.argv)
55
56    window = Window()
57    window.show()
58
59    sys.exit(app.exec_())
View Code
文本光标对象方法之插入表格:

所谓的表格就是类似于Excel 的,它关键就是行和列。


1from PyQt5.Qt import * #刚开始学习可以这样一下导入
2import sys
3
4class Window(QWidget):
5    def __init__(self):
6        super().__init__()
7        self.setWindowTitle("QTextEdit的学习")
8        self.resize(400,400)
9        self.set_ui()
10
11
12    def set_ui(self):
13        self.textEdit = QTextEdit(self)
14        self.textEdit.move(50,50)
15        self.textEdit.resize(300,300)
16        self.textEdit.setStyleSheet("background-color:cyan;")
17
18        btn = QPushButton(self)
19        btn.setText("按钮")
20        btn.move(0,300)
21        self.setup_conent()
22        self.cursor_object()
23
24    def setup_conent(self) :
25        # self.textEdit.setText("hhhhhhhh")
26        # self.textEdit.append("Hello world")
27        pass
28
29    ############################文本光标对象方法之插入表格###############################
30    def cursor_object(self):
31        # QTextCursor   #它的对象方法,编辑器不能很好识别,需要我们自己点进去去找
32        QTextCursor
33        cursor_obj =self.textEdit.textCursor()
34
35        # cursor_obj.insertTable(5,3)  #插入5行  3 列
36
37        QTextTableFormat
38        textTableFormat = QTextTableFormat()
39
40        ############################QTextTableFormat 的设置###############################
41        textTableFormat.setAlignment(Qt.AlignRight)  #设置整个表格在右面  右对齐
42        textTableFormat.setCellPadding(3)  # 内边距
43        textTableFormat.setCellSpacing(5)  #外边距
44
45        #限制列宽
46        # textTableFormat.setColumnWidthConstraints((QTextLength,QTextLength,QTextLength))
47        QTextLength
48        textTableFormat.setColumnWidthConstraints((QTextLength(QTextLength.PercentageLength,50),\
49                                                   QTextLength(QTextLength.PercentageLength,40),\
50                                                   QTextLength(QTextLength.PercentageLength,10)))
51                                    # 限制列宽 分别是 50%  40%  10%
52
53        ############################QTextTableFormat 的设置###############################
54
55        textTable = cursor_obj.insertTable(5,3,textTableFormat)
56
57
58        QTextTable
59        #插入之后,它会返回 QTextTable 的对象 ,里面存储着关于表格的信息
60        # textTable.appendColumns(2)  # 追加了两列  ,详细查看文档
61
62
63
64    ############################文本光标对象方法之插入表格###############################
65
66
67if __name__ == '__main__':
68    app =QApplication(sys.argv)
69
70    window = Window()
71    window.show()
72
73    sys.exit(app.exec_())
View Code
文本光标对象方法之插入文本块:



1from PyQt5.Qt import * #刚开始学习可以这样一下导入
2import sys
3
4class Window(QWidget):
5    def __init__(self):
6        super().__init__()
7        self.setWindowTitle("QTextEdit的学习")
8        self.resize(400,400)
9        self.set_ui()
10
11
12    def set_ui(self):
13        self.textEdit = QTextEdit(self)
14        self.textEdit.move(50,50)
15        self.textEdit.resize(300,300)
16        self.textEdit.setStyleSheet("background-color:cyan;")
17
18        btn = QPushButton(self)
19        btn.setText("按钮")
20        btn.move(0,300)
21        self.setup_conent()
22        self.cursor_object()
23
24    def setup_conent(self) :
25        # self.textEdit.setText("hhhhhhhh")
26        # self.textEdit.append("Hello world")
27        pass
28
29    ############################文本光标对象方法之文本块###############################
30    def cursor_object(self):
31        # QTextCursor   #它的对象方法,编辑器不能很好识别,需要我们自己点进去去找
32        QTextCursor
33        cursor_obj =self.textEdit.textCursor()
34
35        # cursor_obj.insertBlock()    #这样是直接插入空的的文本块
36
37
38
39        # cursor_obj.insertBlock(QTextBlockFormat)  #设置文本块的同时设置文本块格式
40        # textBlockFormat = QTextBlockFormat()
41        # ############################QTextBlockFormat 的设置###############################
42        # textBlockFormat.setAlignment(Qt.AlignRight)  #右对齐
43        # textBlockFormat.setRightMargin(100)  #右边距是 100
44        # textBlockFormat.setIndent(3)  #缩进是3个 tab
45        # ############################QTextBlockFormat 的设置###############################
46        #
47        #
48        # cursor_obj.insertBlock(textBlockFormat)
49
50
51
52
53        # 在设置QTextBlockFormat 段落级别的时候也可以设置字符级别的格式
54        textBlockFormat = QTextBlockFormat()
55        textCharFormat = QTextCharFormat()
56        ############################QTextBlockFormat 和 QTextCharFormat的设置###############################
57
58        #对段落的设置
59        textBlockFormat.setAlignment(Qt.AlignRight)  #右对齐
60        textBlockFormat.setRightMargin(100)  #右边距是 100
61        textBlockFormat.setIndent(3)  #缩进是3个 tab
62
63        #对字符的设置
64        textCharFormat.setFontFamily("隶书")
65        textCharFormat.setFontPointSize(20)
66        textCharFormat.setFontItalic(True)
67
68        ############################QTextBlockFormat 和 QTextCharFormat的设置###############################
69        cursor_obj.insertBlock(textBlockFormat,textCharFormat)
70
71
72
73    ############################文本光标对象方法之文本块###############################
74
75
76if __name__ == '__main__':
77    app =QApplication(sys.argv)
78
79    window = Window()
80    window.show()
81
82    sys.exit(app.exec_())
View Code
文本光标对象方法之插入框架:

#插入新的框架:


1from PyQt5.Qt import * #刚开始学习可以这样一下导入
2import sys
3
4class Window(QWidget):
5    def __init__(self):
6        super().__init__()
7        self.setWindowTitle("QTextEdit的学习")
8        self.resize(400,400)
9        self.set_ui()
10
11
12    def set_ui(self):
13        self.textEdit = QTextEdit(self)
14        self.textEdit.move(50,50)
15        self.textEdit.resize(300,300)
16        self.textEdit.setStyleSheet("background-color:cyan;")
17
18        btn = QPushButton(self)
19        btn.setText("按钮")
20        btn.move(0,300)
21        self.setup_conent()
22        self.cursor_object()
23
24    def setup_conent(self) :
25        # self.textEdit.setText("hhhhhhhh")
26        # self.textEdit.append("Hello world")
27        pass
28
29    ############################文本光标对象方法之文本框架###############################
30    def cursor_object(self):
31        # QTextCursor   #它的对象方法,编辑器不能很好识别,需要我们自己点进去去找
32        QTextCursor
33        cursor_obj =self.textEdit.textCursor()
34
35        QTextFrameFormat
36        textFrameFormat = QTextFrameFormat()
37        ############################QTextFrameFormat 的设置###############################
38        textFrameFormat.setBorder(10)
39        textFrameFormat.setBorderBrush(QColor(200,50,50))
40        textFrameFormat.setRightMargin(20)
41
42        # 这时就产生了个新的框架
43        ############################QTextFrameFormat 的设置###############################
44
45
46        cursor_obj.insertFrame(textFrameFormat)
47
48
49    ############################文本光标对象方法之文本框架###############################
50
51
52if __name__ == '__main__':
53    app =QApplication(sys.argv)
54
55    window = Window()
56    window.show()
57
58    sys.exit(app.exec_())
View Code
根框架进行设置:


1from PyQt5.Qt import * #刚开始学习可以这样一下导入
2import sys
3
4class Window(QWidget):
5    def __init__(self):
6        super().__init__()
7        self.setWindowTitle("QTextEdit的学习")
8        self.resize(400,400)
9        self.set_ui()
10
11
12    def set_ui(self):
13        self.textEdit = QTextEdit(self)
14        self.textEdit.move(50,50)
15        self.textEdit.resize(300,300)
16        self.textEdit.setStyleSheet("background-color:cyan;")
17
18        btn = QPushButton(self)
19        btn.setText("按钮")
20        btn.move(0,300)
21        self.setup_conent()
22        self.cursor_object()
23
24    def setup_conent(self) :
25        # self.textEdit.setText("hhhhhhhh")
26        # self.textEdit.append("Hello world")
27        pass
28
29    ############################文本光标对象方法之根框架###############################
30    def cursor_object(self):
31        # QTextCursor   #它的对象方法,编辑器不能很好识别,需要我们自己点进去去找
32        QTextCursor
33        cursor_obj =self.textEdit.textCursor()
34
35
36
37        doc = self.textEdit.document()  #  doc为文本对象
38        root_frame =  doc.rootFrame()
39        print(root_frame)  #<PyQt5.QtGui.QTextFrame object at 0x00000208E69D3E58>
40        QTextFrameFormat
41        textFrameFormat = QTextFrameFormat()
42        ############################QTextFrameFormat 的设置###############################
43        textFrameFormat.setBorder(10)
44        textFrameFormat.setBorderBrush(QColor(200,50,50))
45
46        ############################QTextFrameFormat 的设置###############################
47
48        root_frame.setFrameFormat(textFrameFormat)
49
50    ############################文本光标对象方法之根框架###############################
51
52
53if __name__ == '__main__':
54    app =QApplication(sys.argv)
55
56    window = Window()
57    window.show()
58
59    sys.exit(app.exec_())
View Code
===================================================================
2,设置和合并格式:
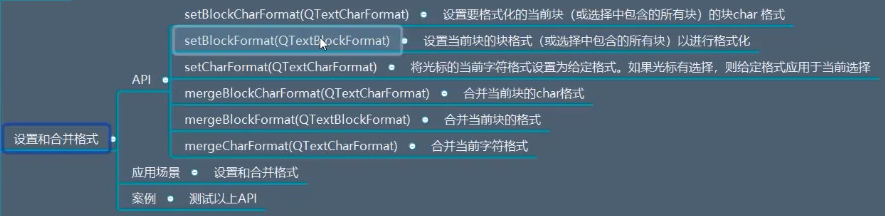
注: 块就是段落,字符就是每个字的设置
设置块内字符格式:


1from PyQt5.Qt import * #刚开始学习可以这样一下导入
2import sys
3
4class Window(QWidget):
5    def __init__(self):
6        super().__init__()
7        self.setWindowTitle("QTextEdit的学习")
8        self.resize(400,400)
9        self.set_ui()
10
11
12    def set_ui(self):
13        self.textEdit = QTextEdit(self)
14        self.textEdit.move(50,50)
15        self.textEdit.resize(300,300)
16        self.textEdit.setStyleSheet("background-color:cyan;")
17        self.cursor_object()
18
19    def setup_conent(self) :
20        pass
21
22    ############################文本光标对象 --格式设置和合并方法 之设置块内字符格式###############################
23    def cursor_object(self):
24        # QTextCursor   #它的对象方法,编辑器不能很好识别,需要我们自己点进去去找
25        QTextCursor
26        cursor_obj =self.textEdit.textCursor()
27
28        textCharFormat = QTextCharFormat()
29        ############################QTextCharFormat 的设置###############################
30        textCharFormat.setFontFamily("隶书")
31        textCharFormat.setFontPointSize(30)
32        textCharFormat.setFontOverline(True)
33        textCharFormat.setFontUnderline(True)
34
35
36
37        ############################QTextCharFormat 的设置 ###############################
38        cursor_obj.setBlockCharFormat(textCharFormat)
39
40
41    ############################文本光标对象 --格式设置和合并方法   之设置块内字符格式###############################
42
43
44
45if __name__ == '__main__':
46    app =QApplication(sys.argv)
47
48    window = Window()
49    window.show()
50
51    sys.exit(app.exec_())
View Code
设置块格式:


1from PyQt5.Qt import * #刚开始学习可以这样一下导入
2import sys
3
4class Window(QWidget):
5    def __init__(self):
6        super().__init__()
7        self.setWindowTitle("QTextEdit的学习")
8        self.resize(400,400)
9        self.set_ui()
10
11
12    def set_ui(self):
13        self.textEdit = QTextEdit(self)
14        self.textEdit.move(50,50)
15        self.textEdit.resize(300,300)
16        self.textEdit.setStyleSheet("background-color:cyan;")
17        self.cursor_object()
18
19    def setup_conent(self) :
20        pass
21
22    ############################文本光标对象 --格式设置和合并方法 之设置块格式###############################
23    def cursor_object(self):
24        # QTextCursor   #它的对象方法,编辑器不能很好识别,需要我们自己点进去去找
25        QTextCursor
26        cursor_obj =self.textEdit.textCursor()
27
28        textBlockFormat = QTextBlockFormat()
29        ############################QTextBlockFormat 的设置###############################
30        textBlockFormat.setAlignment(Qt.AlignCenter)
31        textBlockFormat.setIndent(2)
32        ############################QTextBlockFormat 的设置###############################
33        cursor_obj.setBlockFormat(textBlockFormat)
34    ############################文本光标对象 --格式设置和合并方法   之设置块格式###############################
35
36
37
38if __name__ == '__main__':
39    app =QApplication(sys.argv)
40
41    window = Window()
42    window.show()
43
44    sys.exit(app.exec_())
View Code
给 当前光标选中的字符进行设置:


1from PyQt5.Qt import * #刚开始学习可以这样一下导入
2import sys
3
4class Window(QWidget):
5    def __init__(self):
6        super().__init__()
7        self.setWindowTitle("QTextEdit的学习")
8        self.resize(400,400)
9        self.set_ui()
10
11
12    def set_ui(self):
13        self.textEdit = QTextEdit(self)
14        self.textEdit.move(50,50)
15        self.textEdit.resize(300,300)
16        self.textEdit.setStyleSheet("background-color:cyan;")
17        self.cursor_object()
18
19        btn = QPushButton(self)
20        btn.setText("按钮")
21        btn.move(0,300)
22        btn.clicked.connect(lambda :self.cursor_object())
23
24
25
26
27    def setup_conent(self) :
28        pass
29
30    ############################文本光标对象 --格式设置和合并方法 之设置当前光标选定字符格式###############################
31
32    #注 : 此时配合按钮一起使用
33    def cursor_object(self):
34        # QTextCursor   #它的对象方法,编辑器不能很好识别,需要我们自己点进去去找
35        QTextCursor
36        cursor_obj =self.textEdit.textCursor()
37
38
39        textCharFormat = QTextCharFormat()
40        ############################QTextCharFormat 的设置 ###############################
41        textCharFormat.setFontFamily("幼圆")
42        textCharFormat.setFontOverline(True)
43        textCharFormat.setFontUnderline(True)
44        textCharFormat.setFontPointSize(30)
45
46        ############################QTextCharFormat 的设置 ###############################
47
48        cursor_obj.setCharFormat(textCharFormat)
49    ############################文本光标对象 --格式设置和合并方法   之设置当前光标选定字符格式###############################
50
51
52
53if __name__ == '__main__':
54    app =QApplication(sys.argv)
55
56    window = Window()
57    window.show()
58
59    sys.exit(app.exec_())
View Code
合并 字符格式:


1from PyQt5.Qt import * #刚开始学习可以这样一下导入
2import sys
3
4class Window(QWidget):
5    def __init__(self):
6        super().__init__()
7        self.setWindowTitle("QTextEdit的学习")
8        self.resize(400,400)
9        self.set_ui()
10
11
12    def set_ui(self):
13        self.textEdit = QTextEdit(self)
14        self.textEdit.move(50,50)
15        self.textEdit.resize(300,300)
16        self.textEdit.setStyleSheet("background-color:cyan;")
17        self.cursor_object()
18
19        btn = QPushButton(self)
20        btn.setText("按钮")
21        btn.move(0,300)
22        btn.clicked.connect(lambda :self.cursor_object())
23
24
25
26
27    def setup_conent(self) :
28        pass
29
30    ############################文本光标对象 --格式设置和合并方法 之合并当前字符格式###############################
31
32    #注 : 此时配合按钮一起使用
33    def cursor_object(self):
34        # QTextCursor   #它的对象方法,编辑器不能很好识别,需要我们自己点进去去找
35        QTextCursor
36        cursor_obj =self.textEdit.textCursor()
37
38
39        textCharFormat1 = QTextCharFormat()
40        textCharFormat2 = QTextCharFormat()
41        ############################QTextCharFormat 的设置###############################
42        textCharFormat1.setFontFamily("幼圆")
43        textCharFormat1.setFontUnderline(True)
44        textCharFormat1.setFontOverline(True)
45
46        textCharFormat2.setFontStrikeOut(True)
47
48        ############################QTextCharFormat 的设置###############################
49        cursor_obj.setCharFormat(textCharFormat1)
50        # cursor_obj.setCharFormat(textCharFormat2)  # 它会量1覆盖掉的
51
52        cursor_obj.mergeCharFormat(textCharFormat2)  # 它会将 1 和 2 合并
53    ############################文本光标对象 --格式设置和合并方法   之合并当前字符格式###############################
54
55
56
57if __name__ == '__main__':
58    app =QApplication(sys.argv)
59
60    window = Window()
61    window.show()
62
63    sys.exit(app.exec_())
View Code
3,获取内容相关
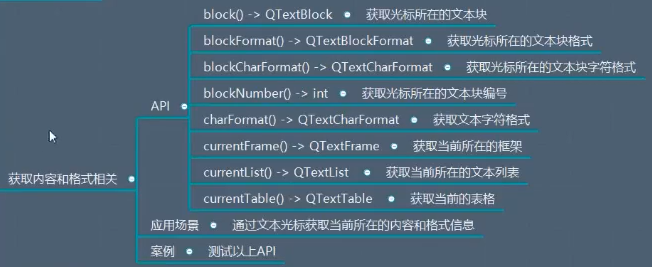


1from PyQt5.Qt import * #刚开始学习可以这样一下导入
2import sys
3
4class Window(QWidget):
5    def __init__(self):
6        super().__init__()
7        self.setWindowTitle("QTextEdit的学习")
8        self.resize(400,400)
9        self.set_ui()
10
11
12    def set_ui(self):
13        self.textEdit = QTextEdit(self)
14        self.textEdit.move(50,50)
15        self.textEdit.resize(300,300)
16        self.textEdit.setStyleSheet("background-color:cyan;")
17        self.cursor_object()
18
19        btn = QPushButton(self)
20        btn.setText("按钮")
21        btn.move(0,300)
22        btn.clicked.connect(lambda :self.cursor_object())
23
24
25
26
27    def setup_conent(self) :
28        pass
29
30    ############################文本光标对象 --内容和格式的获取 ###############################
31
32    #注 : 此时配合按钮一起使用
33    def cursor_object(self):
34        # QTextCursor   #它的对象方法,编辑器不能很好识别,需要我们自己点进去去找
35        QTextCursor
36        cursor_obj =self.textEdit.textCursor()
37
38        ############################获取 文本块对象###############################
39        QTextBlock
40        # print(cursor_obj.block())
41        print(cursor_obj.block().text())
42        ############################获取 文本块对象###############################
43
44        ############################相应文本块的编号###############################
45        print(cursor_obj.blockNumber())
46        ############################相应文本块的编号###############################
47
48        ############################当前文本的列表###############################
49        print(cursor_obj.currentList())  #这只是当前没有设置而已
50
51
52        ############################当前文本的列表###############################
53
54
55    ############################文本光标对象 --内容和格式的获取   ###############################
56
57if __name__ == '__main__':
58    app =QApplication(sys.argv)
59
60    window = Window()
61    window.show()
62
63    sys.exit(app.exec_())
View Code
4,文本选中和清空
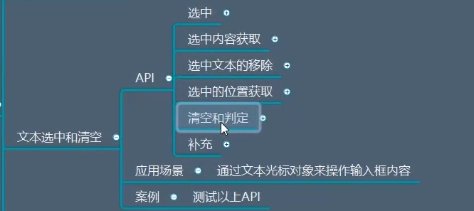
选中:
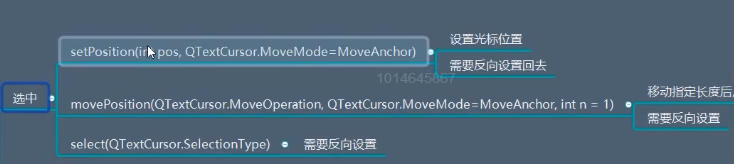
这里涉及到的移动模式:

如果模式采用的是默认(锚点和光标在同一个地方):


1from PyQt5.Qt import * #刚开始学习可以这样一下导入
2import sys
3
4class Window(QWidget):
5    def __init__(self):
6        super().__init__()
7        self.setWindowTitle("QTextEdit的学习")
8        self.resize(400,400)
9        self.set_ui()
10
11
12    def set_ui(self):
13        self.textEdit = QTextEdit(self)
14        self.textEdit.move(50,50)
15        self.textEdit.resize(300,300)
16        self.textEdit.setStyleSheet("background-color:cyan;")
17        self.cursor_object()
18
19        btn = QPushButton(self)
20        btn.setText("按钮")
21        btn.move(0,300)
22        btn.clicked.connect(lambda :self.cursor_object())
23
24
25
26
27    def setup_conent(self) :
28        pass
29
30    ############################文本光标对象 --文本选中和清空  之设置光标位置###############################
31
32    #注 : 此时配合按钮一起使用
33    def cursor_object(self):
34        # QTextCursor   #它的对象方法,编辑器不能很好识别,需要我们自己点进去去找
35        QTextCursor
36        cursor_obj =self.textEdit.textCursor()
37
38        cursor_obj.setPosition(6)
39        self.textEdit.setTextCursor(cursor_obj)  #需要将文本光标对象设置回去  反向设置
40
41
42        self.textEdit.setFocus()  #重新获取焦点
43    ############################文本光标对象 --文本选中和清空   之设置光标位置###############################
44
45if __name__ == '__main__':
46    app =QApplication(sys.argv)
47
48    window = Window()
49    window.show()
50
51    sys.exit(app.exec_())
View Code
如果模式,我们采用的是保持锚点不懂的话,这时锚点和光标就会形成选中的效果。


1from PyQt5.Qt import * #刚开始学习可以这样一下导入
2import sys
3
4class Window(QWidget):
5    def __init__(self):
6        super().__init__()
7        self.setWindowTitle("QTextEdit的学习")
8        self.resize(400,400)
9        self.set_ui()
10
11
12    def set_ui(self):
13        self.textEdit = QTextEdit(self)
14        self.textEdit.move(50,50)
15        self.textEdit.resize(300,300)
16        self.textEdit.setStyleSheet("background-color:cyan;")
17        self.cursor_object()
18
19        btn = QPushButton(self)
20        btn.setText("按钮")
21        btn.move(0,300)
22        btn.clicked.connect(lambda :self.cursor_object())
23
24
25
26
27    def setup_conent(self) :
28        pass
29
30    ############################文本光标对象 --文本选中和清空  之设置光标位置###############################
31
32    #注 : 此时配合按钮一起使用
33    def cursor_object(self):
34        # QTextCursor   #它的对象方法,编辑器不能很好识别,需要我们自己点进去去找
35        QTextCursor
36        cursor_obj =self.textEdit.textCursor()
37
38        cursor_obj.setPosition(6,QTextCursor.KeepAnchor)   # 设置锚点不动
39        self.textEdit.setTextCursor(cursor_obj)
40
41
42        self.textEdit.setFocus()  #重新获取焦点
43    ############################文本光标对象 --文本选中和清空   之设置光标位置###############################
44
45if __name__ == '__main__':
46    app =QApplication(sys.argv)
47
48    window = Window()
49    window.show()
50
51    sys.exit(app.exec_())
View Code
所以,这个方法既可以控制光标也可以达到选中的效果!
第二个方法:
MovePosition()
这里有关移动的操作MoveOperation :
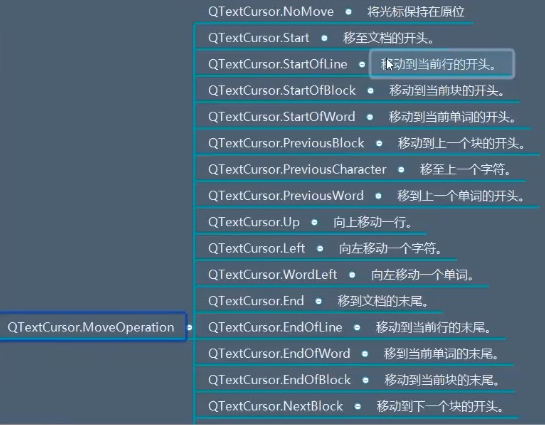
当然它的第二个参数也可以设置是否移动锚点。
我们这里采用默认情况,只研究第一个参数:


1from PyQt5.Qt import * #刚开始学习可以这样一下导入
2import sys
3
4class Window(QWidget):
5    def __init__(self):
6        super().__init__()
7        self.setWindowTitle("QTextEdit的学习")
8        self.resize(400,400)
9        self.set_ui()
10
11
12    def set_ui(self):
13        self.textEdit = QTextEdit(self)
14        self.textEdit.move(50,50)
15        self.textEdit.resize(300,300)
16        self.textEdit.setStyleSheet("background-color:cyan;")
17        self.cursor_object()
18
19        btn = QPushButton(self)
20        btn.setText("按钮")
21        btn.move(0,300)
22        btn.clicked.connect(lambda :self.cursor_object())
23
24
25
26
27    def setup_conent(self) :
28        pass
29
30    ############################文本光标对象 --文本选中和清空  之MovePosition()###############################
31
32    #注 : 此时配合按钮一起使用
33    def cursor_object(self):
34        # QTextCursor   #它的对象方法,编辑器不能很好识别,需要我们自己点进去去找
35        QTextCursor
36        cursor_obj =self.textEdit.textCursor()
37
38
39        # cursor_obj.movePosition(QTextCursor.StartOfLine,1)  #到开头
40        cursor_obj.movePosition(QTextCursor.Up,1)  #到上一行
41
42        self.textEdit.setTextCursor(cursor_obj)  # 它也需要反向设置
43        self.textEdit.setFocus()
44
45    ############################文本光标对象 --文本选中和清空   之MovePosition()###############################
46
47if __name__ == '__main__':
48    app =QApplication(sys.argv)
49
50    window = Window()
51    window.show()
52
53    sys.exit(app.exec_())
View Code
第三个方法: select() 前面两个都是根据位置来的,第三个是提供的快捷方法!



1from PyQt5.Qt import * #刚开始学习可以这样一下导入
2import sys
3
4class Window(QWidget):
5    def __init__(self):
6        super().__init__()
7        self.setWindowTitle("QTextEdit的学习")
8        self.resize(400,400)
9        self.set_ui()
10
11
12    def set_ui(self):
13        self.textEdit = QTextEdit(self)
14        self.textEdit.move(50,50)
15        self.textEdit.resize(300,300)
16        self.textEdit.setStyleSheet("background-color:cyan;")
17        self.cursor_object()
18
19        btn = QPushButton(self)
20        btn.setText("按钮")
21        btn.move(0,300)
22        btn.clicked.connect(lambda :self.cursor_object())
23
24
25
26
27    def setup_conent(self) :
28        pass
29
30    ############################文本光标对象 --文本选中和清空  之select()###############################
31
32    #注 : 此时配合按钮一起使用
33    def cursor_object(self):
34        # QTextCursor   #它的对象方法,编辑器不能很好识别,需要我们自己点进去去找
35        QTextCursor
36        cursor_obj =self.textEdit.textCursor()
37
38        cursor_obj.select(QTextCursor.BlockUnderCursor)
39        self.textEdit.setTextCursor(cursor_obj)  # 它也要反向设置
40
41    ############################文本光标对象 --文本选中和清空   之select()###############################
42
43if __name__ == '__main__':
44    app =QApplication(sys.argv)
45
46    window = Window()
47    window.show()
48
49    sys.exit(app.exec_())
View Code
选中内容获取:



1from PyQt5.Qt import * #刚开始学习可以这样一下导入
2import sys
3
4class Window(QWidget):
5    def __init__(self):
6        super().__init__()
7        self.setWindowTitle("QTextEdit的学习")
8        self.resize(400,400)
9        self.set_ui()
10
11
12    def set_ui(self):
13        self.textEdit = QTextEdit(self)
14        self.textEdit.move(50,50)
15        self.textEdit.resize(300,300)
16        self.textEdit.setStyleSheet("background-color:cyan;")
17
18        # TextCursor  #插入表格
19        self.textEdit.textCursor().insertTable(5,3)
20
21        self.cursor_object()
22        btn = QPushButton(self)
23        btn.setText("按钮")
24        btn.move(0,300)
25        btn.clicked.connect(lambda :self.cursor_object())
26
27
28
29
30    def setup_conent(self) :
31        pass
32
33    ############################文本光标对象 --文本选中内容的获取  之select()###############################
34
35    #注 : 此时配合按钮一起使用
36    def cursor_object(self):
37        # QTextCursor   #它的对象方法,编辑器不能很好识别,需要我们自己点进去去找
38        QTextCursor
39        cursor_obj =self.textEdit.textCursor()
40        ############################selectedText 的使用###############################
41        # print(cursor_obj.selectedText())
42        ############################selectedText 的使用###############################
43
44
45        ############################selection 的使用###############################
46        # QTextDocumentFragment
47        #
48        # # print(cursor_obj.selection())
49        # print(cursor_obj.selection().toPlainText())
50        ############################selection 的使用###############################
51
52
53        ############################selectedTableCells 选中表格的单元格 的使用###############################
54        print(cursor_obj.selectedTableCells())
55        #它返回的结果意思是:
56        #第一个参数是选中哪一行,第二个是多少行
57        #第三个参数是选中哪一列,第四个是多少列
58        ############################selectedTableCells 选中表格的单元格 的使用###############################
59
60
61    ############################文本光标对象 --文本选中内容的获取   之select()###############################
62
63if __name__ == '__main__':
64    app =QApplication(sys.argv)
65
66    window = Window()
67    window.show()
68
69    sys.exit(app.exec_())
View Code
选中的位置获取:



1from PyQt5.Qt import * #刚开始学习可以这样一下导入
2import sys
3
4class Window(QWidget):
5    def __init__(self):
6        super().__init__()
7        self.setWindowTitle("QTextEdit的学习")
8        self.resize(400,400)
9        self.set_ui()
10
11
12    def set_ui(self):
13        self.textEdit = QTextEdit(self)
14        self.textEdit.move(50,50)
15        self.textEdit.resize(300,300)
16        self.textEdit.setStyleSheet("background-color:cyan;")
17
18        self.cursor_object()
19        btn = QPushButton(self)
20        btn.setText("按钮")
21        btn.move(0,300)
22        btn.clicked.connect(lambda :self.cursor_object())
23
24
25
26
27    def setup_conent(self) :
28        pass
29
30    ############################文本光标对象 --选中位置的获取###############################
31
32    #注 : 此时配合按钮一起使用
33    def cursor_object(self):
34        # QTextCursor   #它的对象方法,编辑器不能很好识别,需要我们自己点进去去找
35        QTextCursor
36        cursor_obj =self.textEdit.textCursor()
37
38        print(cursor_obj.selectionStart(),cursor_obj.selectionEnd())
39
40
41    ############################文本光标对象 --选中位置的获取###############################
42
43if __name__ == '__main__':
44    app =QApplication(sys.argv)
45
46    window = Window()
47    window.show()
48
49    sys.exit(app.exec_())
View Code
取消文本的选中和判定是否有文本选中:
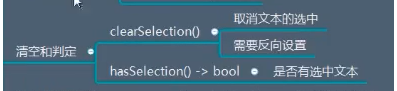


1from PyQt5.Qt import * #刚开始学习可以这样一下导入
2import sys
3
4class Window(QWidget):
5    def __init__(self):
6        super().__init__()
7        self.setWindowTitle("QTextEdit的学习")
8        self.resize(400,400)
9        self.set_ui()
10
11
12    def set_ui(self):
13        self.textEdit = QTextEdit(self)
14        self.textEdit.move(50,50)
15        self.textEdit.resize(300,300)
16        self.textEdit.setStyleSheet("background-color:cyan;")
17
18        self.cursor_object()
19        btn = QPushButton(self)
20        btn.setText("按钮")
21        btn.move(0,300)
22        btn.clicked.connect(lambda :self.cursor_object())
23
24
25
26
27    def setup_conent(self) :
28        pass
29
30    ############################文本光标对象 --清空和判定###############################
31
32    #注 : 此时配合按钮一起使用
33    def cursor_object(self):
34        # QTextCursor   #它的对象方法,编辑器不能很好识别,需要我们自己点进去去找
35        QTextCursor
36        cursor_obj =self.textEdit.textCursor()
37
38        cursor_obj.clearSelection()  #它需要反向设置
39        self.textEdit.setTextCursor(cursor_obj)
40
41        self.textEdit.setFocus()
42
43    ############################文本光标对象 --清空和判定###############################
44
45if __name__ == '__main__':
46    app =QApplication(sys.argv)
47
48    window = Window()
49    window.show()
50
51    sys.exit(app.exec_())
View Code
选中文本的移除:



1from PyQt5.Qt import * #刚开始学习可以这样一下导入
2import sys
3
4class Window(QWidget):
5    def __init__(self):
6        super().__init__()
7        self.setWindowTitle("QTextEdit的学习")
8        self.resize(400,400)
9        self.set_ui()
10
11
12    def set_ui(self):
13        self.textEdit = QTextEdit(self)
14        self.textEdit.move(50,50)
15        self.textEdit.resize(300,300)
16        self.textEdit.setStyleSheet("background-color:cyan;")
17
18        self.cursor_object()
19        btn = QPushButton(self)
20        btn.setText("按钮")
21        btn.move(0,300)
22        btn.clicked.connect(lambda :self.cursor_object())
23
24
25
26
27    def setup_conent(self) :
28        pass
29
30    ############################文本光标对象 --选中文本的移除###############################
31
32    #注 : 此时配合按钮一起使用
33    def cursor_object(self):
34        # QTextCursor   #它的对象方法,编辑器不能很好识别,需要我们自己点进去去找
35        QTextCursor
36        cursor_obj =self.textEdit.textCursor()
37
38        cursor_obj.removeSelectedText()
39        self.textEdit.setFocus()
40
41    ############################文本光标对象 --选中文本的移除###############################
42
43if __name__ == '__main__':
44    app =QApplication(sys.argv)
45
46    window = Window()
47    window.show()
48
49    sys.exit(app.exec_())
View Code
注:表格的内容也可以被删除!
5,删除文本字符
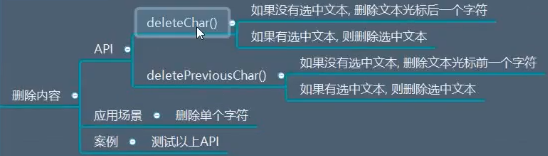
它和上面不同的是,它不用选中文本也能删除,类似 backspace 和 delete


1from PyQt5.Qt import * #刚开始学习可以这样一下导入
2import sys
3
4class Window(QWidget):
5    def __init__(self):
6        super().__init__()
7        self.setWindowTitle("QTextEdit的学习")
8        self.resize(400,400)
9        self.set_ui()
10
11
12    def set_ui(self):
13        self.textEdit = QTextEdit(self)
14        self.textEdit.move(50,50)
15        self.textEdit.resize(300,300)
16        self.textEdit.setStyleSheet("background-color:cyan;")
17
18        self.cursor_object()
19        btn = QPushButton(self)
20        btn.setText("按钮")
21        btn.move(0,300)
22        btn.clicked.connect(lambda :self.cursor_object())
23
24
25
26
27    def setup_conent(self) :
28        pass
29
30    ############################文本光标对象 --文本字符的删除###############################
31
32    #注 : 此时配合按钮一起使用
33    def cursor_object(self):
34        # QTextCursor   #它的对象方法,编辑器不能很好识别,需要我们自己点进去去找
35        QTextCursor
36        cursor_obj =self.textEdit.textCursor()
37
38        #向后删   如果是选中文本的话删除选中文本
39        # cursor_obj.deleteChar()
40
41        #向前删   如果是选中文本的话删除选中文本
42        cursor_obj.deletePreviousChar()
43    ############################文本光标对象 --文本字符的删除###############################
44
45if __name__ == '__main__':
46    app =QApplication(sys.argv)
47
48    window = Window()
49    window.show()
50
51    sys.exit(app.exec_())
View Code
6,位置相关
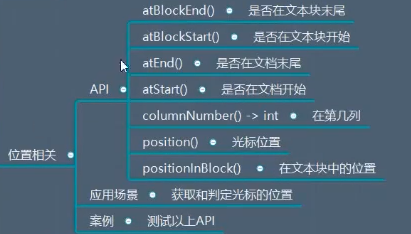


1from PyQt5.Qt import * #刚开始学习可以这样一下导入
2import sys
3
4class Window(QWidget):
5    def __init__(self):
6        super().__init__()
7        self.setWindowTitle("QTextEdit的学习")
8        self.resize(400,400)
9        self.set_ui()
10
11
12    def set_ui(self):
13        self.textEdit = QTextEdit(self)
14        self.textEdit.move(50,50)
15        self.textEdit.resize(300,300)
16        self.textEdit.setStyleSheet("background-color:cyan;")
17
18        self.cursor_object()
19        btn = QPushButton(self)
20        btn.setText("按钮")
21        btn.move(0,300)
22        btn.clicked.connect(lambda :self.cursor_object())
23
24
25
26
27    def setup_conent(self) :
28        pass
29
30    ############################文本光标对象 --位置相关###############################
31
32    #注 : 此时配合按钮一起使用
33    def cursor_object(self):
34        # QTextCursor   #它的对象方法,编辑器不能很好识别,需要我们自己点进去去找
35        QTextCursor
36        cursor_obj =self.textEdit.textCursor()
37
38
39    ############################文本光标对象 --位置相关###############################
40
41if __name__ == '__main__':
42    app =QApplication(sys.argv)
43
44    window = Window()
45    window.show()
46
47    sys.exit(app.exec_())
View Code
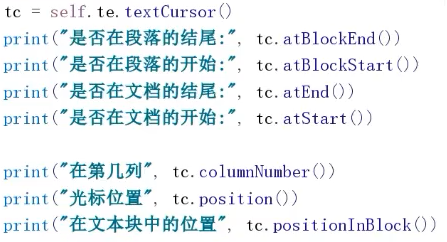
7,开始和结束编辑标识
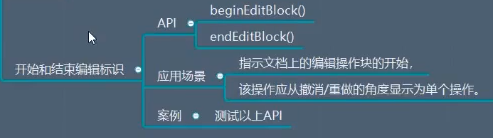
撤销时撤销多个,
同时操作多个操作,这是它的用途:


1from PyQt5.Qt import * #刚开始学习可以这样一下导入
2import sys
3
4class Window(QWidget):
5    def __init__(self):
6        super().__init__()
7        self.setWindowTitle("QTextEdit的学习")
8        self.resize(400,400)
9        self.set_ui()
10
11
12    def set_ui(self):
13        self.textEdit = QTextEdit(self)
14        self.textEdit.move(50,50)
15        self.textEdit.resize(300,300)
16        self.textEdit.setStyleSheet("background-color:cyan;")
17
18        self.cursor_object()
19        btn = QPushButton(self)
20        btn.setText("按钮")
21        btn.move(0,300)
22        btn.clicked.connect(lambda :self.cursor_object())
23
24
25
26
27    def setup_conent(self) :
28        pass
29
30    ############################文本光标对象 --开始和结束标识编辑###############################
31
32    #注 : 此时配合按钮一起使用
33    def cursor_object(self):
34        # QTextCursor   #它的对象方法,编辑器不能很好识别,需要我们自己点进去去找
35        QTextCursor
36        cursor_obj =self.textEdit.textCursor()
37
38
39        #现在要撤销123  456  一起撤销
40        cursor_obj.beginEditBlock()
41
42        cursor_obj.insertText("123")
43        cursor_obj.insertBlock()
44        cursor_obj.insertText("456")
45        cursor_obj.insertBlock()
46
47        cursor_obj.endEditBlock()
48
49        cursor_obj.insertText("789")
50        cursor_obj.insertBlock()
51
52
53
54
55
56    ############################文本光标对象 --开始和结束标识编辑###############################
57
58if __name__ == '__main__':
59    app =QApplication(sys.argv)
60
61    window = Window()
62    window.show()
63
64    sys.exit(app.exec_())
View Code
到这文本光标就没了,它的内容是很多的,
使用它的时候会有写麻烦,一般的使用都要先创建文本光标对象,然后才能使用!
这样不方便使用,于是就有了下面的这几个,它直接可以用QTextEdit 的对象调用的!
更方便快捷
QTextEdit功能之自动化格式:

我们在指定的地方输入特定字符,就会转换成对应的效果!

目前仅支持 创建项目符号列表这一种格式!


1from PyQt5.Qt import * #刚开始学习可以这样一下导入
2import sys
3
4class Window(QWidget):
5    def __init__(self):
6        super().__init__()
7        self.setWindowTitle("QTextEdit的学习")
8        self.resize(400,400)
9        self.set_ui()
10
11
12    def set_ui(self):
13        self.textEdit = QTextEdit(self)
14        self.textEdit.move(50,50)
15        self.textEdit.resize(300,300)
16        self.textEdit.setStyleSheet("background-color:cyan;")
17
18        btn = QPushButton(self)
19        btn.setText("按钮")
20        btn.move(0,300)
21        btn.clicked.connect(self.test)
22
23    def test(self) :
24        ############################自动格式化###############################
25        QTextEdit
26        self.textEdit.setAutoFormatting(QTextEdit.AutoBulletList)
27        self.textEdit.setFocus()
28
29        ############################自动格式化###############################
30
31if __name__ == '__main__':
32    app =QApplication(sys.argv)
33
34    window = Window()
35    window.show()
36
37    sys.exit(app.exec_())
View Code
QTextEdit功能之软换行模式:
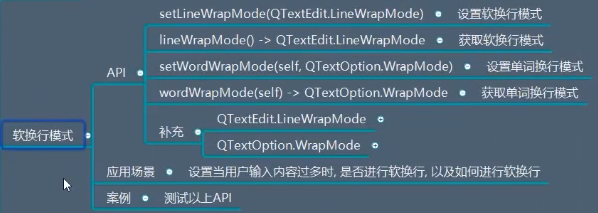
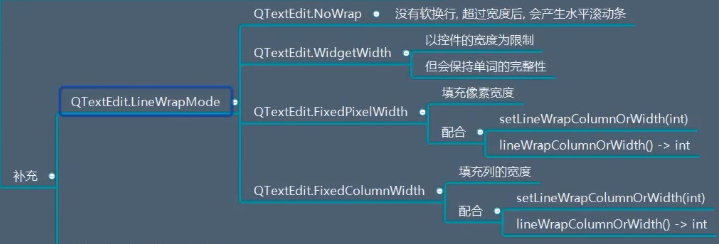
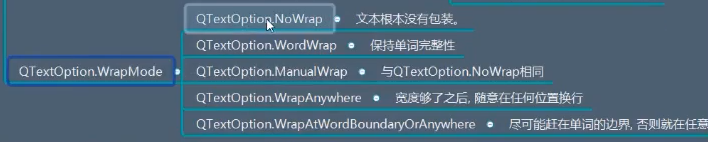


1from PyQt5.Qt import * #刚开始学习可以这样一下导入
2import sys
3
4class Window(QWidget):
5    def __init__(self):
6        super().__init__()
7        self.setWindowTitle("QTextEdit的学习")
8        self.resize(400,400)
9        self.set_ui()
10
11
12    def set_ui(self):
13        self.textEdit = QTextEdit(self)
14        self.textEdit.move(50,50)
15        self.textEdit.resize(300,300)
16        self.textEdit.setStyleSheet("background-color:cyan;")
17
18        btn = QPushButton(self)
19        btn.setText("按钮")
20        btn.move(0,300)
21        btn.clicked.connect(self.test)
22
23    def test(self) :
24        ############################软换行 相关###############################
25        # self.textEdit.setLineWrapMode(QTextEdit.NoWrap)  #不用软换行
26
27        # self.textEdit.setLineWrapMode(QTextEdit.FixedPixelWidth)  #固定像素宽度
28        # self.textEdit.setLineWrapColumnOrWidth(100)  # 像素值  或 列数 (根据上面的模式选择)
29
30        self.textEdit.setLineWrapMode(QTextEdit.FixedColumnWidth)  #固定列宽度
31        self.textEdit.setLineWrapColumnOrWidth(8)  # 像素值  或 列数 (根据上面的模式选择)
32        ############################软换行 相关###############################
33
34if __name__ == '__main__':
35    app =QApplication(sys.argv)
36
37    window = Window()
38    window.show()
39
40    sys.exit(app.exec_())
View Code
具体的特定模式,可以自行查找!
QTextEdit功能之覆盖模式:
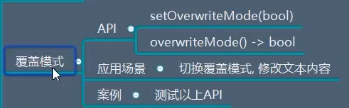
覆盖模式就是键盘上,按下Insert 之后的模式!


1from PyQt5.Qt import * #刚开始学习可以这样一下导入
2import sys
3
4class Window(QWidget):
5    def __init__(self):
6        super().__init__()
7        self.setWindowTitle("QTextEdit的学习")
8        self.resize(400,400)
9        self.set_ui()
10
11
12    def set_ui(self):
13        self.textEdit = QTextEdit(self)
14        self.textEdit.move(50,50)
15        self.textEdit.resize(300,300)
16        self.textEdit.setStyleSheet("background-color:cyan;")
17
18        btn = QPushButton(self)
19        btn.setText("按钮")
20        btn.move(0,300)
21        btn.clicked.connect(self.test)
22
23    def test(self) :
24        ############################设置覆盖模式  insert ###############################
25        self.textEdit.setOverwriteMode(True)  #覆盖模式
26
27        print(self.textEdit.overwriteMode())
28
29        ############################设置覆盖模式  insert ###############################
30if __name__ == '__main__':
31    app =QApplication(sys.argv)
32
33    window = Window()
34    window.show()
35
36    sys.exit(app.exec_())
View Code
QTextEdit功能之光标宽度设置:
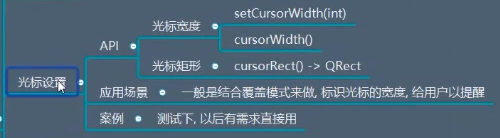
之前的QWidget 中讲过的 setCursor 是设置光标的样式! setTextCursor 是设置文本光标对象的!
这里使用的是 setCursorWidth()


1from PyQt5.Qt import * #刚开始学习可以这样一下导入
2import sys
3
4class Window(QWidget):
5    def __init__(self):
6        super().__init__()
7        self.setWindowTitle("QTextEdit的学习")
8        self.resize(400,400)
9        self.set_ui()
10
11
12    def set_ui(self):
13        self.textEdit = QTextEdit(self)
14        self.textEdit.move(50,50)
15        self.textEdit.resize(300,300)
16        self.textEdit.setStyleSheet("background-color:cyan;")
17
18        btn = QPushButton(self)
19        btn.setText("按钮")
20        btn.move(0,300)
21        btn.clicked.connect(self.test)
22
23    def test(self) :
24        ############################光标设置   ###############################
25        self.textEdit.setCursorWidth(10)
26
27        ############################光标设置   ###############################
28if __name__ == '__main__':
29    app =QApplication(sys.argv)
30
31    window = Window()
32    window.show()
33
34    sys.exit(app.exec_())
View Code
需求:插入模式时,光标变宽,正常的时候变回来。 提供个切换按钮
光标宽度的切换!


1from PyQt5.Qt import * #刚开始学习可以这样一下导入
2import sys
3
4class Window(QWidget):
5    def __init__(self):
6        super().__init__()
7        self.setWindowTitle("QTextEdit的学习")
8        self.resize(400,400)
9        self.set_ui()
10
11
12    def set_ui(self):
13        self.textEdit = QTextEdit(self)
14        self.textEdit.move(50,50)
15        self.textEdit.resize(300,300)
16        self.textEdit.setStyleSheet("background-color:cyan;")
17
18        btn = QPushButton(self)
19        btn.setText("按钮")
20        btn.move(0,300)
21        btn.clicked.connect(self.test)
22
23    def test(self) :
24        ############################光标 宽度的切换   ###############################
25        if self.textEdit.overwriteMode():
26            self.textEdit.setOverwriteMode(False)
27            self.textEdit.setCursorWidth(1)
28        else:
29            self.textEdit.setOverwriteMode(True)
30            self.textEdit.setCursorWidth(10)
31        ############################光标  宽度的切换   ###############################
32if __name__ == '__main__':
33    app =QApplication(sys.argv)
34
35    window = Window()
36    window.show()
37
38    sys.exit(app.exec_())
View Code


1from PyQt5.Qt import * #刚开始学习可以这样一下导入
2import sys
3
4class Window(QWidget):
5    def __init__(self):
6        super().__init__()
7        self.setWindowTitle("QTextEdit的学习")
8        self.resize(400,400)
9        self.set_ui()
10
11
12    def set_ui(self):
13        self.textEdit = QTextEdit(self)
14        self.textEdit.move(50,50)
15        self.textEdit.resize(300,300)
16        self.textEdit.setStyleSheet("background-color:cyan;")
17
18        btn = QPushButton(self)
19        btn.setText("按钮")
20        btn.move(0,300)
21        btn.clicked.connect(self.test)
22
23    def test(self) :
24        ############################光标    ###############################
25        print(self.textEdit.cursorWidth())
26        print(self.textEdit.cursorRect(self.textEdit.textCursor()))
27
28        ############################光标     ###############################
29if __name__ == '__main__':
30    app =QApplication(sys.argv)
31
32    window = Window()
33    window.show()
34
35    sys.exit(app.exec_())
其他
QTextEdit功能之对齐方式:

它和之前的文本光标对象中的对齐方式 是完全相同的!


1from PyQt5.Qt import * #刚开始学习可以这样一下导入
2import sys
3
4class Window(QWidget):
5    def __init__(self):
6        super().__init__()
7        self.setWindowTitle("QTextEdit的学习")
8        self.resize(400,400)
9        self.set_ui()
10
11
12    def set_ui(self):
13        self.textEdit = QTextEdit(self)
14        self.textEdit.move(50,50)
15        self.textEdit.resize(300,300)
16        self.textEdit.setStyleSheet("background-color:cyan;")
17
18        btn = QPushButton(self)
19        btn.setText("按钮")
20        btn.move(0,300)
21        btn.clicked.connect(self.test)
22
23    def test(self) :
24        ############################对齐方式(作用于段落)    ###############################
25        self.textEdit.setAlignment(Qt.AlignCenter)
26
27        ############################对齐方式(作用于段落)     ###############################
28
29
30if __name__ == '__main__':
31    app =QApplication(sys.argv)
32
33    window = Window()
34    window.show()
35
36    sys.exit(app.exec_())
View Code
QTextEdit功能之字体格式:
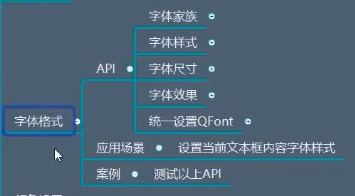
它和之前的文本光标对象中的字体格式是完全相同的!
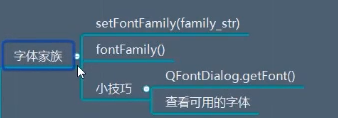
小技巧的使用:


1from PyQt5.Qt import * #刚开始学习可以这样一下导入
2import sys
3
4class Window(QWidget):
5    def __init__(self):
6        super().__init__()
7        self.setWindowTitle("QTextEdit的学习")
8        self.resize(400,400)
9        self.set_ui()
10
11
12    def set_ui(self):
13        self.textEdit = QTextEdit(self)
14        self.textEdit.move(50,50)
15        self.textEdit.resize(300,300)
16        self.textEdit.setStyleSheet("background-color:cyan;")
17
18        btn = QPushButton(self)
19        btn.setText("按钮")
20        btn.move(0,300)
21        btn.clicked.connect(self.test)
22
23    def test(self) :
24        ############################字体设置 字体家族 ###############################
25        QFontDialog.getFont()
26        ############################字体设置 字体家族 ###############################
27
28
29if __name__ == '__main__':
30    app =QApplication(sys.argv)
31
32    window = Window()
33    window.show()
34
35    sys.exit(app.exec_())
View Code

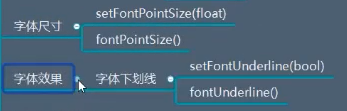
如果名字记不住的话,直接用上面的小技巧查看即可!


1from PyQt5.Qt import * #刚开始学习可以这样一下导入
2import sys
3
4class Window(QWidget):
5    def __init__(self):
6        super().__init__()
7        self.setWindowTitle("QTextEdit的学习")
8        self.resize(400,400)
9        self.set_ui()
10
11
12    def set_ui(self):
13        self.textEdit = QTextEdit(self)
14        self.textEdit.move(50,50)
15        self.textEdit.resize(300,300)
16        self.textEdit.setStyleSheet("background-color:cyan;")
17
18        btn = QPushButton(self)
19        btn.setText("按钮")
20        btn.move(0,300)
21        btn.clicked.connect(self.test)
22
23    def test(self) :
24        ############################字体设置  ###############################
25        # QFontDialog.getFont()
26        self.textEdit.setFontFamily("新宋体")
27        self.textEdit.setFontWeight(QFont.Black)
28        self.textEdit.setFontItalic(True)
29        self.textEdit.setFontPointSize(20)
30
31        self.textEdit.setFontUnderline(True)  # 下划线
32
33        ############################字体设置  ###############################
34
35
36if __name__ == '__main__':
37    app =QApplication(sys.argv)
38
39    window = Window()
40    window.show()
41
42    sys.exit(app.exec_())
View Code
如果感觉上述满足不了我们的需求,用下面的方法:
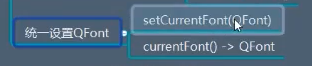


1from PyQt5.Qt import * #刚开始学习可以这样一下导入
2import sys
3
4class Window(QWidget):
5    def __init__(self):
6        super().__init__()
7        self.setWindowTitle("QTextEdit的学习")
8        self.resize(400,400)
9        self.set_ui()
10
11
12    def set_ui(self):
13        self.textEdit = QTextEdit(self)
14        self.textEdit.move(50,50)
15        self.textEdit.resize(300,300)
16        self.textEdit.setStyleSheet("background-color:cyan;")
17
18        btn = QPushButton(self)
19        btn.setText("按钮")
20        btn.move(0,300)
21        btn.clicked.connect(self.test)
22
23    def test(self) :
24        ############################字体设置  ###############################
25        # QFontDialog.getFont()
26
27        font = QFont()
28        font.setStrikeOut(True)  # 设置删除线
29
30        self.textEdit.setCurrentFont(font)
31
32        ############################字体设置  ###############################
33
34
35if __name__ == '__main__':
36    app =QApplication(sys.argv)
37
38    window = Window()
39    window.show()
40
41    sys.exit(app.exec_())
View Code
QTextEdit功能之颜色设置:
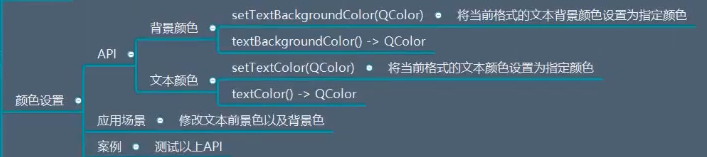
包含有背景颜色和文本颜色:


1from PyQt5.Qt import * #刚开始学习可以这样一下导入
2import sys
3
4class Window(QWidget):
5    def __init__(self):
6        super().__init__()
7        self.setWindowTitle("QTextEdit的学习")
8        self.resize(400,400)
9        self.set_ui()
10
11
12    def set_ui(self):
13        self.textEdit = QTextEdit(self)
14        self.textEdit.move(50,50)
15        self.textEdit.resize(300,300)
16        self.textEdit.setStyleSheet("background-color:cyan;")
17
18        btn = QPushButton(self)
19        btn.setText("按钮")
20        btn.move(0,300)
21        btn.clicked.connect(self.test)
22
23    def test(self) :
24        ############################颜色设置  ###############################
25        self.textEdit.setTextBackgroundColor(QColor(200,10,50))
26        self.textEdit.setTextColor(QColor(100,200,50))
27        ############################颜色设置  ###############################
28
29if __name__ == '__main__':
30    app =QApplication(sys.argv)
31
32    window = Window()
33    window.show()
34
35    sys.exit(app.exec_())
View Code
QTextEdit功能之当前的字符格式:
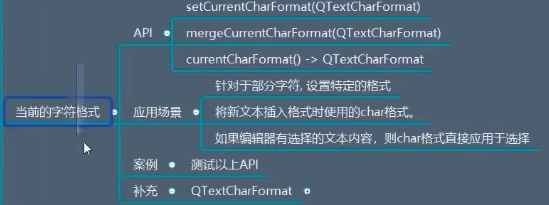
它和之前的文本光标对象中的字符格式 是完全相同的!


1from PyQt5.Qt import * #刚开始学习可以这样一下导入
2import sys
3
4class Window(QWidget):
5    def __init__(self):
6        super().__init__()
7        self.setWindowTitle("QTextEdit的学习")
8        self.resize(400,400)
9        self.set_ui()
10
11
12    def set_ui(self):
13        self.textEdit = QTextEdit(self)
14        self.textEdit.move(50,50)
15        self.textEdit.resize(300,300)
16        self.textEdit.setStyleSheet("background-color:cyan;")
17
18        btn = QPushButton(self)
19        btn.setText("按钮")
20        btn.move(0,300)
21        btn.clicked.connect(self.test)
22
23    def test(self) :
24        ############################字符格式设置  ###############################
25        textCharFormat = QTextCharFormat()
26        textCharFormat.setFontFamily("宋体")
27        textCharFormat.setFontPointSize(20)
28        textCharFormat.setFontCapitalization(QFont.Capitalize) # 首字母大写
29        textCharFormat.setForeground(QColor(100,20,200))  # 设置字体颜色
30
31        self.textEdit.setCurrentCharFormat(textCharFormat)  #这不行了
32
33        textCharFormat2 = QTextCharFormat()
34        textCharFormat2.setFontOverline(True)
35
36        self.textEdit.mergeCurrentCharFormat(textCharFormat2)
37        ############################字符格式设置  ###############################
38
39if __name__ == '__main__':
40    app =QApplication(sys.argv)
41
42    window = Window()
43    window.show()
44
45    sys.exit(app.exec_())
View Code
QTextEdit功能之常用的编辑操作:
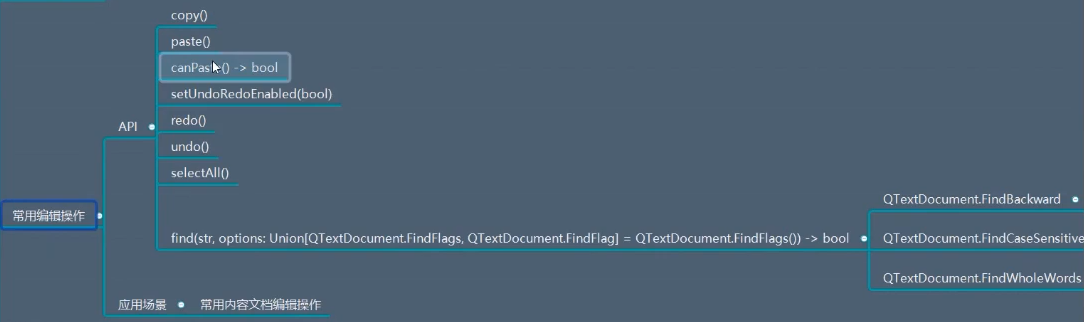
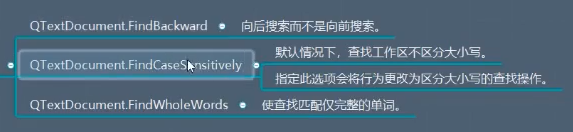


1from PyQt5.Qt import * #刚开始学习可以这样一下导入
2import sys
3
4class Window(QWidget):
5    def __init__(self):
6        super().__init__()
7        self.setWindowTitle("QTextEdit的学习")
8        self.resize(400,400)
9        self.set_ui()
10
11
12    def set_ui(self):
13        self.textEdit = QTextEdit(self)
14        self.textEdit.move(50,50)
15        self.textEdit.resize(300,300)
16        self.textEdit.setStyleSheet("background-color:cyan;")
17
18        btn = QPushButton(self)
19        btn.setText("按钮")
20        btn.move(0,300)
21        btn.clicked.connect(self.test)
22
23    def test(self) :
24        ############################常用编辑操作  ###############################
25        # self.textEdit.copy()
26
27        # self.textEdit.paste()
28
29        # self.textEdit.selectAll()   # 全选
30
31        QTextDocument.FindBackward
32        # self.textEdit.find("xx",QTextDocument.FindBackward)  #向左检索  默认就是向右检索
33
34        # self.textEdit.find("xx",QTextDocument.FindBackward|QTextDocument.FindCaseSensitively)   #区分大小写
35
36        self.textEdit.find("xx",QTextDocument.FindBackward|QTextDocument.FindCaseSensitively|QTextDocument.FindWholeWords)   #完整的单词
37
38        ############################常用编辑操作  ###############################
39
40if __name__ == '__main__':
41    app =QApplication(sys.argv)
42
43    window = Window()
44    window.show()
45
46    sys.exit(app.exec_())
View Code
QTextEdit功能之滚动到锚点:

滚动到锚点位置!


1from PyQt5.Qt import * #刚开始学习可以这样一下导入
2import sys
3
4class Window(QWidget):
5    def __init__(self):
6        super().__init__()
7        self.setWindowTitle("QTextEdit的学习")
8        self.resize(400,400)
9        self.set_ui()
10
11
12    def set_ui(self):
13        self.textEdit = QTextEdit(self)
14        self.textEdit.move(50,50)
15        self.textEdit.resize(300,300)
16        self.textEdit.setStyleSheet("background-color:cyan;")
17
18        btn = QPushButton(self)
19        btn.setText("按钮")
20        btn.move(0,300)
21        btn.clicked.connect(self.test)
22
23        ############################滚动到锚点  ###############################
24        self.textEdit.insertHtml("xxx"* 300 + "<a name= 'py123' href = '#http:python123.io'>Python123</a>" +"aaa"*500)
25    def test(self) :
26        self.textEdit.scrollToAnchor("py123")  # 注 要加上name 属性
27        ############################滚动到锚点  ###############################
28
29if __name__ == '__main__':
30    app =QApplication(sys.argv)
31
32    window = Window()
33    window.show()
34
35    sys.exit(app.exec_())
View Code
QTextEdit功能之只读设置:
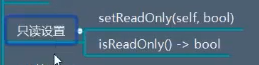
权限控制,只能浏览,不能修改!


1from PyQt5.Qt import * #刚开始学习可以这样一下导入
2import sys
3
4class Window(QWidget):
5    def __init__(self):
6        super().__init__()
7        self.setWindowTitle("QTextEdit的学习")
8        self.resize(400,400)
9        self.set_ui()
10
11
12    def set_ui(self):
13        self.textEdit = QTextEdit(self)
14        self.textEdit.move(50,50)
15        self.textEdit.resize(300,300)
16        self.textEdit.setStyleSheet("background-color:cyan;")
17
18        btn = QPushButton(self)
19        btn.setText("按钮")
20        btn.move(0,300)
21        btn.clicked.connect(self.test)
22
23    def test(self) :
24       ############################只读设置###############################
25       self.textEdit.setReadOnly(True)
26
27       self.textEdit.insertPlainText("dasfjfsdsakjl ")  # 只读只是限制 键盘和鼠标
28       ############################只读设置###############################
29
30if __name__ == '__main__':
31    app =QApplication(sys.argv)
32
33    window = Window()
34    window.show()
35
36    sys.exit(app.exec_())
View Code
QTextEdit功能之tab控制:
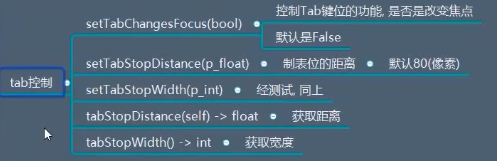
之前知道tab 可以在不同控件上切换焦点!
但是,在QTextEdit 中就比较混乱,因为tab 还可能是制表符,
所以可以通过上述方法来控制!


1from PyQt5.Qt import * #刚开始学习可以这样一下导入
2import sys
3
4class Window(QWidget):
5    def __init__(self):
6        super().__init__()
7        self.setWindowTitle("QTextEdit的学习")
8        self.resize(400,400)
9        self.set_ui()
10
11
12    def set_ui(self):
13        self.textEdit = QTextEdit(self)
14        self.textEdit.move(50,50)
15        self.textEdit.resize(300,300)
16        self.textEdit.setStyleSheet("background-color:cyan;")
17
18        btn = QPushButton(self)
19        btn.setText("按钮")
20        btn.move(0,300)
21        btn.clicked.connect(self.test)
22
23    def test(self) :
24       ############################tab 设置###############################
25       self.textEdit.setTabChangesFocus(True)  #此时就是变成了 改变焦点的功能,而不是制表符
26
27       #设置 制表符的距离
28       print(self.textEdit.tabStopDistance())
29       self.textEdit.setTabStopDistance(40)
30       ############################tab 设置###############################
31
32if __name__ == '__main__':
33    app =QApplication(sys.argv)
34
35    window = Window()
36    window.show()
37
38    sys.exit(app.exec_())
View Code
QTextEdit功能之锚点获取(获取url) :



1from PyQt5.Qt import * #刚开始学习可以这样一下导入
2import sys
3
4class Window(QWidget):
5    def __init__(self):
6        super().__init__()
7        self.setWindowTitle("QTextEdit的学习")
8        self.resize(400,400)
9        self.set_ui()
10
11
12    def set_ui(self):
13        self.textEdit = QTextEdit(self)
14        self.textEdit.move(50,50)
15        self.textEdit.resize(300,300)
16        self.textEdit.setStyleSheet("background-color:cyan;")
17
18        btn = QPushButton(self)
19        btn.setText("按钮")
20        btn.move(0,300)
21        btn.clicked.connect(self.test)
22
23    def test(self) :
24       ############################tab 设置###############################
25       self.textEdit.insertHtml("<a name = 'py123' href = 'http://python123.io'>Python123</a>")
26       ############################tab 设置###############################
27    def open_href(self):
28        '''
29        打开超链接
30        '''
31        pass
32
33if __name__ == '__main__':
34    app =QApplication(sys.argv)
35
36    window = Window()
37    window.show()
38
39    sys.exit(app.exec_())
View Code
由于QTextEdit 中没有关于 处理鼠标点击的方法,所以,我们考虑重写这个方法
如下:


1from PyQt5.Qt import *  # 刚开始学习可以这样一下导入
2import sys
3
4
5class MyTextEdit(QTextEdit):
6    def mousePressEvent(self, event):
7        QMouseEvent
8        # print(event.pos())
9        # print(self.anchorAt(event.pos()))  # 这里可以得到 超链接
10        url = self.anchorAt(event.pos())
11        #下面用拿到的url 打开超链接
12        if len(url)>0:
13            QDesktopServices.openUrl(QUrl(url))
14
15class Window(QWidget):
16    def __init__(self):
17        super().__init__()
18        self.setWindowTitle("QTextEdit的学习")
19        self.resize(400, 400)
20        self.set_ui()
21
22    def set_ui(self):
23        self.textEdit = MyTextEdit(self)
24        self.textEdit.move(50, 50)
25        self.textEdit.resize(300, 300)
26        self.textEdit.setStyleSheet("background-color:cyan;")
27
28        btn = QPushButton(self)
29        btn.setText("按钮")
30        btn.move(0, 300)
31        btn.clicked.connect(self.test)
32
33    def test(self):
34        ############################tab 设置###############################
35        self.textEdit.insertHtml("<a name = 'py123' href = 'http://python123.io'>Python123</a>")
36        ############################tab 设置###############################
37
38if __name__ == '__main__':
39    app = QApplication(sys.argv)
40
41    window = Window()
42    window.show()
43
44    sys.exit(app.exec_())
View Code
QTextEdit信号:
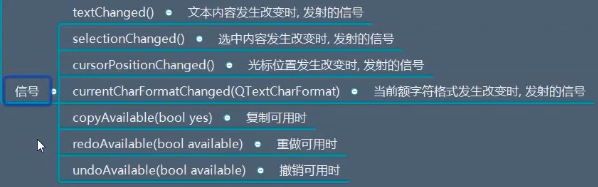
后面三个主要的用途是,当用户没有选定文本的时候,有些按钮是不可用的!


1from PyQt5.Qt import *  # 刚开始学习可以这样一下导入
2import sys
3
4
5class Window(QWidget):
6    def __init__(self):
7        super().__init__()
8        self.setWindowTitle("QTextEdit的学习")
9        self.resize(400, 400)
10        self.set_ui()
11
12    def set_ui(self):
13        self.textEdit = QTextEdit(self)
14        self.textEdit.move(50, 50)
15        self.textEdit.resize(300, 300)
16        self.textEdit.setStyleSheet("background-color:cyan;")
17
18        btn = QPushButton(self)
19        btn.setText("按钮")
20        btn.move(0, 300)
21        btn.clicked.connect(self.test)
22
23
24        ############################信号textChanged ###############################
25
26        def textEdit_textChanged_slot():
27            print("文本内容发生改变")
28
29        self.textEdit.textChanged.connect(textEdit_textChanged_slot)
30
31    def test(self):
32        pass
33
34        ############################信号textChanged ###############################
35
36
37if __name__ == '__main__':
38    app = QApplication(sys.argv)
39
40    window = Window()
41    window.show()
42
43    sys.exit(app.exec_())
View Code


1from PyQt5.Qt import *  # 刚开始学习可以这样一下导入
2import sys
3
4
5class Window(QWidget):
6    def __init__(self):
7        super().__init__()
8        self.setWindowTitle("QTextEdit的学习")
9        self.resize(400, 400)
10        self.set_ui()
11
12    def set_ui(self):
13        self.textEdit = QTextEdit(self)
14        self.textEdit.move(50, 50)
15        self.textEdit.resize(300, 300)
16        self.textEdit.setStyleSheet("background-color:cyan;")
17
18        btn = QPushButton(self)
19        btn.setText("按钮")
20        btn.move(0, 300)
21        btn.clicked.connect(self.test)
22
23
24        ############################信号selectionChanged ###############################
25
26        def textEdit_textChanged_slot():
27            print("选中的文本发生改变")
28
29        self.textEdit.selectionChanged.connect(textEdit_textChanged_slot)
30
31    def test(self):
32        pass
33
34        ############################信号selectionChanged ###############################
35
36
37if __name__ == '__main__':
38    app = QApplication(sys.argv)
39
40    window = Window()
41    window.show()
42
43    sys.exit(app.exec_())
View Code


1from PyQt5.Qt import *  # 刚开始学习可以这样一下导入
2import sys
3
4
5class Window(QWidget):
6    def __init__(self):
7        super().__init__()
8        self.setWindowTitle("QTextEdit的学习")
9        self.resize(400, 400)
10        self.set_ui()
11
12    def set_ui(self):
13        self.textEdit = QTextEdit(self)
14        self.textEdit.move(50, 50)
15        self.textEdit.resize(300, 300)
16        self.textEdit.setStyleSheet("background-color:cyan;")
17
18        btn = QPushButton(self)
19        btn.setText("按钮")
20        btn.move(0, 300)
21        btn.clicked.connect(self.test)
22
23
24        ############################信号copyAvailable###############################
25
26        def textEdit_copyAvailable_slot(arg):
27            print("能否复制",arg)
28        self.textEdit.copyAvailable.connect(textEdit_copyAvailable_slot)
29
30    def test(self):
31        pass
32
33        ############################信号copyAvailable ###############################
34
35
36if __name__ == '__main__':
37    app = QApplication(sys.argv)
38
39    window = Window()
40    window.show()
41
42    sys.exit(app.exec_())
View Code
总结:
以上就是QTextEdit 控件,
下面是输入控件中的第三个 QPlainTextEdit :https://www.cnblogs.com/zach0812/p/11381938.html