
1、Sentinel 哨兵
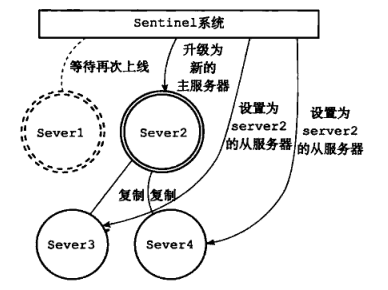
Sentinel(哨兵)是Redis 的高可用性解决方案:由一个或多个Sentinel 实例 组成的Sentinel 系统可以监视任意多个主服务器,以及这些主服务器属下的所有从服务器,并在被监视的主服务器进入下线状态时,自动将下线主服务器属下的某个从服务器升级为新的主服务器。
例如:
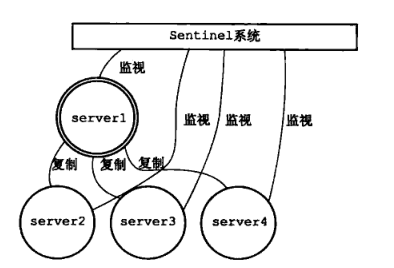
在Server1 掉线后:

升级Server2 为新的主服务器:
2、Redis 主从分离
在讲解Sentinel 哨兵集群之前,我们先来搭建一个简单的主从分离(读写分离)。
首先,我们默认大家都已经安装了redis,然后我们将 redis.conf 拷贝多份,并且创建多个目录,用于区分多个redis 服务:

这里面,每个目录中都有自己的redis.conf 配置文件,接下来,我们先设置主服务器的配置文件。
一、配置Master
1、修改端口
1# Accept connections on the specified port, default is 6379 (IANA #815344).
2# If port 0 is specified Redis will not listen on a TCP socket.
3port 6380
redis 的默认端口是6379,这里我们把主服务器的端口设置为6380
2、修改pidfile
1# If a pid file is specified, Redis writes it where specified at startup
2# and removes it at exit.
3#
4# When the server runs non daemonized, no pid file is created if none is
5# specified in the configuration. When the server is daemonized, the pid file
6# is used even if not specified, defaulting to "/var/run/redis.pid".
7#
8# Creating a pid file is best effort: if Redis is not able to create it
9# nothing bad happens, the server will start and run normally.
10pidfile /var/run/redis_6380.pid
pidfile 是我们启动redis 的时候,linux 为我们分配的一个pid 进程号,如果这里不作修改,会影响后面redis服务的启动
3、启动 redis

启动redis,我们可以看到,redis已经占领了6380 端口
进入客户端
1redis-cli -p 6380
2127.0.0.1:6380> info
3...
4# Replication
5role:master
6connected_slaves:0
7master_repl_offset:0
8repl_backlog_active:0
9repl_backlog_size:1048576
10repl_backlog_first_byte_offset:0
11repl_backlog_histlen:0
12...
我们可以看到,redis 现在的角色是一个master 启动的服务。
二、配置Slave
和上面配置 master一样,我们需要修改端口号和pid 文件,在修改完之后,我们有两种方法配置从服务
1、在配置文件中配置从服务
1################################# REPLICATION #################################
2
3# Master-Slave replication. Use slaveof to make a Redis instance a copy of
4# another Redis server. A few things to understand ASAP about Redis replication.
5#
6# 1) Redis replication is asynchronous, but you can configure a master to
7#    stop accepting writes if it appears to be not connected with at least
8#    a given number of slaves.
9# 2) Redis slaves are able to perform a partial resynchronization with the
10#    master if the replication link is lost for a relatively small amount of
11#    time. You may want to configure the replication backlog size (see the next
12#    sections of this file) with a sensible value depending on your needs.
13# 3) Replication is automatic and does not need user intervention. After a
14#    network partition slaves automatically try to reconnect to masters
15#    and resynchronize with them.
16#
17# slaveof <masterip> <masterport>
18
19slaveof 127.0.0.1 6380
我们可以在配置文件中直接修改 slaveof 属性,我们直接配置主服务器的ip 地址,和端口号,如果这里主服务器有配置密码
可以通过配置masterauth 来设置链接密码
1# If the master is password protected (using the "requirepass" configuration
2# directive below) it is possible to tell the slave to authenticate before
3# starting the replication synchronization process, otherwise the master will
4# refuse the slave request.
5#
6# masterauth <master-password>
启动redis 服务:

我们可以看到,现在有两个现在在运行,我们进入6381的客户端,看一下他的状态,
1# Replication
2role:slave
3master_host:127.0.0.1
4master_port:6380
5master_link_status:up
6master_last_io_seconds_ago:1
7master_sync_in_progress:0
8slave_repl_offset:71
9slave_priority:100
10slave_read_only:1
11connected_slaves:0
12master_repl_offset:0
13repl_backlog_active:0
14repl_backlog_size:1048576
15repl_backlog_first_byte_offset:0
16repl_backlog_histlen:0
我们可以看到,现在的redis 是一个从服务的角色,连接着6380的服务。
2、在服务启动后设置
我们修改6382端口的服务器配置文件之后,启动服务

进入客户端,查看当前服务器的状态:
1# Replication
2role:master
3connected_slaves:0
4master_repl_offset:0
5repl_backlog_active:0
6repl_backlog_size:1048576
7repl_backlog_first_byte_offset:0
8repl_backlog_histlen:0
我们可以看到,当前服务器的状态时作为一个主服务的角色在运行,我们接下来修改他的状态:
1127.0.0.1:6382> slaveof 127.0.0.1 6380
2
3//修改后状态
4# Replication
5role:slave
6master_host:127.0.0.1
7master_port:6380
8master_link_status:up
9master_last_io_seconds_ago:1
10master_sync_in_progress:0
11slave_repl_offset:617
12slave_priority:100
13slave_read_only:1
14connected_slaves:0
15master_repl_offset:0
16repl_backlog_active:0
17repl_backlog_size:1048576
18repl_backlog_first_byte_offset:0
19repl_backlog_histlen:0
3、总结
我们先看一下目前master 的状态:
1# Replication
2role:master
3connected_slaves:2
4slave0:ip=127.0.0.1,port=6381,state=online,offset=785,lag=0
5slave1:ip=127.0.0.1,port=6382,state=online,offset=785,lag=0
6master_repl_offset:785
7repl_backlog_active:1
8repl_backlog_size:1048576
9repl_backlog_first_byte_offset:2
10repl_backlog_histlen:784
我们可以可以看到,两个从服务已经在连着主服务器,上面两种配置的区别在于,当salve 断线重连之后,
如果我们是修改类配置文件,重连之后会自己链接上去master,并且同步master 上面的数据,
如果我们是手动连接上去的主服务器,重连之后,从服务器会读取自己本地的 rdb 回复数据,而不会去自动链接主服务
我们如果需要设置读写分离,只需要在主服务器中设置:
1# Note: read only slaves are not designed to be exposed to untrusted clients
2# on the internet. It's just a protection layer against misuse of the instance.
3# Still a read only slave exports by default all the administrative commands
4# such as CONFIG, DEBUG, and so forth. To a limited extent you can improve
5# security of read only slaves using 'rename-command' to shadow all the
6# administrative / dangerous commands.
7slave-read-only yes
3、Sentinel 哨兵
1、配置端口
在sentinel.conf 配置文件中, 我们可以找到port 属性,这里是用来设置sentinel 的端口,一般情况下,至少会需要三个哨兵对redis 进行监控,我们可以通过修改端口启动多个sentinel 服务。
1# port <sentinel-port>
2# The port that this sentinel instance will run on
3port 26379
2、配置主服务器的ip 和端口
我们把监听的端口修改成6380,并且加上权值为2,这里的权值,是用来计算我们需要将哪一台服务器升级升主服务器
1# sentinel monitor <master-name> <ip> <redis-port> <quorum>
2#
3# Tells Sentinel to monitor this master, and to consider it in O_DOWN
4# (Objectively Down) state only if at least <quorum> sentinels agree.
5#
6# Note that whatever is the ODOWN quorum, a Sentinel will require to
7# be elected by the majority of the known Sentinels in order to
8# start a failover, so no failover can be performed in minority.
9#
10# Slaves are auto-discovered, so you don't need to specify slaves in
11# any way. Sentinel itself will rewrite this configuration file adding
12# the slaves using additional configuration options.
13# Also note that the configuration file is rewritten when a
14# slave is promoted to master.
15#
16# Note: master name should not include special characters or spaces.
17# The valid charset is A-z 0-9 and the three characters ".-_".
18sentinel monitor mymaster 127.0.0.1 6380 2
3、启动Sentinel
/sentinel$ redis-sentinel sentinel.conf
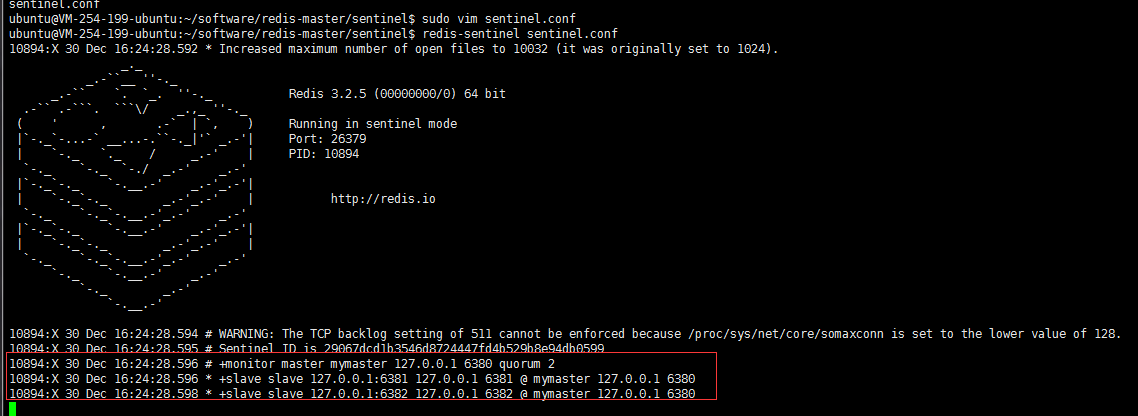
sentinel 启动之后,就会监视到现在有一个主服务器,两个从服务器
当我们把其中一个从服务器器关闭之后,我们可以看到日志:
10894:X 30 Dec 16:27:03.670 # +sdown slave 127.0.0.1:6381 127.0.0.1 6381 @ mymaster 127.0.0.1 6380
日志表示,6381这个从服务器已经从主服务器中脱离了出来,我们重新把6381 接回去。
110894:X 30 Dec 16:28:43.288 * +reboot slave 127.0.0.1:6381 127.0.0.1 6381 @ mymaster 127.0.0.1 6380
210894:X 30 Dec 16:28:43.365 # -sdown slave 127.0.0.1:6381 127.0.0.1 6381 @ mymaster 127.0.0.1 6380
4、关闭Master
我们手动关闭Master 之后,sentinel 在监听master 确实是断线了之后,将会开始计算权值,然后重新分配主服务器
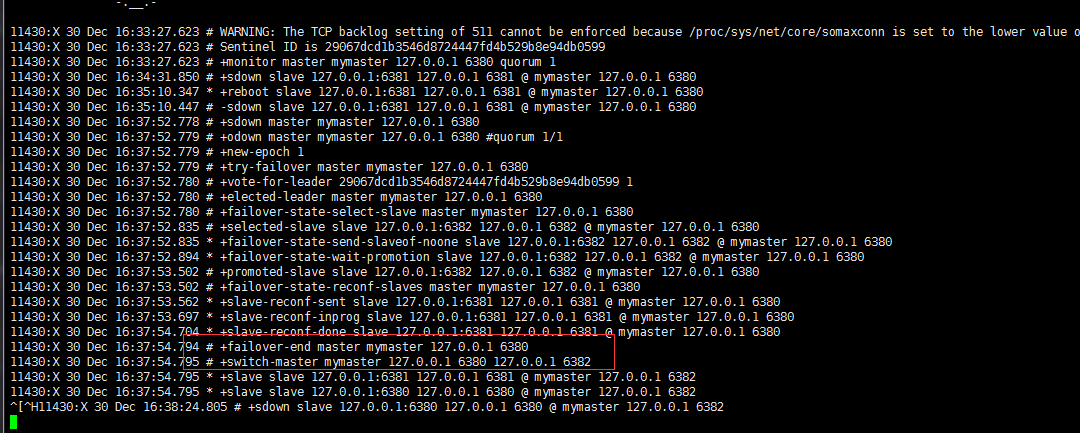
我们可以看到,6380主服务器断了之后,sentinel 帮我们选了6382作为新的主服务器
我们进到6382的客户端,查看他的状态:
1# Replication
2role:master
3connected_slaves:1
4slave0:ip=127.0.0.1,port=6381,state=online,offset=13751,lag=0
5master_repl_offset:13751
6repl_backlog_active:1
7repl_backlog_size:1048576
8repl_backlog_first_byte_offset:2
9repl_backlog_histlen:13750
我们可以看到 6382,重slave 荣升为master
1127.0.0.1:6382> set name jaycekon
2OK
原本的没有权限写,也得到了相应的权限
5、重连Master
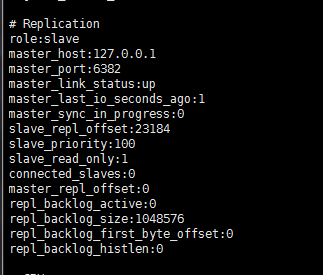
大家可能会好奇,如果master 重连之后,会不会抢回属于他的位置,答案是否定的,就比如你被一个小弟抢了你老大的位置,他肯给回你这个位置吗。因此当master 回来之后,他也只能当个小弟
4、Sentinel 总结
一、Sentinel的作用:
A、Master 状态监测
B、如果Master 异常,则会进行Master-slave 转换,将其中一个Slave作为Master,将之前的Master作为Slave
C、Master-Slave切换后,master_redis.conf、slave_redis.conf和sentinel.conf的内容都会发生改变,即master_redis.conf中会多一行slaveof的配置,sentinel.conf的监控目标会随之调换
二、Sentinel的工作方式:
1):每个Sentinel以每秒钟一次的频率向它所知的Master,Slave以及其他 Sentinel 实例发送一个 PING 命令
2):如果一个实例(instance)距离最后一次有效回复 PING 命令的时间超过 down-after-milliseconds 选项所指定的值, 则这个实例会被 Sentinel 标记为主观下线。
3):如果一个Master被标记为主观下线,则正在监视这个Master的所有 Sentinel 要以每秒一次的频率确认Master的确进入了主观下线状态。
4):当有足够数量的 Sentinel(大于等于配置文件指定的值)在指定的时间范围内确认Master的确进入了主观下线状态, 则Master会被标记为客观下线
5):在一般情况下, 每个 Sentinel 会以每 10 秒一次的频率向它已知的所有Master,Slave发送 INFO 命令
6):当Master被 Sentinel 标记为客观下线时,Sentinel 向下线的 Master 的所有 Slave 发送 INFO 命令的频率会从 10 秒一次改为每秒一次
7):若没有足够数量的 Sentinel 同意 Master 已经下线, Master 的客观下线状态就会被移除。
若 Master 重新向 Sentinel 的 PING 命令返回有效回复, Master 的主观下线状态就会被移除。