
转载自:田小波的博客
1.简介
在上一篇文章中,我向大家介绍了 Spring MVC 是如何处理 HTTP 请求的。Spring MVC 可对外提供服务时,说明其已经处于了就绪状态。再次之前,Spring MVC 需要进行一系列的初始化操作。正所谓兵马未动,粮草先行。这些操作包括创建容器,加载 DispatcherServlet 中用到的各种组件等。本篇文章就来和大家讨论一下这些初始化操作中的容器创建操作,容器的创建是其他一些初始化过程的基础。那其他的就不多说了,我们直入主题吧。
2.容器的创建过程
一般情况下,我们会在一个 Web 应用中配置两个容器。一个容器用于加载 Web 层的类,比如我们的接口 Controller、HandlerMapping、ViewResolver 等。在本文中,我们把这个容器叫做 web 容器。另一个容器用于加载业务逻辑相关的类,比如 service、dao 层的一些类。在本文中,我们把这个容器叫做业务容器。在容器初始化的过程中,业务容器会先于 web 容器进行初始化。web 容器初始化时,会将业务容器作为父容器。这样做的原因是,web 容器中的一些 bean 会依赖于业务容器中的 bean。比如我们的 controller 层接口通常会依赖 service 层的业务逻辑类。下面举个例子进行说明:
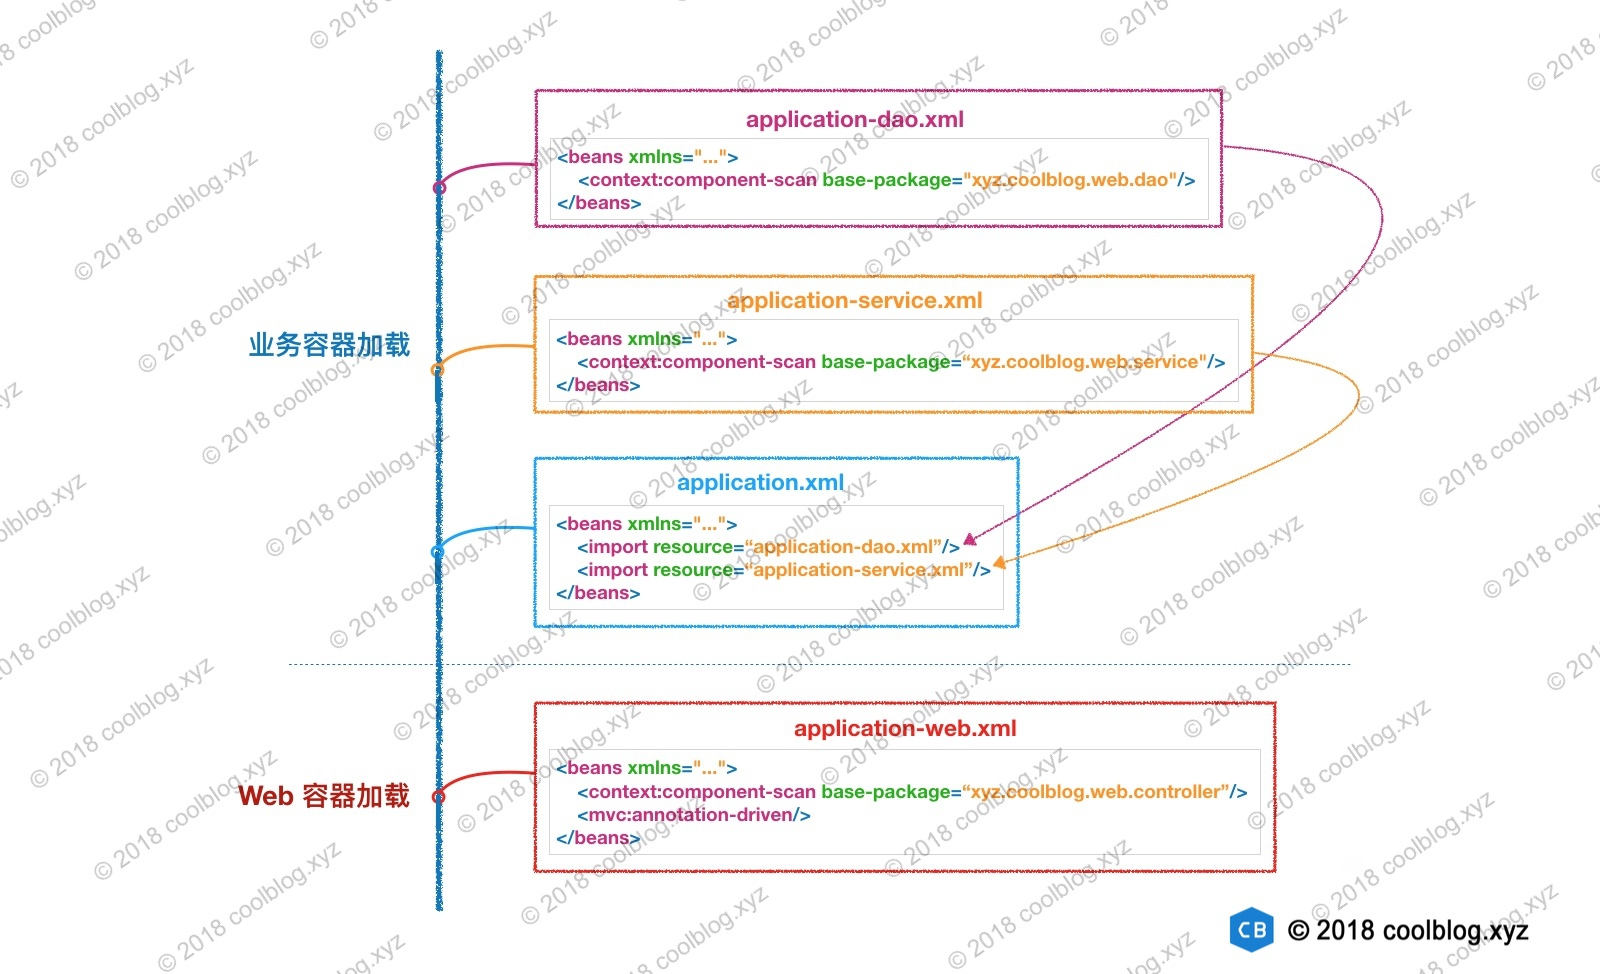
如上,我们将 dao 层的类配置在 application-dao.xml 文件中,将 service 层的类配置在 application-service.xml 文件中。然后我们将这两个配置文件通过 标签导入到 application.xml 文件中。此时,我们可以让业务容器去加载 application.xml 配置文件即可。另一方面,我们将 Web 相关的配置放在 application-web.xml 文件中,并将该文件交给 Web 容器去加载。
这里我们把配置文件进行分层,结构上看起来清晰了很多,也便于维护。这个其实和代码分层是一个道理,如果我们把所有的代码都放在同一个包下,那看起来会多难受啊。同理,我们用业务容器和 Web 容器去加载不同的类也是一种分层的体现吧。当然,如果应用比较简单,仅用 Web 容器去加载所有的类也不是不可以。
2.1 业务容器的创建过程
前面说了一些背景知识作为铺垫,那下面我们开始分析容器的创建过程吧。按照创建顺序,我们先来分析业务容器的创建过程。业务容器的创建入口是 ContextLoaderListener 的 contextInitialized 方法。顾名思义,ContextLoaderListener 是用来监听 ServletContext 加载事件的。当 ServletContext 被加载后,监听器的 contextInitialized 方法就会被 Servlet 容器调用。ContextLoaderListener Spring 框架提供的,它的配置方法如下:
1<web-app>
2    <listener>
3        <listener-class>org.springframework.web.context.ContextLoaderListener</listener-class>
4    </listener>
5
6    <context-param>
7        <param-name>contextConfigLocation</param-name>
8        <param-value>classpath:application.xml</param-value>
9    </context-param>
10
11    <!-- 省略其他配置 -->
12</web-app>
如上,ContextLoaderListener 可通过 ServletContext 获取到 contextConfigLocation 配置。这样,业务容器就可以加载 application.xml 配置文件了。那下面我们来分析一下 ContextLoaderListener 的源码吧。
1public class ContextLoaderListener extends ContextLoader implements ServletContextListener {
2
3    // 省略部分代码
4
5    @Override
6    public void contextInitialized(ServletContextEvent event) {
7        // 初始化 WebApplicationContext
8        initWebApplicationContext(event.getServletContext());
9    }
10}
11
12public WebApplicationContext initWebApplicationContext(ServletContext servletContext) {
13    /*
14     * 如果 ServletContext 中 ROOT_WEB_APPLICATION_CONTEXT_ATTRIBUTE 属性值
15     * 不为空时,表明有其他监听器设置了这个属性。Spring 认为不能替换掉别的监听器设置
16     * 的属性值,所以这里抛出异常。
17     */
18    if (servletContext.getAttribute(WebApplicationContext.ROOT_WEB_APPLICATION_CONTEXT_ATTRIBUTE) != null) {
19        throw new IllegalStateException(
20                "Cannot initialize context because there is already a root application context present - " +
21                "check whether you have multiple ContextLoader* definitions in your web.xml!");
22    }
23
24    Log logger = LogFactory.getLog(ContextLoader.class);
25    servletContext.log("Initializing Spring root WebApplicationContext");
26    if (logger.isInfoEnabled()) {...}
27    long startTime = System.currentTimeMillis();
28
29    try {
30        if (this.context == null) {
31            // 创建 WebApplicationContext
32            this.context = createWebApplicationContext(servletContext);
33        }
34        if (this.context instanceof ConfigurableWebApplicationContext) {
35            ConfigurableWebApplicationContext cwac = (ConfigurableWebApplicationContext) this.context;
36            if (!cwac.isActive()) {
37                if (cwac.getParent() == null) {
38                    /*
39                     * 加载父 ApplicationContext,一般情况下,业务容器不会有父容器,
40                     * 除非进行配置
41                     */
42                    ApplicationContext parent = loadParentContext(servletContext);
43                    cwac.setParent(parent);
44                }
45                // 配置并刷新 WebApplicationContext
46                configureAndRefreshWebApplicationContext(cwac, servletContext);
47            }
48        }
49
50        // 设置 ApplicationContext 到 servletContext 中
51        servletContext.setAttribute(WebApplicationContext.ROOT_WEB_APPLICATION_CONTEXT_ATTRIBUTE, this.context);
52
53        ClassLoader ccl = Thread.currentThread().getContextClassLoader();
54        if (ccl == ContextLoader.class.getClassLoader()) {
55            currentContext = this.context;
56        }
57        else if (ccl != null) {
58            currentContextPerThread.put(ccl, this.context);
59        }
60
61        if (logger.isDebugEnabled()) {...}
62        if (logger.isInfoEnabled()) {...}
63
64        return this.context;
65    }
66    catch (RuntimeException ex) {
67        logger.error("Context initialization failed", ex);
68        servletContext.setAttribute(WebApplicationContext.ROOT_WEB_APPLICATION_CONTEXT_ATTRIBUTE, ex);
69        throw ex;
70    }
71    catch (Error err) {
72        logger.error("Context initialization failed", err);
73        servletContext.setAttribute(WebApplicationContext.ROOT_WEB_APPLICATION_CONTEXT_ATTRIBUTE, err);
74        throw err;
75    }
76}
如上,我们看一下上面的创建过程。首先 Spring 会检测 ServletContext 中 ROOT_WEB_APPLICATION_CONTEXT_ATTRIBUTE 属性有没有被设置,若被设置过,则抛出异常。若未设置,则调用 createWebApplicationContext 方法创建容器。创建好后,再调用 configureAndRefreshWebApplicationContext 方法配置并刷新容器。最后,调用 setAttribute 方法将容器设置到 ServletContext 中。经过以上几步,整个创建流程就结束了。流程并不复杂,可简单总结为创建容器 → 配置并刷新容器 → 设置容器到 ServletContext 中。这三步流程中,最后一步就不进行分析,接下来分析一下第一步和第二步流程对应的源码。如下:
1protected WebApplicationContext createWebApplicationContext(ServletContext sc) {
2    // 判断创建什么类型的容器,默认类型为 XmlWebApplicationContext
3    Class<?> contextClass = determineContextClass(sc);
4    if (!ConfigurableWebApplicationContext.class.isAssignableFrom(contextClass)) {
5        throw new ApplicationContextException("Custom context class [" + contextClass.getName() +
6                "] is not of type [" + ConfigurableWebApplicationContext.class.getName() + "]");
7    }
8    // 通过反射创建容器
9    return (ConfigurableWebApplicationContext) BeanUtils.instantiateClass(contextClass);
10}
11
12protected Class<?> determineContextClass(ServletContext servletContext) {
13    /*
14     * 读取用户自定义配置,比如:
15     * <context-param>
16     *     <param-name>contextClass</param-name>
17     *     <param-value>XXXConfigWebApplicationContext</param-value>
18     * </context-param>
19     */
20    String contextClassName = servletContext.getInitParameter(CONTEXT_CLASS_PARAM);
21    if (contextClassName != null) {
22        try {
23            return ClassUtils.forName(contextClassName, ClassUtils.getDefaultClassLoader());
24        }
25        catch (ClassNotFoundException ex) {
26            throw new ApplicationContextException(
27                    "Failed to load custom context class [" + contextClassName + "]", ex);
28        }
29    }
30    else {
31        /*
32         * 若无自定义配置,则获取默认的容器类型,默认类型为 XmlWebApplicationContext。
33         * defaultStrategies 读取的配置文件为 ContextLoader.properties,
34         * 该配置文件内容如下:
35         * org.springframework.web.context.WebApplicationContext =
36         *     org.springframework.web.context.support.XmlWebApplicationContext
37         */
38        contextClassName = defaultStrategies.getProperty(WebApplicationContext.class.getName());
39        try {
40            return ClassUtils.forName(contextClassName, ContextLoader.class.getClassLoader());
41        }
42        catch (ClassNotFoundException ex) {
43            throw new ApplicationContextException(
44                    "Failed to load default context class [" + contextClassName + "]", ex);
45        }
46    }
47}
简单说一下 createWebApplicationContext 方法的流程,该方法首先会调用 determineContextClass 判断创建什么类型的容器,默认为 XmlWebApplicationContext。然后调用 instantiateClass 方法通过反射的方式创建容器实例。instantiateClass 方法就不跟进去分析了,大家可以自己去看看,比较简单。
继续往下分析,接下来分析一下 configureAndRefreshWebApplicationContext 方法的源码。如下:
1protected void configureAndRefreshWebApplicationContext(ConfigurableWebApplicationContext wac, ServletContext sc) {
2    if (ObjectUtils.identityToString(wac).equals(wac.getId())) {
3        // 从 ServletContext 中获取用户配置的 contextId 属性
4        String idParam = sc.getInitParameter(CONTEXT_ID_PARAM);
5        if (idParam != null) {
6            // 设置容器 id
7            wac.setId(idParam);
8        }
9        else {
10            // 用户未配置 contextId,则设置一个默认的容器 id
11            wac.setId(ConfigurableWebApplicationContext.APPLICATION_CONTEXT_ID_PREFIX +
12                    ObjectUtils.getDisplayString(sc.getContextPath()));
13        }
14    }
15
16    wac.setServletContext(sc);
17    // 获取 contextConfigLocation 配置
18    String configLocationParam = sc.getInitParameter(CONFIG_LOCATION_PARAM);
19    if (configLocationParam != null) {
20        wac.setConfigLocation(configLocationParam);
21    }
22
23    ConfigurableEnvironment env = wac.getEnvironment();
24    if (env instanceof ConfigurableWebEnvironment) {
25        ((ConfigurableWebEnvironment) env).initPropertySources(sc, null);
26    }
27
28    customizeContext(sc, wac);
29
30    // 刷新容器
31    wac.refresh();
32}
上面的源码不是很长,逻辑不是很复杂。下面简单总结 configureAndRefreshWebApplicationContext 方法主要做了事情,如下:
- 设置容器 id
- 获取 contextConfigLocation 配置,并设置到容器中
- 刷新容器
到此,关于业务容器的创建过程就分析完了,下面我们继续分析 Web 容器的创建过程。
###2.2 Web 容器的创建过程
前面说了业务容器的创建过程,业务容器是通过 ContextLoaderListener。那 Web 容器是通过什么创建的呢?答案是通过 DispatcherServlet。我在上一篇文章介绍 HttpServletBean 抽象类时,说过该类覆写了父类 HttpServlet 中的 init 方法。这个方法就是创建 Web 容器的入口,那下面我们就从这个方法入手。如下:
1// -☆- org.springframework.web.servlet.HttpServletBean
2public final void init() throws ServletException {
3    if (logger.isDebugEnabled()) {...}
4
5    // 获取 ServletConfig 中的配置信息
6    PropertyValues pvs = new ServletConfigPropertyValues(getServletConfig(), this.requiredProperties);
7    if (!pvs.isEmpty()) {
8        try {
9            /*
10             * 为当前对象(比如 DispatcherServlet 对象)创建一个 BeanWrapper,
11             * 方便读/写对象属性。
12             */
13            BeanWrapper bw = PropertyAccessorFactory.forBeanPropertyAccess(this);
14            ResourceLoader resourceLoader = new ServletContextResourceLoader(getServletContext());
15            bw.registerCustomEditor(Resource.class, new ResourceEditor(resourceLoader, getEnvironment()));
16            initBeanWrapper(bw);
17            // 设置配置信息到目标对象中
18            bw.setPropertyValues(pvs, true);
19        }
20        catch (BeansException ex) {
21            if (logger.isErrorEnabled()) {...}
22            throw ex;
23        }
24    }
25
26    // 进行后续的初始化
27    initServletBean();
28
29    if (logger.isDebugEnabled()) {...}
30}
31
32protected void initServletBean() throws ServletException {
33}
上面的源码主要做的事情是将 ServletConfig 中的配置信息设置到 HttpServletBean 的子类对象中(比如 DispatcherServlet),我们并未从上面的源码中发现创建容器的痕迹。不过如果大家注意看源码的话,会发现 initServletBean 这个方法稍显奇怪,是个空方法。这个方法的访问级别为 protected,子类可进行覆盖。HttpServletBean 子类 FrameworkServlet 覆写了这个方法,下面我们到 FrameworkServlet 中探索一番。
1// -☆- org.springframework.web.servlet.FrameworkServlet
2protected final void initServletBean() throws ServletException {
3    getServletContext().log("Initializing Spring FrameworkServlet '" + getServletName() + "'");
4    if (this.logger.isInfoEnabled()) {...}
5    long startTime = System.currentTimeMillis();
6
7    try {
8        // 初始化容器
9        this.webApplicationContext = initWebApplicationContext();
10        initFrameworkServlet();
11    }
12    catch (ServletException ex) {
13        this.logger.error("Context initialization failed", ex);
14        throw ex;
15    }
16    catch (RuntimeException ex) {
17        this.logger.error("Context initialization failed", ex);
18        throw ex;
19    }
20
21    if (this.logger.isInfoEnabled()) {...}
22}
23
24protected WebApplicationContext initWebApplicationContext() {
25    // 从 ServletContext 中获取容器,也就是 ContextLoaderListener 创建的容器
26    WebApplicationContext rootContext =
27            WebApplicationContextUtils.getWebApplicationContext(getServletContext());
28    WebApplicationContext wac = null;
29
30    /*
31     * 若下面的条件成立,则需要从外部设置 webApplicationContext。有两个途径可以设置
32     * webApplicationContext,以 DispatcherServlet 为例:
33     *    1. 通过 DispatcherServlet 有参构造方法传入 WebApplicationContext 对象
34     *    2. 将 DispatcherServlet 配置到其他容器中,由其他容器通过
35     *       setApplicationContext 方法进行设置
36     *
37     * 途径1 可参考 AbstractDispatcherServletInitializer 中的
38     * registerDispatcherServlet 方法源码。一般情况下,代码执行到此处,
39     * this.webApplicationContext 为 null,大家可自行调试进行验证。
40     */
41    if (this.webApplicationContext != null) {
42        wac = this.webApplicationContext;
43        if (wac instanceof ConfigurableWebApplicationContext) {
44            ConfigurableWebApplicationContext cwac = (ConfigurableWebApplicationContext) wac;
45            if (!cwac.isActive()) {
46                if (cwac.getParent() == null) {
47                    // 设置 rootContext 为父容器
48                    cwac.setParent(rootContext);
49                }
50                // 配置并刷新容器
51                configureAndRefreshWebApplicationContext(cwac);
52            }
53        }
54    }
55    if (wac == null) {
56        // 尝试从 ServletContext 中获取容器
57        wac = findWebApplicationContext();
58    }
59    if (wac == null) {
60        // 创建容器,并将 rootContext 作为父容器
61        wac = createWebApplicationContext(rootContext);
62    }
63
64    if (!this.refreshEventReceived) {
65        onRefresh(wac);
66    }
67
68    if (this.publishContext) {
69        String attrName = getServletContextAttributeName();
70        // 将创建好的容器设置到 ServletContext 中
71        getServletContext().setAttribute(attrName, wac);
72        if (this.logger.isDebugEnabled()) {...}
73    }
74
75    return wac;
76}
77
78protected WebApplicationContext createWebApplicationContext(ApplicationContext parent) {
79    // 获取容器类型,默认为 XmlWebApplicationContext.class
80    Class<?> contextClass = getContextClass();
81    if (this.logger.isDebugEnabled()) {...}
82    if (!ConfigurableWebApplicationContext.class.isAssignableFrom(contextClass)) {
83        throw new ApplicationContextException(
84                "Fatal initialization error in servlet with name '" + getServletName() +
85                "': custom WebApplicationContext class [" + contextClass.getName() +
86                "] is not of type ConfigurableWebApplicationContext");
87    }
88
89    // 通过反射实例化容器
90    ConfigurableWebApplicationContext wac =
91            (ConfigurableWebApplicationContext) BeanUtils.instantiateClass(contextClass);
92
93    wac.setEnvironment(getEnvironment());
94    wac.setParent(parent);
95    wac.setConfigLocation(getContextConfigLocation());
96
97    // 配置并刷新容器
98    configureAndRefreshWebApplicationContext(wac);
99
100    return wac;
101}
102
103protected void configureAndRefreshWebApplicationContext(ConfigurableWebApplicationContext wac) {
104    if (ObjectUtils.identityToString(wac).equals(wac.getId())) {
105        // 设置容器 id
106        if (this.contextId != null) {
107            wac.setId(this.contextId);
108        }
109        else {
110            // 生成默认 id
111            wac.setId(ConfigurableWebApplicationContext.APPLICATION_CONTEXT_ID_PREFIX +
112                    ObjectUtils.getDisplayString(getServletContext().getContextPath()) + '/' + getServletName());
113        }
114    }
115
116    wac.setServletContext(getServletContext());
117    wac.setServletConfig(getServletConfig());
118    wac.setNamespace(getNamespace());
119    wac.addApplicationListener(new SourceFilteringListener(wac, new ContextRefreshListener()));
120
121    ConfigurableEnvironment env = wac.getEnvironment();
122    if (env instanceof ConfigurableWebEnvironment) {
123        ((ConfigurableWebEnvironment) env).initPropertySources(getServletContext(), getServletConfig());
124    }
125
126    // 后置处理,子类可以覆盖进行一些自定义操作。在 Spring MVC 未使用到,是个空方法。
127    postProcessWebApplicationContext(wac);
128    applyInitializers(wac);
129    // 刷新容器
130    wac.refresh();
131}
以上就是创建 Web 容器的源码,下面总结一下该容器创建的过程。如下:
- 从 ServletContext 中获取 ContextLoaderListener 创建的容器
- 若 this.webApplicationContext != null 条件成立,仅设置父容器和刷新容器即可
- 尝试从 ServletContext 中获取容器,若容器不为空,则无需执行步骤4
- 创建容器,并将 rootContext 作为父容器
- 设置容器到 ServletContext 中
到这里,关于 Web 容器的创建过程就讲完了。总的来说,Web 容器的创建过程和业务容器的创建过程大致相同,但是差异也是有的,不能忽略。
3.总结
本篇文章对 Spring MVC 两种容器的创建过程进行了较为详细的分析,总的来说两种容器的创建过程并不是很复杂。大家在分析这两种容器的创建过程时,看的不明白的地方,可以进行调试,这对于理解代码逻辑还是很有帮助的。当然阅读 Spring MVC 部分的源码最好有 Servlet 和 Spring IOC 容器方面的知识,这些是基础,Spring MVC 就是在这些基础上构建的。
限于个人能力,文章叙述有误,还望大家指明。也请多多指教,在这里说声谢谢。好了,本篇文章就到这里了。感谢大家的阅读。