
一、前言
Orm框架的本质是简化编程中操作数据库的编码,发展到现在,基本上就剩宣称不用谢一句sql的hibernate,一个是可以灵活调试动态sql的mybatis,两者各有特点,在企业级系统来发中可以根据需求灵活使用。发现一个有趣的现象:传统企业大都喜欢hibernate,互联网行业通常使用mybatis。
hibernate特点就是所有的sql都用java代码来生成,不用跳出程序去写sql,有这编程的完整性,发展到最顶端就是spring data jpa这种模式,基本上根据方法名就可以生成对应的sql。
mybatis初期使用比较麻烦,需要各种配置文件、实体类、Dao层映射关系、还有一大堆其他配置文件。
当然mybatis也有发现了这种弊端,初期开发了generator可以根据表结构自动生成实体类、配置文件和dao层代码,可以减轻一部分开发量;后期也进行了大量的优化可以使用注解,自动管理dao层和配置文件等,发展到最顶级就是今天讲的这种springboot+mybatis可以完全注解不用配置文件,也可以简单配置轻松上手。
springboot就是牛逼呀,啥玩意关联springboot都能化繁为简。

二、mybatis-spring-boot-starter
mybatis-spring-boot-starter主要由两种解决方案,一种是使用注解解决一切问题,一种的简化后的老传统。
当然任何模式都需要先引入mybatis-spring-boot-starter的pom文件,现在最新版本是
1<dependency>
2	<groupId>org.mybatis.spring.boot</groupId>
3	<artifactId>mybatis-spring-boot-starter</artifactId>
4	<version>2.1.1</version>
5</dependency>
三、无配置注解版
1、添加maven文件
<dependencies> <dependency> <groupId>org.springframework.boot</groupId> <artifactId>spring-boot-starter-data-jdbc</artifactId> </dependency> <dependency> <groupId>org.springframework.boot</groupId> <artifactId>spring-boot-starter-web</artifactId> </dependency> <dependency> <groupId>org.mybatis.spring.boot</groupId> <artifactId>mybatis-spring-boot-starter</artifactId> <version>2.1.1</version> </dependency>
<dependency> <groupId>com.oracle.ojdbc</groupId> <artifactId>ojdbc8</artifactId> <scope>runtime</scope> </dependency>
_<!-- https://mvnrepository.com/artifact/com.alibaba/druid --> _ <dependency> <groupId>com.alibaba</groupId> <artifactId>druid</artifactId> <version>1.1.21</version> </dependency>
_<!-- https://mvnrepository.com/artifact/log4j/log4j --> _ <dependency> <groupId>log4j</groupId> <artifactId>log4j</artifactId> <version>1.2.17</version> </dependency> </dependencies>
2、application.yml添加相关配置
1spring:
2  datasource:
3    username: mine
4    password: mine
5    url: jdbc:oracle:thin:@127.0.0.1:1521:orcl
6    driver-class-name: oracle.jdbc.driver.OracleDriver
7    type: com.alibaba.druid.pool.DruidDataSource
8    initialSize: 5
9    minIdle: 5
10    maxActive: 20
11    maxWait: 60000
12    timeBetweenEvictionRunsMillis: 60000
13    minEvictableIdleTimeMillis: 300000
14    validationQuery: SELECT 1 FROM DUAL
15    testWhileIdle: true
16    testOnBorrow: false
17    testOnReturn: false
18    poolPreparedStatements: true
19    filters: stat,wall,log4j
20    maxPoolPreparedStatementPerConnectionSize: 20
21    useGlobalDataSourceStat: true
22    connectionProperties: druid.stat.mergeSql=true;druid.stat.slowSqlMillis=500
Spring Boot 会自动加载spring.datasource.*相关配置,数据源就会自动注入到 sqlSessionFactory 中,sqlSessionFactory 会自动注入到 Mapper 中,对了,你一切都不用管了,直接拿起来使用就行了。
在启动类中添加对 mapper 包扫描@MapperScan
@MapperScan(value="com.demo.mapper") @SpringBootApplication public class DemoApplication { public static void main(String[] args) { SpringApplication.run(DemoApplication.class, args); } }
或者直接在 Mapper 类上面添加注解@Mapper,建议使用上面那种,不然每个 mapper 加个注解也挺麻烦的
3、controller
@RestController public class DeptController { @Autowired DepartmentMapper departmentMapper;
1@GetMapping(**"/dept/{id}"**)
2**public** Department getDepartment(@PathVariable(**"id"**) Integer id){
3    **return** **departmentMapper**.getDeptById(id);
4}
5
6@GetMapping(**"/dept"**)
7**public int** insertDeptById(@PathVariable(**"id"**) Integer id,@PathVariable(**"departmentName"**) String departmentName){
8    **int** ret = **departmentMapper**.insertDept(id,departmentName);
9    **return** ret;
10}
}
4、开发mapper
1package com.demo.mapper;
2
3import com.demo.bean.Department;
4import org.apache.ibatis.annotations.*;
5
6public interface DepartmentMapper {
7    @Select("select * from SSH_DEPARTMENT where id=#{id}")
8    public Department getDeptById(Integer id);
9
10    @Delete("delete from SSH_DEPARTMENT where id=#{id}")
11    public int deleteDeptById(Integer id);
12
13    @Options(useGeneratedKeys = true,keyProperty = "id")
14    @Insert("insert into SSH_DEPARTMENT(department_name) values(#{departmentName})")
15    public int insertDept(Department department);
16
17    @Update("update SSH_DEPARTMENT set departmentName=#{DEPARTMENT_NAME} where id=#{id}")
18    public int updateDept(Department department);
19}
- @Select 是查询类的注解,所有的查询均使用这个
- @Result 修饰返回的结果集,关联实体类属性和数据库字段一一对应,如果实体类属性和数据库属性名保持一致,就不需要这个属性来修饰。
- @Insert 插入数据库使用,直接传入实体类会自动解析属性到对应的值
- @Update 负责修改,也可以直接传入对象
- @delete 负责删除
4、运行
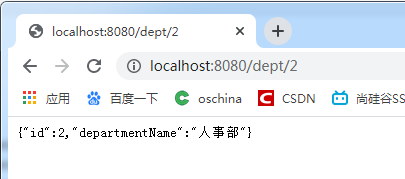
上面三步就基本完成了相关 Mapper 层开发,使用的时候当作普通的类注入进入就可以了
(1)查询
(2)插入
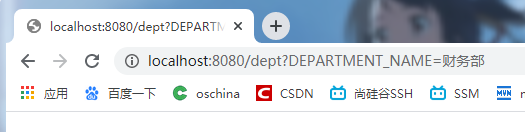
- 插入前数据库状态

- 浏览器调用controller执行插入
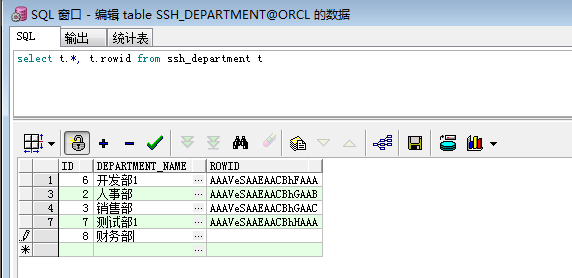
- 插入后结果查询
四、极简XML版本
极简 xml 版本保持映射文件的老传统,接口层只需要定义空方法,系统会自动根据方法名在映射文件中找对应的 Sql
1、配置
pom 文件和上个版本一样,只是application.yml新增以下配置
1mybatis.config-location=classpath:mybatis/mybatis-config.xml
2mybatis.mapper-locations=classpath:mybatis/mapper/*.xml
mybatis-config.xml 配置
1<?xml version="1.0" encoding="UTF-8" ?>
2<!DOCTYPE configuration
3        PUBLIC "-//mybatis.org//DTD Config 3.0//EN"
4        "http://mybatis.org/dtd/mybatis-3-config.dtd">
5<configuration>
6
7    <settings>
8        <setting name="mapUnderscoreToCamelCase" value="true"/>
9    </settings>
10</configuration>
2、employeeMapper.xml
1<?xml version="1.0" encoding="UTF-8" ?>
2<!DOCTYPE mapper
3        PUBLIC "-//mybatis.org//DTD Mapper 3.0//EN"
4        "http://mybatis.org/dtd/mybatis-3-mapper.dtd">
5<mapper namespace="com.atguigu.springboot.mapper.EmployeeMapper">
6   <!--    public Employee getEmpById(Integer id);
7
8    public void insertEmp(Employee employee);-->
9    <select id="getEmpById" resultType="com.atguigu.springboot.bean.Employee">
10        SELECT * FROM employee WHERE id=#{id}
11    </select>
12
13    <insert id="insertEmp">
14        INSERT INTO employee(lastName,email,gender,d_id) VALUES (#{lastName},#{email},#{gender},#{dId})
15    </insert>
16</mapper>
3、开发mapper
1package com.demo.mapper;
2
3import com.demo.bean.Employee;
4import org.mybatis.spring.annotation.MapperScan;
5
6@MapperScan
7public interface EmployeeMapper {
8    public Employee getEmpById(Integer id);
9    public void insertEmp(Employee employee);
10}
对比上一步,这里只需要定义接口方法。
4、运行结果与注解方式无异。
五、两种模式如何选择

两种模式各有特点,注解版适合简单快速的模式,其实像现在流行的这种微服务模式,一个微服务就会对应一个自己的数据库,多表连接查询的需求会大大的降低,会越来越适合这种模式。
老传统模式比较适合大型项目,可以灵活的动态生成sql,方便调整sql,有的人就是爱写sql,再配上点存储过程,越复杂越好,感觉自己越牛,那你就用这个。