
1.简介
1 SystemTap是一个Linux非常有用的调试(跟踪/探测)工具,常用于Linux
2 内核或者应用程序的信息采集,比如:获取一个函数里面运行时的变
3 量、调用堆栈,甚至可以直接修改变量的值,对诊断性能或功能问题非
4 常有帮助。SystemTap提供非常简单的命令行接口和很简洁的脚本语
5 言,以及非常丰富的tapset和例子。
2.何时使用
1定位(内核)函数位置
2查看函数被调用时的调用堆栈、局部变量、参数
3查看函数指针变量实际指的是哪个函数
4查看代码的执行轨迹(哪些行被执行了)
5查看内核或者进程的执行流程
6调试内存泄露或者内存重复释放
7统计函数调用次数
8......
3.原理
在网上找了个原理图:
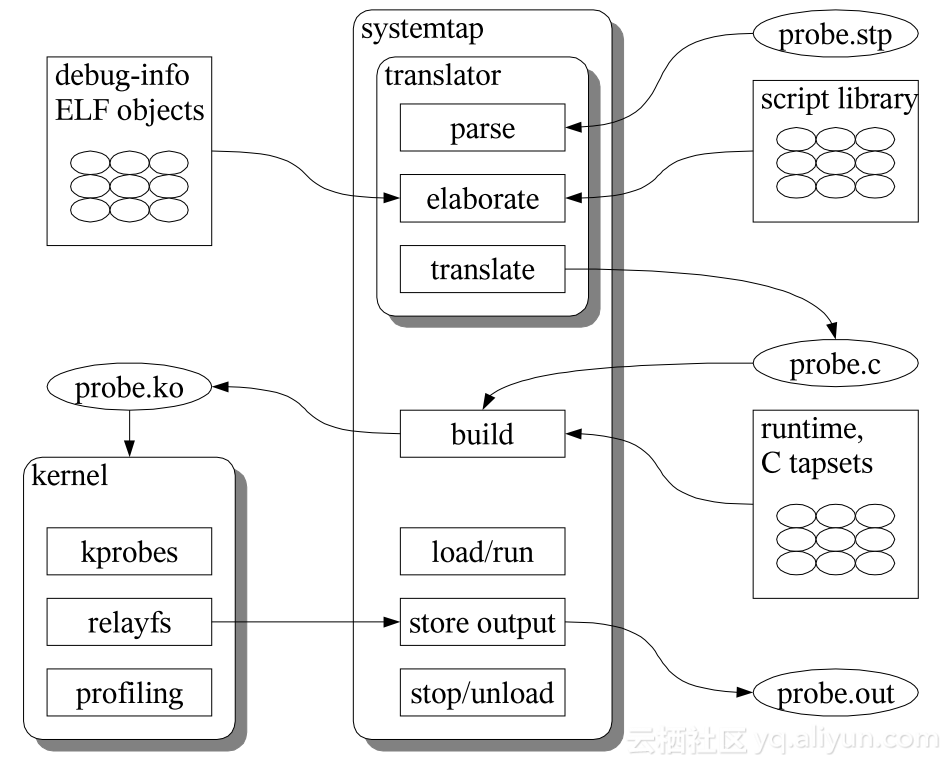
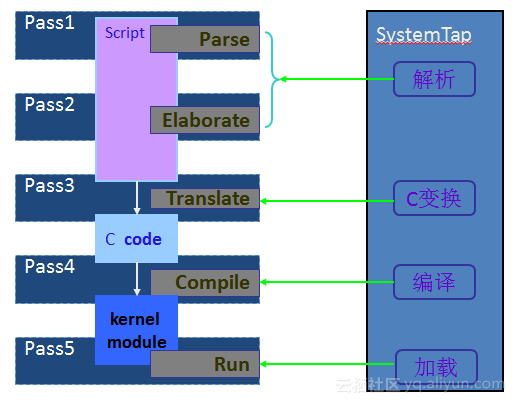
SystemTap的处理流程有5个步骤:解析script文件(parse)、细化(elaborate)、script文件翻译成C语言代码(translate)、编译C语言代码(生成内核模块)(build)、加载内核模块(run)
4.安装
SystemTap依赖的package: elfutils、gcc、kernel-devel、kernel-debuginfo 如果调用用户态进程,还需要该程序有调试符号,否则无法调试。 推荐使用最新稳定版的SystemTap,目前最新稳定版为:systemtap-2.9.tar.gz
5.入门
5.1 stap命令
1stap [OPTIONS] FILENAME [ARGUMENTS]
2stap [OPTIONS] - [ARGUMENTS]
3stap [OPTIONS] –e SCRIPT [ARGUMENTS]
4
5比较常用和有用的参数:
6-e SCRIPT               Run given script.
7-l PROBE                List matching probes.
8-L PROBE                List matching probes and local variables.
9-g                      guru mode
10-D NM=VAL               emit macro definition into generated C code
11-o FILE                 send script output to file, instead of stdout.
12-x PID                  sets target() to PID
Hello World:
1root@j9 ~/stp# cat hello-world.stp
2probe begin {
3    print("===Hello World===\n")
4}
5
6probe end {
7    print("===GunLe===\n")
8}
9root@j9 ~/stp# stap hello-world.stp
10===Hello World===
11^C===GunLe===
12root@j9 ~/stp# stap -e 'probe begin { printf("Hello World!\n") exit() }'
13Hello World!
14root@j9 ~/stp#
5.2 staprun命令
staprun [OPTIONS] MODULE [MODULE-OPTIONS]
stap命令与staprun命令的区别在于: stap命令的操作对象是stp文件或script命令等,而staprun命令的操作对象是编译生成的内核模块。
6.脚本语言
6.1 probe
“probe” <=> “探测”, 是SystemTap进行具体地收集数据的关键字。 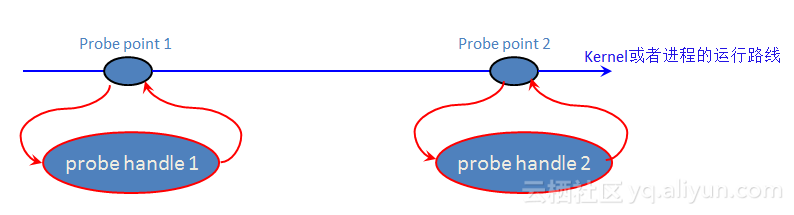
“probe point” 是probe动作的时机,也称探测点。也就是probe程序监视的某事件点,一旦侦测的事件触发了,则probe将从此处插入内核或者用户进程中。 “probe handle” 是当probe插入内核或者用户进程后所做的具体动作。
probe用法:
probe probe-point { statement }
在Hello World例子中begin和end就是probe-point, statement就是该探测点的处理逻辑,在Hello World例子中statement只有一行print,statement可以是复杂的代码块。 探测点语法:
1kernel.function(PATTERN)
2kernel.function(PATTERN).call
3kernel.function(PATTERN).return
4kernel.function(PATTERN).return.maxactive(VALUE)
5kernel.function(PATTERN).inline
6kernel.function(PATTERN).label(LPATTERN)
7module(MPATTERN).function(PATTERN)
8module(MPATTERN).function(PATTERN).call
9module(MPATTERN).function(PATTERN).return.maxactive(VALUE)
10module(MPATTERN).function(PATTERN).inline
11kernel.statement(PATTERN)
12kernel.statement(ADDRESS).absolute
13module(MPATTERN).statement(PATTERN)
14process(PROCESSPATH).function(PATTERN)
15process(PROCESSPATH).function(PATTERN).call
16process(PROCESSPATH).function(PATTERN).return
17process(PROCESSPATH).function(PATTERN).inline
18process(PROCESSPATH).statement(PATTERN)
PATTERN语法为:
1func[@file]
2func@file:linenumber
例如:
1kernel.function("*init*")
2module("ext3").function("*")
3kernel.statement("*@kernel/time.c:296")
4process("/home/admin/tengine/bin/nginx").function("ngx_http_process_request")
在return探测点可以用$return获取该函数的返回值。 inline函数无法安装.return探测点,也无法用$return获取其返回值。
6.2 基本语法
SystemTap脚本语法比较简单,与C语言类似,只是每一行结尾";"是可选的。主要语句如下: if/else、while、for/foreach、break/continue、return、next、delete、try/catch 其中: next:主要在probe探测点逻辑处理中使用,调用此语句时,立刻从调用函数中退出。不同于exit()的是,next只是退出当前的调用函数,而此SystemTap并没有终了,但exit()则会终止SystemTap。
6.2.1 变量
不需要明确声明变量类型,脚本语言会根据函数参数等自动判断变量是什么类型的。 局部变量:在声明的probe和block(”{ }“范围内的部分)内有效。 全局变量:用”global“声明的变量,在此SystemTap的整个动作过程中都有效。全局变量的声明位置没有具体要求。需要注意的是,全局变量默认有锁保护,使用过多会有性能损失,如果用全局变量保存指针,可能出现指针所指的内容被进程修改,在探测点中拿不到真正的数据。 获取进程中的变量(全局变量、局部变量、参数)直接在变量名前面加$即可(后面会有例子)
6.2.2 注释
1# ...... : Shell语言风格
2//...... : C++语言风格
3 /*......*/ : C语言风格
6.2.3 操作符
比较运算符、算数运算符基本上与C语言一样,需要特别指出的是: (1)、.操作符:连接两个字符串,类似于php; (2)、=和!:正则匹配和正则不匹配;
6.2.4 函数
函数定义例子:
1function indent:string (delta:long){
2  return _generic_indent(-1, "",  delta)
3}
4
5function _generic_indent (idx, desc, delta)
6{
7  ts = __indent_timestamp ()
8  if (! _indent_counters[idx]) _indent_timestamps[idx] = ts
9  depth = _generic_indent_depth(idx, delta)
10  return sprintf("%6d (%d:%d) %s:%-*s", (ts - _indent_timestamps[idx]), depth, delta, desc, depth, "")
11}
12
13function strlen:long(s:string) %{
14    STAP_RETURN(strlen(STAP_ARG_s));
15%}
官方有很多很有用的函数,详情请参考:https://sourceware.org/systemtap/tapsets/ 以及在本机安装了SystemTap之后在目录/usr/local/share/systemtap/tapset/下也可以看具体函数的实现以及一些奇特的用法。
7.技巧
7.1 定位函数位置
在一个大型项目中找出函数在哪里定义有时很有用,特别是一些比较难找出在哪里定义的函数,比如内核或者glibc中的某个函数想要看其实现时,首先得找出其在哪个文件的哪一行定义,用SystemTap一行命令就可以搞定。 比如要看printf在glibc中哪里定义的:
1root@j9 ~# stap -l 'process("/lib/x86_64-linux-gnu/libc.so.6").function("printf")'
2process("/lib/x86_64-linux-gnu/libc-2.15.so").function("__printf@/build/buildd/eglibc-2.15/stdio-common/printf.c:29")
可以看出printf是在printf.c第29行定义的。 再比如要看内核中recv系统的调用是在哪里定义的:
1root@j9 ~# stap -l 'kernel.function("sys_recv")'
2kernel.function("sys_recv@/build/buildd/linux-lts-trusty-3.13.0/net/socket.c:1868")
可以看出recv是在socket.c第1868行定义的。 甚至可以*号来模糊查找:
1root@j9 ~# stap -l 'kernel.function("*recv")'
2kernel.function("__audit_mq_sendrecv@/build/buildd/linux-lts-trusty-3.13.0/kernel/auditsc.c:2062")
3kernel.function("audit_mq_sendrecv@/build/buildd/linux-lts-trusty-3.13.0/include/linux/audit.h:263")
4kernel.function("compat_sys_recv@/build/buildd/linux-lts-trusty-3.13.0/net/compat.c:762")
5kernel.function("i2c_master_recv@/build/buildd/linux-lts-trusty-3.13.0/drivers/i2c/i2c-core.c:1827")
6kernel.function("ip_cmsg_recv@/build/buildd/linux-lts-trusty-3.13.0/net/ipv4/ip_sockglue.c:147")
7kernel.function("kgdb_tty_recv@/build/buildd/linux-lts-trusty-3.13.0/drivers/tty/serial/kgdb_nmi.c:109")
8kernel.function("ppp_do_recv@/build/buildd/linux-lts-trusty-3.13.0/drivers/net/ppp/ppp_generic.c:1617")
9kernel.function("scm_recv@/build/buildd/linux-lts-trusty-3.13.0/include/net/scm.h:109")
10kernel.function("sys_recv@/build/buildd/linux-lts-trusty-3.13.0/net/socket.c:1868")
11kernel.function("tcp_event_data_recv@/build/buildd/linux-lts-trusty-3.13.0/net/ipv4/tcp_input.c:615")
12kernel.function("tcp_splice_data_recv@/build/buildd/linux-lts-trusty-3.13.0/net/ipv4/tcp.c:637")
13kernel.function("tpm_tis_recv@/build/buildd/linux-lts-trusty-3.13.0/drivers/char/tpm/tpm_tis.c:231")
14kernel.function("try_fill_recv@/build/buildd/linux-lts-trusty-3.13.0/drivers/net/virtio_net.c:615")
同理,也可以用来定位用户进程的函数位置: 比如tengine的文件ngx_shmem.c里面为了兼容各个操作系统而实现了三个版本的ngx_shm_alloc,用#if (NGX_HAVE_MAP_ANON)、#elif (NGX_HAVE_MAP_DEVZERO)、#elif (NGX_HAVE_SYSVSHM)、#endif来做条件编译,那怎么知道编译出来的是哪个版本呢,用SystemTap的话就很简单了,否则要去grep一下这几宏有没有定义才知道了。
1[root@cache4 tengine]# stap -l 'process("/home/admin/tengine/bin/nginx").function("ngx_shm_alloc")'
2process("/home/admin/tengine/bin/nginx").function("ngx_shm_alloc@src/os/unix/ngx_shmem.c:15")
7.2 查看可用探测点以及该探测点上可用的变量
在一些探测点上能获取的变量比较有限,这是因为这些变量可能已经被编译器优化掉了,优化掉的变量就获取不到了。一般先用-L参数来看看有哪些变量可以直接使用:
1[root@cache4 tengine]# stap -L 'process("/home/admin/tengine/bin/nginx").function("ngx_shm_alloc")'
2process("/home/admin/tengine/bin/nginx").function("ngx_shm_alloc@src/os/unix/ngx_shmem.c:15") $shm:ngx_shm_t*
可见在该探测点上可以直接使用$shm这个变量,其类型是ngx_shm_t*。 statement探测点也类似:
1[root@cache4 tengine]# stap -L 'process("/home/admin/tengine/bin/nginx").statement("ngx_pcalloc@src/core/ngx_palloc.c:*")'
2process("/home/admin/tengine/bin/nginx").statement("ngx_pcalloc@src/core/ngx_palloc.c:395") $pool:ngx_pool_t* $size:size_t
3process("/home/admin/tengine/bin/nginx").statement("ngx_pcalloc@src/core/ngx_palloc.c:398") $pool:ngx_pool_t* $size:size_t
4process("/home/admin/tengine/bin/nginx").statement("ngx_pcalloc@src/core/ngx_palloc.c:399") $size:size_t
5process("/home/admin/tengine/bin/nginx").statement("ngx_pcalloc@src/core/ngx_palloc.c:404") $size:size_t $p:void*
7.3 输出调用堆栈
用户态探测点堆栈:print_ubacktrace()、sprint_ubacktrace() 内核态探测点堆栈:print_backtrace()、sprint_backtrace() 不带s和带s的区别是前者直接输出,后者是返回堆栈字符串。 这几个函数非常有用,在排查问题时可以根据一些特定条件来过滤函数被执行时是怎么调用进来的,比如排查tengine返回5xx时的调用堆栈是怎样的:
1#cat debug_tengine_5xx.stp
2probe process("/home/admin/tengine/bin/nginx").function("ngx_http_finalize_request").call {
3    if ($rc >= 500) {
4        printf("rc: %d\n", $rc)
5        print_ubacktrace()
6    }
7}
8
9#stap debug_tengine_5xx.stp
10rc: 502
11 0x49af2e : ngx_http_finalize_request+0xe/0x480 [/home/admin/tengine/bin/nginx]
12 0x543305 : ngx_http_video_flv_send_rest+0xf5/0x380 [/home/admin/tengine/bin/nginx]
13 0x543187 : ngx_http_video_finalize_request+0x57/0xe0 [/home/admin/tengine/bin/nginx]
14 0x49828f : ngx_http_terminate_request+0x4f/0xc0 [/home/admin/tengine/bin/nginx]
15 0x49b760 : ngx_http_test_reading+0x50/0x130 [/home/admin/tengine/bin/nginx]
16 0x49779f : ngx_http_request_handler+0x1f/0x40 [/home/admin/tengine/bin/nginx]
17 0x47ea8f : ngx_epoll_process_events+0x2df/0x330 [/home/admin/tengine/bin/nginx]
18 0x4753f9 : ngx_process_events_and_timers+0x69/0x1c0 [/home/admin/tengine/bin/nginx]
19 0x47d4d8 : ngx_worker_process_cycle+0x138/0x260 [/home/admin/tengine/bin/nginx]
20 0x47a38a : ngx_spawn_process+0x1ca/0x5e0 [/home/admin/tengine/bin/nginx]
21 0x47c73c : ngx_start_worker_processes+0x7c/0x100 [/home/admin/tengine/bin/nginx]
22 0x47db5f : ngx_master_process_cycle+0x3af/0x9b0 [/home/admin/tengine/bin/nginx]
23 0x45a740 : main+0xa90/0xb50 [/home/admin/tengine/bin/nginx]
24 0x3623e1ecdd [/lib64/libc-2.12.so+0x1ecdd/0x38d000]
比如看看内核是怎么收包的:
1root@jusse ~# cat netif_receive_skb.stp
2probe kernel.function("netif_receive_skb")
3{
4    printf("--------------------------------------------------------\n");
5    print_backtrace();
6    printf("--------------------------------------------------------\n");
7}
8root@jusse ~# stap netif_receive_skb.stp
9--------------------------------------------------------
10 0xffffffff8164dc00 : netif_receive_skb+0x0/0x90 [kernel]
11 0xffffffff8164e280 : napi_gro_receive+0xb0/0x130 [kernel]
12 0xffffffff81554537 : handle_incoming_queue+0xe7/0x100 [kernel]
13 0xffffffff815555d9 : xennet_poll+0x279/0x430 [kernel]
14 0xffffffff8164ee09 : net_rx_action+0x139/0x250 [kernel]
15 0xffffffff810702cd : __do_softirq+0xdd/0x300 [kernel]
16 0xffffffff8107088e : irq_exit+0x11e/0x140 [kernel]
17 0xffffffff8144e785 : xen_evtchn_do_upcall+0x35/0x50 [kernel]
18 0xffffffff8176c9ed : xen_hvm_callback_vector+0x6d/0x80 [kernel]
19--------------------------------------------------------
7.4 获取函数参数
一些被编译器优化掉的函数参数用-L去看的时候没有找到,这样的话在探测点里面也不能直接用$方式获取该参数变量,这时可以使用SystemTap提供的*_arg函数接口,*是根据类型指定的,比如pointer_arg是获取指针类型参数,int_arg是获取整型参数,类似的还有long_arg、longlong_arg、uint_arg、ulong_arg、ulonglong_arg、s32_arg、s64_arg、u32_arg、u64_arg:

1root@j9 ~# stap -L 'kernel.function("sys_open")'
2kernel.function("SyS_open@/build/buildd/linux-lts-trusty-3.13.0/fs/open.c:1011") $ret:long int
3root@j9 ~# cat sys_open.stp
4probe kernel.function("sys_open").call
5{
6    printf("filename: %p(%s), flags: %d, mode: %x\n", pointer_arg(1), kernel_string(pointer_arg(1)), int_arg(2), int_arg(3));
7}
8root@j9 ~# stap sys_open.stp
9filename: 0xc2081d2120(/proc/stat), flags: 524288, mode: 0
10filename: 0x7facec00e838(/root/opt/libexec/systemtap/stapio), flags: 0, mode: 1b6
11filename: 0x2219488(/var/log/auth.log), flags: 0, mode: 1b6
12filename: 0x7facec00e838(/root/opt/libexec/systemtap/stapio), flags: 0, mode: 1b6
13filename: 0x7fad10172c29(/etc/passwd), flags: 524288, mode: 1b6
14^C
再比如两个函数的函数参数类型兼容也可以使用这种方法获取: 
这两个函数的参数完全兼容,只是第二个参数命名不一样而已,可以像下面这么用:
1#cat debug_tengine_5xx.stp
2probe process("/home/admin/tengine/bin/nginx").function("ngx_http_finalize_request").call, process("/home/admin/tengine/bin/nginx").function("ngx_http_special_response_handler").call {
3    rc = int_arg(2)
4    if (rc >= 500) {
5        printf("rc: %d\n", rc)
6        print_ubacktrace()
7    }
8}
7.5 获取全局变量
有时候用$可以直接获取到全局变量,但有时候又获取不到,那可以试试@var: 比如获取nginx的全局变量ngx_cycyle:
1root@j9 ~# cat get_ngx_cycle.stp
2probe process("/home/admin/tengine/bin/nginx").function("ngx_process_events_and_timers").call {
3    printf("ngx_cycle->connections: %d\n", $ngx_cycle->connections)
4    exit()
5}
6
7root@j9 ~# stap get_ngx_cycle.stp
8semantic error: while processing probe process("/home/admin/tengine/bin/nginx").function("ngx_process_events_and_timers@src/event/ngx_event.c:225").call from: process("/home/admin/tengine/bin/nginx").function("ngx_process_events_and_timers").call
9
10semantic error: unable to find local 'ngx_cycle', [man error::dwarf] dieoffset 0x73ca8 in /home/admin/tengine/bin/nginx, near pc 0x434152 in ngx_process_events_and_timers src/event/ngx_event.c (alternatives: $cycle, $delta, $timer, $flags)): identifier '$ngx_cycle' at get_ngx_cycle.stp:3:44
11        source:     printf("ngx_cycle->connections: %d\n", $ngx_cycle->connections)
12                                                           ^
13
14Pass 2: analysis failed.  [man error::pass2]
15
16root@j9 ~# cat get_ngx_cycle.stp
17probe process("/home/admin/tengine/bin/nginx").function("ngx_process_events_and_timers").call {
18    ngx_cycle = @var("ngx_cycle@src/core/ngx_cycle.c")
19    printf("ngx_cycle->connections: %d\n", ngx_cycle->connections)
20    exit()
21}
22
23root@j9 ~# stap get_ngx_cycle.stp
24ngx_cycle->connections: 19507312
7.6 获取数据结构成员用法
1typedef struct {
2    size_t      len;
3    u_char     *data;
4} ngx_str_t;
5
6struct ngx_http_request_s {
7    ......
8    ngx_uint_t                        method;
9    ngx_uint_t                        http_version;
10
11    ngx_str_t                         request_line;
12    ngx_str_t                         raw_uri;
13    ngx_str_t                         uri;
14    ......
15};
上面这个是nginx里面的http请求结构里面的几个成员,在C语言里,如果r是struct ngx_http_request_t *,那么要获取uri的data是这样的:r->uri.data,但在SystemTap里面,不管是指针还是数据结构,都是用->访问其成员:
1#cat get_http_uri.stp
2probe process("/home/admin/tengine/bin/nginx").function("ngx_http_process_request").call {
3    printf("r->uri.len: %d, r->uri.data: %p\n", $r->uri.len, $r->uri.data)
4}
5#stap get_http_uri.stp
6WARNING: never-assigned local variable 'len' (similar: data): identifier 'len' at get_http_uri.stp:2:57
7 source:     printf("r->uri.len: %d, r->uri.data: %p\n", $r->uri.len, $r->uri.data)
8                                                                 ^
9WARNING: never-assigned local variable 'data' (similar: len): identifier 'data' at :2:70
10 source:     printf("r->uri.len: %d, r->uri.data: %p\n", $r->uri.len, $r->uri.data)
11                                                                              ^
12semantic error: invalid operator: operator '.' at :2:56
13        source:     printf("r->uri.len: %d, r->uri.data: %p\n", $r->uri.len, $r->uri.data)
14                                                                       ^
15
16semantic error: type mismatch: expected long but found string: operator '.' at :2:56
17        source:     printf("r->uri.len: %d, r->uri.data: %p\n", $r->uri.len, $r->uri.data)
18                                                                       ^
19
20Pass 2: analysis failed.  [man error::pass2]
21
22#cat get_http_uri.stp
23probe process("/home/admin/tengine/bin/nginx").function("ngx_http_process_request").call {
24    printf("r->uri.len: %d, r->uri.data: %p\n", $r->uri->len, $r->uri->data)
25}
26
27#stap get_http_uri.stp
28r->uri.len: 1, r->uri.data: 0x1276f94
29r->uri.len: 1, r->uri.data: 0x11d5fc4
30r->uri.len: 1, r->uri.data: 0x124fd24
31^C
7.7 输出整个数据结构
SystemTap有两个语法可以输出整个数据结构:在变量的后面加一个或者两个
$即可,例子如下:
1#cat get_r_pool.stp
2probe process("/home/admin/tengine/bin/nginx").function("ngx_http_process_request").call {
3    printf("$r->pool$: %s\n$r->pool$$: %s\n", $r->pool$, $r->pool$$)
4}
5#stap get_r_pool.stp
6$r->pool$: {.d={...}, .max=4016, .current=0x161acd0, .chain=0x0, .large=0x0, .cleanup=0x0, .log=0x161c690}
7$r->pool$$: {.d={.last="a", .end="", .next=0x1617650, .failed=0}, .max=4016, .current=0x161acd0, .chain=0x0, .large=0x0, .cleanup=0x0, .log=0x161c690}
其中r->pool的结构如下:
1typedef struct {
2    u_char               *last;
3    u_char               *end;
4    ngx_pool_t           *next;
5    ngx_uint_t            failed;
6} ngx_pool_data_t;
7
8struct ngx_pool_s {
9    ngx_pool_data_t       d;
10    size_t                max;
11    ngx_pool_t           *current;
12    ngx_chain_t          *chain;
13    ngx_pool_large_t     *large;
14    ngx_pool_cleanup_t   *cleanup;
15    ngx_log_t            *log;
16#if  (NGX_DEBUG_POOL)
17    size_t                size;
18    ngx_pool_stat_t      *stat;
19#endif
20};
ngx_pool_s包含了结构ngx_pool_data_t。变量后面加和$的区别是后者展开了里面的结构而前者不展开,此用法只输出基本数据类型的值。
7.8 输出字符串指针
用户态使用:user_string、user_string_n 内核态使用:kernel_string、kernel_string_n、user_string_quoted
1#cat get_http_uri.stp
2probe process("/home/admin/tengine/bin/nginx").function("ngx_http_process_request").call {
3    printf("r->uri: %s\nr->uri(n): %s\n", user_string($r->uri->data), user_string_n($r->uri->data, $r->uri->len))
4}
5
6#stap get_http_uri.stp
7r->uri: /?id=1 HTTP/1.1
8User-Agent
9r->uri(n): /
user_string_quoted是获取用户态传给内核的字符串,代码中一般有__user宏标记: 
1#cat sys_open.stp
2probe kernel.function("sys_open")
3{
4    printf("filename: %s\n", user_string_quoted(pointer_arg(1)));
5}
6#stap sys_open.stp
7filename: "/var/log/auth.log"
8filename: "/proc/stat"
9filename: "/proc/uptime"
7.9 指针类型转换
SystemTap提供@cast来实现指针类型转换,比如可以将void *转成自己需要的类型: 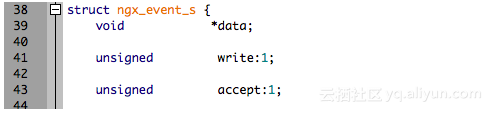
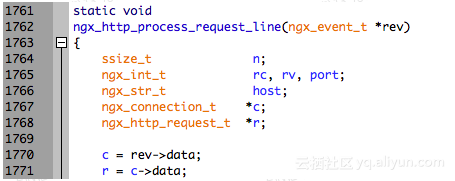
1#cat get_c_fd.stp
2probe process("/home/admin/tengine/bin/nginx").function("ngx_http_process_request_line").call {
3    printf("c->fd: %d\n", @cast($rev->data, "ngx_connection_t")->fd)
4}
5
6#stap get_c_fd.stp
7c->fd: 3
8c->fd: 28
9c->fd: 30
10c->fd: 32
11c->fd: 34
12^C
7.10 定义某个类型的变量
同样是用@cast,定义一个变量用来保存其转换后的地址即可,用法如下:
1#cat get_c.stp
2probe process("/home/admin/tengine/bin/nginx").function("ngx_http_process_request_line").call {
3    c = &@cast($rev->data, "ngx_connection_t")
4    printf("c->fd: %d, c->requests: %d\n", c->fd, c->requests)
5}
6
7#stap get_c.stp
8c->fd: 3, c->requests: 1
9c->fd: 28, c->requests: 1
10c->fd: 30, c->requests: 1
11^C
7.11 多级指针用法
1root@j9 ~# cat cc_multi_pointer.c
2#include <stdio.h>
3
4struct test {
5    int count;
6};
7
8int main(int argc, char *argv[])
9{
10    struct test t = {.count = 5566};
11    struct test *pt = &t;
12    struct test **ppt = &pt;
13
14    printf("t.count: %d, pt->count: %d, ppt->count: %d\n", t.count, pt->count, (*ppt)->count);
15
16    return 0;
17}
18
19root@j9 ~# gcc -Wall -g -o cc_multi_pointer ./cc_multi_pointer.c
20
21root@j9 ~# cat cc_multi_pointer.stp
22probe process("./cc_multi_pointer").statement("main@./cc_multi_pointer.c:13")
23{
24    printf("$t->count: %d, $pt->count: %d, $ppt->count: %d", $t->count, $pt->count, $ppt[0]->count);
25}
26
27root@j9 ~# ./cc_multi_pointer
28t.count: 5566, pt->count: 5566, ppt->count: 5566
29
30root@j9 ~# stap ./cc_multi_pointer.stp -c './cc_multi_pointer'
31t.count: 5566, pt->count: 5566, ppt->count: 5566
32$t->count: 5566, $pt->count: 5566, $ppt->count: 5566
简言之:通过[0]去解引用即可。
7.12 遍历C语言数组
下面是在nginx处理请求关闭时遍历请求头的例子:
1#cat debug_http_header.stp
2probe process("/home/admin/tengine/bin/nginx").function("ngx_http_finalize_request").call {
3    i = 0
4    headers_in_part = &$r->headers_in->headers->part
5    headers = &@cast(headers_in_part->elts, "ngx_table_elt_t")[0]
6    while (headers) {
7        if (i >= headers_in_part->nelts) {
8            if (!headers_in_part->next) {
9                break
10            }
11            headers_in_part = headers_in_part->next;
12            headers = &@cast(headers_in_part->elts, "ngx_table_elt_t")[0]
13            i = 0
14        }
15        h = &@cast(headers, "ngx_table_elt_t")[i]
16        printf("%s: %s\n", user_string_n(h->key->data, h->key->len), user_string_n(h->value->data, h->value->len))
17        i += 1
18    }
19}
20
21#stap debug_http_header.stp
22User-Agent: curl/7.29.0
23Host: 127.0.0.1:20090
24Accept: */*
7.13 查看函数指针所指的函数名
获取一个地址所对应的符号: 用户态:usymname 内核态:symname
1#cat get_c_handler.stp
2probe process("/home/admin/tengine/bin/nginx").function("ngx_http_process_request_line").call {
3    c = &@cast($rev->data, "ngx_connection_t")
4    printf("c->read->handlers: %s, c->write->handler: %s\n", usymname(c->read->handler), usymname(c->write->handler))
5}
6
7#stap get_c_handler.stp
8c->read->handlers: ngx_http_process_request_line, c->write->handler: ngx_http_empty_handler
9^C
7.14 修改进程中的变量
1root@j9 ~# cat stap_set_var.c -n
2     1  #include <stdio.h>
3     2
4     3  typedef struct policy {
5     4      int     id;
6     5  } policy_t;
7     6
8     7  int main(int argc, char *argv[])
9     8  {
10     9      policy_t policy;
11    10      policy_t *p = &policy;
12    11      policy_t **pp;
13    12
14    13      p->id = 111;
15    14
16    15      printf("before stap set, p->id: %d\n", p->id);
17    16
18    17      pp = &p;
19    18
20    19      printf("after stap set, p->id: %d, (*pp)->id: %d\n", p->id, (*pp)->id);
21    20
22    21      return 0;
23    22  }
24
25root@j9 ~# gcc -Wall -g -o ./stap_set_var ./stap_set_var.c
26
27root@j9 ~# cat stap_set_var.stp
28probe process("./stap_set_var").statement("main@./stap_set_var.c:17")
29{
30    $p->id = 222;
31    printf("$p$: %s\n", $p$)
32}
33
34root@j9 ~# stap -g stap_set_var.stp -c ./stap_set_var
35before stap set, p->id: 111
36after stap set, p->id: 222, (*pp)->id: 222
37$p$: {.id=222}
38
39root@j9 ~#
可以看出在第17行用SystemTap修改后的值在第19行就生效了。 需要注意的是stap要加-g参数在guru模式下才能修改变量的值。
7.15 跟踪进程执行流程
thread_indent(n): 补充空格 ppfunc(): 当前探测点所在的函数 在call探测点调用thread_indent(4)补充4个空格,在return探测点调用thread_indent(-4)回退4个空格,效果如下:
1#cat trace_nginx.stp
2probe process("/home/admin/tengine/bin/nginx").function("*@src/http/ngx_http_*").call
3{
4    printf("%s -> %s\n", thread_indent(4), ppfunc());
5}
6
7probe process("/home/admin/tengine/bin/nginx").function("*@src/http/ngx_http_*").return
8{
9    printf("%s <- %s\n", thread_indent(-4), ppfunc());
10}
11
12#stap trace_nginx.stp
13     0 nginx(11368):    -> ngx_http_init_connection
14    21 nginx(11368):    <- ngx_http_init_connection
15     0 nginx(11368):    -> ngx_http_wait_request_handler
16    30 nginx(11368):        -> ngx_http_create_request
17    41 nginx(11368):        <- ngx_http_create_request
18    55 nginx(11368):        -> ngx_http_process_request_line
19    72 nginx(11368):            -> ngx_http_read_request_header
20    78 nginx(11368):            <- ngx_http_read_request_header
21    91 nginx(11368):            -> ngx_http_parse_request_line
22    99 nginx(11368):            <- ngx_http_parse_request_line
23   109 nginx(11368):            -> ngx_http_process_request_uri
24   115 nginx(11368):            <- ngx_http_process_request_uri
25   127 nginx(11368):            -> ngx_http_process_request_headers
26   138 nginx(11368):                -> ngx_http_read_request_header
27   143 nginx(11368):                <- ngx_http_read_request_header
28   155 nginx(11368):                -> ngx_http_parse_header_line
29   163 nginx(11368):                <- ngx_http_parse_header_line
30   178 nginx(11368):                -> ngx_http_process_user_agent
31   185 nginx(11368):                <- ngx_http_process_user_agent
32   192 nginx(11368):                -> ngx_http_parse_header_line
33   198 nginx(11368):                <- ngx_http_parse_header_line
34   208 nginx(11368):                -> ngx_http_process_host
35   222 nginx(11368):                    -> ngx_http_validate_host
36   229 nginx(11368):                    <- ngx_http_validate_host
37   239 nginx(11368):                    -> ngx_http_set_virtual_server
38   252 nginx(11368):                        -> ngx_http_find_virtual_server
39   259 nginx(11368):                        <- ngx_http_find_virtual_server
40   263 nginx(11368):                    <- ngx_http_set_virtual_server
41   266 nginx(11368):                <- ngx_http_process_host
42   274 nginx(11368):                -> ngx_http_parse_header_line
43   279 nginx(11368):                <- ngx_http_parse_header_line
44   287 nginx(11368):                -> ngx_http_parse_header_line
45   292 nginx(11368):                <- ngx_http_parse_header_line
46
47   .....
48
49  2072 nginx(11368):                                <- ngx_http_finalize_request
50  2076 nginx(11368):                            <- ngx_http_core_content_phase
51  2079 nginx(11368):                        <- ngx_http_core_run_phases
52  2083 nginx(11368):                    <- ngx_http_handler
53  2093 nginx(11368):                    -> ngx_http_run_posted_requests
54  2100 nginx(11368):                    <- ngx_http_run_posted_requests
55  2103 nginx(11368):                <- ngx_http_process_request
56  2107 nginx(11368):            <- ngx_http_process_request_headers
57  2111 nginx(11368):        <- ngx_http_process_request_line
58  2114 nginx(11368):    <- ngx_http_wait_request_handler
59     0 nginx(11368):    -> ngx_http_keepalive_handler
60    26 nginx(11368):        -> ngx_http_close_connection
61    79 nginx(11368):        <- ngx_http_close_connection
62    83 nginx(11368):    <- ngx_http_keepalive_handler
7.16 查看代码执行路径
pp(): 输出当前被激活的探测点
1#cat ngx_http_process_request.stp
2probe process("/home/admin/tengine/bin/nginx").statement("ngx_http_process_request@src/http/ngx_http_request.c:*") {
3    printf("%s\n", pp())
4}
5
6#stap ngx_http_process_request.stp
7process("/home/admin/tengine/bin/nginx").statement("ngx_http_process_request@src/http/ngx_http_request.c:2762")
8process("/home/admin/tengine/bin/nginx").statement("ngx_http_process_request@src/http/ngx_http_request.c:2768")
9process("/home/admin/tengine/bin/nginx").statement("ngx_http_process_request@src/http/ngx_http_request.c:2771")
10process("/home/admin/tengine/bin/nginx").statement("ngx_http_process_request@src/http/ngx_http_request.c:2773")
11process("/home/admin/tengine/bin/nginx").statement("ngx_http_process_request@src/http/ngx_http_request.c:2774")
12process("/home/admin/tengine/bin/nginx").statement("ngx_http_process_request@src/http/ngx_http_request.c:2783")
13process("/home/admin/tengine/bin/nginx").statement("ngx_http_process_request@src/http/ngx_http_request.c:2835")
14process("/home/admin/tengine/bin/nginx").statement("ngx_http_process_request@src/http/ngx_http_request.c:2840")
15process("/home/admin/tengine/bin/nginx").statement("ngx_http_process_request@src/http/ngx_http_request.c:2841")
16process("/home/admin/tengine/bin/nginx").statement("ngx_http_process_request@src/http/ngx_http_request.c:2842")
17process("/home/admin/tengine/bin/nginx").statement("ngx_http_process_request@src/http/ngx_http_request.c:2843")
18process("/home/admin/tengine/bin/nginx").statement("ngx_http_process_request@src/http/ngx_http_request.c:2846")
19process("/home/admin/tengine/bin/nginx").statement("ngx_http_process_request@src/http/ngx_http_request.c:2847")
20process("/home/admin/tengine/bin/nginx").statement("ngx_http_process_request@src/http/ngx_http_request.c:2848")
21process("/home/admin/tengine/bin/nginx").statement("ngx_http_process_request@src/http/ngx_http_request.c:2850")
22process("/home/admin/tengine/bin/nginx").statement("ngx_http_process_request@src/http/ngx_http_request.c:2852")
23process("/home/admin/tengine/bin/nginx").statement("ngx_http_process_request@src/http/ngx_http_request.c:2853")
24^C
可以看出该函数哪些行被执行了。
7.17 巧用正则匹配过滤
在排查问题时,可以利用一些正则匹配来获取自己想要的信息,比如下面是只收集*.j9.com的堆栈:
1#
2cat debug_tengine_5xx.stp
3probe process("/home/admin/tengine/bin/t-coresystem-tengine-cdn").function("ngx_http_finalize_request").call {
4    rc = $rc
5    if (rc < 0) {
6        host = "(null)"
7        if ($r->headers_in->server->len != 0) {
8            host = user_string_n($r->headers_in->server->data, $r->headers_in->server->len)
9        } else {
10            cscf = &@cast($r->srv_conf, "ngx_http_core_srv_conf_t")[@var("ngx_http_core_module@src/http/ngx_http_core_module.c")->ctx_index]
11            if (cscf->server_name->len != 0) {
12                 host = user_string_n(cscf->server_name->data, cscf->server_name->len)
13            }
14        }
15
16        if (host =~ ".*\.j9\.com") {
17            printf("rc: %d, host: %s\n", rc, host)
18            print_ubacktrace()
19        }
20    }
21}
22
23#stap debug_tengine_5xx.stp
24WARNING: Missing unwind data for module, rerun with 'stap -d /lib64/libc-2.12.so'
25rc: -4, host: www.j9.com
26 0x49af2e : ngx_http_finalize_request+0xe/0x480 [/home/admin/tengine/bin/t-coresystem-tengine-cdn]
27 0x492eab : ngx_http_core_content_phase+0x2b/0x130 [/home/admin/tengine/bin/t-coresystem-tengine-cdn]
28 0x48e74d : ngx_http_core_run_phases+0x3d/0x50 [/home/admin/tengine/bin/t-coresystem-tengine-cdn]
29 0x514c3c : ngx_http_lua_socket_tcp_read+0x44c/0x590 [/home/admin/tengine/bin/t-coresystem-tengine-cdn]
30 0x513150 : ngx_http_lua_socket_tcp_handler+0x30/0x50 [/home/admin/tengine/bin/t-coresystem-tengine-cdn]
31 0x475b96 : ngx_event_process_posted+0x36/0x40 [/home/admin/tengine/bin/t-coresystem-tengine-cdn]
32 0x47d4d8 : ngx_worker_process_cycle+0x138/0x260 [/home/admin/tengine/bin/t-coresystem-tengine-cdn]
33 0x47a38a : ngx_spawn_process+0x1ca/0x5e0 [/home/admin/tengine/bin/t-coresystem-tengine-cdn]
34 0x47c73c : ngx_start_worker_processes+0x7c/0x100 [/home/admin/tengine/bin/t-coresystem-tengine-cdn]
35 0x47db5f : ngx_master_process_cycle+0x3af/0x9b0 [/home/admin/tengine/bin/t-coresystem-tengine-cdn]
36 0x45a740 : main+0xa90/0xb50 [/home/admin/tengine/bin/t-coresystem-tengine-cdn]
37 0x3623e1ecdd [/lib64/libc-2.12.so+0x1ecdd/0x38d000]
38rc: -4, host: cdn.j9.com
39 0x49af2e : ngx_http_finalize_request+0xe/0x480 [/home/admin/tengine/bin/t-coresystem-tengine-cdn]
40 0x492eab : ngx_http_core_content_phase+0x2b/0x130 [/home/admin/tengine/bin/t-coresystem-tengine-cdn]
41 0x48e74d : ngx_http_core_run_phases+0x3d/0x50 [/home/admin/tengine/bin/t-coresystem-tengine-cdn]
42 0x514c3c : ngx_http_lua_socket_tcp_read+0x44c/0x590 [/home/admin/tengine/bin/t-coresystem-tengine-cdn]
43 0x513150 : ngx_http_lua_socket_tcp_handler+0x30/0x50 [/home/admin/tengine/bin/t-coresystem-tengine-cdn]
44 0x475b96 : ngx_event_process_posted+0x36/0x40 [/home/admin/tengine/bin/t-coresystem-tengine-cdn]
45 0x47d4d8 : ngx_worker_process_cycle+0x138/0x260 [/home/admin/tengine/bin/t-coresystem-tengine-cdn]
46 0x47a38a : ngx_spawn_process+0x1ca/0x5e0 [/home/admin/tengine/bin/t-coresystem-tengine-cdn]
47 0x47c73c : ngx_start_worker_processes+0x7c/0x100 [/home/admin/tengine/bin/t-coresystem-tengine-cdn]
48 0x47db5f : ngx_master_process_cycle+0x3af/0x9b0 [/home/admin/tengine/bin/t-coresystem-tengine-cdn]
49 0x45a740 : main+0xa90/0xb50 [/home/admin/tengine/bin/t-coresystem-tengine-cdn]
50 0x3623e1ecdd [/lib64/libc-2.12.so+0x1ecdd/0x38d000]
7.18 关联数组用法
SystemTap的关联数组必须是全局变量,需要用global进行声明,其索引可以支持多达9项索引域,各域间以逗号隔开。支持 =, ++ 与 +=操作,其默认的初始值为0。 例如:
1root@j9 ~# cat stap_array.stp
2global reads
3probe vfs.read {
4    reads[execname(), pid()] ++
5}
6probe timer.s(3) {
7    foreach ([execname, pid] in reads) {
8        printf("%s(%d) : %d \n", execname, pid, reads[execname, pid])
9    }
10    print("============================\n")
11    delete reads
12}
13
14root@j9 ~# stap stap_array.stp
15stapio(18716) : 16
16rsyslogd(770) : 1
17docker(743) : 3
18IFSWatch(5594) : 30
19QThread(5594) : 6
20AliYunDunUpdate(1057) : 4
21sshd(15118) : 1
22sshd(15191) : 1
23============================
24stapio(18716) : 16
25sshd(15191) : 3
26docker(743) : 3
27IFSWatch(5594) : 30
28sshd(15118) : 2
29QThread(5594) : 12
30AliYunDunUpdate(1057) : 8
31============================
32^C
33root@j9 ~/systemtap#
也可以用+、-进行排序:
1root@j9 ~# cat stap_array.stp
2global reads
3probe vfs.read {
4    reads[execname(), pid()] ++
5}
6probe timer.s(3) {
7    foreach ([execname, pid+] in reads) {
8        printf("%s(%d) : %d \n", execname, pid, reads[execname, pid])
9    }
10    print("============================\n")
11    delete reads
12}
13
14root@j9 ~# stap stap_array.stp
15docker(743) : 3
16rsyslogd(770) : 1
17AliYunDunUpdate(1057) : 12
18IFSWatch(5594) : 30
19QThread(5594) : 12
20sshd(15118) : 2
21sshd(15191) : 2
22stapio(19021) : 16
23============================
24docker(743) : 3
25AliYunDunUpdate(1057) : 12
26IFSWatch(5594) : 30
27QThread(5594) : 6
28sshd(15118) : 1
29sshd(15191) : 19
30stapio(19021) : 16
31============================
32^C
33root@j9 ~#
7.19 调试内存泄漏以及内存重复释放
1probe begin {
2    printf("=============begin============\n")
3}
4
5//记录内存分配和释放的计数关联数组
6global g_mem_ref_tbl
7//记录内存分配和释放的调用堆栈关联数组
8global g_mem_bt_tbl
9
10probe process("/lib/x86_64-linux-gnu/libc.so.6").function("__libc_malloc").return, process("/lib/x86_64-linux-gnu/libc.so.6").function("__libc_calloc").return {
11    if (target() == pid()) {
12        if (g_mem_ref_tbl[$return] == 0) {
13            g_mem_ref_tbl[$return]++
14            g_mem_bt_tbl[$return] = sprint_ubacktrace()
15        }
16    }
17}
18
19probe process("/lib/x86_64-linux-gnu/libc.so.6").function("__libc_free").call {
20    if (target() == pid()) {
21        g_mem_ref_tbl[$mem]--
22
23        if (g_mem_ref_tbl[$mem] == 0) {
24            if ($mem != 0) {
25                //记录上次释放的调用堆栈
26                g_mem_bt_tbl[$mem] = sprint_ubacktrace()
27            }
28        } else if (g_mem_ref_tbl[$mem] < 0 && $mem != 0) {
29            //如果调用free已经失衡,那就出现了重复释放内存的问题,这里输出当前调用堆栈,以及这个地址上次释放的调用堆栈
30            printf("MMMMMMMMMMMMMMMMMMMMMMMMMMMM\n")
31            printf("g_mem_ref_tbl[%p]: %d\n", $mem, g_mem_ref_tbl[$mem])
32            print_ubacktrace()
33            printf("last free backtrace:\n%s\n", g_mem_bt_tbl[$mem])
34            printf("WWWWWWWWWWWWWWWWWWWWWWWWWWWW\n")
35        }
36    }
37}
38
39probe end {
40    //最后输出产生泄漏的内存是在哪里分配的
41    printf("=============end============\n")
42    foreach(mem in g_mem_ref_tbl) {
43        if (g_mem_ref_tbl[mem] > 0) {
44            printf("%s\n", g_mem_bt_tbl[mem])
45        }
46    }
47}
详细请看:http://blog.csdn.net/wangzuxi/article/details/44901285
7.20 嵌入C代码
在进程fork出子进程时打印出进程id和进程名:
1root@jusse ~/systemtap# cat copy_process.stp
2function getprocname:string(task:long)
3%{
4    struct task_struct *task = (struct task_struct *)STAP_ARG_task;
5    snprintf(STAP_RETVALUE, MAXSTRINGLEN, "pid: %d, comm: %s", task->pid, task->comm);
6%}
7
8function getprocid:long(task:long)
9%{
10    struct task_struct *task = (struct task_struct *)STAP_ARG_task;
11    STAP_RETURN(task->pid);
12%}
13
14probe kernel.function("copy_process").return
15{
16    printf("copy_process return: %p, pid: %d, getprocname: %s, getprocid: %d\n", $return, $return->pid, getprocname($return), getprocid($return));
17}
18root@jusse ~/systemtap# stap -g copy_process.stp
19copy_process return: 0xffff880039f61800, pid: 12212, getprocname: pid: 12212, comm: bash, getprocid: 12212
20copy_process return: 0xffff880039f61800, pid: 12212, getprocname: pid: 12212, comm: bash, getprocid: 12212
21copy_process return: 0xffff880039f63000, pid: 12213, getprocname: pid: 12213, comm: cc_epoll, getprocid: 12213
22copy_process return: 0xffff880039f63000, pid: 12213, getprocname: pid: 12213, comm: cc_epoll, getprocid: 12213
23copy_process return: 0xffff8800081a9800, pid: 12214, getprocname: pid: 12214, comm: cc_epoll, getprocid: 12214
24copy_process return: 0xffff8800081a9800, pid: 12214, getprocname: pid: 12214, comm: cc_epoll, getprocid: 12214
25copy_process return: 0xffff8800004d8000, pid: 12215, getprocname: pid: 12215, comm: cc_epoll, getprocid: 12215
26copy_process return: 0xffff8800004d8000, pid: 12215, getprocname: pid: 12215, comm: cc_epoll, getprocid: 12215
27copy_process return: 0xffff880000564800, pid: 12216, getprocname: pid: 12216, comm: cc_epoll, getprocid: 12216
28copy_process return: 0xffff880000564800, pid: 12216, getprocname: pid: 12216, comm: cc_epoll, getprocid: 12216
29copy_process return: 0xffff880000566000, pid: 12217, getprocname: pid: 12217, comm: cc_epoll, getprocid: 12217
30copy_process return: 0xffff880000566000, pid: 12217, getprocname: pid: 12217, comm: cc_epoll, getprocid: 12217
有三个需要注意的地方: 1)、SystemTap脚本里面嵌入C语言代码要在每个大括号前加%前缀,是%{…… %} 而不是%{ …… }%; 2)、获取脚本函数参数要用STAP_ARG_前缀; 3)、一般long等返回值用STAP_RETURN,而string类型返回值要用snprintf、strncat等方式把字符串复制到STAP_RETVALUE里面。
7.21 调试内核模块
这小节就不细讲了,这篇博客 (http://blog.chinaunix.net/uid-14528823-id-4726046.html) 写得很详细,这里只copy两个关键点过来记录一下: 要调试自己的内核模块,需要注意的有两个关键点: 1)、使用SystemTap调试内核模块,探测点的编写格式示例为: module("ext3").function("ext3_*") 2)、需要将自己的模块cp到/lib/modules/uname -r/extra目录中,否则找不到符号,如果/lib/modules/uname -r/目录下没有extra这个目录,自己mkdir一下就可以。
7.22 一些错误提示及解决办法
错误提示1:
1ERROR: MAXACTION exceeded near keyword at debug_connection.stp:86:9
2ERROR: MAXACTION exceeded near operator '->' at debug_connection.stp:84:30
解决办法: 加上stap参数:-DMAXACTION=102400,如果还报这种类型的错误,只需把102400调成更大的值即可。
错误提示2:
WARNING: Number of errors: 0, skipped probes: 82
解决办法: 加上-DMAXSKIPPED=102400和-DSTP_NO_OVERLOAD参数
还有一些可以去掉限制的宏:
MAXSTRINGLEN:这个宏会影响sprintf的buffer大小,默认为512字节。 MAXTRYLOCK:对全局变量进行try lock操作的次数,超过则次数还拿不到锁则放弃和跳过该探测点,默认值为1000.全局变量多的时候可以把这个宏开大一点。
(完)