
背景
Android开发过程中,开发的小伙伴对动态加载代码肯定不陌生。使用各个开源框架的中都应该有接触,其主要原理离不开ClassLoader等相关的类。这里我们会从Android中ClassLoader等相关类的源码入手,更好的理解和学习动态加载类的原理。
详细分析ClassLoader加载原理
ClassLoader 的继承关系如下:
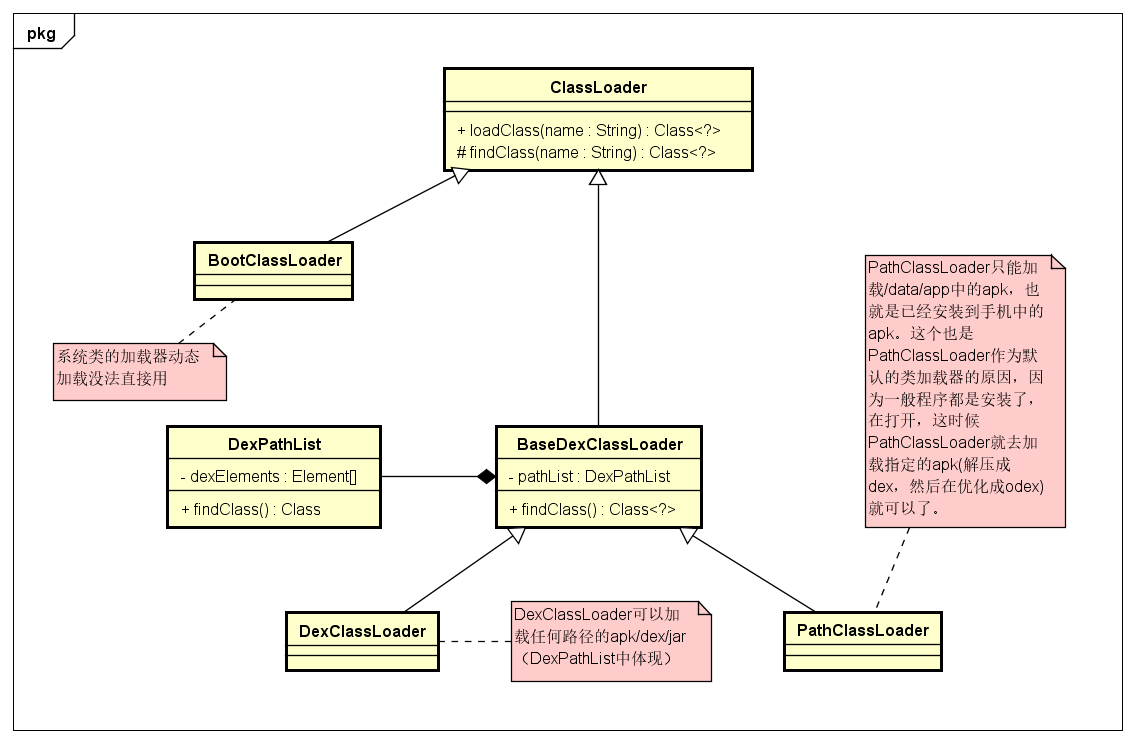
这里我们主要分析一下 BaseDexClassLoader.findClass()和 ClassLoader.loadClass()两个函数在系统中是怎么进行查找class的过程。
我们看一下系统加载类ClassLoader.loadClass()函数实现代码,在ClassLoader.java中:
1    protected Class<?> loadClass(String name, boolean resolve)
2        throws ClassNotFoundException
3    {
4            // 首先 检测是否已经加载过
5            Class<?> c = findLoadedClass(name);
6            if (c == null) {
7                try {
8                    if (parent != null) {
9                        //去调用父类的loadClass
10                        c = parent.loadClass(name, false);
11                    } else {
12                        c = findBootstrapClassOrNull(name);
13                    }
14                } catch (ClassNotFoundException e) {
15                    // ClassNotFoundException thrown if class not found
16                    // from the non-null parent class loader
17                }
18
19                if (c == null) {
20                    //未找到的情况下,使用findClass在当前dex查找
21                    c = findClass(name);
22                }
23            }
24            return c;
25    }
26
27    protected Class<?> findClass(String name) throws ClassNotFoundException {
28        throw new ClassNotFoundException(name);
29    }
- 1,
loadClass()先调用findLoadedClass()来判断当前类是否已加载; - 2, 未查找到递归去父类中查找是否加载到缓存;
- 3, 均未缓存,去
BootClassLoader中查找; - 4, 以上未发现,自顶级父类依次向下查找,调用
findClass()查找当前dex。
findLoadedClass函数分析
下图为
findLoadedClass()的调用流程;根据调用流程图配合源代码进行详细的分析原理。
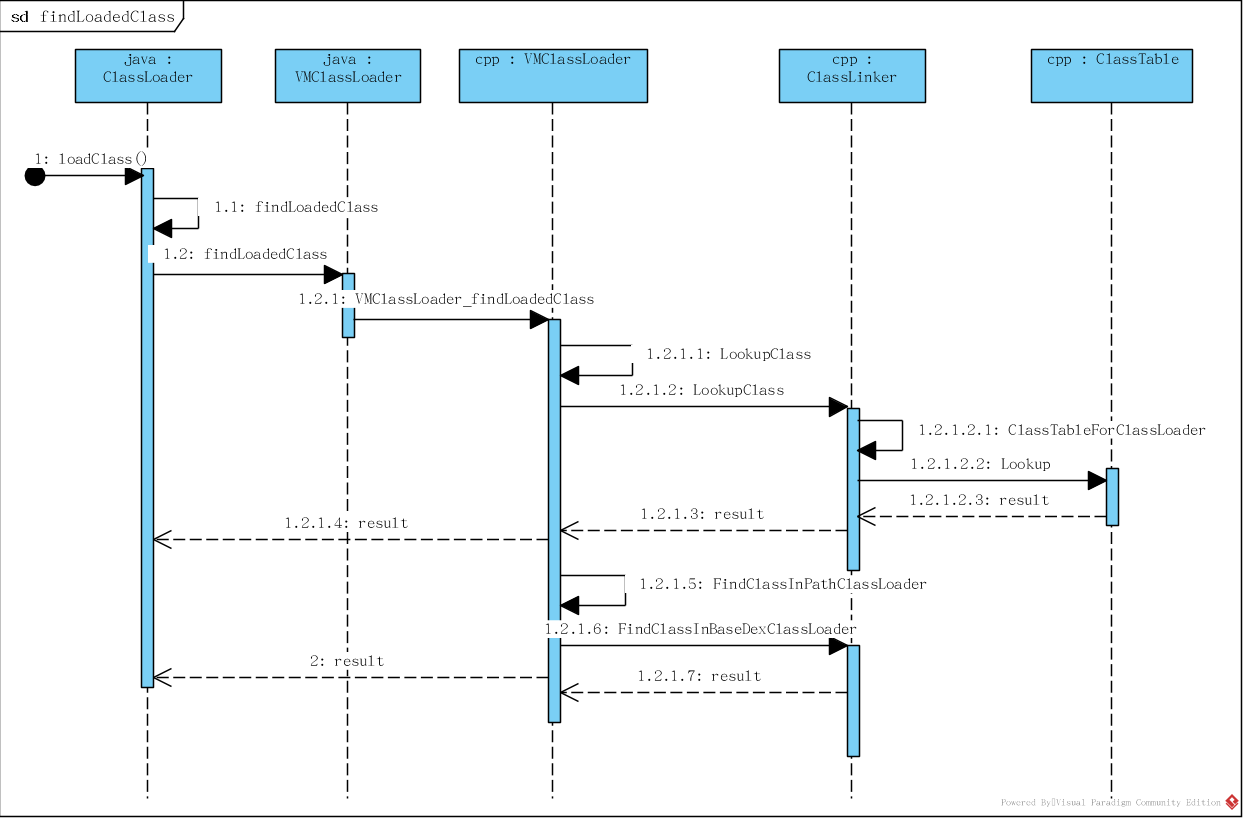
下面介绍对应的源代码实现部分:
1    protected final Class<?> findLoadedClass(String name) {
2        ClassLoader loader;
3        if (this == BootClassLoader.getInstance())
4            loader = null;
5        else
6            loader = this;
7        return VMClassLoader.findLoadedClass(loader, name);
8    }
函数最终统一调用VMClassLoader.findLoadedClass()进行查找类。
native static Class findLoadedClass(ClassLoader cl, String name);
实现在java_lang_VMClassLoader.cc文件中。
1static jclass VMClassLoader_findLoadedClass(JNIEnv* env, jclass, jobject javaLoader,jstring javaName) {
2  ....
3  ObjPtr<mirror::ClassLoader> loader = soa.Decode<mirror::ClassLoader>(javaLoader);
4  ClassLinker* cl = Runtime::Current()->GetClassLinker();
5
6  ObjPtr<mirror::Class> c = VMClassLoader::LookupClass(cl,
7                                                       soa.Self(),
8                                                       descriptor.c_str(),
9                                                       descriptor_hash,
10                                                       loader);
11  if (c != nullptr && c->IsResolved()) {
12    return soa.AddLocalReference<jclass>(c);
13  }
14  ...
15  if (loader != nullptr) {
16    // Try the common case.
17    StackHandleScope<1> hs(soa.Self());
18    c = VMClassLoader::FindClassInPathClassLoader(cl,
19                                                  soa,
20                                                  soa.Self(),
21                                                  descriptor.c_str(),
22                                                  descriptor_hash,
23                                                  hs.NewHandle(loader));
24    if (c != nullptr) {
25      return soa.AddLocalReference<jclass>(c);
26    }
27  }
28
29  return nullptr;
30}
31
32  static mirror::Class* LookupClass(ClassLinker* cl,
33                                    Thread* self,
34                                    const char* descriptor,
35                                    size_t hash,
36                                    ObjPtr<mirror::ClassLoader> class_loader)
37      REQUIRES(!Locks::classlinker_classes_lock_)
38      REQUIRES_SHARED(Locks::mutator_lock_) {
39    return cl->LookupClass(self, descriptor, hash, class_loader);
40  }
41  static ObjPtr<mirror::Class> FindClassInPathClassLoader(ClassLinker* cl,
42                                                          ScopedObjectAccessAlreadyRunnable& soa,
43                                                          Thread* self,
44                                                          const char* descriptor,
45                                                          size_t hash,
46                                                          Handle<mirror::ClassLoader> class_loader)
47      REQUIRES_SHARED(Locks::mutator_lock_) {
48    ObjPtr<mirror::Class> result;
49    if (cl->FindClassInBaseDexClassLoader(soa, self, descriptor, hash, class_loader, &result)) {
50      return result;
51    }
52    return nullptr;
53  }
上述代码findLoadedClass()分为两步;
- 1,通过
class_linker_->Lookupclass()进行查找加载类; - 2,如果没找到在通过
class_linker_->FindClassInPathClassLoader()进行查找。
class_linker_在虚拟机的启动startVM()函数的时候进行的初始化。<br>Runtime::class_linker_在Runtime::Init()函数的时候做的初始化。
1  if (UNLIKELY(IsAotCompiler())) {
2    class_linker_ = new AotClassLinker(intern_table_);
3  } else {
4    class_linker_ = new ClassLinker(intern_table_);
5  }
继续来分析ClassLinker::LookupClass()函数的具体实现;
1mirror::Class* ClassLinker::LookupClass(Thread* self,
2                                        const char* descriptor,
3                                        size_t hash,
4                                        ObjPtr<mirror::ClassLoader> class_loader) {
5  ReaderMutexLock mu(self, *Locks::classlinker_classes_lock_);
6  ClassTable* const class_table = ClassTableForClassLoader(class_loader);
7  if (class_table != nullptr) {
8    ObjPtr<mirror::Class> result = class_table->Lookup(descriptor, hash);
9    if (result != nullptr) {
10      return result.Ptr();
11    }
12  }
13  return nullptr;
14}
LookupClass()函数通过class_loader是否为nullptr,nullptr使用boot_class_table_来获取class_table, 否则获取当前ClassLoader的ClassTable。 class_table存放当前已经加载过的class,其实可以理解为class cache。如何进行dex 解析和aot等加载系统类和解析映射到内存中的不在此处展开分析。可以了解art虚拟机启动进行详细分析。
findClass()函数分析
下图是findClass的调用流程;根据调用流程图配合下面的代码进行详细的分析了解;
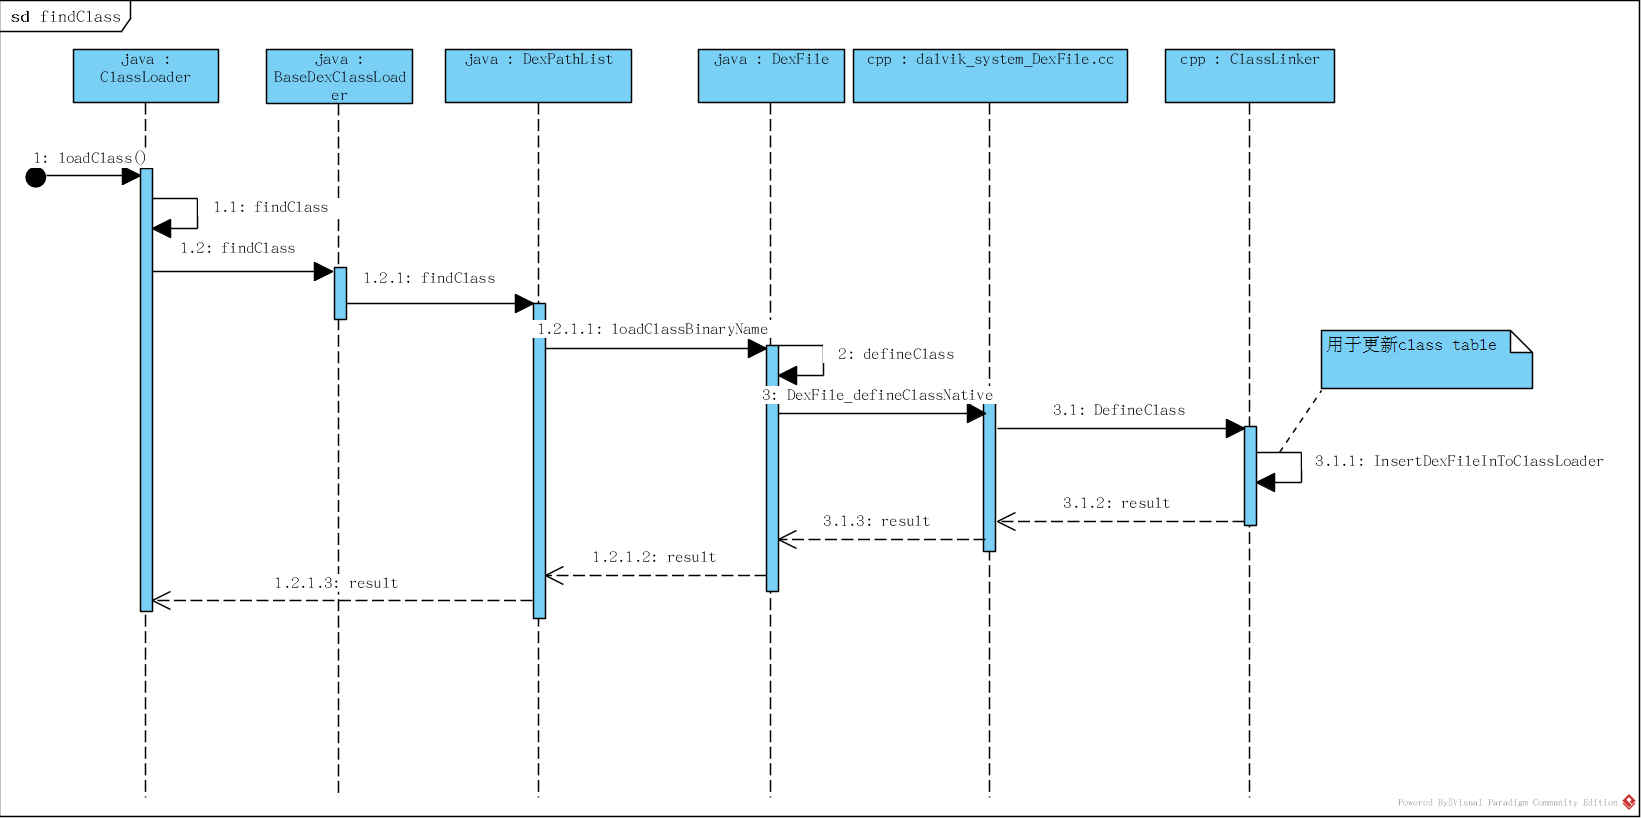
下面我们介绍对应的源代码实现部分。
findClass()函数在BaseDexClassLoader.java实现, 该函数主要做的事情就是在当前dex中查找类。如果类在当前dex中即返回。
代码如下:
1    @Override
2    protected Class<?> findClass(String name) throws ClassNotFoundException {
3        List<Throwable> suppressedExceptions = new ArrayList<Throwable>();
4        Class c = pathList.findClass(name, suppressedExceptions);
5        if (c == null) {
6            ...
7            throw cnfe;
8        }
9        return c;
10    }
pathList类型为DexPathList用来保存dexfile文件的句柄等dex的操作。pathList.findClass()实现在当前dex中查找类, pathList在new DexClassLoader()构造时初始化。
1  public BaseDexClassLoader(String dexPath, File optimizedDirectory,
2            String librarySearchPath, ClassLoader parent) {
3        ...
4        this.pathList = new DexPathList(this, dexPath, librarySearchPath, null);
5        ...
6    }
DexPathList.java
1public DexPathList(ClassLoader definingContext, String dexPath,
2            String librarySearchPath, File optimizedDirectory) {
3
4        ...
5        this.definingContext = definingContext;
6        ArrayList<IOException> suppressedExceptions = new ArrayList<IOException>();
7        // save dexPath for BaseDexClassLoader
8        this.dexElements = makeDexElements(splitDexPath(dexPath), optimizedDirectory,
9                                           suppressedExceptions, definingContext);
10
11        this.nativeLibraryDirectories = splitPaths(librarySearchPath, false);
12        this.systemNativeLibraryDirectories =
13                splitPaths(System.getProperty("java.library.path"), true);
14        List<File> allNativeLibraryDirectories = new ArrayList<>(nativeLibraryDirectories);
15        allNativeLibraryDirectories.addAll(systemNativeLibraryDirectories);
16
17        this.nativeLibraryPathElements = makePathElements(allNativeLibraryDirectories);
18
19        if (suppressedExceptions.size() > 0) {
20            this.dexElementsSuppressedExceptions =
21                suppressedExceptions.toArray(new IOException[suppressedExceptions.size()]);
22        } else {
23            dexElementsSuppressedExceptions = null;
24        }
25    }
dexElements数组保存dexfile文件句柄。具体实现在makeDexElements()函数中调用loadDexFile()函数加载dex。该函数实现:
1DexFile.java
2private static DexFile loadDexFile(File file, File optimizedDirectory, ClassLoader loader, Element[] elements) throws IOException {
3        if (optimizedDirectory == null) {
4            return new DexFile(file, loader, elements);
5        } else {
6            String optimizedPath = optimizedPathFor(file, optimizedDirectory);
7            return DexFile.loadDex(file.getPath(), optimizedPath, 0, loader, elements);
8        }
9    }
DexFile.loadDex()进行解析加载dex文件。关键代码如下:
1private DexFile(String sourceName, String outputName, int flags, ClassLoader loader, DexPathList.Element[] elements) throws IOException {
2    ...
3    mCookie = openDexFile(sourceName, outputName, flags, loader, elements);
4    mInternalCookie = mCookie;
5    mFileName = sourceName;
6    ...
7}
8
9private static Object openDexFile(String sourceName, String outputName, int flags, ClassLoader loader, DexPathList.Element[] elements) throws IOException {
10    // Use absolute paths to enable the use of relative paths when testing on host.
11    return openDexFileNative(new File(sourceName).getAbsolutePath(),
12                              (outputName == null)
13                              ? null
14                              : new File(outputName).getAbsolutePath(),
15                              flags,loader,elements);
16}
17
18private static native Object openDexFileNative(String sourceName, String outputName, int flags, ClassLoader loader, DexPathList.Element[] elements);
最终打开dexfile是通过native方法实现,并且返回mCookie, mCookie类型是int用来标识dex的唯一性。 openDexFileNative()实现代码:
1//`dalvik_system_DexFile.cc`
2static jobject DexFile_openDexFileNative(JNIEnv* env,
3                                         jclass,
4                                         jstring javaSourceName,
5                                         jstring javaOutputName,
6                                         jint flags ATTRIBUTE_UNUSED,
7                                         jobject class_loader,
8                                         jobjectArray dex_elements)
9{
10  ...
11  Runtime* const runtime = Runtime::Current();
12  ClassLinker* linker = runtime->GetClassLinker();
13
14  ...
15
16  dex_files = runtime->GetOatFileManager().OpenDexFilesFromOat(sourceName.c_str(), class_loader, dex_elements, /*out*/ &oat_file, /*out*/ &error_msgs);
17  ....
18}
上述代码通过aotManager打开并返回mCookie,进一步的打开实现不在此处展开。即上述已经已经填充elements[],下面开始展开pathList.findClass()函数的查找方式。
1    //BaseDexClassLoader.java
2    public Class<?> findClass(String name, List<Throwable> suppressed) {
3        for (Element element : dexElements) {
4            Class<?> clazz = element.findClass(name, definingContext, suppressed);
5            if (clazz != null) {
6                return clazz;
7            }
8        }
9
10        if (dexElementsSuppressedExceptions != null) {
11            suppressed.addAll(Arrays.asList(dexElementsSuppressedExceptions));
12        }
13        return null;
14    }
findClass()会遍历elements[], 每个element保存了dex的DexFile句柄,然后调用loadClassBinaryName()函数进行当前dex查找类。
1//DexPathList.java
2  public Class<?> findClass(String name, ClassLoader definingContext,
3          List<Throwable> suppressed) {
4      return dexFile != null ? dexFile.loadClassBinaryName(name, definingContext, suppressed): null;
5  }
6
7
8  public Class loadClassBinaryName(String name, ClassLoader loader, List<Throwable> suppressed) {
9      return defineClass(name, loader, mCookie, this, suppressed);
10  }
11
12  private static Class defineClass(String name, ClassLoader loader, Object cookie, DexFile dexFile, List<Throwable> suppressed) {
13      Class result = null;
14      try {
15          result = defineClassNative(name, loader, cookie, dexFile);
16      } catch (NoClassDefFoundError e) {
17          if (suppressed != null) {
18              suppressed.add(e);
19          }
20      } catch (ClassNotFoundException e) {
21          if (suppressed != null) {
22              suppressed.add(e);
23          }
24      }
25      return result;
26  }
真正去dex或者内存中查找类的函数在native中defineClassNative()实现, 我们来分析一下真正的实现过程:
1private static native Class defineClassNative(String name, ClassLoader loader, Object cookie, DexFile dexFile)
2
3//dalvik_system_DexFile.cc
4static jclass DexFile_defineClassNative(JNIEnv* env,
5                                        jclass,
6                                        jstring javaName,
7                                        jobject javaLoader,
8                                        jobject cookie,
9                                        jobject dexFile) {
10  std::vector<const DexFile*> dex_files;
11  const OatFile* oat_file;
12  if (!ConvertJavaArrayToDexFiles(env, cookie, /*out*/ dex_files, /*out*/ oat_file)) {
13    ...
14    return nullptr;
15  }
16
17  ScopedUtfChars class_name(env, javaName);
18  ...
19
20  const std::string descriptor(DotToDescriptor(class_name.c_str()));
21  const size_t hash(ComputeModifiedUtf8Hash(descriptor.c_str()));
22  for (auto& dex_file : dex_files) {
23      ...
24      ClassLinker* class_linker = Runtime::Current()->GetClassLinker();
25      ObjPtr<mirror::Class> result = class_linker->DefineClass(soa.Self(),
26                                                               descriptor.c_str(),
27                                                               hash,
28                                                               class_loader,
29                                                               *dex_file,
30                                                               *dex_class_def);
31      // Add the used dex file. This only required for the DexFile.loadClass API since normal
32      // class loaders already keep their dex files live.
33      class_linker->InsertDexFileInToClassLoader(soa.Decode<mirror::Object>(dexFile),
34                                                 class_loader.Get());
35      ....
36        return soa.AddLocalReference<jclass>(result);
37      }
38    }
39    ...
40  return nullptr;
41}
通过Runtime拿到当前的ClassLinker对象,然后通过class_linker->DefineClass()在当前dex中进行查找类。然后把找到的类通过class_linker->InsertDexFileInToClassLoader()插入到class_table中进行缓存,返回查找到的类。这里不进一步展开分析。
<br>Android ClassLoader加载过程的源代码分析到此已经分析的差不多了,如果想深入的了解具体原理,可以自己看源代码的实现。 这里就介绍到这里。初次写技术分享的文章,如有错误请指正,感谢!
(360技术原创内容,转载请务必保留文末二维码,谢谢~)

关于360技术
360技术是360技术团队打造的技术分享公众号,每天推送技术干货内容
更多技术信息欢迎关注“360技术”微信公众号