
1. Spring简介
1. Spring的出现是为了取代EJB(Enterprise JavaBean)的臃肿、低效、脱离现实的缺点。Spring致力于J2EE应用的各层(表现层、业务层、持久层)的解决方案,Spring是企业应用开发的“一站式”选择。
2. 定义:Spring是分层的JavaSE/EE应用一站式的轻量级开源框架(官网: http://spring.io/ ),以Ioc(Inverse of control)控制反转和Aop(Aspect Oriented Programming)面向切面编程为核心。
3. 优点:
- 轻量级:针对EJB来说,使用方便。
- 一站式:spring针对各各层(表现层、业务层、持久层)提出解决方案。
- 表现层:springmvc(spring自己的mvc框架),提供和其它web框架整合方案。
- 业务层:spring基于aop(面向切面编程)思想进行事务控制。
- 持久层:spring自己提供JdbcTemplate,提供和其它持久层框架整合的方案。
4. spring核心 :Ioc(控制反转)和aop(面向切面编程)。重点是:IOC,spring要管理各各层的bean。
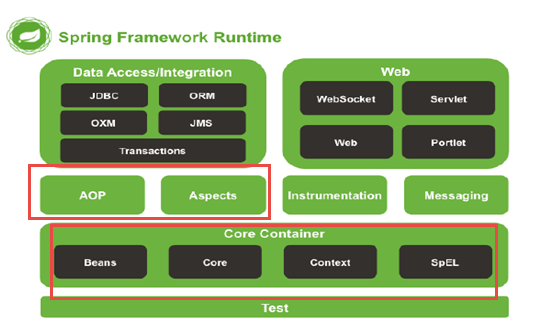
5. Spring模块组件图:
2. Spring IOC
1. 什么是IOC
1. 不使用ioc,代码中创建一个对象直接操作接口实现类,并没有面向接口开发。面向接口开发指的是调用接口的方法,只面向接口而不面向接口实现类,因为一个接口可能有多个实现类。而没有面向接口开发的问题就是调用接口的类和接口实现类之间存在直接耦合。比如下列代码
1//老板向一个写字员发出命令去做一个工作
2public class Boss {
3	private Writer emp;//直接使用Writer类,与Boss产生强依赖关系,直接耦合
4
5	//老板只能向写字员发出命令,如果想要向一个秘书或其他员工发出命令则无法实现,这显然是不合理的
6	public void order(){
7		emp=new Writer();
8		emp.doJob();
9	}
10}
11public class Writer{
12	public void doJob(){
13		System.out.println("do something");
14	}
15}
面向接口开发的改进代码:
1//老板向一个员工发出命令去做一个工作
2public class Boss {
3	private Employee emp;//使用Employee接口,将具体实现类与Boss解耦合,这样就大大增强了代码的可重用性并减弱耦合度
4
5	//老板可以向任何一个实现了Employee接口的员工类发出命令
6	public void order(){
7		emp=new Writer();
8		emp.doJob();
9	}
10}
11public class Writer implements Employee{
12	public void doJob(){
13		System.out.println("do something");
14	}
15}
16public interface Employee {
17	public void doJob();
18}
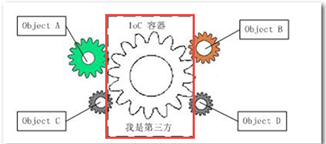
2. IOC:Inverse of Control,即控制反转。是指将原来程序中自己创建实现类对象的控制权反转到IOC容器中。只需要通过IOC获了对象的实例,将IOC当成一个黑盒子、工厂。对象只与工厂耦合,对象之间没有耦合。而上面的代码也可以改为
1//老板向一个员工发出命令去做一个工作
2public class Boss {
3	private Employee emp;//使用Employee接口,这样就大大增强了代码的可重用性并减弱耦合度
4	//老板可以向任何一个实现了Employee接口的员工类发出命令,但这里的Employee的具体实现类对象由IOC容器提供,通过IOC容器来生成所需要的对象,这样可以将Boss类与具体员工类解耦,所有的类之间的依赖关系都由IOC容器进行管理,便于修改维护
5
6	public void order(){
7        emp=IOC容器.getEmp();
8		emp.doJob();
9	}
10}
11public class Writer implements Employee{
12	public void doJob(){
13		System.out.println("do something");
14	}
15}
16public interface Employee {
17	public void doJob();
18}
2. Spring IOC的使用
1. 首先建立一个Maven项目,通过Maven来导入所需要的jar包,主要是spring-webmvc.jar以及其相关的依赖jar包,使用4.3.版本,另外要注意,JDK版本与Spring版本的兼容问题,Spring4.0以后的版本建议使用JDK1.8版本;其次要导入commons-logging.jar,该包是Spring所使用的JCL日志体系jar包,只有相关接口,具体的实现类还需要导入log4j.jar。
2. 编写Spring IOC容器的配置文件:是一个xml文件
-
引入xml文件Spring的相关标签约束,加入的每一个Spring的相关jar包里都会包含该jar包相关的约束文件,具体如何添加可以网上搜索相关方法,这里给一个基本全面的标签约束,可以直接复制粘贴使用,xsi:schemaLocation中可以修改每个版本的约束文件,比如Spring4.3版本的beans相关约束可以将http://www.springframework.org/schema/beans http://www.springframework.org/schema/beans/spring-beans-3.2.xsd 改为 http://www.springframework.org/schema/beans http://www.springframework.org/schema/beans/****spring-beans-4.3.xsd
1<beans xmlns="http://www.springframework.org/schema/beans" 2 xmlns:xsi="http://www.w3.org/2001/XMLSchema-instance" 3 xmlns:context="http://www.springframework.org/schema/context" 4 xmlns:jdbc="http://www.springframework.org/schema/jdbc" 5 xmlns:jee="http://www.springframework.org/schema/jee" 6 xmlns:tx="http://www.springframework.org/schema/tx" 7 xmlns:aop="http://www.springframework.org/schema/aop" 8 xmlns:mvc="http://www.springframework.org/schema/mvc" 9 xmlns:util="http://www.springframework.org/schema/util" 10 xmlns:jpa="http://www.springframework.org/schema/data/jpa" 11 xsi:schemaLocation=" 12 http://www.springframework.org/schema/beans http://www.springframework.org/schema/beans/spring-beans-3.2.xsd 13 http://www.springframework.org/schema/context http://www.springframework.org/schema/context/spring-context-3.2.xsd 14 http://www.springframework.org/schema/jdbc http://www.springframework.org/schema/jdbc/spring-jdbc-3.2.xsd 15 http://www.springframework.org/schema/jee http://www.springframework.org/schema/jee/spring-jee-3.2.xsd 16 http://www.springframework.org/schema/tx http://www.springframework.org/schema/tx/spring-tx-3.2.xsd 17 http://www.springframework.org/schema/data/jpa http://www.springframework.org/schema/data/jpa/spring-jpa-1.3.xsd 18 http://www.springframework.org/schema/aop http://www.springframework.org/schema/aop/spring-aop-3.2.xsd 19 http://www.springframework.org/schema/mvc http://www.springframework.org/schema/mvc/spring-mvc-3.2.xsd 20 http://www.springframework.org/schema/util http://www.springframework.org/schema/util/spring-util-3.2.xsd"> -
在xml文件中的beans标签内添加bean,bean标签内有多个属性以及一些嵌套标签,用于定义bean的相关操作,下面简单定义一个bean作为示例
1//注意,一个JavaBean类的规范实现
2public class UserData{
3	private String cn_user_id;
4	private String cn_user_name;
5	private String cn_user_password;
6	public static UserData getUser(){
7		return new UserData("9527","9527","9527");
8	}
9	public UserData(String cn_user_id, String cn_user_name, String cn_user_password) {
10		super();
11		this.cn_user_id = cn_user_id;
12		this.cn_user_name = cn_user_name;
13		this.cn_user_password = cn_user_password;
14	}
15//IOC容器中的bean必须有无参构造方法,也就是默认构造方法
16	public UserData() {
17		super();
18	}
19	public String getCn_user_id() {
20		return cn_user_id;
21	}
22	public void setCn_user_id(String cn_user_id) {
23		this.cn_user_id = cn_user_id;
24	}
25	public String getCn_user_name() {
26		return cn_user_name;
27	}
28	public void setCn_user_name(String cn_user_name) {
29		this.cn_user_name = cn_user_name;
30	}
31	public String getCn_user_password() {
32		return cn_user_password;
33	}
34	public void setCn_user_password(String cn_user_password) {
35		this.cn_user_password = cn_user_password;
36	}
37
38}
39
40
41<?xml version="1.0" encoding="UTF-8"?>
42<beans xmlns="http://www.springframework.org/schema/beans"
43	xsi:schemaLocation="
44		http://www.springframework.org/schema/beans http://www.springframework.org/schema/beans/spring-beans-3.2.xsd">
45	<!-- bean标签:
46		1.id/name属性:用来标示bean的名称,该名称在SpringIOC容器中不允许重复,如果不指定名称,将默认为类路径
47		2.class属性:IOC要管理实现类的全限定路径名,IOC将根据此路径去实例化类对象
48	 -->
49	<bean id="user" class="com.cloud_note.entity.UserData"></bean>
50	<!-- SpringIOC实例化bean的三种方法:
51	1.默认无参构造器
52	2.有参构造器
53	3.静态工厂方法
54	 -->
55	<!-- 有参构造器方法 -->
56	<bean id="user1" class="com.cloud_note.entity.UserData">
57	<!-- index指参数在参数列表的下标,从0开始 -->
58		<constructor-arg index="0" value="9527" type="java.lang.String"></constructor-arg>
59		<constructor-arg index="1" value="9527" type="java.lang.String"></constructor-arg>
60		<constructor-arg index="2" value="9527" type="java.lang.String"></constructor-arg>
61	</bean>
62	<!-- 静态工厂方法,通过类中的静态工厂方法生成bean实例 -->
63	<bean id="user2" class="com.cloud_note.entity.UserData" factory-method="getUser">
64
65	<!-- bean作用域:
66	1.singleton:单例模式,即在Spring容器启动时只生成一个bean实例,在每次访问(getBean)时都将此对象返回,Spring容器默认此方式
67	2.prototype:多例模式,即每次访问(getBean)Spring容器都会返回一个新实例
68	3.request
69	4.session
70	 -->
71	<bean id="user" class="com.cloud_note.entity.UserData" scope="singleton"></bean>
72	<bean id="user1" class="com.cloud_note.entity.UserData" scope="prototype"></bean>
73	</bean>
74</beans>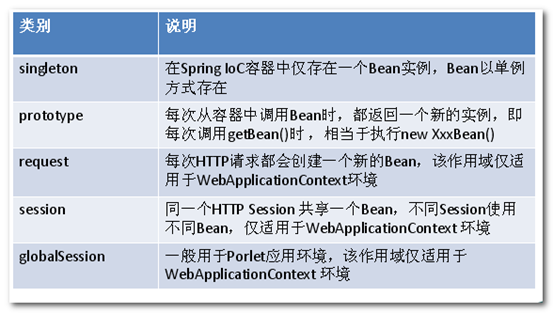
-
编写测试代码,测试是否能从上面配置的IOC容器中取出指定的bean对象
1//测试从Spring中获取bean实例,该测试方法需要导入junit的jar包,来使用@Test相关注解
2public class TestCase1 {
3	//测试无参构造器方法
4	@Test
5	public void test1(){
6		//1.获取SpringIOC容器对象
7		ApplicationContext app=new ClassPathXmlApplicationContext("config/applicationContext.xml");
8		//2.从SpringIOC中获取对应的bean实例
9		UserData user=(UserData) app.getBean("user");
10		System.out.println("获取成功");
11	}
12	//测试有参构造器方法
13	@Test
14	public void test2(){
15		ApplicationContext app=new ClassPathXmlApplicationContext("config/applicationContext.xml");
16		UserData user=(UserData) app.getBean("user1");
17		System.out.println(user.getCn_user_id());
18	}
19	//测试静态工厂方法
20	@Test
21	public void test3(){
22		ApplicationContext app=new ClassPathXmlApplicationContext("config/applicationContext.xml");
23		UserData user=(UserData) app.getBean("user2");
24		System.out.println(user.getCn_user_id());
25	}
26
27	//获取SpringIOC容器对象的方法
28	@Test
29	public void test4(){
30		//1.FileSystemXmlApplicationContext是通过加载文件系统路径下的配置文件来创建一个容器实例
31		ApplicationContext app1=new FileSystemXmlApplicationContext("/src/main/resources/config/applicationContext.xml");
32		//2.ClassPathXmlApplicationContext是通过加载classpath路径下的配置文件来创建一个容器实例
33		ApplicationContext app2=new ClassPathXmlApplicationContext("config/applicationContext.xml");
34		//3.同时加载多个配置文件,可以连续填写多个路径参数或传入数组,或者通过通配符来加载
35		ApplicationContext app3=new ClassPathXmlApplicationContext("config/applicationContext.xml","config/applicationContext1.xml");
36		String[] configs=new String[]{"config/applicationContext.xml","config/applicationContext1.xml"};
37		ApplicationContext app4=new ClassPathXmlApplicationContext(configs);
38		ApplicationContext app5=new ClassPathXmlApplicationContext("classpath:config/applicationContext*.xml");
39	}
3. 使用注解向IOC容器中添加bean:
-
首先要在Spring配置文件中开启组件扫描
1<?xml version="1.0" encoding="UTF-8"?> 2<!--省略xml约束--> 3<beans> 4 <!-- Spring注解开发:通过注解来管理Spring的bean --> 5 <!-- 开启组件扫描,用以扫描指定包内带有实例化注解的类 --> 6 <context:component-scan base-package="package"></context:component-scan> 7 8</beans> -
对象实例化的注解有四种,分别是:通过注解进行实例化时,必须保证类中有默认构造方法
- @Component:指定该类为一个普通bean,默认id为类名首字母小写,也可指定id,如@Component("user")
- @Repository:指定该类为一个持久层bean,默认id为类名首字母小写,也可指定id,如@Repository("user")
- @Service:指定该类为一个业务层bean,默认id为类名首字母小写,也可指定id,如@Service("user")
- @Controller:指定该类为一个控制层bean,默认id为类名首字母小写,也可指定id,如@Controller("user")
-
@Scope("prototype"/"singleton"):该注解指定bean的作用域,该注解要与以上注解搭配使用,singleton表示容器中只生成一个实例,也就是单例模式,默认为该模式;而prototype表示会生成多个实例,每访问一次容器就创建一次
3. DI(依赖注入)
1. 即IOC容器在运行期间动态的将对象的依赖关系注入到对象的属性中,底层原理为:首先生成类对象,依据所依赖的属性类型生成属性实例,然后通过set方法来实现注入,或通过有参构造器在生成类的实例时注入所依赖的属性实例
2. 依赖注入的实现方式有两种:有参构造器实现注入、set方法实现注入
3. 通过配置文件配置依赖注入:有参构造器在上面的IOC介绍中已经演示
1<?xml version="1.0" encoding="UTF-8"?>
2<beans xmlns="http://www.springframework.org/schema/beans"
3	xmlns:xsi="http://www.w3.org/2001/XMLSchema-instance"
4	xmlns:context="http://www.springframework.org/schema/context"
5	xmlns:jdbc="http://www.springframework.org/schema/jdbc"
6	xmlns:jee="http://www.springframework.org/schema/jee"
7	xmlns:tx="http://www.springframework.org/schema/tx"
8	xmlns:aop="http://www.springframework.org/schema/aop"
9	xmlns:mvc="http://www.springframework.org/schema/mvc"
10	xmlns:util="http://www.springframework.org/schema/util"
11	xmlns:jpa="http://www.springframework.org/schema/data/jpa"
12	xsi:schemaLocation="
13		http://www.springframework.org/schema/beans http://www.springframework.org/schema/beans/spring-beans-3.2.xsd
14		http://www.springframework.org/schema/context http://www.springframework.org/schema/context/spring-context-3.2.xsd
15		http://www.springframework.org/schema/jdbc http://www.springframework.org/schema/jdbc/spring-jdbc-3.2.xsd
16		http://www.springframework.org/schema/jee http://www.springframework.org/schema/jee/spring-jee-3.2.xsd
17		http://www.springframework.org/schema/tx http://www.springframework.org/schema/tx/spring-tx-3.2.xsd
18		http://www.springframework.org/schema/data/jpa http://www.springframework.org/schema/data/jpa/spring-jpa-1.3.xsd
19		http://www.springframework.org/schema/aop http://www.springframework.org/schema/aop/spring-aop-3.2.xsd
20		http://www.springframework.org/schema/mvc http://www.springframework.org/schema/mvc/spring-mvc-3.2.xsd
21		http://www.springframework.org/schema/util http://www.springframework.org/schema/util/spring-util-3.2.xsd">
22
23	<!--set方法实现注入-->
24	<bean id="user" class="UserData"></bean>
25	<bean id="book" class="Book">
26	<!-- property标签:指定注入的属性
27		name属性用来指定类中需要注入的属性名,由set方法后的字符串首字母小写决定,即调用注入的set方法时将由set+name属性值
28		来决定调用那个set方法
29		ref属性表示被注入的bean的id
30		value属性表示一个具体的值,用于java中的简单类型
31	-->
32		<property name="user" ref="user"></property>
33	</bean>
34
35	<!-- set方法可以注入的属性类型 -->
36	<bean id="queryVo" class="QueryVo">
37	<!-- 基本类型 -->
38	<property name="t1" value="vn"></property>
39	<property name="t2" value="1"></property>
40	<!-- pojo类型 -->
41	<property name="t3" ref="user"></property>
42	<!-- List类型   List<String> -->
43	<property name="t4">
44		<list>
45			<value>vn</value>
46		</list>
47	</property>
48	<!-- List类型   List<UserData> -->
49	<property name="t5">
50		<list>
51			<ref bean="user"/>
52		</list>
53	</property>
54	<!-- Map类型 -->
55	<property name="t6">
56		<map>
57			<entry key="1" value="vn"></entry>
58		</map>
59	</property>
60	<!-- Properties类型 -->
61	<property name="t7">
62		<props>
63			<prop key="name">vn</prop>
64		</props>
65	</property>
66	</bean>
67</beans>
4. 通过注解进行依赖注入:
-
首先需要开启Spring组件扫描,并且要保证注入的属性实例的类以及被注入的类都在Spring容器中
-
@Autowired:直接标记在属性上,依据属性类型进行注入,即依据该类型在容器中查找相同类型或基类的bean进行注入,若依据类型查找到多个bean,则会报错,可以在要注入的bean的类前添加实例注解时指定bean的id即可避免,也可以写在set方法上, @Autowired会依据set方法中的参数类型来查找bean
-
@Qualifier("id"):该注解要写在@Autowired之后,搭配使用,用来指定要注入的bean的id,也可以避免上面的错误, 这两个注解也可以写在set方法上
-
@Resource(name="user"):相当于@Autowired+@Qualifier(""),直接依据id查找,@Autowired是由Spring提供的,而@Resource是由jdk提供的
@Component("book") @Scope("prototype") public class Book implements Serializable { private String cn_notebook_id;
1//@Autowired
2//@Qualifier("user")
3@Resource(name="user")
4private UserData user;
5
6public UserData getUser() {
7	return user;
8}
9
10//@Autowired
11//@Qualifier("user")
12public void setUser(UserData user) {
13	this.user = user;
14}
15public String getCn_notebook_id() {
16	return cn_notebook_id;
17}
18public void setCn_notebook_id(String cn_notebook_id) {
19	this.cn_notebook_id = cn_notebook_id;
20}
}