
1. cobbler简介
cobbler官网:http://cobbler.github.io/
Cobbler是一个Linux服务器安装的服务,可以通过网络启动(PXE)的方式来快速安装、重装物理服务器和虚拟机,同时还可以管理DHCP,DNS等。
Cobbler可以使用命令行方式管理,也提供了基于Web的界面管理工具(cobbler-web),还提供了API接口,可以方便二次开发使用。
Cobbler是较早前的kickstart的升级版,优点是比较容易配置,还自带web界面比较易于管理。
Cobbler内置了一个轻量级配置管理系统,但它也支持和其它配置管理系统集成,如Puppet,暂时不支持SaltStack。
2、cobbler集成的服务
- PXE服务支持
- DHCP服务管理
- DNS服务管理(可选bind,dnsmasq)
- 电源管理
- Kickstart服务支持
- YUM仓库管理
- TFTP(PXE启动时需要)
- Apache(提供kickstart的安装源,并提供定制化的kickstart配置)
3、cobbler配置文件详解
cobbler配置文件目录在/etc/cobbler
1配置文件                                                                        作用
2/etc/cobbler/settings                                    cobbler 主配置文件
3/etc/cobbler/iso/                                              iso模板配置文件
4/etc/cobbler/pxe                                            pxe模板配置文件
5/etc/cobbler/power                                      电源配置文件
6/etc/cobbler/user.conf                               web服务授权配置文件
7/etc/cobbler/users.digest                               web访问的用户名密码配置文件
8/etc/cobbler/dhcp.template                       dhcp服务器的的配置模板
9/etc/cobbler/dnsmasq.templat e              dns服务器的配置模板
10/etc/cobbler/tftpd.template                         tftp服务的配置模板
11/etc/cobbler/modules.conf                           模块的配置文件
-
cobbler数据目录
1目录 作用 2/var/lib/cobbler/config/ 用于存放distros,system,profiles等信息配置文件 3/var/lib/cobbler/triggers/ 用于存放用户定义的cobbler命令 4/var/lib/cobbler/kickstart/ 默认存放kickstart文件 5/var/lib/cobbler/loaders/ 存放各种引导程序以镜像目录 6/var/www/cobbler/ks_mirror/ 导入的发行版系统的所有数据 7/var/www/cobbler/images/ 导入发行版的kernel和initrd镜像用于远程网络启动 8/var/www/cobbler/repo_mirror/ yum仓库存储目录 -
cobbler的日志文件
1日志文件路径 说明 2/var/log/cobbler/installing 客户端安装日志 3/var/log/cobbler/cobbler.log cobbler日志 -
cobbler命令详解
1cobbler check            //核对当前设置是否有问题
2cobbler list                //列出所有的cobbler元素
3cobbler report           //列出元素的详细信息
4cobbler sync            //同步配置到数据目录,更改配置最好都要执行下
5cobbler reposync     //同步yum仓库
6cobbler distro          //查看导入的发行版系统信息
7cobbler system        //查看添加的系统信息
8cobbler profile         //查看配置信息
4.cobbler 部署
4.2cobbler 部署
1//关闭防火墙
2[root@localhost ~]# systemctl  stop  firewalld
3[root@localhost ~]# systemctl  disable  firewalld
4Removed symlink /etc/systemd/system/multi-user.target.wants/firewalld.service.
5Removed symlink /etc/systemd/system/dbus-org.fedoraproject.FirewallD1.service.
6[root@localhost ~]# vim  /etc/selinux/config
7 **//将第六行中的 enforcing 改为 disabled**
8# This file controls the state of SELinux on the system.
9# SELINUX= can take one of these three values:
10#     enforcing - SELinux security policy is enforced.
11#     permissive - SELinux prints warnings instead of enforcing.
12#     disabled - No SELinux policy is loaded.
13SELINUX=disabled
14
15[root@localhost ~]# setenforce   0
16
17//配置yum源
18//下载之前请确保电脑有网和本地仓库可用
19//163网络源下载好后请将原来的源移走或删除
20[root@localhost yum.repos.d]# yum  install  -y  wget
21[root@server ~]#  curl -o /etc/yum.repos.d/CentOS7-Base-163.repo http://mirrors.163.com/.help/CentOS7-Base-163.repo
22[root@server ~]# sed -i 's/\$releasever/7/g' /etc/yum.repos.d/CentOS7-Base-163.repo
23[root@server ~]# sed -i 's/^enabled=.*/enabled=1/g' /etc/yum.repos.d/CentOS7-Base-163.repo
24[root@server ~]# yum install -y epel-release
25
26//安装cobbler以及相关的软件
27[root@server ~]#  yum -y install httpd dhcp tftp python-ctypes cobbler xinetd cobbler-web pykickstart
28
29//启动服务并设置开机自启
30[root@server ~]# systemctl start httpd
31[root@server ~]# systemctl start cobblerd
32[root@server ~]# systemctl enable httpd
33Created symlink from /etc/systemd/system/multi-user.target.wants/httpd.service to /usr/lib/systemd/system/httpd.service.
34[root@sever ~]# systemctl enable cobblerd
35Created symlink from /etc/systemd/system/multi-user.target.wants/cobblerd.service to /usr/lib/systemd/system/cobblerd.service.
36
37//修改server的ip地址为本机ip
38[root@server ~]# sed -i 's/^server: 127.0.0.1/server: 192.168.66.130/' /etc/cobbler/settings
39
40//设置tftp的ip地址为本机ip
41[root@server ~]# sed -i 's/^next_server: 127.0.0.1/next_server: 192.168.66.130/' /etc/cobbler/settings
42
43//开启tftp
44[root@server ~]# sed -i '/disable/s/yes/no/g' /etc/xinetd.d/tftp
45
46//下载缺失文件
47[root@server ~]# cobbler get-loaders
48task started: 2020-05-28_172454_get_loaders
49task started (id=Download Bootloader Content, time=Thu May 28 17:24:54 2020)
50downloading https://cobbler.github.io/loaders/README to /var/lib/cobbler/loaders/README
51downloading https://cobbler.github.io/loaders/COPYING.elilo to /var/lib/cobbler/loaders/COPYING.elilo
52downloading https://cobbler.github.io/loaders/COPYING.yaboot to /var/lib/cobbler/loaders/COPYING.yaboot
53downloading https://cobbler.github.io/loaders/COPYING.syslinux to /var/lib/cobbler/loaders/COPYING.syslinux
54downloading https://cobbler.github.io/loaders/elilo-3.8-ia64.efi to /var/lib/cobbler/loaders/elilo-ia64.efi
55downloading https://cobbler.github.io/loaders/yaboot-1.3.17 to /var/lib/cobbler/loaders/yaboot
56downloading https://cobbler.github.io/loaders/pxelinux.0-3.86 to /var/lib/cobbler/loaders/pxelinux.0
57downloading https://cobbler.github.io/loaders/menu.c32-3.86 to /var/lib/cobbler/loaders/menu.c32
58downloading https://cobbler.github.io/loaders/grub-0.97-x86.efi to /var/lib/cobbler/loaders/grub-x86.efi
59downloading https://cobbler.github.io/loaders/grub-0.97-x86_64.efi to /var/lib/cobbler/loaders/grub-x86_64.efi
60*** TASK COMPLETE ***
61
62//启动rsync并设置开机自启
63[root@server ~]# systemctl start rsyncd
64[root@server ~]# systemctl enable rsyncd
65Created symlink from /etc/systemd/system/multi-user.target.wants/rsyncd.service to /usr/lib/systemd/system/rsyncd.service.
66
67//生成加密的密码
68[root@server ~]#  openssl passwd -1 -salt "$RANDOM" 'wlw123!'
69$1$30214$snHY66HJF6ZeMh8ul1eW..//这是密码加密后的形式
70
71//将新生成的加密密码加入到配置文件
72[root@server ~]# vim /etc/cobbler/settings
73//修改密码
74default_password_crypted: "$1$30214$snHY66HJF6ZeMh8ul1eW.."
75
76//重启cobbler
77[root@server ~]# systemctl restart cobblerd
78[root@server ~]# ss -antl
79State      Recv-Q Send-Q            Local Address:Port                           Peer Address:Port
80LISTEN     0      128                           *:22                                        *:*
81LISTEN     0      100                   127.0.0.1:25                                        *:*
82LISTEN     0      5                     127.0.0.1:25151                                     *:*
83LISTEN     0      5                             *:873                                       *:*
84LISTEN     0      128                          :::80                                       :::*
85LISTEN     0      128                          :::22                                       :::*
86LISTEN     0      100                         ::1:25                                       :::*
87LISTEN     0      128                          :::443                                      :::*
88LISTEN     0      5                            :::873                                      :::*
89
90//通过cobbler check 核对当前设置是否有问题
91//要是有Seliux错误要重启虚拟机
92[root@wan ~]# cobbler check
93The following are potential configuration items that you may want to fix:
94
951 : debmirror package is not installed, it will be required to manage debian deployments and repositories
962 : fencing tools were not found, and are required to use the (optional) power management features. install cman or fence-agents to use them
97
98Restart cobblerd and then run 'cobbler sync' to apply changes.
99//以上两个是关于debian系统的错误,请忽略
100
101//配置cobbler dhcp
102//修改cobbler配置文件,让cobbler控制dhcp
103[root@wan ~]# sed -i '/^manage_dhcp/s/0/1/g' /etc/cobbler/settings
104[root@wan ~]# sed -n '/^manage_dhcp/p' /etc/cobbler/settings
105manage_dhcp: 1
106
107//配置dhcp
108[root@wan ~]# vim /etc/cobbler/dhcp.template
109subnet 192.168.66.0 netmask 255.255.255.0 {
110     option routers             192.168.66.2;   // 指定网关
111     option domain-name-servers 192.168.66.2;   // 此处为系统安装好后指定的dns地址
112     option subnet-mask         255.255.255.0;
113     range dynamic-bootp        192.168.66.100 192.168.66.200;    // 分配的ip地址范围(批量安装机子,最多252,253台)
114     default-lease-time         21600;
115     max-lease-time             43200;
116     next-server                $next_server;
117
118//重启服务并同步配置,改完dhcp必须要sync同步配置
119[root@wan ~]# systemctl restart cobblerd
120[root@wan ~]# cobbler sync
121.......
122*** TASK COMPLETE ***       #最后出现这个表示正常
123
124//检查dhcp是否正常
125[root@wan ~]# netstat -anulp | grep dhcp
126udp        0      0 0.0.0.0:67              0.0.0.0:*                           1392/dhcpd
127//导入redhat7镜像
128[root@wan ~]# mount /dev/cdrom /mnt/
129mount: /dev/sr0 写保护,将以只读方式挂载
130[root@wan ~]# cobbler import --path=/mnt --name=rhel-7 --arch=x86_64
131.......
132*** TASK COMPLETE ***       #最后出现这个表示正常
133
134# 说明:
135    --path      //镜像路径
136    --name      //为安装源定义一个名字
137    --arch      //指定安装源平台
138//安装源的唯一标示就是根据name参数来定义,本例导入成功后,安装源的唯一标示就是CentOS-7-x86_64,如果重复,系统会提示导入失败
139
140//查看cobbler镜像列表
141[root@wan ~]# cobbler list
142distros:
143   rhel-7-x86_64
144
145profiles:
146   rhel-7-x86_64
147
148systems:
149
150repos:
151
152images:
153
154mgmtclasses:
155
156packages:
157
158files:
159
160//创建kickstarts自动安装脚本
161[root@wan ~]# cat > /var/lib/cobbler/kickstarts/rhel-7-x86_64.ks <<'EOF'
162auth --enableshadow --passalgo=sha512
163bootloader --location=mbr
164clearpart --all --initlabel
165part /boot --asprimary --fstype="ext4" --size=500
166part swap --fstype="swap" --size=4096
167part / --fstype="ext4" --grow --size=15000
168text
169firewall --disabled
170firstboot --disable
171keyboard us
172lang en_US
173url --url=http://192.168.66.130/cobbler/ks_mirror/rhel-7-x86_64
174$yum_repo_stanza
175reboot
176
177## 此处密码应为本机系统anaconda-ks.cfg文件里的 # Root password
178rootpw --iscrypted $6$2WTFvfNvAMgCUPuC$MJgWGzhakgxrRObcEbAwSe8vkz0s//xyiTllGwxRsHHruQhcskO69u2LVTU9u0eemHXH2pzcGawyAJ54R2E/x0
179
180selinux --disabled
181skipx
182timezone Asia/Shanghai --isUtc --nontp
183install
184zerombr
185
186%packages
187@^minimal
188@core
189kexec-tools
190
191%end
192
193%addon com_redhat_kdump --enable --reserve-mb='auto'
194
195%end
196
197%anaconda
198pwpolicy root --minlen=6 --minquality=1 --notstrict --nochanges --notempty
199pwpolicy user --minlen=6 --minquality=1 --notstrict --nochanges --emptyok
200pwpolicy luks --minlen=6 --minquality=1 --notstrict --nochanges --notempty
201%end
202EOF
203# 检查ks文件语法是否有误
204[root@localhost ~]# cobbler validateks
205task started: 2018-08-21_171616_validateks
206task started (id=Kickstart Validation, time=Tue Aug 21 17:16:16 2018)
207----------------------------
208osversion: rhel7
209checking url: http://192.168.100.96/cblr/svc/op/ks/profile/rhel-7-x86_64
210running: /usr/bin/ksvalidator -v "rhel7" "http://192.168.100.96/cblr/svc/op/ks/profile/rhel-7-x86_64"
211received on stdout:
212received on stderr:
213*** all kickstarts seem to be ok ***
214*** TASK COMPLETE ***
215
216# 查看当前cobbler有哪些配置文件
217[root@localhost ~]# cobbler profile list
218   rhel-7-x86_64
219
220# 修改profile,将我们新建的ks文件设为默认的kickstarts安装文件
221[root@localhost ~]# cobbler profile edit --name rhel-7-x86_64 --kickstart=/var/lib/cobbler/kickstarts/rhel-7-x86_64.ks
222
223# 配置网卡名称为传统网卡名称eth0
224[root@localhost ~]# cobbler profile edit --name rhel-7-x86_64 --kopts='net.ifnames=0 biosdevname=0'
225
226# 检查当前系统cobbler配置文件信息
227[root@localhost ~]# cobbler profile report
228Name                           : rhel-7-x86_64
229TFTP Boot Files                : {}
230Comment                        :
231DHCP Tag                       : default
232Distribution                   : rhel-7-x86_64        //仓库名字
233Enable gPXE?                   : 0
234Enable PXE Menu?               : 1
235Fetchable Files                : {}
236Kernel Options                 : {'biosdevname': '0', 'net.ifnames': '0'}       //网卡设为传统命名方式
237Kernel Options (Post Install)  : {}
238Kickstart                      : /var/lib/cobbler/kickstarts/rhel-7-x86_64.ks     //使用的kickstarts配置文件的路径,必须为我们新建的ks文件的路径
239Kickstart Metadata             : {}
240Management Classes             : []
241Management Parameters          : <<inherit>>
242Name Servers                   : []
243Name Servers Search Path       : []
244Owners                         : ['admin']
245Parent Profile                 :
246Internal proxy                 :
247Red Hat Management Key         : <<inherit>>
248Red Hat Management Server      : <<inherit>>
249Repos                          : []
250Server Override                : <<inherit>>
251Template Files                 : {}
252Virt Auto Boot                 : 1
253Virt Bridge                    : xenbr0
254Virt CPUs                      : 1
255Virt Disk Driver Type          : raw
256Virt File Size(GB)             : 5
257Virt Path                      :
258Virt RAM (MB)                  : 512
259Virt Type                      : kvm
260
261# 同步cobbler
262[root@localhost ~]# cobbler sync
263.......
264*** TASK COMPLETE ***       ##出现此表示成功
265
266# 为避免发生未知问题,先把服务端所有服务重启
267[root@localhost ~]# systemctl restart xinetd
268[root@localhost ~]# systemctl restart cobblerd
269[root@localhost ~]# systemctl restart httpd
270[root@localhost ~]# ss -antl
271State      Recv-Q Send-Q Local Address:Port               Peer Address:Port
272LISTEN     0      128            *:22                         *:*
273LISTEN     0      100    127.0.0.1:25                         *:*
274LISTEN     0      5      127.0.0.1:25151                      *:*
275LISTEN     0      5              *:873                        *:*
276LISTEN     0      128           :::80                        :::*
277LISTEN     0      128           :::22                        :::*
278LISTEN     0      100          ::1:25                        :::*
279LISTEN     0      128           :::443                       :::*
280LISTEN     0      5             :::873                       :::*
5.客户端安装系统
手动验证:
创建一个虚拟机,模式和服务端模式一样,(这里我使用的是nat,所以要安装的虚拟机模式也是nat),然后设置虚拟机
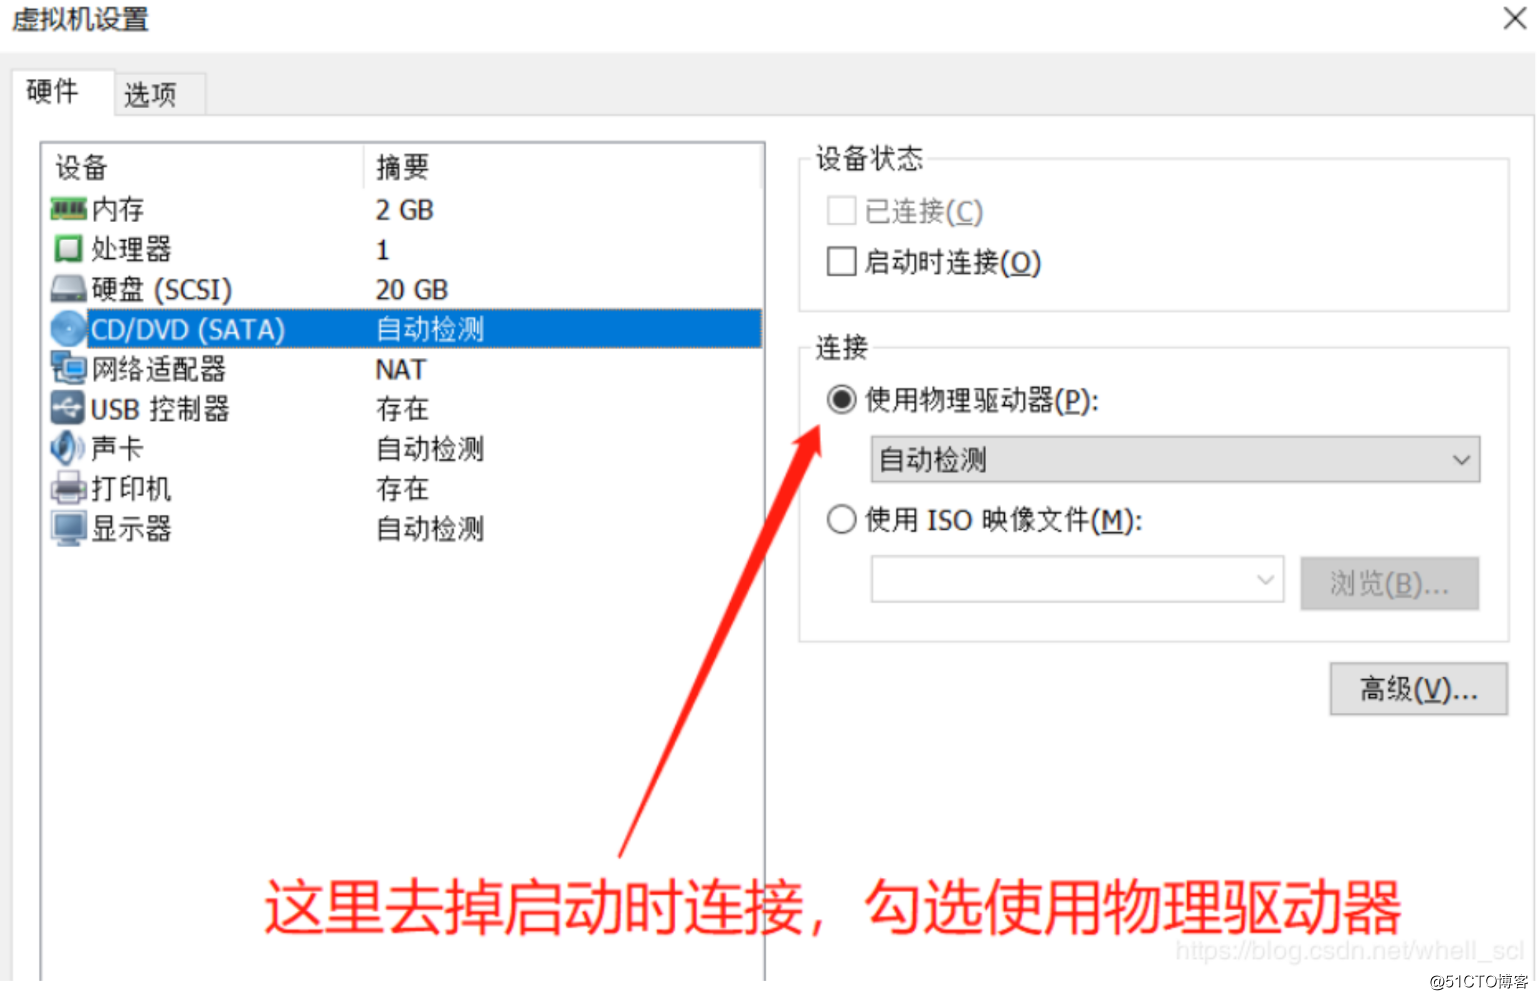
然后,直接开启虚拟机,看到以下界面,选择第二个,回车,然后等待系统自动安装完成即可。
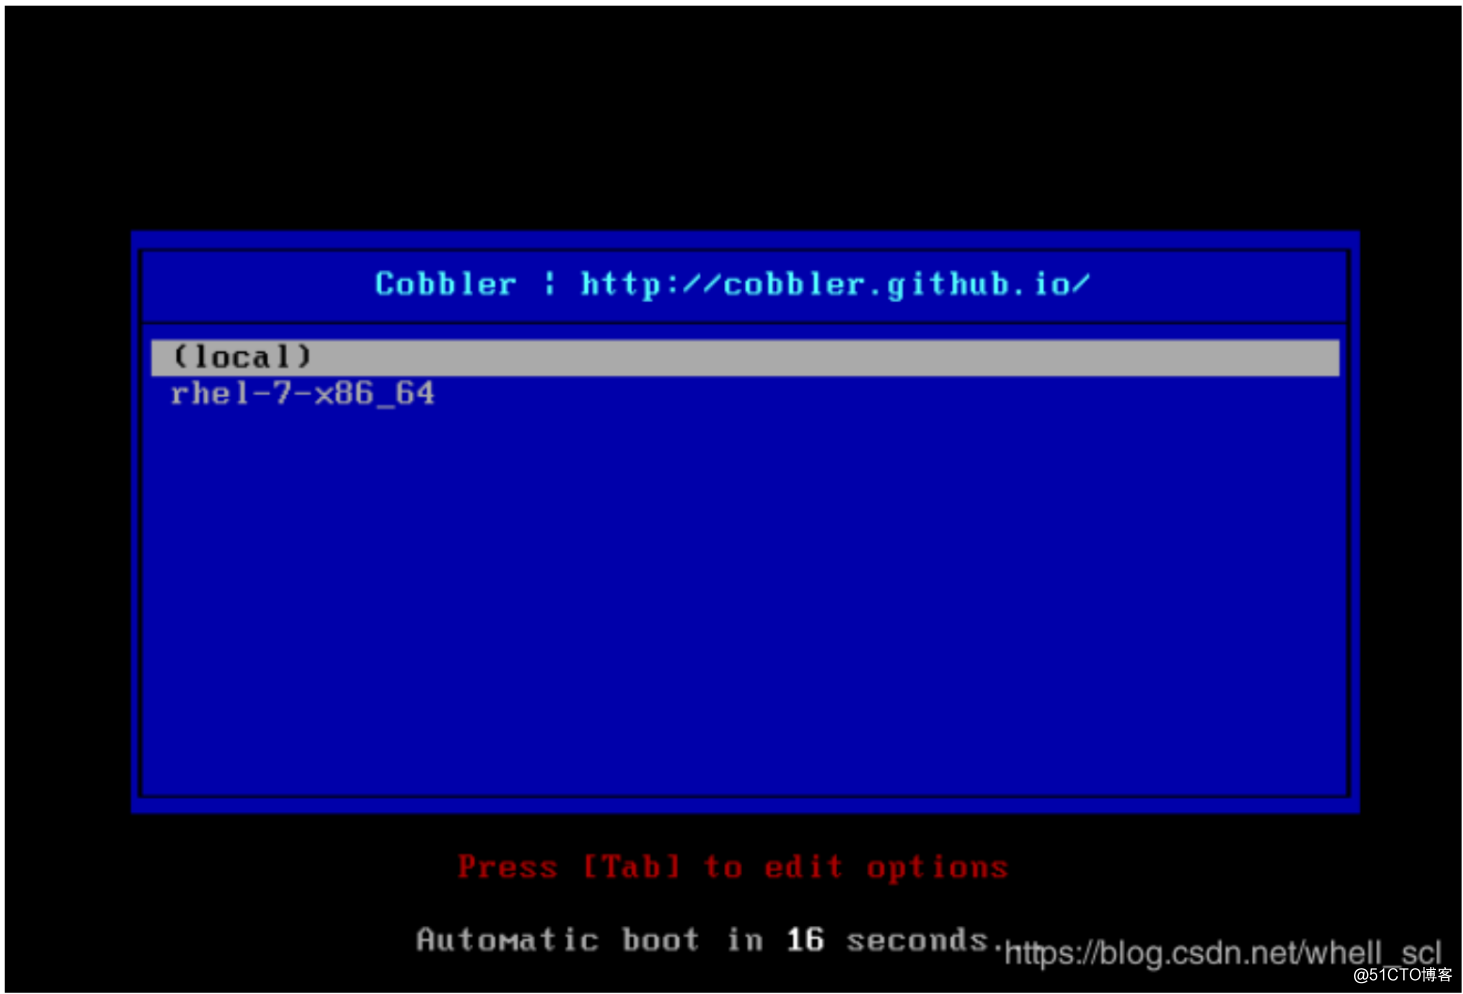
因为这种方式需要手动选择,如果机器太多,每台服务器都要选择,还是很麻烦,所以采用web界面配置定制安装
1# 配置完成后可能导致访问不了web页面,猜测python-django版本有问题
2[root@localhost ~]# yum -y install python2-pip
3[root@localhost ~]#  pip install --upgrade pip
4[root@localhost ~]# pip install Django==1.9.13
5#用pip安装指定版本的Django
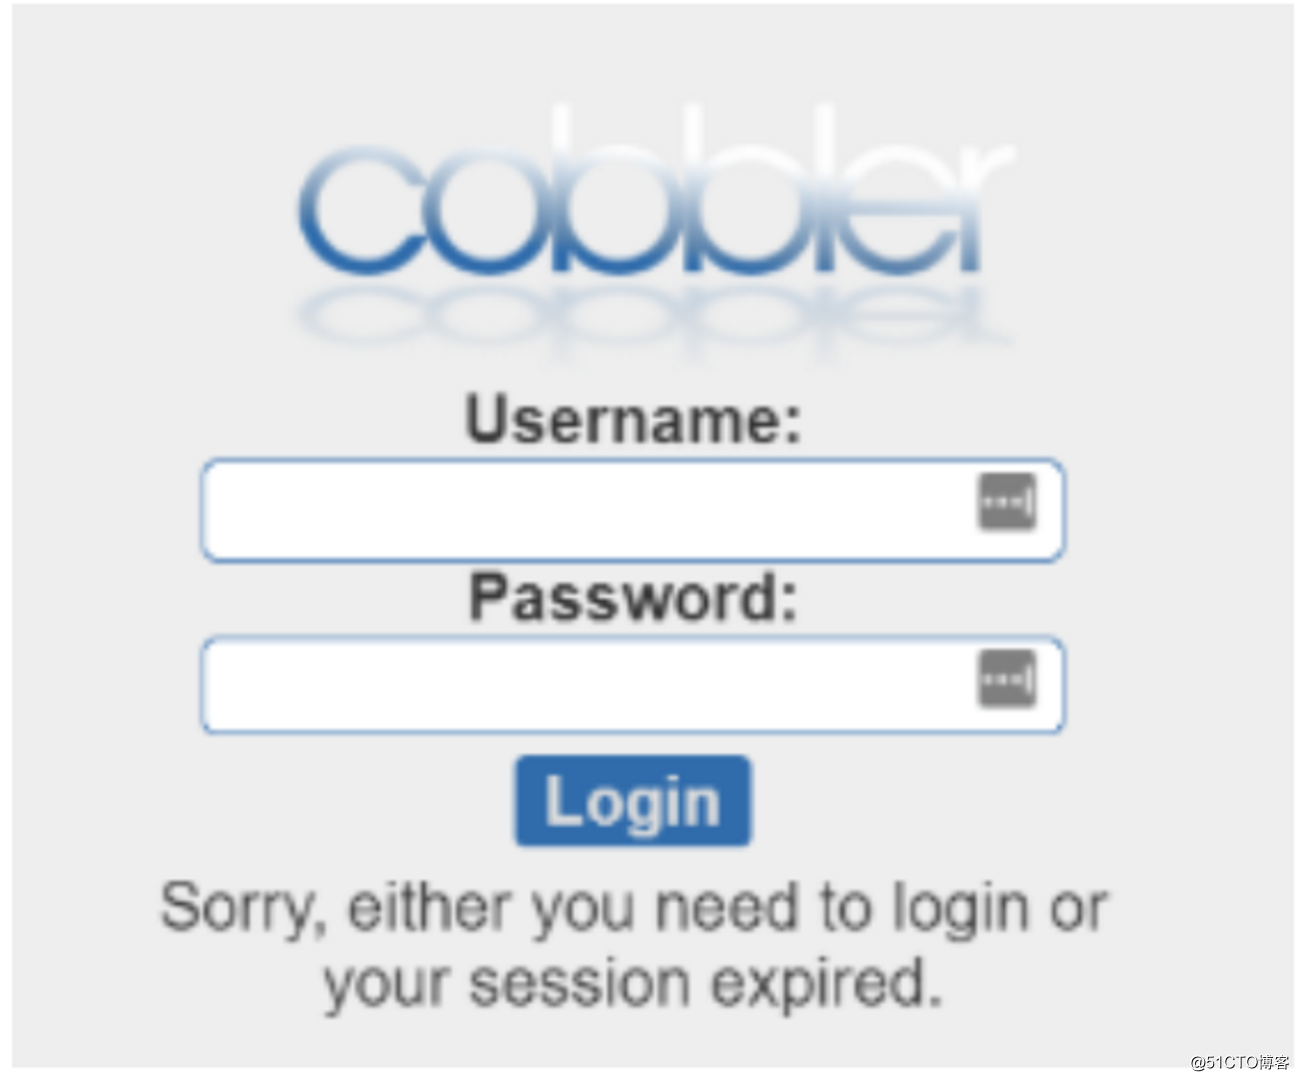
重启httpd服务 ,再次访问https://192.168.100.96/cobbler\_web出现登录页面
6.定制安装
定制安装步骤:
-
统计服务器mac地址
-
配置cobbler
-
安装
6.1 获取mac地址
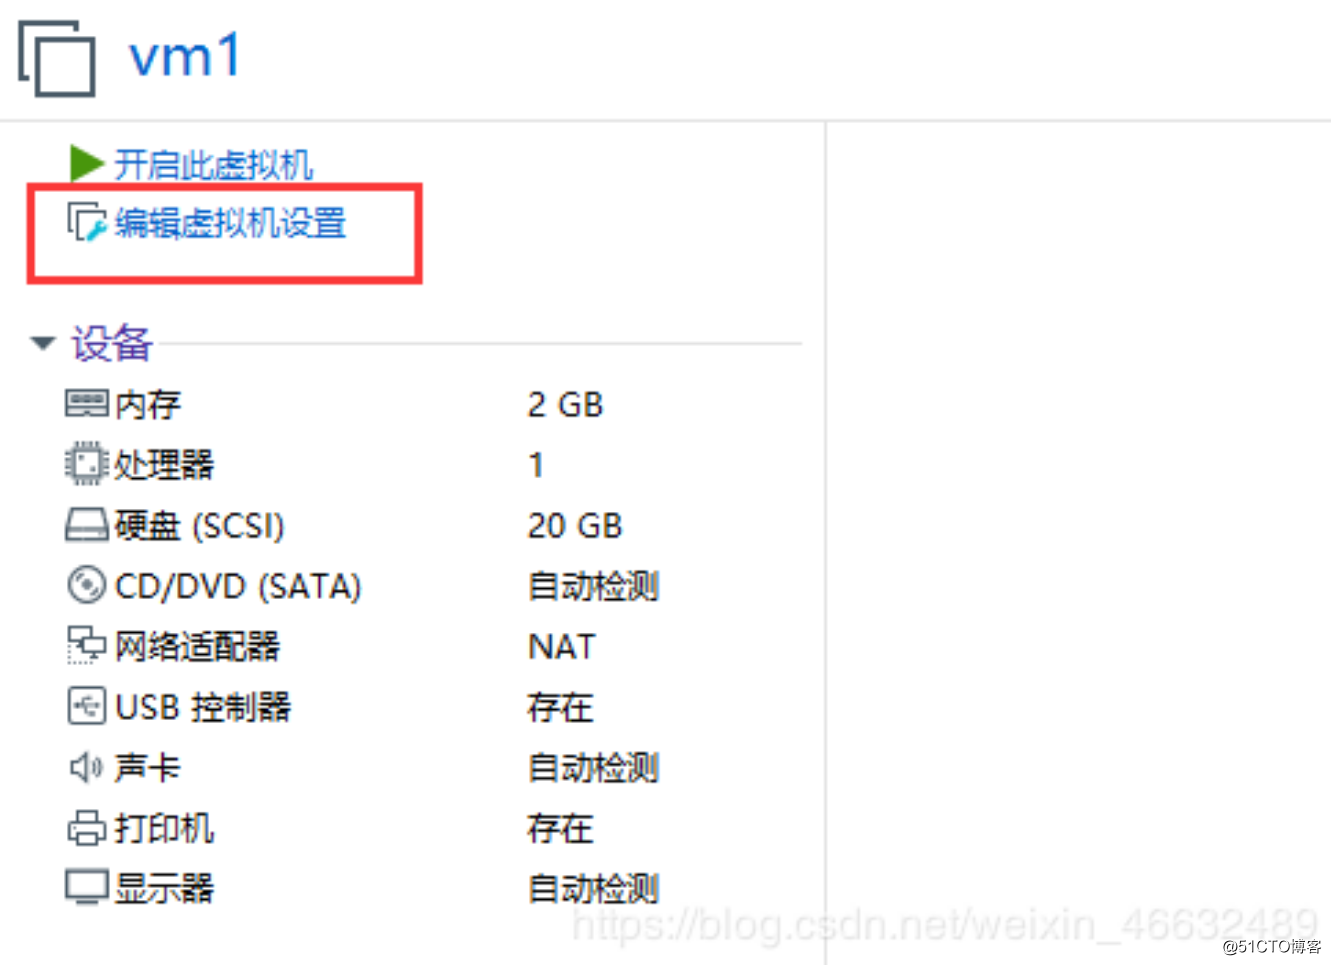
mac地址在:虚拟机—编辑此虚拟机—网路适配器—高级—MAC地址(点击生成然后复制即可)
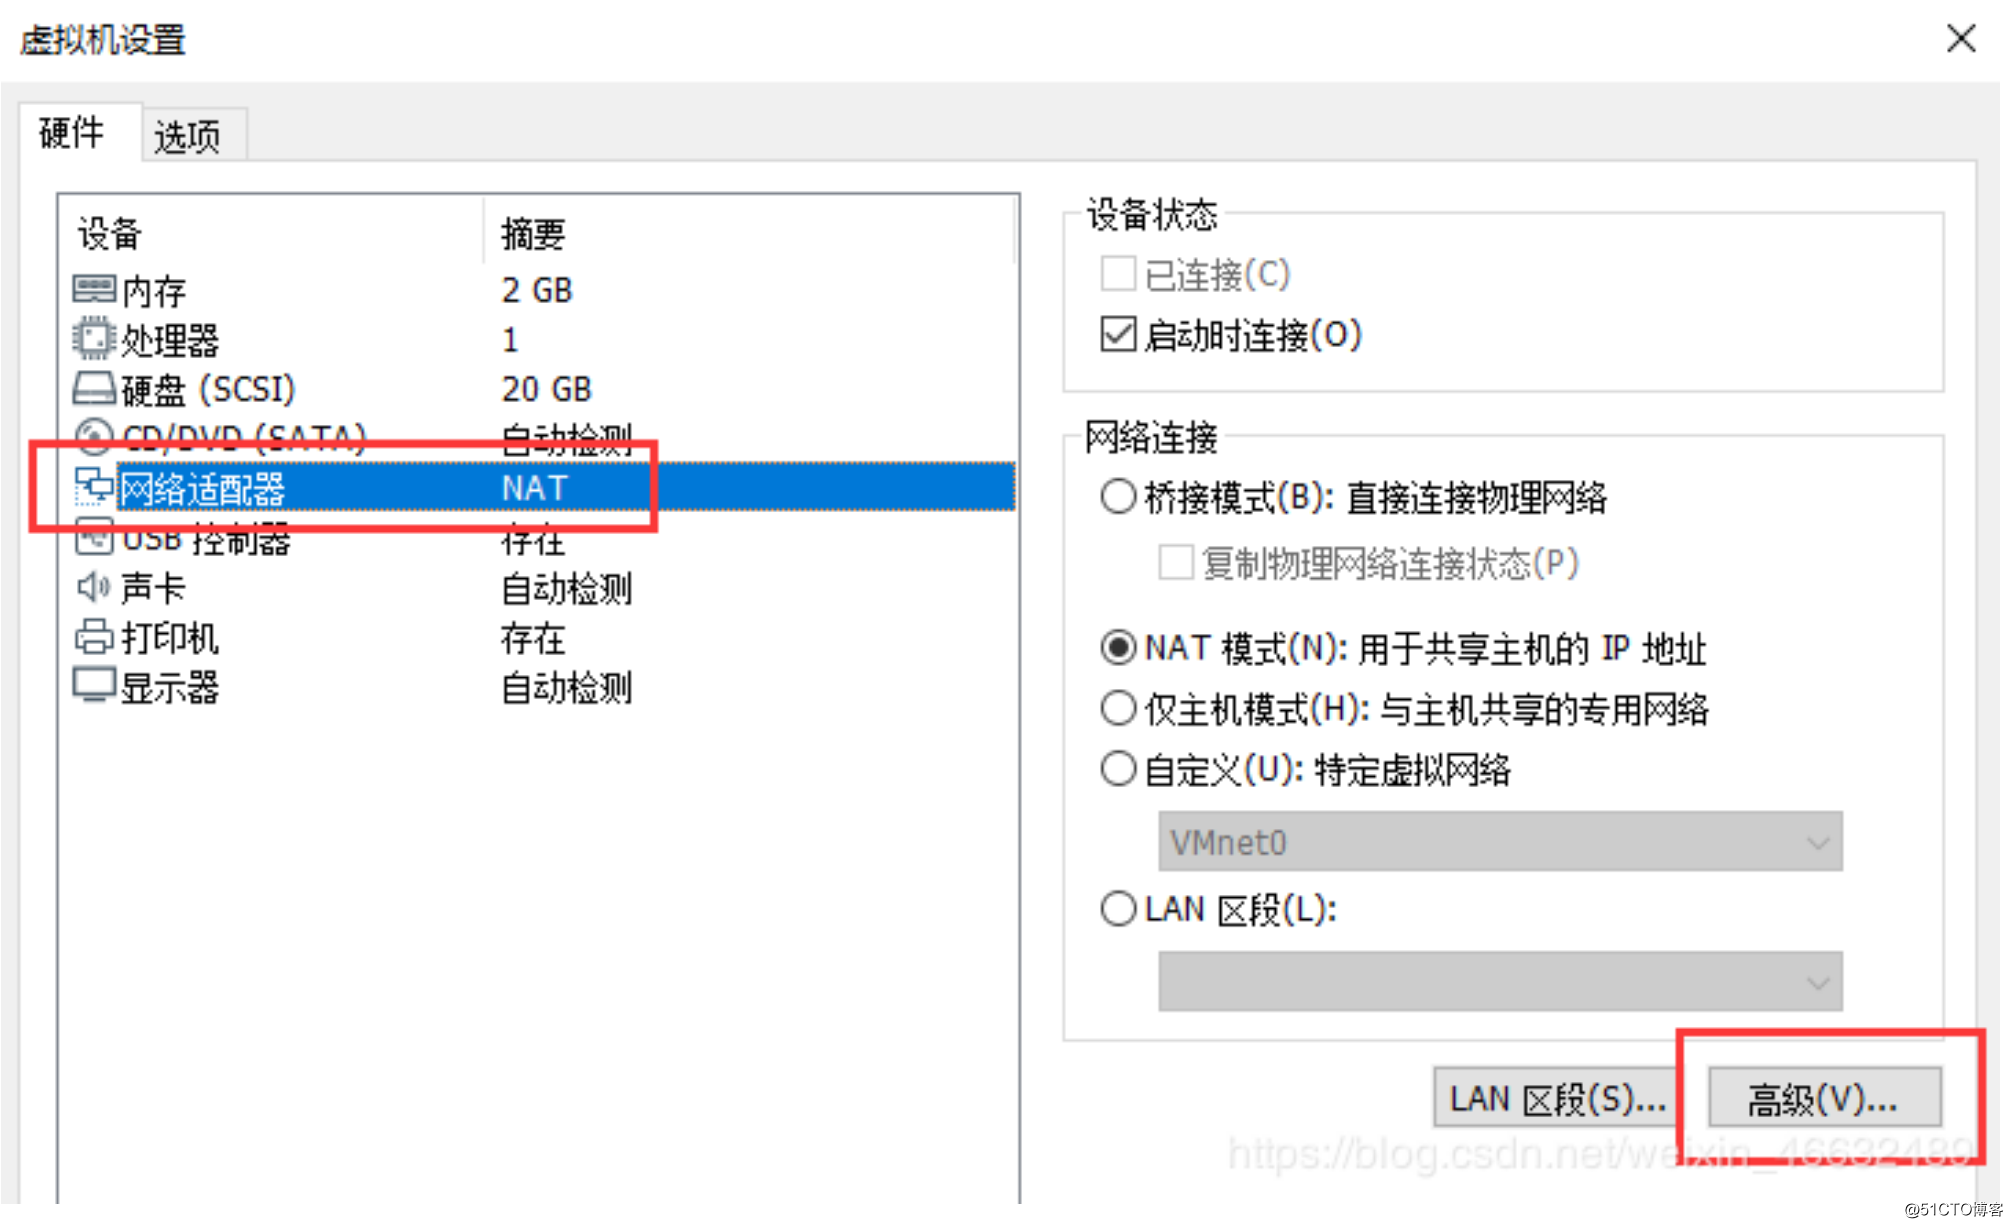
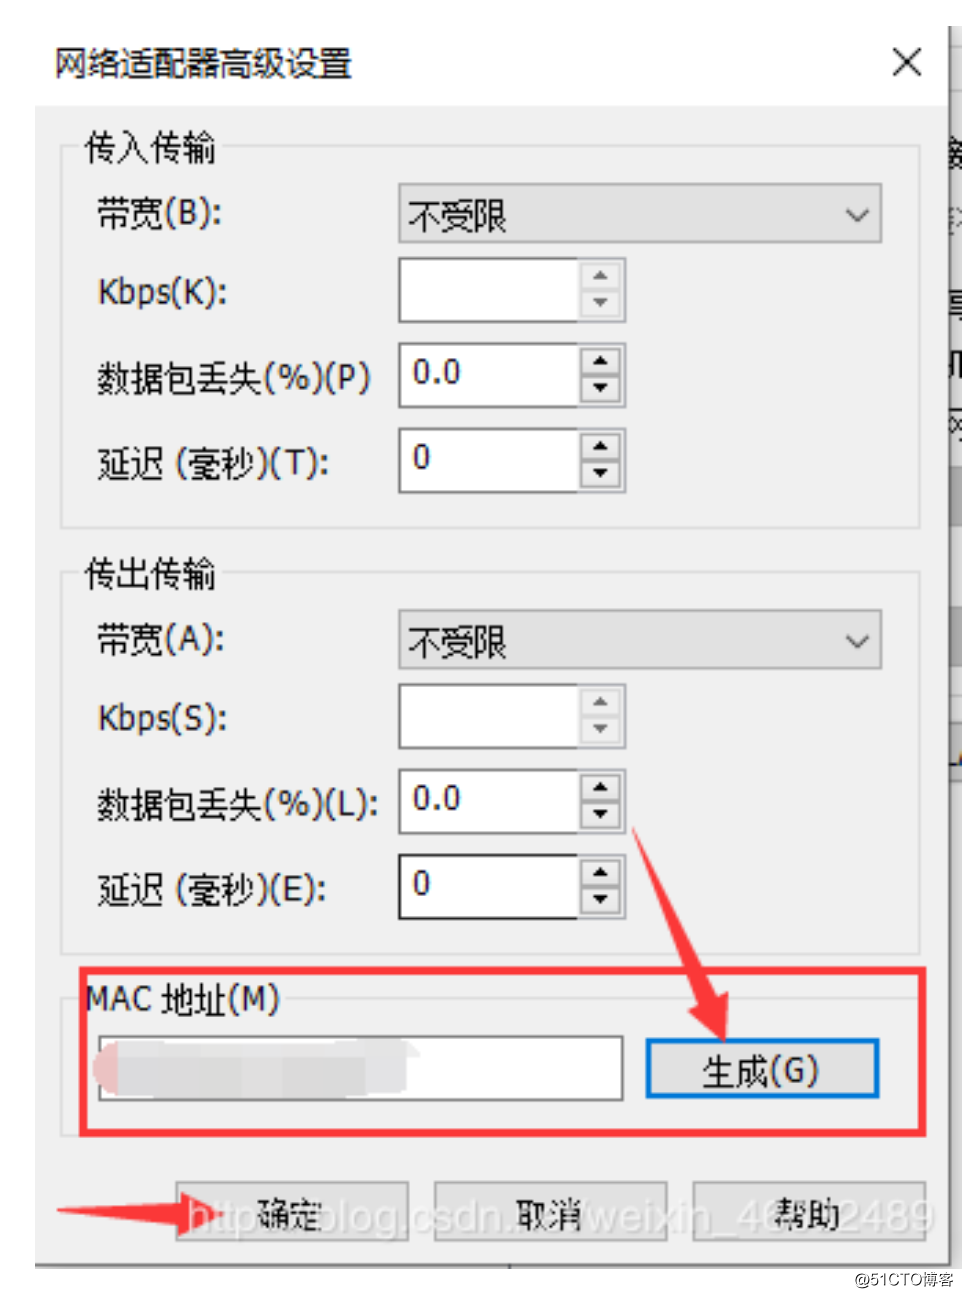
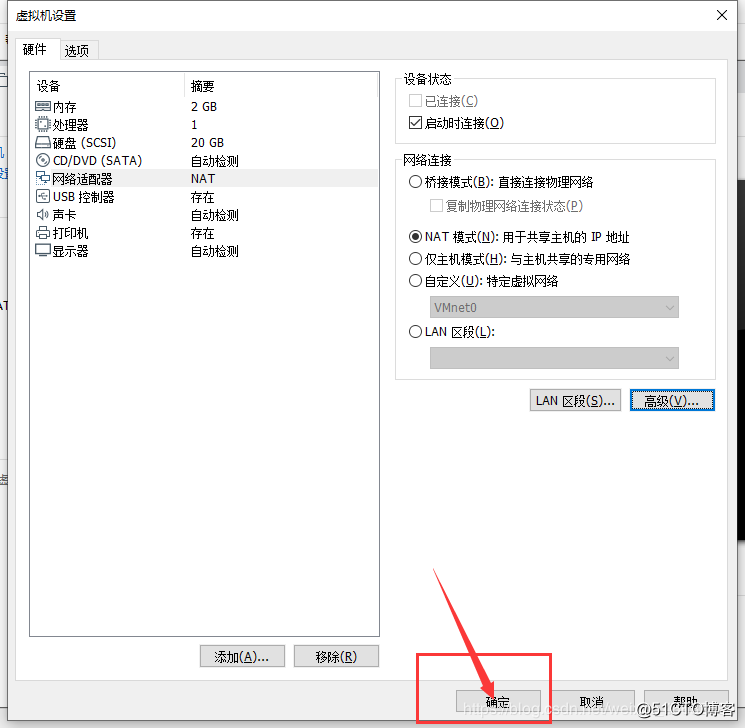
6.2 配置cobbler
-
直接在浏览器上搜索:https://本机ip+/cobbler_web
-
用户名与密码都是cobbler

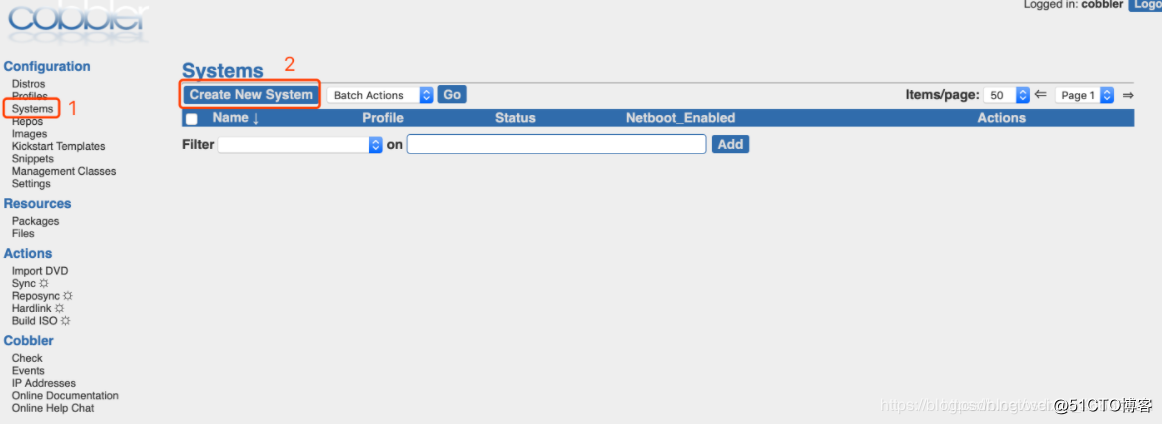
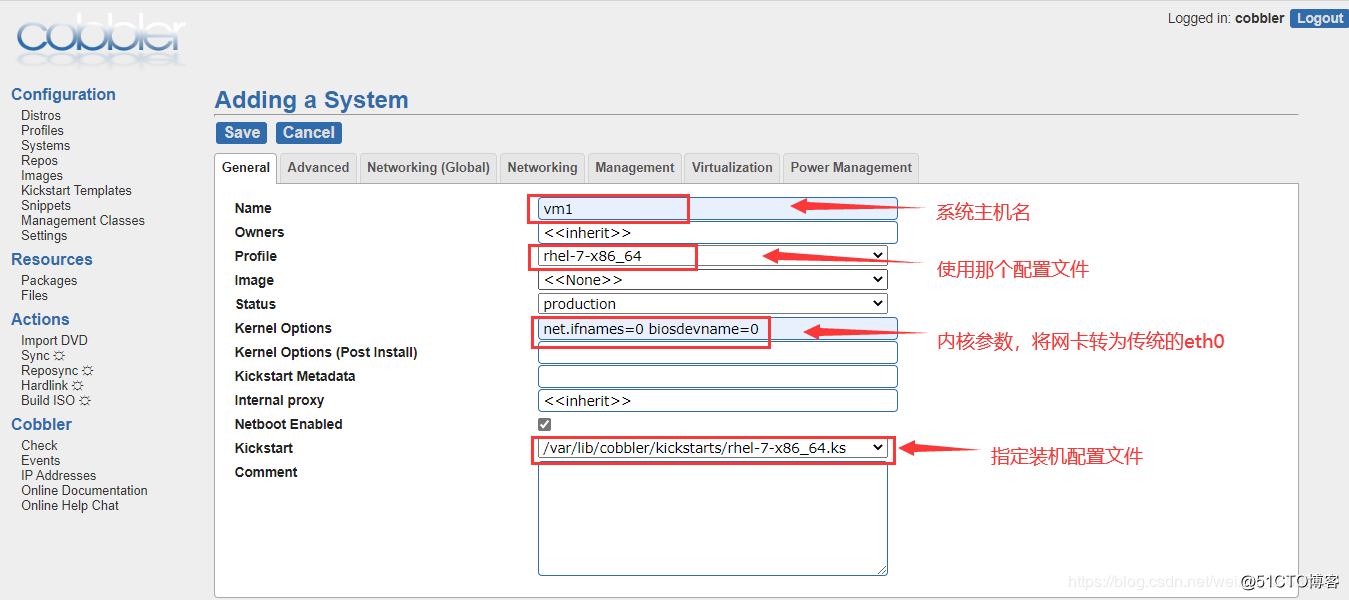
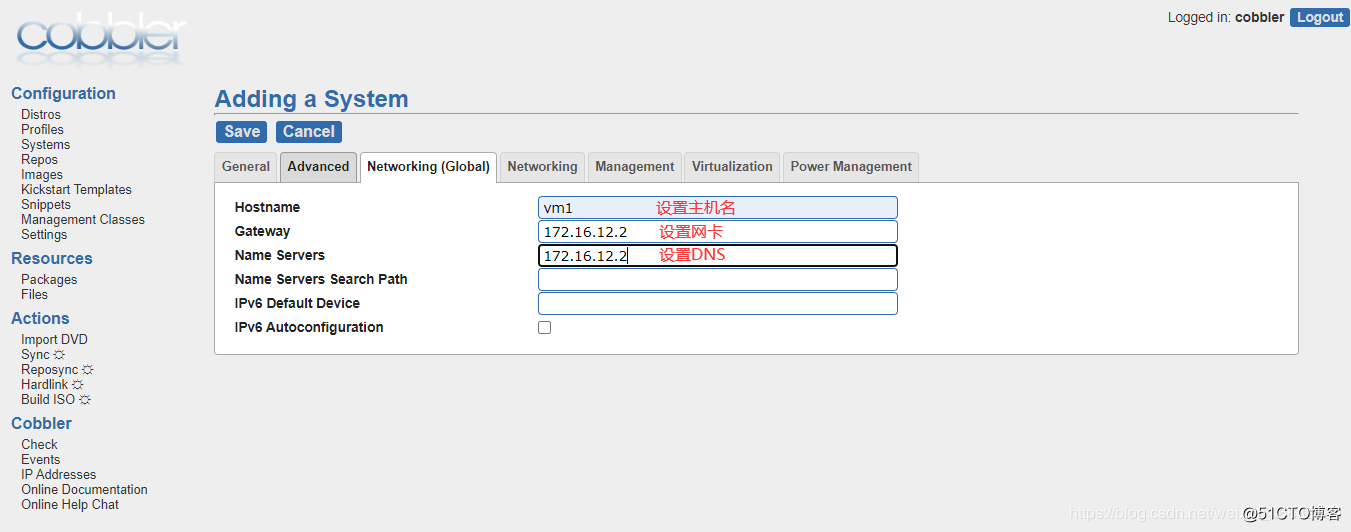
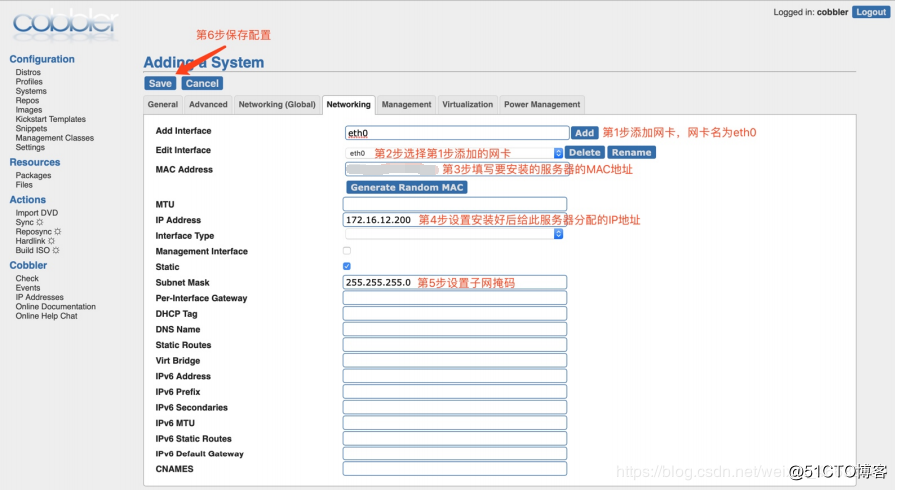
6.3 安装
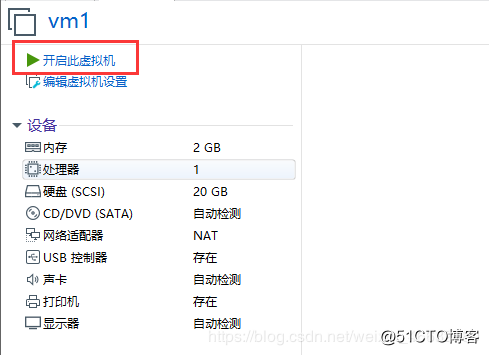
直接开启此虚拟机,它就会自动安装
编写脚本部署cobbler服务端
1#!/bin/bash
2#配置yum源
3curl -o /etc/yum.repos.d/CentOS7-Base-163.repo http://mirrors.163.com/.help/CentOS7-Base-163.repo
4sed -i 's/\$releasever/7/g' /etc/yum.repos.d/CentOS7-Base-163.repo
5sed -i 's/^enabled=.*/enabled=1/g' /etc/yum.repos.d/CentOS7-Base-163.repo
6yum install -y epel-release
7
8#安装cobbler以及相关的软件
9yum -y install httpd dhcp tftp python-ctypes cobbler xinetd cobbler-web pykickstart
10
11#启动服务并设置开机自启
12systemctl start httpd
13systemctl start cobblerd
14systemctl enable httpd
15systemctl enable cobblerd
16
17#关闭防火墙
18firewall()
19{
20systemctl stop firewalld
21systemctl disable firewalld
22systemctl mask firewalld
23setenforce 0
24}
25
26#修改server的ip地址为本机ip
27sed -i 's/^server: 127.0.0.1/server: 192.168.66.130/' /etc/cobbler/settings
28
29#设置tftp的ip地址为本机ip
30sed -i 's/^next_server: 127.0.0.1/next_server: 192.168.66.130/' /etc/cobbler/settings
31
32#开启tftp
33sed -i '/disable/s/yes/no/g' /etc/xinetd.d/tftp
34#下载缺失文件
35cobbler get-loaders
36
37#启动rsync并设置开机自启
38systemctl start rsyncd
39systemctl enable rsyncd
40
41#生成加密密码并添加到配置文件
42configure_passwd()
43{
44if [$? -eq 0];then
45passwd=`openssl passwd -1 -salt "$RANDOM" 'wlw123!'`
46sed -i "101idefault_password_crypted: \"$pass\"" /etc/cobbler/settings
47sed -i '102d' /etc/cobbler/settings
48fi
49}
50#重启cobbler
51systemctl restart cobblerd
52#配置cobbler dhcp
53#修改cobbler配置文件,让cobbler控制dhcp
54sed -i '/^manage_dhcp/s/0/1/g' /etc/cobbler/settings
55sed -n '/^manage_dhcp/p' /etc/cobbler/settings
56
57#配置cobbler dhcp
58configure_dhcp()
59{
60if [$? -eq 0];then
61sed -i '21s/192.168.1/192.168.66/g' /etc/cobbler/dhcp.template
62sed -i '22s/192.168.1.5/192.168.66.2/g' /etc/cobbler/dhcp.template
63sed -i '23s/192.168.1.1/192.168.66.2/g' /etc/cobbler/dhcp.template
64sed -i '25s/192.168.1.100 192.168.1.254/192.168.66.100 192.168.66.200/' /etc/cobbler/dhcp.template
65fi
66}
67
68#重启服务并同步配置,改完dhcp必须要sync同步配置
69systemctl restart cobblerd
70cobbler sync
71main()
72{
73    firewall&&configure_cobbler&&configure_passwd&&configure_dhcp
74}
75#导入redhat7镜像
76mount /dev/cdrom /mnt/
77cobbler import --path=/mnt --name=rhel-7 --arch=x86_64
78
79#提取root密码
80root=`awk 'NR==23{print}' anaconda-ks.cfg`
81
82#创建kickstarts自动安装脚本
83cat > /var/lib/cobbler/kickstarts/rhel-7-x86_64.ks <<'EOF'
84auth --enableshadow --passalgo=sha512
85bootloader --location=mbr
86clearpart --all --initlabel
87part /boot --asprimary --fstype="ext4" --size=500
88part swap --fstype="swap" --size=4096
89part / --fstype="ext4" --grow --size=15000
90text
91firewall --disabled
92firstboot --disable
93keyboard us
94lang en_US
95url --url=http://192.168.66.130/cobbler/ks_mirror/rhel-7-x86_64
96$yum_repo_stanza
97reboot
98
99## 此处密码应为本机系统anaconda-ks.cfg文件里的 # Root password
100rootpw --iscrypted $6$2WTFvfNvAMgCUPuC$MJgWGzhakgxrRObcEbAwSe8vkz0s//xyiTllGwxRsHHruQhcskO69u2LVTU9u0eemHXH2pzcGawyAJ54R2E/x0
101
102selinux --disabled
103skipx
104timezone Asia/Shanghai --isUtc --nontp
105install
106zerombr
107
108%packages
109@^minimal
110@core
111kexec-tools
112
113%end
114
115%addon com_redhat_kdump --enable --reserve-mb='auto'
116
117%end
118
119%anaconda
120pwpolicy root --minlen=6 --minquality=1 --notstrict --nochanges --notempty
121pwpolicy user --minlen=6 --minquality=1 --notstrict --nochanges --emptyok
122pwpolicy luks --minlen=6 --minquality=1 --notstrict --nochanges --notempty
123%end
124EOF
125
126# 修改profile,将我们新建的ks文件设为默认的kickstarts安装文件
127cobbler profile edit --name rhel-7-x86_64 --kickstart=/var/lib/cobbler/kickstarts/rhel-7-x86_64.ks
128
129# 配置网卡名称为传统网卡名称eth0
130cobbler profile edit --name rhel-7-x86_64 --kopts='net.ifnames=0 biosdevname=0'
131
132# 同步cobbler
133cobbler sync
134
135# 为避免发生未知问题,先把服务端所有服务重启
136systemctl restart xinetd
137systemctl restart cobblerd
138systemctl restart httpd