
一、前言
web.xml里面配置
1<listener>
2        <listener-class>org.springframework.web.context.request.RequestContextListener</listener-class>
3</listener>
component-bean.xml里面配置
1 <bean id="lavaPvgInfo" class="com.alibaba.lava.privilege.PrivilegeInfo"
2        scope="request">
3        <property name="aesKey" value="666" />
4        <aop:scoped-proxy />
5    </bean>
测试Rpc
1@WebResource("/testService")public class TestRpc {    @Autowired
2    private PrivilegeInfo pvgInfo;    @ResourceMapping("test")    public ActionResult test(ErrorContext context) {
3        ActionResult result = new ActionResult();
4
5        String aseKey = pvgInfo.getAesKey();
6        pvgInfo.setAesKey("888");
7        System.out.println("aseKey---" + aseKey);        return result;
8    }
9}
二、源码分析
2.1 使用装饰模式对Bean定义进行修改
先上时序图:
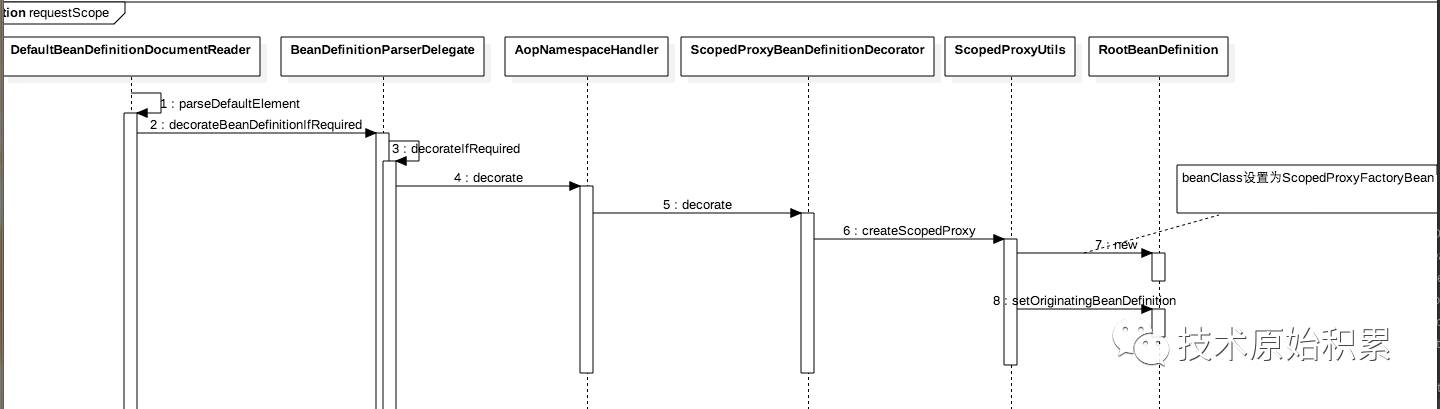
可知上面时序图完成了对RequestScope对象定义的修改创建了代理bean,具体修改内容是修改了beanClass为ScopedProxyFactoryBean,并且保存了原来的bean定义originatingBeanDefinition。
下面看下主要代码ScopedProxyUtils中的createScopedProxy
1public static BeanDefinitionHolder createScopedProxy(BeanDefinitionHolder definition,
2            BeanDefinitionRegistry registry, boolean proxyTargetClass) {
3
4        String originalBeanName = definition.getBeanName();
5        BeanDefinition targetDefinition = definition.getBeanDefinition();        // 保持原来的beanName不变,但是基于原来的bean定义创建代理bean定义,
6        // 保存原来的bean定义到代理bean里面为后面创建代理类做准备.
7        RootBeanDefinition proxyDefinition = new RootBeanDefinition(ScopedProxyFactoryBean.class);
8        proxyDefinition.setOriginatingBeanDefinition(definition.getBeanDefinition());
9        proxyDefinition.setSource(definition.getSource());
10        proxyDefinition.setRole(BeanDefinition.ROLE_INFRASTRUCTURE);
11
12        String targetBeanName = getTargetBeanName(originalBeanName);
13        proxyDefinition.getPropertyValues().add("targetBeanName", targetBeanName);        if (proxyTargetClass) {
14            targetDefinition.setAttribute(AutoProxyUtils.PRESERVE_TARGET_CLASS_ATTRIBUTE, Boolean.TRUE);            // ScopedFactoryBean's "proxyTargetClass" default is TRUE, so we don't need to set it explicitly here.
15        }        else {
16            proxyDefinition.getPropertyValues().add("proxyTargetClass", Boolean.FALSE);
17        }        // Copy autowire settings from original bean definition.
18        proxyDefinition.setAutowireCandidate(targetDefinition.isAutowireCandidate());
19        proxyDefinition.setPrimary(targetDefinition.isPrimary());        if (targetDefinition instanceof AbstractBeanDefinition) {
20            proxyDefinition.copyQualifiersFrom((AbstractBeanDefinition) targetDefinition);
21        }        // The target bean should be ignored in favor of the scoped proxy.
22        targetDefinition.setAutowireCandidate(false);
23        targetDefinition.setPrimary(false);        // 注册代理前的bean到容器,在创建代理bean时候使用.targetBeanName=scopedTarget.lavaPvgInfo
24        registry.registerBeanDefinition(targetBeanName, targetDefinition);        // 返回代理bean定义作为原来的bean定义
25        return new BeanDefinitionHolder(proxyDefinition, originalBeanName, definition.getAliases());
26    }
2.2 创建代理Bean
先上时序图

主要代码如下:
1    public void setBeanFactory(BeanFactory beanFactory) {
2        ...
3        ConfigurableBeanFactory cbf = (ConfigurableBeanFactory) beanFactory;        this.scopedTargetSource.setBeanFactory(beanFactory);               //创建代理工厂
4        ProxyFactory pf = new ProxyFactory();
5        pf.copyFrom(this);
6        pf.setTargetSource(this.scopedTargetSource);
7
8        ...        // Add an introduction that implements only the methods on ScopedObject.
9        ScopedObject scopedObject = new DefaultScopedObject(cbf, this.scopedTargetSource.getTargetBeanName());
10        pf.addAdvice(new DelegatingIntroductionInterceptor(scopedObject));        // Add the AopInfrastructureBean marker to indicate that the scoped proxy
11        // itself is not subject to auto-proxying! Only its target bean is.
12        pf.addInterface(AopInfrastructureBean.class);        this.proxy = pf.getProxy(cbf.getBeanClassLoader());
13    }
14
15public Object getProxy(ClassLoader classLoader) {
16            ....        try {//获取目标类,也就是被代理的
17            Class rootClass = this.advised.getTargetClass();
18            Assert.state(rootClass != null, "Target class must be available for creating a CGLIB proxy");
19
20            Class proxySuperClass = rootClass;            if (ClassUtils.isCglibProxyClass(rootClass)) {
21                proxySuperClass = rootClass.getSuperclass();
22                Class[] additionalInterfaces = rootClass.getInterfaces();                for (Class additionalInterface : additionalInterfaces) {                    this.advised.addInterface(additionalInterface);
23                }
24            }            // Validate the class, writing log messages as necessary.
25            validateClassIfNecessary(proxySuperClass);            // Configure CGLIB Enhancer...
26            Enhancer enhancer = createEnhancer();            if (classLoader != null) {
27                enhancer.setClassLoader(classLoader);                if (classLoader instanceof SmartClassLoader &&
28                        ((SmartClassLoader) classLoader).isClassReloadable(proxySuperClass)) {
29                    enhancer.setUseCache(false);
30                }
31            }                       //设置被代理类为超类,这样解释了为啥代理后的类能够赋值给被代理类不会发生错误
32            enhancer.setSuperclass(proxySuperClass);
33            enhancer.setStrategy(new UndeclaredThrowableStrategy(UndeclaredThrowableException.class));
34            enhancer.setInterfaces(AopProxyUtils.completeProxiedInterfaces(this.advised));
35            enhancer.setInterceptDuringConstruction(false);                       //获取拦截器,其中就有DynamicAdvisedInterceptor
36            Callback[] callbacks = getCallbacks(rootClass);
37            enhancer.setCallbacks(callbacks);
38            enhancer.setCallbackFilter(new ProxyCallbackFilter(                    this.advised.getConfigurationOnlyCopy(), this.fixedInterceptorMap, this.fixedInterceptorOffset));
39
40            Class[] types = new Class[callbacks.length];            for (int x = 0; x < types.length; x++) {
41                types[x] = callbacks[x].getClass();
42            }
43            enhancer.setCallbackTypes(types);            // Generate the proxy class and create a proxy instance.
44            Object proxy;            if (this.constructorArgs != null) {
45                proxy = enhancer.create(this.constructorArgTypes, this.constructorArgs);
46            }            else {
47                proxy = enhancer.create();
48            }            return proxy;
49        }
2.3 调用时序图
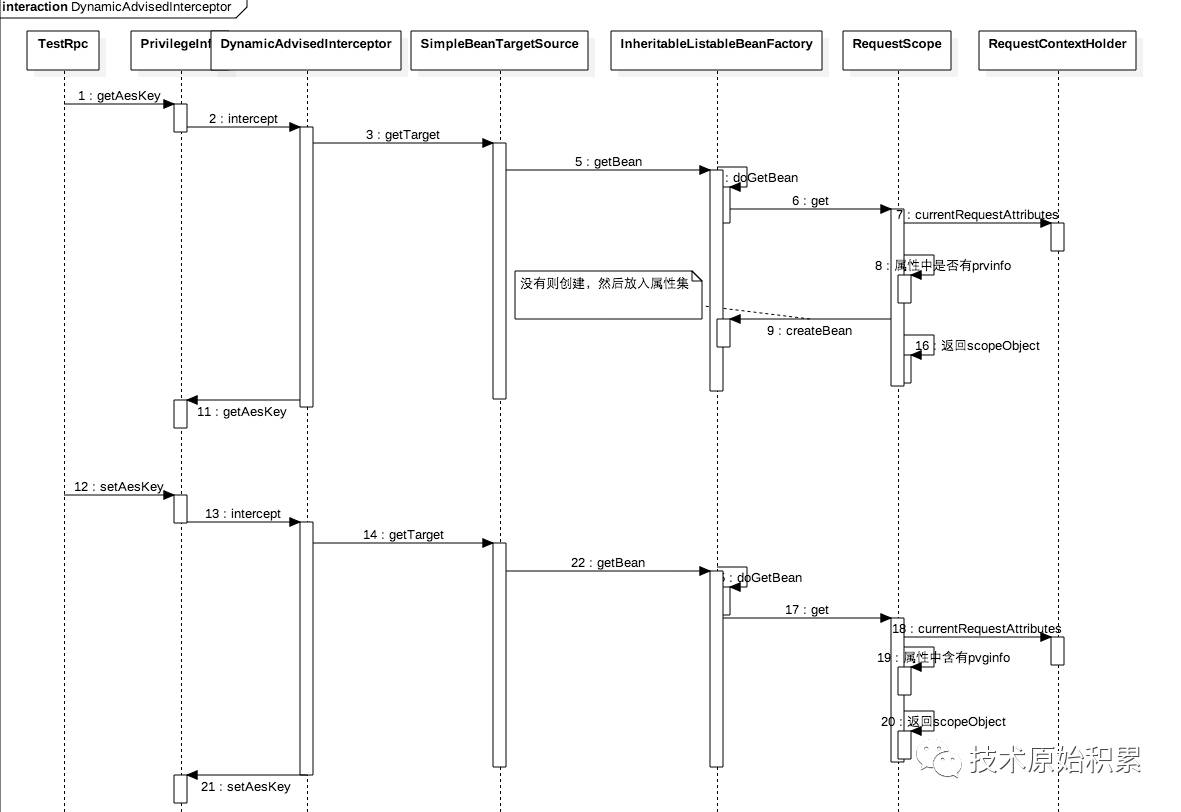
代码:
1private static class DynamicAdvisedInterceptor implements MethodInterceptor, Serializable {
2
3        ...        public Object intercept(Object proxy, Method method, Object[] args, MethodProxy methodProxy) throws Throwable {
4            Object oldProxy = null;            boolean setProxyContext = false;
5            Class targetClass = null;
6            Object target = null;            try {                if (this.advised.exposeProxy) {                    // Make invocation available if necessary.
7                    oldProxy = AopContext.setCurrentProxy(proxy);
8                    setProxyContext = true;
9                }                // 获取被代理类
10                target = getTarget();                if (target != null) {
11                    targetClass = target.getClass();
12                }
13                List<Object> chain = this.advised.getInterceptorsAndDynamicInterceptionAdvice(method, targetClass);
14                Object retVal;                // Check whether we only have one InvokerInterceptor: that is,
15                // no real advice, but just reflective invocation of the target.
16                if (chain.isEmpty() && Modifier.isPublic(method.getModifiers())) {
17
18                    retVal = methodProxy.invoke(target, args);
19                }                else {                    // We need to create a method invocation...
20                    retVal = new CglibMethodInvocation(proxy, target, method, args, targetClass, chain, methodProxy).proceed();
21                }
22                retVal = massageReturnTypeIfNecessary(proxy, target, method, retVal);                return retVal;
23            }            finally {                if (target != null) {
24                    releaseTarget(target);
25                }                if (setProxyContext) {                    // Restore old proxy.
26                    AopContext.setCurrentProxy(oldProxy);
27                }
28            }
29        }
30}
getTarget是关键方法,看下:
1    protected Object getTarget() throws Exception {        return this.advised.getTargetSource().getTarget();
2    }    public Object getTarget() throws Exception {        return getBeanFactory().getBean(getTargetBeanName());
3    }
所以最后是从IOC获取目标类bean.下面看下getBean代码:
1//获取RequestScope对象String scopeName = mbd.getScope();final Scope scope = this.scopes.get(scopeName);if (scope == null) {    throw new IllegalStateException("No Scope registered for scope '" + scopeName + "'");
2}try {   //调用RequestScope对象对象的get方法
3    Object scopedInstance = scope.get(beanName, new ObjectFactory<Object>() {        public Object getObject() throws BeansException {
4            beforePrototypeCreation(beanName);            try {                return createBean(beanName, mbd, args);
5            }            finally {
6                afterPrototypeCreation(beanName);
7            }
8        }
9    });
10    bean = getObjectForBeanInstance(scopedInstance, name, beanName, mbd);
11}catch (IllegalStateException ex) {    throw new BeanCreationException(beanName,            "Scope '" + scopeName + "' is not active for the current thread; " +            "consider defining a scoped proxy for this bean if you intend to refer to it from a singleton",
12            ex);
13}
requestscope的get方法:
1    public Object get(String name, ObjectFactory objectFactory) {               //获取当前线程属性集合
2        RequestAttributes attributes = RequestContextHolder.currentRequestAttributes();
3        Object scopedObject = attributes.getAttribute(name, getScope());        if (scopedObject == null) {//不在属性集则调用createBean创建,然后放入集合
4            scopedObject = objectFactory.getObject();
5            attributes.setAttribute(name, scopedObject, getScope());
6        }        return scopedObject;
7    }
可知requestAttributesHolder属性是threadlocal
1public abstract class RequestContextHolder  {    private static final boolean jsfPresent =
2            ClassUtils.isPresent("javax.faces.context.FacesContext", RequestContextHolder.class.getClassLoader());    private static final ThreadLocal<RequestAttributes> requestAttributesHolder =            new NamedThreadLocal<RequestAttributes>("Request attributes");    private static final ThreadLocal<RequestAttributes> inheritableRequestAttributesHolder =            new NamedInheritableThreadLocal<RequestAttributes>("Request context");
3}
本文分享自微信公众号 - 技术原始积累(gh_805ebfd2deb0)。
如有侵权,请联系 support@oschina.cn 删除。
本文参与“OSC源创计划”,欢迎正在阅读的你也加入,一起分享。