
转:https://www.cnblogs.com/zrtqsk/p/3735273.html
Spring作为当前Java最流行、最强大的轻量级框架,受到了程序员的热烈欢迎。准确的了解Spring Bean的生命周期是非常必要的。我们通常使用ApplicationContext作为Spring容器。这里,我们讲的也是 ApplicationContext中Bean的生命周期。而实际上BeanFactory也是差不多的,只不过处理器需要手动注册。
转载请注明地址 http://www.cnblogs.com/zrtqsk/p/3735273.html,谢谢。
一、生命周期流程图:
Spring Bean的完整生命周期从创建Spring容器开始,直到最终Spring容器销毁Bean,这其中包含了一系列关键点。
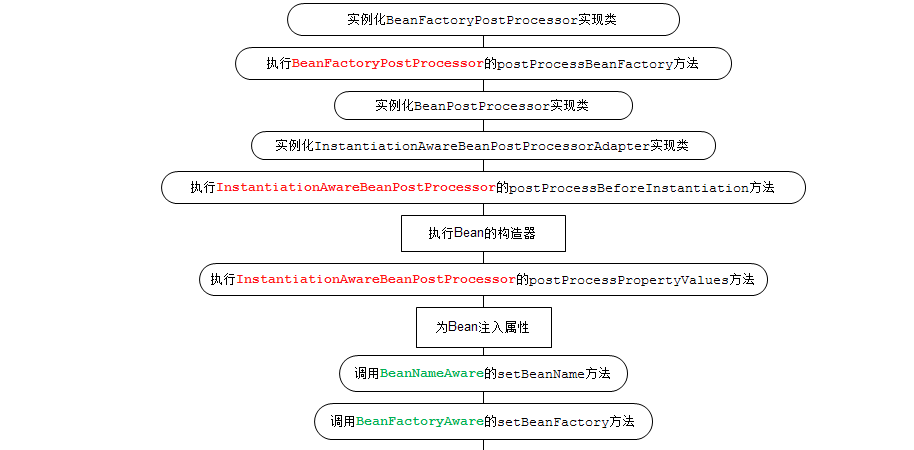

若容器注册了以上各种接口,程序那么将会按照以上的流程进行。下面将仔细讲解各接口作用。
二、各种接口方法分类
Bean的完整生命周期经历了各种方法调用,这些方法可以划分为以下几类:
1、Bean自身的方法 : 这个包括了Bean本身调用的方法和通过配置文件中<bean>的init-method和destroy-method指定的方法
2、Bean级生命周期接口方法 : 这个包括了BeanNameAware、BeanFactoryAware、InitializingBean和DiposableBean这些接口的方法
3、容器级生命周期接口方法 : 这个包括了InstantiationAwareBeanPostProcessor 和 BeanPostProcessor 这两个接口实现,一般称它们的实现类为“后处理器”。
4、工厂后处理器接口方法 : 这个包括了AspectJWeavingEnabler, ConfigurationClassPostProcessor, CustomAutowireConfigurer等等非常有用的工厂后处理器 接口的方法。工厂后处理器也是容器级的。在应用上下文装配配置文件之后立即调用。
三、演示
我们用一个简单的Spring Bean来演示一下Spring Bean的生命周期。
1、首先是一个简单的Spring Bean,调用Bean自身的方法和Bean级生命周期接口方法,为了方便演示,它实现了BeanNameAware、BeanFactoryAware、InitializingBean和DiposableBean这4个接口,同时有2个方法,对应配置文件中<bean>的init-method和destroy-method。如下:

11 package springBeanTest;
2 2
3 3 import org.springframework.beans.BeansException;
4 4 import org.springframework.beans.factory.BeanFactory;
5 5 import org.springframework.beans.factory.BeanFactoryAware;
6 6 import org.springframework.beans.factory.BeanNameAware;
7 7 import org.springframework.beans.factory.DisposableBean;
8 8 import org.springframework.beans.factory.InitializingBean;
9 9
1010 /**
1111  * @author qsk
1212  */
1313 public class Person implements BeanFactoryAware, BeanNameAware,
1414         InitializingBean, DisposableBean {
1515
1616     private String name;
1717     private String address;
1818     private int phone;
1919
2020     private BeanFactory beanFactory;
2121     private String beanName;
2222
2323     public Person() {
2424         System.out.println("【构造器】调用Person的构造器实例化");
2525     }
2626
2727     public String getName() {
2828         return name;
2929     }
3030
3131     public void setName(String name) {
3232         System.out.println("【注入属性】注入属性name");
3333         this.name = name;
3434     }
3535
3636     public String getAddress() {
3737         return address;
3838     }
3939
4040     public void setAddress(String address) {
4141         System.out.println("【注入属性】注入属性address");
4242         this.address = address;
4343     }
4444
4545     public int getPhone() {
4646         return phone;
4747     }
4848
4949     public void setPhone(int phone) {
5050         System.out.println("【注入属性】注入属性phone");
5151         this.phone = phone;
5252     }
5353
5454     @Override
5555     public String toString() {
5656         return "Person [address=" + address + ", name=" + name + ", phone="
5757                 + phone + "]";
5858     }
5959
6060     // 这是BeanFactoryAware接口方法
6161     @Override
6262     public void setBeanFactory(BeanFactory arg0) throws BeansException {
6363         System.out
6464                 .println("【BeanFactoryAware接口】调用BeanFactoryAware.setBeanFactory()");
6565         this.beanFactory = arg0;
6666     }
6767
6868     // 这是BeanNameAware接口方法
6969     @Override
7070     public void setBeanName(String arg0) {
7171         System.out.println("【BeanNameAware接口】调用BeanNameAware.setBeanName()");
7272         this.beanName = arg0;
7373     }
7474
7575     // 这是InitializingBean接口方法
7676     @Override
7777     public void afterPropertiesSet() throws Exception {
7878         System.out
7979                 .println("【InitializingBean接口】调用InitializingBean.afterPropertiesSet()");
8080     }
8181
8282     // 这是DiposibleBean接口方法
8383     @Override
8484     public void destroy() throws Exception {
8585         System.out.println("【DiposibleBean接口】调用DiposibleBean.destory()");
8686     }
8787
8888     // 通过<bean>的init-method属性指定的初始化方法
8989     public void myInit() {
9090         System.out.println("【init-method】调用<bean>的init-method属性指定的初始化方法");
9191     }
9292
9393     // 通过<bean>的destroy-method属性指定的初始化方法
9494     public void myDestory() {
9595         System.out.println("【destroy-method】调用<bean>的destroy-method属性指定的初始化方法");
9696     }
9797 }

2、接下来是演示BeanPostProcessor接口的方法,如下:

11 package springBeanTest;
2 2
3 3 import org.springframework.beans.BeansException;
4 4 import org.springframework.beans.factory.config.BeanPostProcessor;
5 5
6 6 public class MyBeanPostProcessor implements BeanPostProcessor {
7 7
8 8     public MyBeanPostProcessor() {
9 9         super();
1010         System.out.println("这是BeanPostProcessor实现类构造器!!");
1111         // TODO Auto-generated constructor stub
1212     }
1313
1414     @Override
1515     public Object postProcessAfterInitialization(Object arg0, String arg1)
1616             throws BeansException {
1717         System.out
1818         .println("BeanPostProcessor接口方法postProcessAfterInitialization对属性进行更改!");
1919         return arg0;
2020     }
2121
2222     @Override
2323     public Object postProcessBeforeInitialization(Object arg0, String arg1)
2424             throws BeansException {
2525         System.out
2626         .println("BeanPostProcessor接口方法postProcessBeforeInitialization对属性进行更改!");
2727         return arg0;
2828     }
2929 }

如上,BeanPostProcessor接口包括2个方法postProcessAfterInitialization和postProcessBeforeInitialization,这两个方法的第一个参数都是要处理的Bean对象,第二个参数都是Bean的name。返回值也都是要处理的Bean对象。这里要注意。
3、InstantiationAwareBeanPostProcessor 接口本质是BeanPostProcessor的子接口,一般我们继承Spring为其提供的适配器类InstantiationAwareBeanPostProcessor Adapter来使用它,如下:

11 package springBeanTest;
2 2
3 3 import java.beans.PropertyDescriptor;
4 4
5 5 import org.springframework.beans.BeansException;
6 6 import org.springframework.beans.PropertyValues;
7 7 import org.springframework.beans.factory.config.InstantiationAwareBeanPostProcessorAdapter;
8 8
9 9 public class MyInstantiationAwareBeanPostProcessor extends
1010         InstantiationAwareBeanPostProcessorAdapter {
1111
1212     public MyInstantiationAwareBeanPostProcessor() {
1313         super();
1414         System.out
1515                 .println("这是InstantiationAwareBeanPostProcessorAdapter实现类构造器!!");
1616     }
1717
1818     // 接口方法、实例化Bean之前调用
1919     @Override
2020     public Object postProcessBeforeInstantiation(Class beanClass,
2121             String beanName) throws BeansException {
2222         System.out
2323                 .println("InstantiationAwareBeanPostProcessor调用postProcessBeforeInstantiation方法");
2424         return null;
2525     }
2626
2727     // 接口方法、实例化Bean之后调用
2828     @Override
2929     public Object postProcessAfterInitialization(Object bean, String beanName)
3030             throws BeansException {
3131         System.out
3232                 .println("InstantiationAwareBeanPostProcessor调用postProcessAfterInitialization方法");
3333         return bean;
3434     }
3535
3636     // 接口方法、设置某个属性时调用
3737     @Override
3838     public PropertyValues postProcessPropertyValues(PropertyValues pvs,
3939             PropertyDescriptor[] pds, Object bean, String beanName)
4040             throws BeansException {
4141         System.out
4242                 .println("InstantiationAwareBeanPostProcessor调用postProcessPropertyValues方法");
4343         return pvs;
4444     }
4545 }

这个有3个方法,其中第二个方法postProcessAfterInitialization就是重写了BeanPostProcessor的方法。第三个方法postProcessPropertyValues用来操作属性,返回值也应该是PropertyValues对象。
4、演示工厂后处理器接口方法,如下:

11 package springBeanTest;
2 2
3 3 import org.springframework.beans.BeansException;
4 4 import org.springframework.beans.factory.config.BeanDefinition;
5 5 import org.springframework.beans.factory.config.BeanFactoryPostProcessor;
6 6 import org.springframework.beans.factory.config.ConfigurableListableBeanFactory;
7 7
8 8 public class MyBeanFactoryPostProcessor implements BeanFactoryPostProcessor {
9 9
1010     public MyBeanFactoryPostProcessor() {
1111         super();
1212         System.out.println("这是BeanFactoryPostProcessor实现类构造器!!");
1313     }
1414
1515     @Override
1616     public void postProcessBeanFactory(ConfigurableListableBeanFactory arg0)
1717             throws BeansException {
1818         System.out
1919                 .println("BeanFactoryPostProcessor调用postProcessBeanFactory方法");
2020         BeanDefinition bd = arg0.getBeanDefinition("person");
2121         bd.getPropertyValues().addPropertyValue("phone", "110");
2222     }
2323
2424 }

5、配置文件如下beans.xml,很简单,使用ApplicationContext,处理器不用手动注册:

1<?xml version="1.0" encoding="UTF-8"?>
2
3<beans xmlns="http://www.springframework.org/schema/beans"
4    xmlns:xsi="http://www.w3.org/2001/XMLSchema-instance" xmlns:p="http://www.springframework.org/schema/p"
5    xmlns:aop="http://www.springframework.org/schema/aop" xmlns:tx="http://www.springframework.org/schema/tx"
6    xsi:schemaLocation="
7            http://www.springframework.org/schema/beans
8            http://www.springframework.org/schema/beans/spring-beans-3.2.xsd">
9
10    <bean id="beanPostProcessor" class="springBeanTest.MyBeanPostProcessor">
11    </bean>
12
13    <bean id="instantiationAwareBeanPostProcessor" class="springBeanTest.MyInstantiationAwareBeanPostProcessor">
14    </bean>
15
16    <bean id="beanFactoryPostProcessor" class="springBeanTest.MyBeanFactoryPostProcessor">
17    </bean>
18
19    <bean id="person" class="springBeanTest.Person" init-method="myInit"
20        destroy-method="myDestory" scope="singleton" p:name="张三" p:address="广州"
21        p:phone="15900000000" />
22
23</beans>

6、下面测试一下:

11 package springBeanTest;
2 2
3 3 import org.springframework.context.ApplicationContext;
4 4 import org.springframework.context.support.ClassPathXmlApplicationContext;
5 5
6 6 public class BeanLifeCycle {
7 7
8 8     public static void main(String[] args) {
9 9
1010         System.out.println("现在开始初始化容器");
1111
1212         ApplicationContext factory = new ClassPathXmlApplicationContext("springBeanTest/beans.xml");
1313         System.out.println("容器初始化成功");
1414         //得到Preson,并使用
1515         Person person = factory.getBean("person",Person.class);
1616         System.out.println(person);
1717
1818         System.out.println("现在开始关闭容器!");
1919         ((ClassPathXmlApplicationContext)factory).registerShutdownHook();
2020     }
2121 }

关闭容器使用的是实际是AbstractApplicationContext的钩子方法。
我们来看一下结果:

1现在开始初始化容器
22014-5-18 15:46:20 org.springframework.context.support.AbstractApplicationContext prepareRefresh
3信息: Refreshing org.springframework.context.support.ClassPathXmlApplicationContext@19a0c7c: startup date [Sun May 18 15:46:20 CST 2014]; root of context hierarchy
42014-5-18 15:46:20 org.springframework.beans.factory.xml.XmlBeanDefinitionReader loadBeanDefinitions
5信息: Loading XML bean definitions from class path resource [springBeanTest/beans.xml]
6这是BeanFactoryPostProcessor实现类构造器!!
7BeanFactoryPostProcessor调用postProcessBeanFactory方法
8这是BeanPostProcessor实现类构造器!!
9这是InstantiationAwareBeanPostProcessorAdapter实现类构造器!!
102014-5-18 15:46:20 org.springframework.beans.factory.support.DefaultListableBeanFactory preInstantiateSingletons
11信息: Pre-instantiating singletons in org.springframework.beans.factory.support.DefaultListableBeanFactory@9934d4: defining beans [beanPostProcessor,instantiationAwareBeanPostProcessor,beanFactoryPostProcessor,person]; root of factory hierarchy
12InstantiationAwareBeanPostProcessor调用postProcessBeforeInstantiation方法
13【构造器】调用Person的构造器实例化
14InstantiationAwareBeanPostProcessor调用postProcessPropertyValues方法
15【注入属性】注入属性address
16【注入属性】注入属性name
17【注入属性】注入属性phone
18【BeanNameAware接口】调用BeanNameAware.setBeanName()
19【BeanFactoryAware接口】调用BeanFactoryAware.setBeanFactory()
20BeanPostProcessor接口方法postProcessBeforeInitialization对属性进行更改!
21【InitializingBean接口】调用InitializingBean.afterPropertiesSet()
22【init-method】调用<bean>的init-method属性指定的初始化方法
23BeanPostProcessor接口方法postProcessAfterInitialization对属性进行更改!
24InstantiationAwareBeanPostProcessor调用postProcessAfterInitialization方法
25容器初始化成功
26Person [address=广州, name=张三, phone=110]
27现在开始关闭容器!
28【DiposibleBean接口】调用DiposibleBean.destory()
29【destroy-method】调用<bean>的destroy-method属性指定的初始化方法
