
一、k8s集群
1、k8s整体架构图
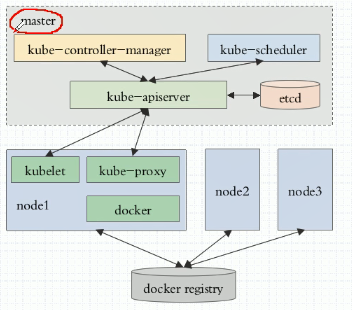
2、k8s网络架构图
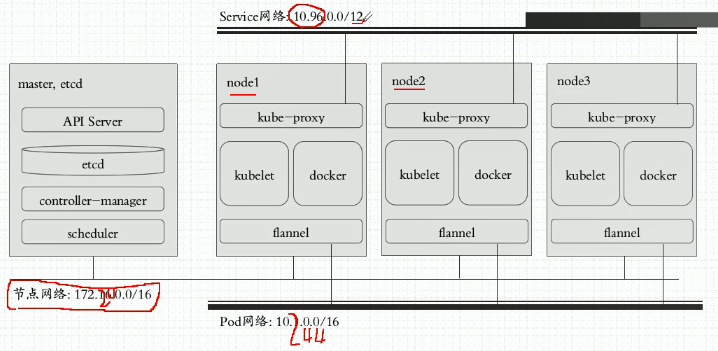
二、基于kubeadm安装k8s步骤
1、master,nodes:安装kubelet,kubeadm,docker
2、master: kubeadm init
3、各nodes: kubeadm join
4、k8s有两种部署方案
a、采用传统的方式来部署k8s自身,让k8s自己的相关组件统统运行为系统级的守护进程,这包括master节点上的四个组件以及每个node节点上的三个组件都运行为系统级的守护进程,但是这个每一步都需要我们自己解决,包括做证书等等,非常繁琐而复杂。
b、通过ansible 的 playbook。
c、通过kubeadm部署,将所有组件都部署在pod中(这些pod为静态pod)。只需要按照kubelet和docker以及flannel即可。
三、部署k8s
1、目前为止k8s官方对docker的支持只到17.03
2、节点规划
master节点:192.168.10.10
node1节点: 192.168.10.11
node2节点: 192.168.10.12
k8s版本:1.11
3、在各节点中添加host并配置master 免密登陆
1[root@localhost ~]# ssh-keygen   #获取节点公钥
2Generating public/private rsa key pair.
3Enter file in which to save the key (/root/.ssh/id_rsa):
4Created directory '/root/.ssh'.
5Enter passphrase (empty for no passphrase):
6Enter same passphrase again:
7Your identification has been saved in /root/.ssh/id_rsa.
8Your public key has been saved in /root/.ssh/id_rsa.pub.
9The key fingerprint is:
10SHA256:1Ww6zH+E56Kmb2/+2tGguLm+a0dJtyEA+alJcoapTIE root@localhost.localdomain
11The key's randomart image is:
12+---[RSA 2048]----+
13|   .    .o       |
14|  E .   . .o     |
15|     . o ..o+    |
16|    . + ++ooo.o  |
17|   o . =So=..++o |
18|    o   o  +o=.o |
19|          ..+ + .|
20|          ++o+ . |
21|        .BXO+oo  |
22+----[SHA256]-----+
23
24[root@localhost ~]# sed -i '35a StrictHostKeyChecking no' /etc/ssh/ssh_config     #取消登陆提示
25
26#下发公钥,若无sshpass命令  使用yum 安装即可
27[root@localhost ~]# sshpass -p 123456 ssh-copy-id -i /root/.ssh/id_rsa.pub 192.168.10.11
28/usr/bin/ssh-copy-id: INFO: Source of key(s) to be installed: "/root/.ssh/id_rsa.pub"
29/usr/bin/ssh-copy-id: INFO: attempting to log in with the new key(s), to filter out any that are already installed
30/usr/bin/ssh-copy-id: INFO: 1 key(s) remain to be installed -- if you are prompted now it is to install the new keys
31
32Number of key(s) added: 1
33
34Now try logging into the machine, with:   "ssh '192.168.10.11'"
35and check to make sure that only the key(s) you wanted were added.
36
37[root@localhost ~]# sshpass -p 123456 ssh-copy-id -i /root/.ssh/id_rsa.pub 192.168.10.12
38/usr/bin/ssh-copy-id: INFO: Source of key(s) to be installed: "/root/.ssh/id_rsa.pub"
39/usr/bin/ssh-copy-id: INFO: attempting to log in with the new key(s), to filter out any that are already installed
40/usr/bin/ssh-copy-id: INFO: 1 key(s) remain to be installed -- if you are prompted now it is to install the new keys
41
42Number of key(s) added: 1
43
44Now try logging into the machine, with:   "ssh '192.168.10.12'"
45and check to make sure that only the key(s) you wanted were added.
46
47[root@localhost ~]# ssh 192.168.10.11
48Last login: Wed May  8 18:11:06 2019 from 192.168.10.1
49[root@localhost ~]# exit
50logout
51Connection to 192.168.10.11 closed.
4、所有节点做时间同步并(关闭firewalld和禁用开机启动)
在xshell 窗口上打开所有会话
1[root@localhost ~]# date -s "2019/5/8 10:39:00"  #修改时间
2Wed May  8 10:39:00 CST 2019
3[root@localhost ~]# hwclock -w    #写入硬件
5、各节点设置docker阿里云源
1[root@localhost ~]# cd /etc/yum.repos.d/
2[root@localhost yum.repos.d]# wget https://mirrors.aliyun.com/docker-ce/linux/centos/docker-ce.repo
3--2019-05-08 10:59:56--  https://mirrors.aliyun.com/docker-ce/linux/centos/docker-ce.repo
4Resolving mirrors.aliyun.com (mirrors.aliyun.com)... 118.112.14.225, 118.112.14.10, 118.112.14.8, ...
5Connecting to mirrors.aliyun.com (mirrors.aliyun.com)|118.112.14.225|:443... connected.
6HTTP request sent, awaiting response... 200 OK
7Length: 2640 (2.6K) [application/octet-stream]
8Saving to: ‘docker-ce.repo’
9
10100%[===================================================================================================================================================>] 2,640       --.-K/s   in 0s
11
122019-05-08 10:59:57 (349 MB/s) - ‘docker-ce.repo’ saved [2640/2640]
6、各节点设置k8s 阿里云源
1[root@localhost yum.repos.d]# cat > /etc/yum.repos.d/kubernetes.repo <<EOF
2> [kubernetes]
3> name=Kubernetes Repo
4> baseurl=https://mirrors.aliyun.com/kubernetes/yum/repos/kubernetes-el7-x86_64/
5> gpgcheck=0
6> gpgkey=https://mirrors.aliyun.com/kubernetes/yum/doc/yum-key.gpg
7> enabled=1
8> EOF
9
10#导入yum-key和package-key
11[root@localhost ~]# wget https://mirrors.aliyun.com/kubernetes/yum/doc/yum-key.gpg
12--2019-05-08 11:30:12--  https://mirrors.aliyun.com/kubernetes/yum/doc/yum-key.gpg
13Resolving mirrors.aliyun.com (mirrors.aliyun.com)... 118.112.14.11, 118.112.14.224, 118.112.14.10, ...
14Connecting to mirrors.aliyun.com (mirrors.aliyun.com)|118.112.14.11|:443... connected.
15HTTP request sent, awaiting response... 200 OK
16Length: 1885 (1.8K) [application/octet-stream]
17Saving to: ‘yum-key.gpg’
18
19100%[===================================================================================================================================================>] 1,885       --.-K/s   in 0s
20
212019-05-08 11:30:12 (13.7 MB/s) - ‘yum-key.gpg’ saved [1885/1885]
22
23[root@localhost ~]# rpm --import yum-key.gpg
24[root@localhost ~]# wget https://mirrors.aliyun.com/kubernetes/yum/doc/rpm-package-key.gpg
25--2019-05-08 11:31:54--  https://mirrors.aliyun.com/kubernetes/yum/doc/rpm-package-key.gpg
26Resolving mirrors.aliyun.com (mirrors.aliyun.com)... 118.112.14.7, 118.112.14.224, 118.112.14.225, ...
27Connecting to mirrors.aliyun.com (mirrors.aliyun.com)|118.112.14.7|:443... connected.
28HTTP request sent, awaiting response... 200 OK
29Length: 975 [application/octet-stream]
30Saving to: ‘rpm-package-key.gpg’
31
32100%[===================================================================================================================================================>] 975         --.-K/s   in 0s
33
342019-05-08 11:31:54 (146 MB/s) - ‘rpm-package-key.gpg’ saved [975/975]
35
36[root@localhost ~]# rpm --import rpm-package-key.gpg
7、各节点开始安装
[root@localhost /]# yum install -y docker-ce-18.06.0.ce-3.el7 kubelet-1.11.1 kubeadm-1.11.1 kubectl-1.11.1 kubernetes-cni-0.6.0-0.x86_64 #若要安装其它版本docker则直接写docker-ce-version即可
8、启动docker,docker会自动到仓库加载相应镜像,但是由于涉及到FQ,因此需要将相关镜像先导入到本地才行。不过我们现在可以借用别人提供的代理路径进行下载。加载完后需要将其注释掉然后继续使用国内的相应仓库进行镜像加载。
编辑 /usr/lib/systemd/system/docker.service文件,在[Service]下面添加如下内容:
Environment="HTTPS_PROXY=http://192.168.10.1:1080" #这是本地代理端口
Environment="HTTP_PROXY=http://192.168.10.1:1080" #这是本地代理端口
Environment="NO_PROXY=127.0.0.0/8,192.168.10.0/24"
1[root@localhost ~]# systemctl daemon-reload
2[root@localhost ~]# systemctl restart docker
3[root@localhost ~]# docker info
4Containers: 0
5 Running: 0
6 Paused: 0
7 Stopped: 0
8Images: 0
9Server Version: 18.09.6
10Storage Driver: overlay2
11 Backing Filesystem: xfs
12 Supports d_type: true
13 Native Overlay Diff: true
14Logging Driver: json-file
15Cgroup Driver: cgroupfs
16Plugins:
17 Volume: local
18 Network: bridge host macvlan null overlay
19 Log: awslogs fluentd gcplogs gelf journald json-file local logentries splunk syslog
20Swarm: inactive
21Runtimes: runc
22Default Runtime: runc
23Init Binary: docker-init
24containerd version: bb71b10fd8f58240ca47fbb579b9d1028eea7c84
25runc version: 2b18fe1d885ee5083ef9f0838fee39b62d653e30
26init version: fec3683
27Security Options:
28 seccomp
29  Profile: default
30Kernel Version: 3.10.0-693.el7.x86_64
31Operating System: CentOS Linux 7 (Core)
32OSType: linux
33Architecture: x86_64
34CPUs: 4
35Total Memory: 1.781GiB
36Name: k8smaster
37ID: RW6C:KASL:OFHE:QOAY:ZUIY:UYCF:KYA7:ACRY:7MDT:WIPV:2G4R:FV3H
38Docker Root Dir: /var/lib/docker
39Debug Mode (client): false
40Debug Mode (server): false
41HTTPS Proxy: http://www.ik8s.io:10080
42No Proxy: 127.0.0.0/8,172.20.0.0/16
43Registry: https://index.docker.io/v1/
44Labels:
45Experimental: false
46Insecure Registries:
47 127.0.0.0/8
48Live Restore Enabled: false
49Product License: Community Engine
9、所有节点设置kubelet开机自启动(暂时不要启动,启动会失败),并且设置docker开机启动
1[root@localhost ~]# rpm -ql kubelet
2/etc/kubernetes/manifests  #清单目录
3/etc/sysconfig/kubelet  #配置文件
4/usr/bin/kubelet  #主程序
5/usr/lib/systemd/system/kubelet.service 开机启动文件
[root@localhost ~]# cat /etc/sysconfig/kubelet
KUBELET_EXTRA_ARGS= #早期的k8s要求不能开swap,否则无法安装也无法启动,但是现在可以忽略这个警告,就是在这个参数中设置。
[root@localhost ~]# systemctl enable kubelet.service
Created symlink from /etc/systemd/system/multi-user.target.wants/kubelet.service to /usr/lib/systemd/system/kubelet.service.
[root@localhost ~]# systemctl enable docker.service
Created symlink from /etc/systemd/system/multi-user.target.wants/docker.service to /usr/lib/systemd/system/docker.service.
10、初始化k8s集群master节点
1[root@localhost ~]# cat /etc/sysconfig/kubelet
2KUBELET_EXTRA_ARGS="--fail-swap-on=false"
3
4[root@k8smaster ~]# kubeadm init --kubernetes-version=v1.11.1 --pod-network-cidr=10.244.0.0/16 --service-cidr=10.96.0.0/12 --ignore-preflight-errors=Swap
5[init] using Kubernetes version: v1.11.1
6[preflight] running pre-flight checks
7    [WARNING Swap]: running with swap on is not supported. Please disable swap
8I0508 17:57:18.226228   49485 kernel_validator.go:81] Validating kernel version
9I0508 17:57:18.226357   49485 kernel_validator.go:96] Validating kernel config
10    [WARNING SystemVerification]: docker version is greater than the most recently validated version. Docker version: 18.06.0-ce. Max validated version: 17.03
11[preflight/images] Pulling images required for setting up a Kubernetes cluster
12[preflight/images] This might take a minute or two, depending on the speed of your internet connection
13[preflight/images] You can also perform this action in beforehand using 'kubeadm config images pull'
14[kubelet] Writing kubelet environment file with flags to file "/var/lib/kubelet/kubeadm-flags.env"
15[kubelet] Writing kubelet configuration to file "/var/lib/kubelet/config.yaml"
16[preflight] Activating the kubelet service
17[certificates] Generated ca certificate and key.
18[certificates] Generated apiserver certificate and key.
19[certificates] apiserver serving cert is signed for DNS names [k8smaster kubernetes kubernetes.default kubernetes.default.svc kubernetes.default.svc.cluster.local] and IPs [10.96.0.1 192.16
208.10.10][certificates] Generated apiserver-kubelet-client certificate and key.
21[certificates] Generated sa key and public key.
22[certificates] Generated front-proxy-ca certificate and key.
23[certificates] Generated front-proxy-client certificate and key.
24[certificates] Generated etcd/ca certificate and key.
25[certificates] Generated etcd/server certificate and key.
26[certificates] etcd/server serving cert is signed for DNS names [k8smaster localhost] and IPs [127.0.0.1 ::1]
27[certificates] Generated etcd/peer certificate and key.
28[certificates] etcd/peer serving cert is signed for DNS names [k8smaster localhost] and IPs [192.168.10.10 127.0.0.1 ::1]
29[certificates] Generated etcd/healthcheck-client certificate and key.
30[certificates] Generated apiserver-etcd-client certificate and key.
31[certificates] valid certificates and keys now exist in "/etc/kubernetes/pki"
32[kubeconfig] Wrote KubeConfig file to disk: "/etc/kubernetes/admin.conf"
33[kubeconfig] Wrote KubeConfig file to disk: "/etc/kubernetes/kubelet.conf"
34[kubeconfig] Wrote KubeConfig file to disk: "/etc/kubernetes/controller-manager.conf"
35[kubeconfig] Wrote KubeConfig file to disk: "/etc/kubernetes/scheduler.conf"
36[controlplane] wrote Static Pod manifest for component kube-apiserver to "/etc/kubernetes/manifests/kube-apiserver.yaml"
37[controlplane] wrote Static Pod manifest for component kube-controller-manager to "/etc/kubernetes/manifests/kube-controller-manager.yaml"
38[controlplane] wrote Static Pod manifest for component kube-scheduler to "/etc/kubernetes/manifests/kube-scheduler.yaml"
39[etcd] Wrote Static Pod manifest for a local etcd instance to "/etc/kubernetes/manifests/etcd.yaml"
40[init] waiting for the kubelet to boot up the control plane as Static Pods from directory "/etc/kubernetes/manifests"
41[init] this might take a minute or longer if the control plane images have to be pulled
42[apiclient] All control plane components are healthy after 45.011749 seconds
43[uploadconfig] storing the configuration used in ConfigMap "kubeadm-config" in the "kube-system" Namespace
44[kubelet] Creating a ConfigMap "kubelet-config-1.11" in namespace kube-system with the configuration for the kubelets in the cluster
45[markmaster] Marking the node k8smaster as master by adding the label "node-role.kubernetes.io/master=''"
46[markmaster] Marking the node k8smaster as master by adding the taints [node-role.kubernetes.io/master:NoSchedule]
47[patchnode] Uploading the CRI Socket information "/var/run/dockershim.sock" to the Node API object "k8smaster" as an annotation
48[bootstraptoken] using token: fgtp9x.z8gzf2coiouxzr1e
49[bootstraptoken] configured RBAC rules to allow Node Bootstrap tokens to post CSRs in order for nodes to get long term certificate credentials
50[bootstraptoken] configured RBAC rules to allow the csrapprover controller automatically approve CSRs from a Node Bootstrap Token
51[bootstraptoken] configured RBAC rules to allow certificate rotation for all node client certificates in the cluster
52[bootstraptoken] creating the "cluster-info" ConfigMap in the "kube-public" namespace
53[addons] Applied essential addon: CoreDNS
54[addons] Applied essential addon: kube-proxy
55
56Your Kubernetes master has initialized successfully!
57
58To start using your cluster, you need to run the following as a regular user:
59
60  mkdir -p $HOME/.kube
61  sudo cp -i /etc/kubernetes/admin.conf $HOME/.kube/config
62  sudo chown $(id -u):$(id -g) $HOME/.kube/config
63
64You should now deploy a pod network to the cluster.
65Run "kubectl apply -f [podnetwork].yaml" with one of the options listed at:
66  https://kubernetes.io/docs/concepts/cluster-administration/addons/
67
68You can now join any number of machines by running the following on each node
69as root:
70
71  kubeadm join 192.168.10.10:6443 --token(域共享秘钥) fgtp9x.z8gzf2coiouxzr1e --discovery-token-ca-cert-hash(相关证书的哈希码) sha256:eec6e45b46868097fb6dc5c1007a4ed801f67950b5ea4949d9169fcde6d018cc  #在其它节点上可以使用此命令将该节点加入该k8s集群
查看拖下来的镜像
1[root@k8smaster ~]# docker images
2REPOSITORY                                 TAG                 IMAGE ID            CREATED             SIZE
3k8s.gcr.io/kube-proxy-amd64                v1.11.1             d5c25579d0ff        9 months ago        97.8MB
4k8s.gcr.io/kube-scheduler-amd64            v1.11.1             272b3a60cd68        9 months ago        56.8MB
5k8s.gcr.io/kube-controller-manager-amd64   v1.11.1             52096ee87d0e        9 months ago        155MB
6k8s.gcr.io/kube-apiserver-amd64            v1.11.1             816332bd9d11        9 months ago        187MB
7k8s.gcr.io/coredns                         1.1.3               b3b94275d97c        11 months ago       45.6MB
8k8s.gcr.io/etcd-amd64                      3.2.18              b8df3b177be2        13 months ago       219MB
9k8s.gcr.io/pause                           3.1                 da86e6ba6ca1        16 months ago       742kB
执行初始化时提供的命令
1[root@k8smaster ~]# mkdir -p $HOME/.kube
2[root@k8smaster ~]# cp -i /etc/kubernetes/admin.conf $HOME/.kube/config
运行命令查看集群状态,会发现集群处于NotReady状态,因此此时还没有安装flannel
1[root@k8smaster ~]# kubectl get nodes
2NAME        STATUS     ROLES     AGE       VERSION
3k8smaster   NotReady   master    15h       v1.11.1
4[root@k8smaster ~]# kubectl get componentstatus #获取集群组件状态信息,也可以将componentstatus简写为cs
5NAME                 STATUS    MESSAGE              ERROR
6controller-manager   Healthy   ok
7scheduler            Healthy   ok
8etcd-0               Healthy   {"health": "true"}
11、在master节点上部署flannel组件
1[root@k8smaster ~]# kubectl apply -f https://raw.githubusercontent.com/coreos/flannel/master/Documentation/kube-flannel.yml
2podsecuritypolicy.extensions/psp.flannel.unprivileged created
3clusterrole.rbac.authorization.k8s.io/flannel created
4clusterrolebinding.rbac.authorization.k8s.io/flannel created
5serviceaccount/flannel created
6configmap/kube-flannel-cfg created
7daemonset.extensions/kube-flannel-ds-amd64 created
8daemonset.extensions/kube-flannel-ds-arm64 created
9daemonset.extensions/kube-flannel-ds-arm created
10daemonset.extensions/kube-flannel-ds-ppc64le created
11daemonset.extensions/kube-flannel-ds-s390x created
12
13等一段时间查看是否已经有flannel镜像
14[root@k8smaster ~]# docker images
15REPOSITORY                                 TAG                 IMAGE ID            CREATED             SIZE
16quay.io/coreos/flannel                     v0.11.0-amd64       ff281650a721        3 months ago        52.6MB
17k8s.gcr.io/kube-proxy-amd64                v1.11.1             d5c25579d0ff        9 months ago        97.8MB
18k8s.gcr.io/kube-apiserver-amd64            v1.11.1             816332bd9d11        9 months ago        187MB
19k8s.gcr.io/kube-controller-manager-amd64   v1.11.1             52096ee87d0e        9 months ago        155MB
20k8s.gcr.io/kube-scheduler-amd64            v1.11.1             272b3a60cd68        9 months ago        56.8MB
21k8s.gcr.io/coredns                         1.1.3               b3b94275d97c        11 months ago       45.6MB
22k8s.gcr.io/etcd-amd64                      3.2.18              b8df3b177be2        13 months ago       219MB
23k8s.gcr.io/pause                           3.1                 da86e6ba6ca1        16 months ago       742kB
24
25#此时查看节点状态已经正常
26[root@k8smaster ~]# kubectl get nodes
27NAME        STATUS    ROLES     AGE       VERSION
28k8smaster   Ready     master    15h       v1.11.1
29
30#查看系统名称空间中的pod
31[root@k8smaster ~]# kubectl get pods --all-namespaces
32NAMESPACE     NAME                                READY     STATUS    RESTARTS   AGE
33kube-system   coredns-78fcdf6894-6qs64            1/1       Running   0          15h
34kube-system   coredns-78fcdf6894-bhzf4            1/1       Running   0          15h
35kube-system   etcd-k8smaster                      1/1       Running   0          1m
36kube-system   kube-apiserver-k8smaster            1/1       Running   0          1m
37kube-system   kube-controller-manager-k8smaster   1/1       Running   0          1m
38kube-system   kube-flannel-ds-amd64-nskmt         1/1       Running   0          5m
39kube-system   kube-proxy-fknmj                    1/1       Running   0          15h
40kube-system   kube-scheduler-k8smaster            1/1       Running   0          1m
41
42#查看所有名称空间
43[root@k8smaster ~]# kubectl get namespaces #也可以简写为ns
44NAME          STATUS    AGE
45default       Active    15h
46kube-public   Active    15h
47kube-system   Active    15h
12、各节点配置加入master集群
执行master初始化时提醒的命令,并且再加--ignore-preflight-errors=Swap即可
1[root@k8snode1 ~]# kubeadm join 192.168.10.10:6443 --token fgtp9x.z8gzf2coiouxzr1e --discovery-token-ca-cert-hash  sha256:eec6e45b46868097fb6dc5c1007a4ed801f67950b5ea4949d9169fcde6d018cc --
2ignore-preflight-errors=Swap[preflight] running pre-flight checks
3    [WARNING RequiredIPVSKernelModulesAvailable]: the IPVS proxier will not be used, because the following required kernel modules are not loaded: [ip_vs_rr ip_vs_wrr ip_vs_sh ip_vs] or
4 no builtin kernel ipvs support: map[ip_vs_rr:{} ip_vs_wrr:{} ip_vs_sh:{} nf_conntrack_ipv4:{} ip_vs:{}]you can solve this problem with following methods:
5 1. Run 'modprobe -- ' to load missing kernel modules;
62. Provide the missing builtin kernel ipvs support
7
8    [WARNING Swap]: running with swap on is not supported. Please disable swap
9I0509 09:53:21.495533   43376 kernel_validator.go:81] Validating kernel version
10I0509 09:53:21.495936   43376 kernel_validator.go:96] Validating kernel config
11    [WARNING SystemVerification]: docker version is greater than the most recently validated version. Docker version: 18.06.0-ce. Max validated version: 17.03
12[discovery] Trying to connect to API Server "192.168.10.10:6443"
13[discovery] Created cluster-info discovery client, requesting info from "https://192.168.10.10:6443"
14[discovery] Requesting info from "https://192.168.10.10:6443" again to validate TLS against the pinned public key
15[discovery] Cluster info signature and contents are valid and TLS certificate validates against pinned roots, will use API Server "192.168.10.10:6443"
16[discovery] Successfully established connection with API Server "192.168.10.10:6443"
17[kubelet] Downloading configuration for the kubelet from the "kubelet-config-1.11" ConfigMap in the kube-system namespace
18[kubelet] Writing kubelet configuration to file "/var/lib/kubelet/config.yaml"
19[kubelet] Writing kubelet environment file with flags to file "/var/lib/kubelet/kubeadm-flags.env"
20[preflight] Activating the kubelet service
21[tlsbootstrap] Waiting for the kubelet to perform the TLS Bootstrap...
22[patchnode] Uploading the CRI Socket information "/var/run/dockershim.sock" to the Node API object "k8snode1" as an annotation
23
24This node has joined the cluster:
25* Certificate signing request was sent to master and a response
26  was received.
27* The Kubelet was informed of the new secure connection details.
28
29Run 'kubectl get nodes' on the master to see this node join the cluster.
加入后集群也会拉取相关镜像,等拉取镜像后启动起来后可在master节点上查看node处于ready状态
1[root@k8snode1 ~]# docker images
2REPOSITORY                    TAG                 IMAGE ID            CREATED             SIZE
3quay.io/coreos/flannel        v0.11.0-amd64       ff281650a721        3 months ago        52.6MB
4k8s.gcr.io/kube-proxy-amd64   v1.11.1             d5c25579d0ff        9 months ago        97.8MB
5k8s.gcr.io/pause              3.1                 da86e6ba6ca1        16 months ago       742kB
13、查看搭建好的简单的k8s集群
1[root@k8smaster ~]# kubectl get nodes -o wide
2NAME        STATUS    ROLES     AGE       VERSION   INTERNAL-IP     EXTERNAL-IP   OS-IMAGE                KERNEL-VERSION          CONTAINER-RUNTIME
3k8smaster   Ready     master    16h       v1.11.1   192.168.10.10   <none>        CentOS Linux 7 (Core)   3.10.0-693.el7.x86_64   docker://18.6.0
4k8snode1    Ready     <none>    18m       v1.11.1   192.168.10.11   <none>        CentOS Linux 7 (Core)   3.10.0-693.el7.x86_64   docker://18.6.0
5k8snode2    Ready     <none>    4m        v1.11.1   192.168.10.12   <none>        CentOS Linux 7 (Core)   3.10.0-693.el7.x86_64   docker://18.6.0
6[root@k8smaster ~]# kubectl get pods -n kube-system -o wide
7NAME                                READY     STATUS    RESTARTS   AGE       IP              NODE
8coredns-78fcdf6894-6qs64            1/1       Running   0          16h       10.244.0.2      k8smaster
9coredns-78fcdf6894-bhzf4            1/1       Running   0          16h       10.244.0.3      k8smaster
10etcd-k8smaster                      1/1       Running   0          34m       192.168.10.10   k8smaster
11kube-apiserver-k8smaster            1/1       Running   0          34m       192.168.10.10   k8smaster
12kube-controller-manager-k8smaster   1/1       Running   0          34m       192.168.10.10   k8smaster
13kube-flannel-ds-amd64-d22fv         1/1       Running   0          4m        192.168.10.12   k8snode2
14kube-flannel-ds-amd64-nskmt         1/1       Running   0          38m       192.168.10.10   k8smaster
15kube-flannel-ds-amd64-q4jvr         1/1       Running   0          18m       192.168.10.11   k8snode1
16kube-proxy-6858m                    1/1       Running   0          4m        192.168.10.12   k8snode2
17kube-proxy-6btdl                    1/1       Running   0          18m       192.168.10.11   k8snode1
18kube-proxy-fknmj                    1/1       Running   0          16h       192.168.10.10   k8smaster
19kube-scheduler-k8smaster            1/1       Running   0          34m       192.168.10.10   k8smaster
至此,k8s简单集群搭建完成。