
点击上方蓝色字体,选择“设为星标”
回复”资源“获取更多资源

本文作者:Sheep Sun
本文链接:https://www.cnblogs.com/yangxusun9/p/12558683.html

点击右侧关注,大数据开发领域最强公众号!


点击右侧关注,暴走大数据!

一、Sqoop简介
Sqoop将用户编写的Sqoop命令翻译为MR程序,MR程序读取关系型数据库中的数据,写入到HDFS或读取HDFS上的数据,写入到关系型数据库!
在MR程序中如果要读取关系型数据库中的数据,必须指定输入格式为DBInputformat!
在MR程序中如果要向关系型数据库写入数据,必须指定输出格式为DBOutputformat!
Sqoop命令运行的MR程序, 只有Map阶段,没有Reduce阶段!只需要做数据传输, 不需要对数据进行合并和排序!
二、sqoop导入数据(将关系型数据库的数据导入到 HDFS)
数据如下
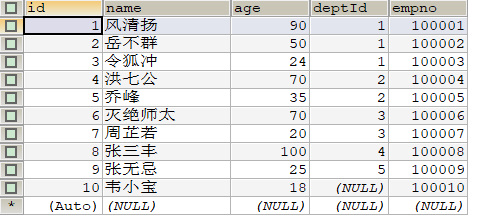
2.1 直接导入HDFS
2.1.1 全表导入(部分导入)
1`bin/sqoop import \`
2
3
4
5`##连接的关系型数据库的url,用户名,密码`
6
7
8
9`--connect jdbc:mysql://hadoop102:3306/test \`
10
11
12
13`--username root \`
14
15
16
17`--password 123 \`
18
19
20
21`##连接的表`
22
23
24
25`--table t_emp \`
26
27
28
29`##导出数据在hdfs上存放路径`
30
31
32
33`--target-dir /sqoopTest \`
34
35
36
37`##如果路径已存在则先删除`
38
39
40
41`--delete-target-dir \`
42
43
44
45`##导入到Hdfs上后,每个字段使用什么参数进行分割`
46
47
48
49`--fields-terminated-by "\t" \`
50
51
52
53`##要启动几个MapTask,默认4个`
54
55
56
57`--num-mappers 2 \`
58
59
60
61`##数据集根据哪个字段进行切分,切分后每个MapTask负责一部分`
62
63
64
65`--split-by id \`
66
67
68
69`##要实现部分导入,加入下面的参数,表示导入哪些列`
70
71
72
73`##columns中如果涉及到多列,用逗号分隔,分隔时不要添加空格`
74
75
76
77`--columns id,name,age`
78
2.1.2 使用sqoop****关键字筛选查询导入数据
1`bin/sqoop import \`
2
3
4
5`--connect jdbc:mysql://hadoop102:3306/test \`
6
7
8
9`--username root \`
10
11
12
13`--password 123 \`
14
15
16
17`--table t_emp \`
18
19
20
21`##指定过滤的where语句,where语句最好使用引号包裹`
22
23
24
25`--where 'id>6' \`
26
27
28
29`--target-dir /sqoopTest \`
30
31
32
33`--delete-target-dir \`
34
35
36
37`--fields-terminated-by "\t" \`
38
39
40
41`--num-mappers 1 \`
42
43
44
45`--split-by id`
46
47
48
49
50
2.1.3 使用查询语句导入
1`bin/sqoop import \`
2
3
4
5`--connect jdbc:mysql://hadoop102:3306/test \`
6
7
8
9`--username root \`
10
11
12
13`--password 123 \`
14
15
16
17`##查询语句最好使用单引号`
18
19
20
21`##如果query后使用的是双引号,则$CONDITIONS前必须加转移符,防止shell识别为自己的变量`
22
23
24
25`--query 'select * from t_emp where id>3 and $CONDITIONS' \`
26
27
28
29`--target-dir /sqoopTest \`
30
31
32
33`--delete-target-dir \`
34
35
36
37`--fields-terminated-by "\t" \`
38
39
40
41`--num-mappers 1 \`
42
43
44
45`--split-by id`
46
注意:
1、如果使用了--query,就不能指定--table,和--columns和--where
--query 和 --table一定不能同时存在!
--where和--query同时存在时,--where失效
--columns和--query同时存在时,还有效!
2、--query 必须跟--target-dir
2.2 导入到Hive
1`bin/sqoop import \`
2
3
4
5`--connect jdbc:mysql://hadoop102:3306/test \`
6
7
8
9`--username root \`
10
11
12
13`--password 123 \`
14
15
16
17`--query 'select * from t_emp where id>3 and $CONDITIONS' \`
18
19
20
21`--target-dir /sqoopTest \`
22
23
24
25`##如果不限定分隔符,那么hive存储的数据将不带分隔符,之后再想操作很麻烦,所以建议加上`
26
27
28
29`--fields-terminated-by "\t" \`
30
31
32
33`--delete-target-dir \`
34
35
36
37`##导入到hive`
38
39
40
41`--hive-import \`
42
43
44
45`##是否覆盖写,不加这个参数就是追加写`
46
47
48
49`--hive-overwrite \`
50
51
52
53`##指定要导入的hive的表名`
54
55
56
57`--hive-table t_emp \`
58
59
60
61`--num-mappers 1 \`
62
63
64
65`--split-by id`
66
原理还是分俩步:先把数据从关系数据库里导到hdfs中,然后再从hdfs中导到hive中,此时hdfs中的文件会被删除
注意:如果hive中没表会自动创建表,但是类型是自动生成的,所以还是 建议手动创建
也可以分俩步走:
先导入hdfs
1`#!/bin/bash`
2
3
4
5`import_data(){`
6
7
8
9`$sqoop import \`
10
11
12
13`--connect jdbc:mysql://hadoop102:3306/gmall \`
14
15
16
17`--username root \`
18
19
20
21`--password 123 \`
22
23
24
25`--target-dir /origin_data/gmall/db/$1/$do_date \`
26
27
28
29`--delete-target-dir \`
30
31
32
33`--query "$2 and  \$CONDITIONS" \`
34
35
36
37`--num-mappers 1 \`
38
39
40
41`--fields-terminated-by '\t' \`
42
43
44
45`# 使用压缩,和指定压缩格式为lzop`
46
47
48
49`--compress \`
50
51
52
53`--compression-codec lzop \`
54
55
56
57`#将String类型和非String类型的空值替换为\N,方便Hive读取`
58
59
60
61`--null-string '\\N' \`
62
63
64
65`--null-non-string '\\N'`
66
67
68
69`}`
70
然后利用 load data 命令导入hive
注意:这里使用到了空值处理 —— **Hive中的Null在底层是以“\N”来存储,而MySQL中的Null在底层就是Null,为了保证数据两端的一致性。在导出数据时采用--input-null-string和--input-null-non-string两个参数。导入数据时采用--null-string和--null-non-string。
**
2.3 导入到 Hbase
1`bin/sqoop import \`
2
3
4
5`--connect jdbc:mysql://hadoop102:3306/test \`
6
7
8
9`--username root \`
10
11
12
13`--password 123 \`
14
15
16
17`--query 'select * from t_emp where id>3 and $CONDITIONS' \`
18
19
20
21`--target-dir /sqoopTest \`
22
23
24
25`--delete-target-dir \`
26
27
28
29`##表不存在是否创建`
30
31
32
33`--hbase-create-table \`
34
35
36
37`##hbase中的表名`
38
39
40
41`--hbase-table "t_emp" \`
42
43
44
45`##将导入数据的哪一列作为rowkey`
46
47
48
49`--hbase-row-key "id" \`
50
51
52
53`##导入的列族`
54
55
56
57`--column-family "info" \`
58
59
60
61`--num-mappers 2 \`
62
63
64
65`--split-by id`
66
1、当选用自动创建表时,如果版本不兼容会报错:
20/03/24 13:51:24 INFO mapreduce.HBaseImportJob: Creating missing HBase table t_emp
Exception in thread "main" java.lang.NoSuchMethodError: org.apache.hadoop.hbase.HTableDescriptor.addFamily(Lorg/apache/hadoop/hbase/HColumnDescriptor;)V
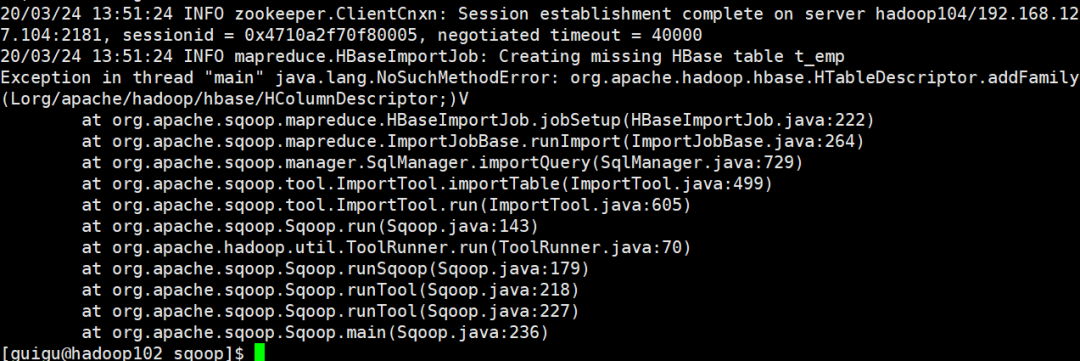
此时只能自己手动创建或者可以重新编译sqoop源码
2、如果要多列族导入,只能多次运行命令,一次导入一个列族
三、导出
将Hdfs上的数据导出到关系型数据库中
3.1 SQL中表为空表时
1`bin/sqoop export \`
2
3
4
5`--connect 'jdbc:mysql://hadoop102:3306/test?useUnicode=true&characterEncoding=utf-8' \`
6
7
8
9`--username root \`
10
11
12
13`--password 123 \`
14
15
16
17`##导出的表名,需要自己提前创建好`
18
19
20
21`--table t_emp2 \`
22
23
24
25`--num-mappers 1 \`
26
27
28
29`##hdfs上导出的数据的路径`
30
31
32
33`--export-dir /user/hive/warehouse/t_emp \`
34
35
36
37`##hdfs上数据的分隔符`
38
39
40
41`--input-fields-terminated-by "\t"`
42
3.2 表不为空表时
如果插入的数据的主键和表中已有数据的主键冲突,那么会报错
Duplicate entry '5' for key 'PRIMARY'
如果在SQL下,可以使用
1`INSERT INTO t_emp2 VALUE(5,'jack',30,3,1111)`
2
3
4
5`ON DUPLICATE KEY UPDATE NAME=VALUES(NAME),deptid=VALUES(deptid),`
6
7
8
9`empno=VALUES(empno);`
10
意为
指定当插入时,主键重复时时,对于重复的记录,只做更新,不做插入!
而用sqoop时,则可以启用以下俩种模式
3.2.1updateonly模式
1`bin/sqoop export \`
2
3
4
5`--connect 'jdbc:mysql://hadoop103:3306/mydb?useUnicode=true&characterEncoding=utf-8' \`
6
7
8
9`--username root \`
10
11
12
13`--password 123456 \`
14
15
16
17`--table t_emp2 \`
18
19
20
21`--num-mappers 1 \`
22
23
24
25`--export-dir /hive/t_emp \`
26
27
28
29`--input-fields-terminated-by "\t" \`
30
31
32
33`--update-key id`
34
利用 --update-key 字段 ,表示主键重复时会进行更新,但是 主键不重复的时候,数据不会插入进来
3.2.2allowinsert模式
1`bin/sqoop export \`
2
3
4
5`--connect 'jdbc:mysql://hadoop103:3306/mydb?useUnicode=true&characterEncoding=utf-8' \`
6
7
8
9`--username root \`
10
11
12
13`--password 123456 \`
14
15
16
17`--table t_emp2 \`
18
19
20
21`--num-mappers 1 \`
22
23
24
25`--export-dir /hive/t_emp \`
26
27
28
29`--input-fields-terminated-by "\t" \`
30
31
32
33`--update-key id \`
34
35
36
37`--update-mode  allowinsert`
38
表示主键重复时会进行更新,主键不重复的时候,数据也会插入进来
3.3 如何查看导出命令的具体实现
3.3.1配置/etc/my.cnf
1`bin/sqoop export \`
2
3
4
5`--connect 'jdbc:mysql://hadoop103:3306/mydb?useUnicode=true&characterEncoding=utf-8' \`
6
7
8
9`--username root \`
10
11
12
13`--password 123456 \`
14
15
16
17`--table t_emp2 \`
18
19
20
21`--num-mappers 1 \`
22
23
24
25`--export-dir /hive/t_emp \`
26
27
28
29`--input-fields-terminated-by "\t" \`
30
31
32
33`--update-key id \`
34
35
36
37`--update-mode  allowinsert`
38
3.3.2重启mysql服务
3.3.3进入/var/lib/mysql,调用方法
1`sudo mysqlbinlog mysql-bin.000001`
2
欢迎点赞+收藏+转发朋友圈素质三连

****文章不错?点个【在看】吧! 👇
本文分享自微信公众号 - 大数据技术与架构(import_bigdata)。
如有侵权,请联系 support@oschina.cn 删除。
本文参与“OSC源创计划”,欢迎正在阅读的你也加入,一起分享。