
Spring Boot中Thymeleaf对表单处理的一些用法:
(1)使用th:field属性:进行表单字段绑定
(2)使用ids对象:一般用于lable配合radio或checkbox使用
(3)表单提交处理
开发环境:IntelliJ IDEA 2019.2.2
Spring Boot版本:2.1.8
新建一个名称为demo的Spring Boot项目。
pom.xml 依赖项如下:
1<dependency>
2            <groupId>org.springframework.boot</groupId>
3            <artifactId>spring-boot-starter-web</artifactId>
4        </dependency>
5
6        <dependency>
7            <groupId>org.springframework.boot</groupId>
8            <artifactId>spring-boot-starter-thymeleaf</artifactId>
9        </dependency>
10
11        <dependency>
12            <groupId>org.springframework.boot</groupId>
13            <artifactId>spring-boot-devtools</artifactId>
14        </dependency>
一、使用th:field属性
th:field属性常用于表单字段绑定,除了自动生成id和name属性,对不同的节点类型还会有不同的生成逻辑。
例如input还会再生成value属性,textarea会自动设文本,select会自动选中相应的选项,如果是同个表单属性,radio和checkbox的id会全局自动增长。
备注:
(1)使用th:field属性时,如果html节点中已经存在相应属性,则不会再另外生成。
(2)th:field属性需要使用星号表达式*{...},即先使用th:object声明表单对象,再使用th:field=*{...}对表单域进行处理。
1、src/main/java/com/example/demo/User.java
1package com.example.demo;
2
3public class User {
4    String name;
5    Integer sex;
6    String[] MyColors;
7
8    public String getName() {
9        return name;
10    }
11    public void setName(String name) {
12        this.name = name;
13    }
14    public Integer getSex() {
15        return sex;
16    }
17    public void setSex(Integer sex) {
18        this.sex = sex;
19    }
20    public String[] getMyColors() {
21        return MyColors;
22    }
23    public void setMyColors(String[] myColors) {
24        MyColors = myColors;
25    }
26}
2、src/main/java/com/example/demo/FieldController.java
1package com.example.demo;
2
3import org.springframework.stereotype.Controller;
4import org.springframework.ui.Model;
5import org.springframework.web.bind.annotation.RequestMapping;
6
7import java.util.HashMap;
8import java.util.Map;
9
10@Controller
11public class FieldController {
12    @RequestMapping("/field")
13    public String field(Model model){
14        //设置用户对象
15        User user = new User();
16        user.setName("小红");
17        user.setSex(0);
18        model.addAttribute("user", user);
19        //设置性别
20        Map<String, Object> sexes = new HashMap<String, Object>();
21        sexes.put("男", 1);
22        sexes.put("女", 0);
23        model.addAttribute("sexes", sexes);
24        return "field";
25    }
26}
3、src/main/resources/templates/field.html
1<!DOCTYPE html>
2<html>
3<head>
4    <meta charset="UTF-8">
5    <title>使用th:field属性</title>
6</head>
7<body>
8    <form th:object="${user}">
9        <input type="text" th:field="*{name}" id="name1" />
10        <input type="text" th:field="*{name}" />
11        <input type="text" th:field="*{name}" />
12        <textarea th:field="*{name}"></textarea>
13        <textarea th:field="*{name}"></textarea>
14        <select th:field="*{sex}">
15            <option th:each="sex : ${sexes}" th:value="${sex.value}" th:text="${sex.key}"></option>
16        </select>
17        <select th:field="*{sex}">
18            <option th:each="sex : ${sexes}" th:value="${sex.value}" th:text="${sex.key}"></option>
19        </select>
20        <input type="checkbox" th:field="*{name}" value="*{name}"/>
21        <input type="checkbox" th:field="*{name}" value="*{name}"/>
22        <input type="radio" th:field="*{name}" value="*{name}"/>
23        <input type="radio" th:field="*{name}" value="*{name}"/>
24    </form>
25</body>
26</html>
启动服务后,浏览器访问http://localhost:8080/field,网页源代码如下:
1<!DOCTYPE html>
2<html>
3<head>
4    <meta charset="UTF-8">
5    <title>使用th:field属性</title>
6</head>
7<body>
8    <form>
9        <input type="text" id="name1" name="name" value="小红" />
10        <input type="text" id="name" name="name" value="小红" />
11        <input type="text" id="name" name="name" value="小红" />
12        <textarea id="name" name="name">小红</textarea>
13        <textarea id="name" name="name">小红</textarea>
14        <select id="sex" name="sex">
15            <option value="0" selected="selected">女</option>
16            <option value="1">男</option>
17        </select>
18        <select id="sex" name="sex">
19            <option value="0" selected="selected">女</option>
20            <option value="1">男</option>
21        </select>
22        <input type="checkbox" value="*{name}" id="name1" name="name"/><input type="hidden" name="_name" value="on"/>
23        <input type="checkbox" value="*{name}" id="name2" name="name"/><input type="hidden" name="_name" value="on"/>
24        <input type="radio" value="*{name}" id="name3" name="name"/>
25        <input type="radio" value="*{name}" id="name4" name="name"/>
26    </form>
27</body>
28</html>
二、使用ids对象
可以使用ids对象的seq方法生成指定名称的递增id。
对于radio和checkbox自动生成的id,配合lable节点使用时,需要知道这个id,可以使用ids对象的prev和next方法。
1、src/main/java/com/example/demo/IdsController.java
1package com.example.demo;
2
3import org.springframework.stereotype.Controller;
4import org.springframework.ui.Model;
5import org.springframework.web.bind.annotation.RequestMapping;
6
7@Controller
8public class IdsController {
9    @RequestMapping("/ids")
10    public String ids(Model model){
11        User user = new User();
12        user.setName("小红");
13        user.setSex(0);
14        model.addAttribute("user", user);
15        return "ids";
16    }
17}
2、src/main/resources/templates/ids.html
1<!DOCTYPE html>
2<html>
3<head>
4    <meta charset="UTF-8">
5    <title>使用ids对象</title>
6</head>
7<body>
8    <form th:object="${user}">
9        <input type="text" th:field="*{name}" th:id="${#ids.seq('tname')}" />
10        <input type="text" th:field="*{name}" th:id="${#ids.seq('tname')}" />
11
12        <input type="radio" th:field="*{name}" value="*{name}" th:id="${#ids.seq('rname')}"/>
13        <input type="radio" th:field="*{name}" value="*{name}" th:id="${#ids.seq('rname')}"/>
14
15        <input type="checkbox" th:field="*{name}" value="*{name}" th:id="${#ids.seq('cname')}" />
16        <input type="checkbox" th:field="*{name}" value="*{name}" th:id="${#ids.seq('cname')}"/>
17
18        <input type="radio" th:field="*{name}" value="*{name}" />
19        <label th:for="${#ids.prev('name')}" th:text="单选A"></label>
20        <input type="radio" th:field="*{name}" value="*{name}" />
21        <label th:for="${#ids.prev('name')}" th:text="单选B"></label>
22
23        <label th:for="${#ids.next('name')}" th:text="多选A"></label>
24        <input type="checkbox" th:field="*{name}" value="*{name}" />
25        <label th:for="${#ids.next('name')}" th:text="多选B"></label>
26        <input type="checkbox" th:field="*{name}" value="*{name}" />
27    </form>
28</body>
29</html>
启动服务后,浏览器访问http://localhost:8080/ids,网页源代码如下:
1<!DOCTYPE html>
2<html>
3<head>
4    <meta charset="UTF-8">
5    <title>使用ids对象</title>
6</head>
7<body>
8    <form>
9        <input type="text" id="tname1" name="name" value="小红" />
10        <input type="text" id="tname2" name="name" value="小红" />
11
12        <input type="radio" value="*{name}" id="rname1" name="name"/>
13        <input type="radio" value="*{name}" id="rname2" name="name"/>
14
15        <input type="checkbox" value="*{name}" id="cname1" name="name" /><input type="hidden" name="_name" value="on"/>
16        <input type="checkbox" value="*{name}" id="cname2" name="name"/><input type="hidden" name="_name" value="on"/>
17
18        <input type="radio" value="*{name}" id="name1" name="name" />
19        <label for="name1">单选A</label>
20        <input type="radio" value="*{name}" id="name2" name="name" />
21        <label for="name2">单选B</label>
22
23        <label for="name3">多选A</label>
24        <input type="checkbox" value="*{name}" id="name3" name="name" /><input type="hidden" name="_name" value="on"/>
25        <label for="name4">多选B</label>
26        <input type="checkbox" value="*{name}" id="name4" name="name" /><input type="hidden" name="_name" value="on"/>
27    </form>
28</body>
29</html>
三、表单的提交处理
提交后,在控制器方法中使用@ModelAttribute映射表单对象。
1、src/main/java/com/example/demo/FormController.java
1package com.example.demo;
2
3import org.springframework.stereotype.Controller;
4import org.springframework.ui.Model;
5import org.springframework.web.bind.annotation.ModelAttribute;
6import org.springframework.web.bind.annotation.PostMapping;
7import org.springframework.web.bind.annotation.RequestMapping;
8
9import java.util.Arrays;
10import java.util.HashMap;
11import java.util.Map;
12
13@Controller
14public class FormController {
15    @RequestMapping("/form")
16    public String form(Model model){
17        setConstant(model);
18        User user = new User();
19        user.setName("小明");
20        user.setSex(1);
21        user.setMyColors(new String[]{"white", "black"});
22        model.addAttribute("user", user);
23        return "form";
24    }
25
26    @PostMapping("/submit")
27    public String submit(@ModelAttribute User user, Model model){
28        setConstant(model);
29        model.addAttribute("user", user);
30        System.out.println("姓名:" + user.getName());
31        System.out.println("性别:" + (user.getSex().intValue() == 1 ? "男" : "女"));
32        System.out.println("喜欢的颜色:" + Arrays.toString(user.getMyColors()));
33        //return "redirect:/form";
34        return "form";
35    }
36
37    //设置常量
38    private void setConstant(Model model){
39        Map<String, Object> sexes = new HashMap<String, Object>();
40        sexes.put("男", 1);
41        sexes.put("女", 0);
42        model.addAttribute("sexes", sexes);
43        String[] colors = new String[]{"red", "white", "black"};
44        model.addAttribute("colors", colors);
45    }
46}
2、src/main/resources/templates/form.html
1<!DOCTYPE html>
2<html>
3<head>
4    <meta charset="UTF-8">
5    <title>表单的提交处理</title>
6</head>
7<body>
8    <form method="post" th:action="@{/submit}" th:object="${user}">
9       <table>
10           <tr>
11               <td>用户名:</td>
12               <td><input type="text" th:field="*{name}" /></td>
13           </tr>
14           <tr>
15               <td>性别:</td>
16               <td><select th:field="*{sex}">
17                       <option th:each="sex : ${sexes}" th:value="${sex.value}" th:text="${sex.key}"></option>
18                    </select>
19               </td>
20           </tr>
21           <tr>
22               <td>喜欢的颜色:</td>
23               <td>
24                   <span th:each="color : ${colors}">
25                       <input type="checkbox"  th:field="*{myColors}" th:value="${color}" />
26                       <label th:for="${#ids.prev('myColors')}" th:text="${color}"></label>
27                   </span>
28               </td>
29           </tr>
30           <tr>
31               <td colspan="2">
32                   <input type="submit" value="提交" />
33               </td>
34           </tr>
35
36       </table>
37
38
39
40    </form>
41</body>
42</html>
启动服务后,浏览器访问http://localhost:8080/from,页面如下图:
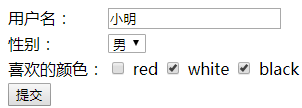
网页源代码如下:
1<!DOCTYPE html>
2<html>
3<head>
4    <meta charset="UTF-8">
5    <title>表单的提交处理</title>
6</head>
7<body>
8    <form method="post" action="/submit">
9       <table>
10           <tr>
11               <td>用户名:</td>
12               <td><input type="text" id="name" name="name" value="小明" /></td>
13           </tr>
14           <tr>
15               <td>性别:</td>
16               <td><select id="sex" name="sex">
17                       <option value="0">女</option>
18                       <option value="1" selected="selected">男</option>
19                    </select>
20               </td>
21           </tr>
22           <tr>
23               <td>喜欢的颜色:</td>
24               <td>
25                   <span>
26                       <input type="checkbox"  value="red" id="myColors1" name="myColors" /><input type="hidden" name="_myColors" value="on"/>
27                       <label for="myColors1">red</label>
28                   </span><span>
29                       <input type="checkbox"  value="white" id="myColors2" name="myColors" checked="checked" /><input type="hidden" name="_myColors" value="on"/>
30                       <label for="myColors2">white</label>
31                   </span><span>
32                       <input type="checkbox"  value="black" id="myColors3" name="myColors" checked="checked" /><input type="hidden" name="_myColors" value="on"/>
33                       <label for="myColors3">black</label>
34                   </span>
35               </td>
36           </tr>
37           <tr>
38               <td colspan="2">
39                   <input type="submit" value="提交" />
40               </td>
41           </tr>
42
43       </table>
44
45
46
47    </form>
48</body>
49</html>
点击提交按钮,IDEA控制台输出:
1姓名:小明
2性别:男
3喜欢的颜色:[white, black]