
mongodb介绍
https://www.yiibai.com/mongodb/mongodb\_drop\_collection.html
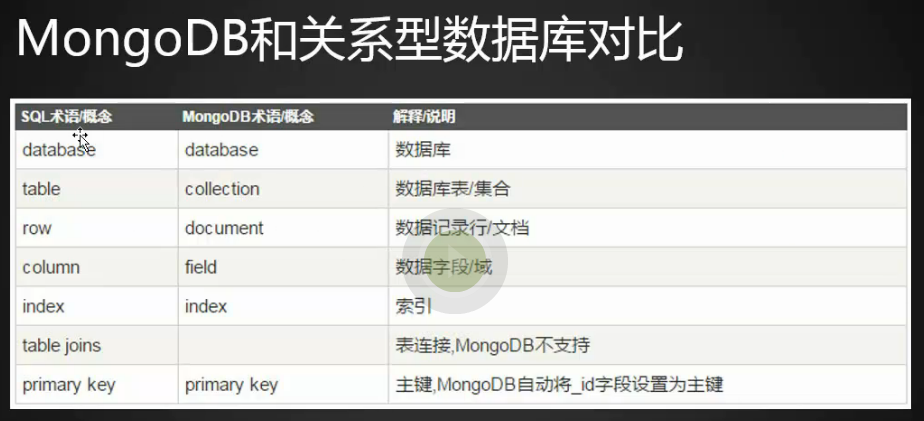
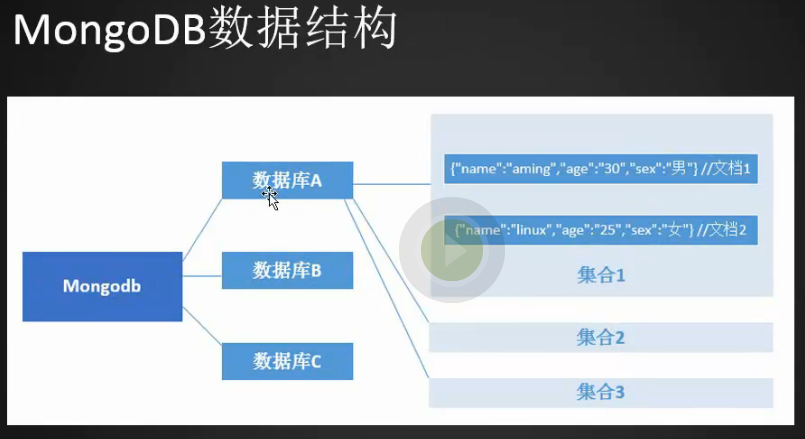
1.文档性数据库类似于json对象,分布式

mongodb安装
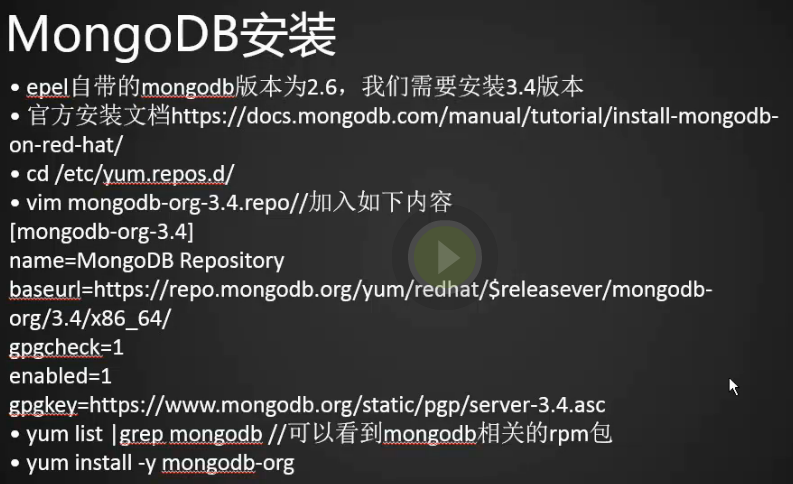
1.基本思路就是创建一个官方的yum源,我们这里安装最新的3.6版本
1[root@centos-02 ~]# cd /etc/yum.repos.d/
2[root@centos-02 yum.repos.d]# vim mongodb.repo
3[root@centos-02 yum.repos.d]#
4[mongodb-org-3.6]
5name=MongoDB Repository
6baseurl=https://repo.mongodb.org/yum/redhat/$releasever/mongodb-org/3.6/x86_64/
7gpgcheck=1
8enabled=1
9gpgkey=https://www.mongodb.org/static/pgp/server-3.6.asc
2.然后查看下源中有没有mongodb这个包,ok有
1[root@centos-02 yum.repos.d]#
2[root@centos-02 yum.repos.d]# yum list|grep mongodb
3collectd-write_mongodb.x86_64             5.8.0-1.el7                  epel
4mongodb.x86_64                            2.6.12-6.el7                 epel
5mongodb-org.x86_64                        3.6.3-1.el7                  mongodb-org-3.6
6mongodb-org-mongos.x86_64                 3.6.3-1.el7                  mongodb-org-3.6
7mongodb-org-server.x86_64                 3.6.3-1.el7                  mongodb-org-3.6
8mongodb-org-shell.x86_64                  3.6.3-1.el7                  mongodb-org-3.6
9mongodb-org-tools.x86_64                  3.6.3-1.el7                  mongodb-org-3.6
10mongodb-server.x86_64                     2.6.12-6.el7                 epel
11mongodb-test.x86_64                       2.6.12-6.el7                 epel
12nodejs-mongodb.noarch                     1.4.7-1.el7                  epel
13php-mongodb.noarch                        1.0.4-1.el7                  epel
14php-pecl-mongodb.x86_64                   1.1.10-1.el7                 epel
15poco-mongodb.x86_64                       1.6.1-3.el7                  epel
16syslog-ng-mongodb.x86_64                  3.5.6-3.el7                  epel
17[root@centos-02 yum.repos.d]#
3.安装mongodb
[root@centos-02 yum.repos.d]# yum install -y mongodb-org
连接mongodb
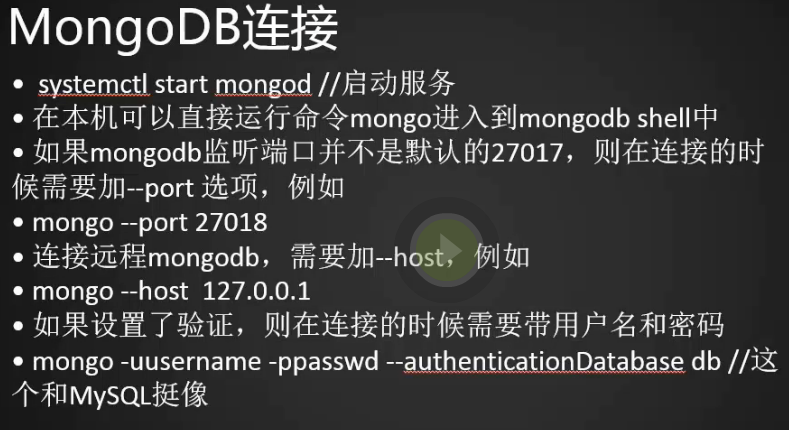
1.如果想绑定多个ip访问,添加多个ip用逗号分割
bindIp: 127.0.0.1,192.168.133.88
2.启动mongodb
1[root@centos-02 yum.repos.d]# systemctl start mongod
2[root@centos-02 yum.repos.d]# ps aux|grep mongod
3mongod    48151  5.1  4.2 1005608 42792 ?       Sl   17:28   0:03 /usr/bin/mongod -f /etc/mongod.conf
4root      48176  0.0  0.0 112680   948 pts/0    R+   17:29   0:00 grep --color=auto mongod
5[root@centos-02 yum.repos.d]# netstat -lntp |grep mongod
6tcp        0      0 192.168.133.88:27017    0.0.0.0:*               LISTEN      48151/mongod
7tcp        0      0 127.0.0.1:27017         0.0.0.0:*               LISTEN      48151/mongod
8[root@centos-02 yum.repos.d]#
3.在本机直接运行mongo进入到mongodb shell中
1[root@centos-02 yum.repos.d]# mongo
2MongoDB shell version v3.6.3
3connecting to: mongodb://127.0.0.1:27017
4MongoDB server version: 3.6.3
5Welcome to the MongoDB shell.
6For interactive help, type "help".
7For more comprehensive documentation, see
8	http://docs.mongodb.org/
9Questions? Try the support group
10	http://groups.google.com/group/mongodb-user
11Server has startup warnings:
122018-04-01T17:28:16.465+0800 I CONTROL  [initandlisten]
132018-04-01T17:28:16.467+0800 I CONTROL  [initandlisten] ** WARNING: Access control is not enabled for the database.
142018-04-01T17:28:16.467+0800 I CONTROL  [initandlisten] **          Read and write access to data and configuration is unrestricted.
152018-04-01T17:28:16.468+0800 I CONTROL  [initandlisten]
162018-04-01T17:28:16.469+0800 I CONTROL  [initandlisten]
172018-04-01T17:28:16.470+0800 I CONTROL  [initandlisten] ** WARNING: /sys/kernel/mm/transparent_hugepage/defrag is 'always'.
182018-04-01T17:28:16.470+0800 I CONTROL  [initandlisten] **        We suggest setting it to 'never'
192018-04-01T17:28:16.470+0800 I CONTROL  [initandlisten]
20>
4.连接到指定的ip和端口
1[root@centos-02 yum.repos.d]# mongo --host 192.168.133.88 --port 27017
2MongoDB shell version v3.6.3
3connecting to: mongodb://192.168.133.88:27017/
4MongoDB server version: 3.6.3
5Server has startup warnings:
62018-04-01T17:28:16.465+0800 I CONTROL  [initandlisten]
72018-04-01T17:28:16.467+0800 I CONTROL  [initandlisten] ** WARNING: Access control is not enabled for the database.
82018-04-01T17:28:16.467+0800 I CONTROL  [initandlisten] **          Read and write access to data and configuration is unrestricted.
92018-04-01T17:28:16.468+0800 I CONTROL  [initandlisten]
102018-04-01T17:28:16.469+0800 I CONTROL  [initandlisten]
112018-04-01T17:28:16.470+0800 I CONTROL  [initandlisten] ** WARNING: /sys/kernel/mm/transparent_hugepage/defrag is 'always'.
122018-04-01T17:28:16.470+0800 I CONTROL  [initandlisten] **        We suggest setting it to 'never'
132018-04-01T17:28:16.470+0800 I CONTROL  [initandlisten]
14>
5.如果设置了验证,需要输入用户和密码和连接的加密库
[root@centos-02 yum.repos.d]# mongo -uusername -ppassword --authenticationDatabase db
mongodb用户管理
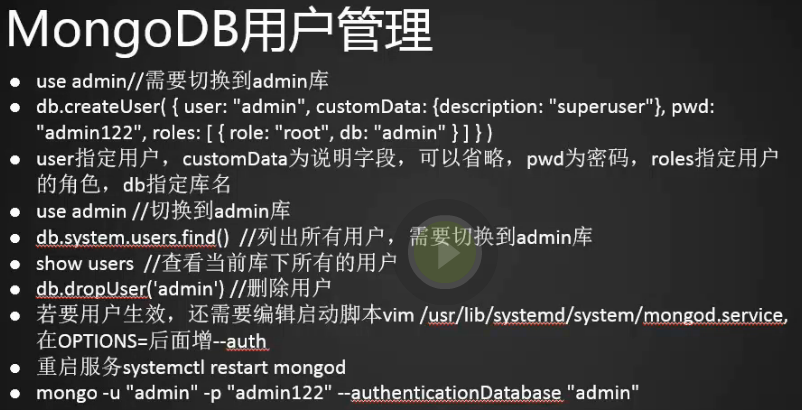
1.如何给用户设置密码,切换到admin库,执行创建用户语句(语句包括,创建的用户名,用户的描述(可以不写),用户密码,什么角色,角色在哪一个库)
1[root@centos-02 yum.repos.d]# mongo --host 192.168.133.88 --port 27017
2MongoDB shell version v3.6.3
3connecting to: mongodb://192.168.133.88:27017/
4MongoDB server version: 3.6.3
5Server has startup warnings:
62018-04-01T17:28:16.465+0800 I CONTROL  [initandlisten]
72018-04-01T17:28:16.467+0800 I CONTROL  [initandlisten] ** WARNING: Access control is not enabled for the database.
82018-04-01T17:28:16.467+0800 I CONTROL  [initandlisten] **          Read and write access to data and configuration is unrestricted.
92018-04-01T17:28:16.468+0800 I CONTROL  [initandlisten]
102018-04-01T17:28:16.469+0800 I CONTROL  [initandlisten]
112018-04-01T17:28:16.470+0800 I CONTROL  [initandlisten] ** WARNING: /sys/kernel/mm/transparent_hugepage/defrag is 'always'.
122018-04-01T17:28:16.470+0800 I CONTROL  [initandlisten] **        We suggest setting it to 'never'
132018-04-01T17:28:16.470+0800 I CONTROL  [initandlisten]
14> use admin
15switched to db admin
16> db.createUser( { user: "admin", customData: {description: "superuser"}, pwd: "admin122", roles: [ { role: "root", db: "admin" } ] } )
17Successfully added user: {
18	"user" : "admin",
19	"customData" : {
20		"description" : "superuser"
21	},
22	"roles" : [
23		{
24			"role" : "root",
25			"db" : "admin"
26		}
27	]
28}
29>
2.列出所有用户,需要事先切换的admin库
1> db.system.users.find()
2{ "_id" : "admin.test1", "user" : "test1", "db" : "admin", "credentials" : { "SCRAM-SHA-1" : { "iterationCount" : 10000, "salt" : "qkIyRd0o38eqKOlEx3vwHA==", "storedKey" : "JVrdMZud+jjZb9awIWxSrLwixxY=", "serverKey" : "vmaJHnyV8tfPyvxqpuF4ipe/MJc=" } }, "roles" : [ { "role" : "readWrite", "db" : "db1" }, { "role" : "read", "db" : "db2" } ] }
3{ "_id" : "admin.admin", "user" : "admin", "db" : "admin", "credentials" : { "SCRAM-SHA-1" : { "iterationCount" : 10000, "salt" : "OMpr/hze3FqzgKmv45sUBw==", "storedKey" : "EkLLK+LNAGMVV3ddgxYoZCXGlPU=", "serverKey" : "h1UxGUDeFB9C1N7dRyN30bDhFOA=" } }, "customData" : { "description" : "superuser" }, "roles" : [ { "role" : "root", "db" : "admin" } ] }
4>
3.查看当前库下所有的用户
1> show users
2{
3	"_id" : "admin.admin",
4	"user" : "admin",
5	"db" : "admin",
6	"customData" : {
7		"description" : "superuser"
8	},
9	"roles" : [
10		{
11			"role" : "root",
12			"db" : "admin"
13		}
14	]
15}
16{
17	"_id" : "admin.test1",
18	"user" : "test1",
19	"db" : "admin",
20	"roles" : [
21		{
22			"role" : "readWrite",
23			"db" : "db1"
24		},
25		{
26			"role" : "read",
27			"db" : "db2"
28		}
29	]
30}
31>
4.删除一个用户,怎么删除,首先创建一个测试用户
1> db.createUser({user:"linux",pwd:"linux",roles:[{role:"read",db:"testdb"}]})
2Successfully added user: {
3	"user" : "linux",
4	"roles" : [
5		{
6			"role" : "read",
7			"db" : "testdb"
8		}
9	]
10}
11>
5.删除后查看用户,发现linux用户没有了
1> db.dropUser('linux')
2true
3> show users
4{
5	"_id" : "admin.admin",
6	"user" : "admin",
7	"db" : "admin",
8	"customData" : {
9		"description" : "superuser"
10	},
11	"roles" : [
12		{
13			"role" : "root",
14			"db" : "admin"
15		}
16	]
17}
18{
19	"_id" : "admin.test1",
20	"user" : "test1",
21	"db" : "admin",
22	"roles" : [
23		{
24			"role" : "readWrite",
25			"db" : "db1"
26		},
27		{
28			"role" : "read",
29			"db" : "db2"
30		}
31	]
32}
33>
6.use一个库,如果这个库不存在,则会创建这个库。
1> use testdb
2switched to db testdb
3>
7.若要用户生效,还需要编辑配置启动文件,在OPTIONS后面加上--auth,只有加了--auth,才可以用用户名密码登录,重启mongo
1[root@centos-02 yum.repos.d]# vim /usr/lib/systemd/system/mongod.service
2[root@centos-02 yum.repos.d]#
3Environment="OPTIONS=--auth -f /etc/mongod.conf"
4[root@centos-02 yum.repos.d]# systemctl daemon-reload
5[root@centos-02 yum.repos.d]# systemctl restart mongod
6[root@centos-02 yum.repos.d]# ps aux|grep mongo
7mongod    48251 60.1  4.2 1005608 42600 ?       Sl   18:26   0:25 /usr/bin/mongod --auth -f /etc/mongod.conf
8root      48279  0.0  0.0 112680   944 pts/0    R+   18:27   0:00 grep --color=auto mong
9[root@centos-02 yum.repos.d]#
8.测试用户密码登录,我们还是用之前不用用户和密码的方式登录查看admin库发现不行了,用用户名密码登录可以
1[root@centos-02 yum.repos.d]# mongo --host 192.168.133.88 --port 27017
2MongoDB shell version v3.6.3
3connecting to: mongodb://192.168.133.88:27017/
4MongoDB server version: 3.6.3
5> use admin
6switched to db admin
7> show users
82018-04-01T18:31:54.272+0800 E QUERY    [thread1] Error: not authorized on admin to execute command { usersInfo: 1.0, $db: "admin" } :
9_getErrorWithCode@src/mongo/shell/utils.js:25:13
10DB.prototype.getUsers@src/mongo/shell/db.js:1686:1
11shellHelper.show@src/mongo/shell/utils.js:799:9
12shellHelper@src/mongo/shell/utils.js:706:15
13@(shellhelp2):1:1
14>
15
16[root@centos-02 yum.repos.d]# mongo --host 192.168.133.88 --port 27017 -u admin -p 'admin122' --authenticationDatabase "admin"
17> use admin
18switched to db admin
19> show users
20{
21	"_id" : "admin.admin",
22	"user" : "admin",
23	"db" : "admin",
24	"customData" : {
25		"description" : "superuser"
26	},
27	"roles" : [
28		{
29			"role" : "root",
30			"db" : "admin"
31		}
32	]
33}
34{
35	"_id" : "admin.test1",
36	"user" : "test1",
37	"db" : "admin",
38	"roles" : [
39		{
40			"role" : "readWrite",
41			"db" : "db1"
42		},
43		{
44			"role" : "read",
45			"db" : "db2"
46		}
47	]
48}
49>
9.大家要记住,创建用户的时候必须要针对一个库,登录的时候也需要针对这个库做认证
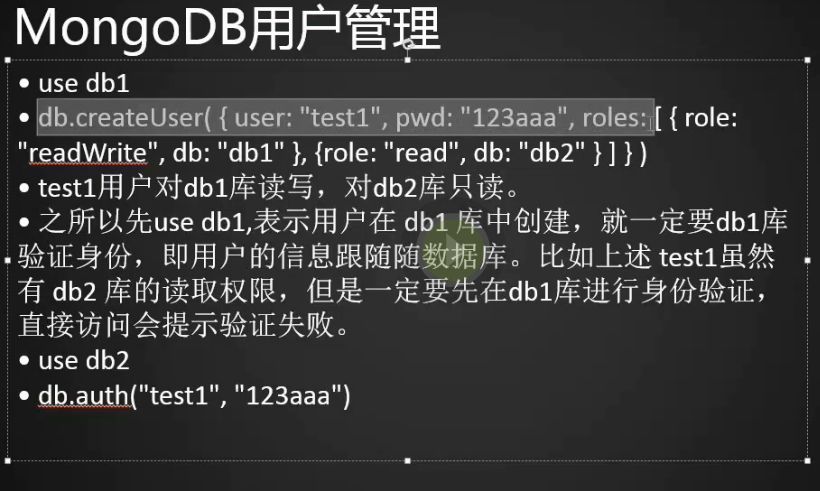
1.创建db1,针对db1授权一个用户
1> use db1
2switched to db db1
3> db.createUser( { user: "test1", pwd: "123aaa", roles: [ { role: "readWrite", db: "db1" }, {role: "read", db: "db2" } ] } )
4Successfully added user: {
5	"user" : "test1",
6	"roles" : [
7		{
8			"role" : "readWrite",
9			"db" : "db1"
10		},
11		{
12			"role" : "read",
13			"db" : "db2"
14		}
15	]
16}
17>
2.在db1里show,在哪个库创建就在哪个库show
1> show users
2{
3	"_id" : "db1.test1",
4	"user" : "test1",
5	"db" : "db1",
6	"roles" : [
7		{
8			"role" : "readWrite",
9			"db" : "db1"
10		},
11		{
12			"role" : "read",
13			"db" : "db2"
14		}
15	]
16}
17>
3.在命令行授权一个用户对db1有权限
1> use db1
2switched to db db1
3> db.auth('test1','123aaa')
41
5>
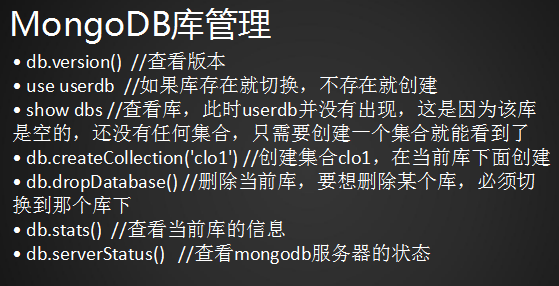
mongodb创建集合、数据管理

1.我们在db1中创建集合
1> db.createCollection("mycol", { capped : true, size : 6142800, max : 10000 } )
2{ "ok" : 1 }
3>
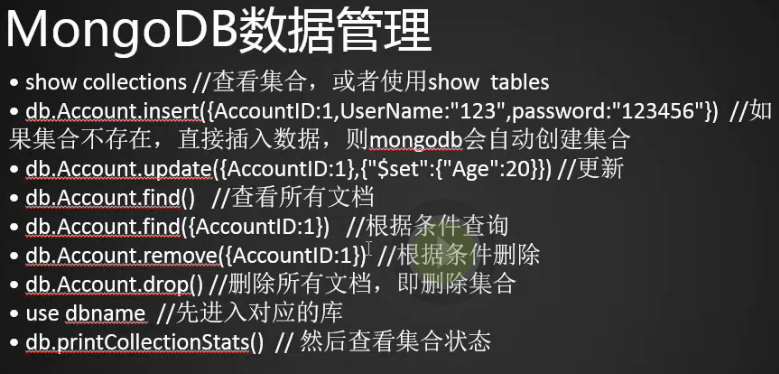
1.查看集合
1> show collections
2mycol
3> show tables
4mycol
5>
2.集合插入数据,没有集合会自动创建集合
1> db.Account.insert({AccountID:1,UserName:"123",password:"123456"})
2WriteResult({ "nInserted" : 1 })
3> show tables
4Account
5mycol
6> db.Account.insert({AccountID:2,UserName:"222",password:"222222"})
7WriteResult({ "nInserted" : 1 })
8>
3.更新数据并查看结果
1> db.Account.update({AccountID:1},{"$set":{"Age":20}})
2WriteResult({ "nMatched" : 1, "nUpserted" : 0, "nModified" : 1 })查看所有文档
3> db.Account.find()
4{ "_id" : ObjectId("5ac23df4fd2577e13af3e0ee"), "AccountID" : 1, "UserName" : "123", "password" : "123456", "Age" : 20 }
5{ "_id" : ObjectId("5ac23e19fd2577e13af3e0ef"), "AccountID" : 2, "UserName" : "222", "password" : "222222" }
6>
4.根据条件查询
1> db.Account.find({AccountID:1})
2{ "_id" : ObjectId("5ac23df4fd2577e13af3e0ee"), "AccountID" : 1, "UserName" : "123", "password" : "123456", "Age" : 20 }
3>
5.根据条件删除一行
1>  db.Account.remove({AccountID:1})
2WriteResult({ "nRemoved" : 1 })
3> db.Account.find()
4{ "_id" : ObjectId("5ac23e19fd2577e13af3e0ef"), "AccountID" : 2, "UserName" : "222", "password" : "222222" }
5>
6.删除所有的文档,即删除集合
1> db.Account.drop()
2true
3> db.Account.find()
4>
7.查看集合状态
db.printCollectionStats()
PHP的mongodb扩展


1.mongodb对于php有两个扩展,一个是mongo扩展,一个是mongodb扩展,mongo扩展是针对php5.X,mongodb是针对更高版本的
2.我们开始安装mongodb,下载mongodb
1[root@centos-02 src]# cd /usr/local/src/
2[root@centos-02 src]# wget http://pecl.php.net/get/mongodb-1.4.2.tgz
3.解压
[root@centos-02 src]# tar zxvf mongodb-1.4.2.tgz
4.进入mongodb执行phpize
1[root@centos-02 src]# cd mongodb-1.4.2
2
3[root@centos-02 mongodb-1.4.2]# /usr/bin/phpize  (安装php-fpm的执行/usr/local/php-frm/bin/phpize)
5.编译
[root@centos-02 mongodb-1.4.2]# ./configure --with-php-config=/usr/bin/php-config (如果是nginx的php路径为/usr/local/php-fpm/bin/php-conf)
6.哈哈不支持低版本的php,重新下一个mongodb
1configure: error: not supported. Need a PHP version >= 5.5.0 (found 5.4.16)
2[root@centos-02 mongodb-1.4.2]#
3
4[root@centos-02 src]# wget https://github.com/mongodb/mongo-php-driver-legacy/archive/master.zip
7.解压
[root@centos-02 src]# unzip master.zip
8.进入mongodb执行phpize,编译
1[root@centos-02 src]# cd mongo-php-driver-legacy-master/[root@centos-02 mongo-php-driver-legacy-master]# /usr/bin/phpize
2[root@centos-02 mongo-php-driver-legacy-master]# ./configure --with-php-config=/usr/bin/php-config
9.make && make install
1[root@centos-02 mongo-php-driver-legacy-master]# make install
2Installing shared extensions:     /usr/lib64/php/modules/
3[root@centos-02 mongo-php-driver-legacy-master]# ls /usr/lib64/php/modules/
4bcmath.so      json.so        mysqli.so      phar.so        xmlwriter.so
5curl.so        ldap.so        mysql.so       redis.so       xsl.so
6dom.so         mbstring.so    pdo_mysql.so   sqlite3.so     zip.so
7fileinfo.so    memcache.so    pdo.so         wddx.so
8gd.so          mongo.so       pdo_sqlite.so  xmlreader.so
9[root@centos-02 mongo-php-driver-legacy-master]# ls /usr/lib64/php/modules/
10.编辑php.ini增加mongo.so
1[root@centos-02 mongo-php-driver-legacy-master]# vim /etc/php.ini (nginx安装的高版本php路径为/usr/local/php-fpm/etc/php.ini)
2extension=mongo.so  (高版本的mongodb.so)
11.检测是否加载了mongo模块
1[root@centos-02 mongo-php-driver-legacy-master]# /usr/bin/php -m|grep mongo
2mongo
3[root@centos-02 mongo-php-driver-legacy-master]#
12.重启httpd (如果用的是php-fpm需要重启/etc/init.d/php-fpm restart)
1[root@centos-02 mongo-php-driver-legacy-master]# systemctl restart httpd
2[root@centos-02 mongo-php-driver-legacy-master]#


1.测试,没有出来我们需要关闭秘钥认证登录
1[root@centos-02 ~]# vim /var/www/html/mongo.php (如果是nginx我们放到vim /data/wwwroot/default/mongo.php)
2[root@centos-02 ~]#
3<?php
4$m = new MongoClient(); // 连接
5$db = $m->test; // 获取名称为 "test" 的数据库
6$collection = $db->createCollection("runoob");
7echo "集合创建成功";
8?>
9
10[root@centos-02 ~]# curl localhost/mongo.php
11集合创建成功
12[root@centos-02 ~]# mongo --host 192.168.133.88 --port 27017 -u admin -p 'admin122' --authenticationDatabase "admin"
13MongoDB shell version v3.6.3
14connecting to: mongodb://192.168.133.88:27017/
15MongoDB server version: 3.6.3
16Server has startup warnings:
172018-04-01T18:27:05.449+0800 I CONTROL  [initandlisten]
182018-04-01T18:27:05.450+0800 I CONTROL  [initandlisten] ** WARNING: /sys/kernel/mm/transparent_hugepage/defrag is 'always'.
192018-04-01T18:27:05.450+0800 I CONTROL  [initandlisten] **        We suggest setting it to 'never'
202018-04-01T18:27:05.450+0800 I CONTROL  [initandlisten]
21> use test
22switched to db test
23> show tables
24>
2.去掉--auth和空格,这样mongodb就不使用用户名密码认证了
1[root@centos-02 ~]# vim /usr/lib/systemd/system/mongod.service
2[root@centos-02 ~]#
3Environment="OPTIONS=--auth -f /etc/mongod.conf"
3.重启mongodb
1[root@centos-02 ~]# systemctl daemon-reload
2[root@centos-02 ~]# systemctl restart mongod
4.再次验证,成功
1[root@centos-02 ~]# !curl
2curl localhost/mongo.php
3集合创建成功
4[root@centos-02 ~]# mongo --host 192.168.133.88 --port 27017
5MongoDB shell version v3.6.3
6connecting to: mongodb://192.168.133.88:27017/
7MongoDB server version: 3.6.3
8Server has startup warnings:
92018-04-03T00:09:20.959+0800 I CONTROL  [initandlisten]
102018-04-03T00:09:20.960+0800 I CONTROL  [initandlisten] ** WARNING: Access control is not enabled for the database.
112018-04-03T00:09:20.960+0800 I CONTROL  [initandlisten] **          Read and write access to data and configuration is unrestricted.
122018-04-03T00:09:20.960+0800 I CONTROL  [initandlisten]
132018-04-03T00:09:20.961+0800 I CONTROL  [initandlisten]
142018-04-03T00:09:20.961+0800 I CONTROL  [initandlisten] ** WARNING: /sys/kernel/mm/transparent_hugepage/defrag is 'always'.
152018-04-03T00:09:20.962+0800 I CONTROL  [initandlisten] **        We suggest setting it to 'never'
162018-04-03T00:09:20.962+0800 I CONTROL  [initandlisten]
17> use test
18switched to db test
19> show tables
20runoob
21>
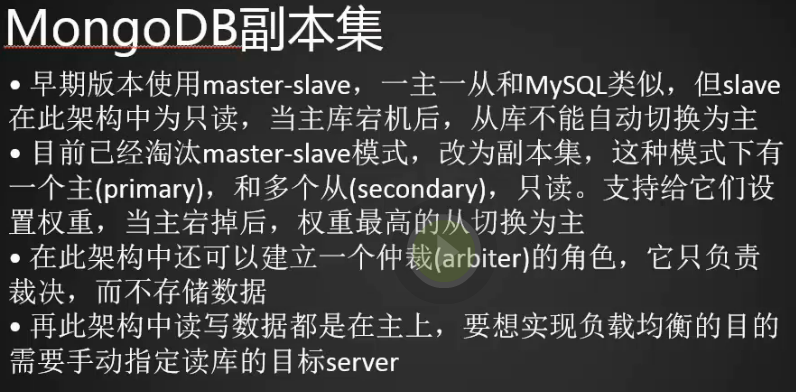
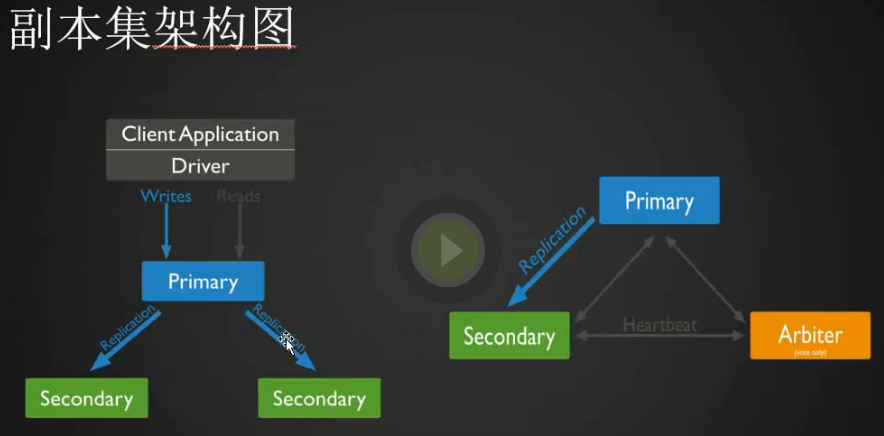
mongodb副本集介绍
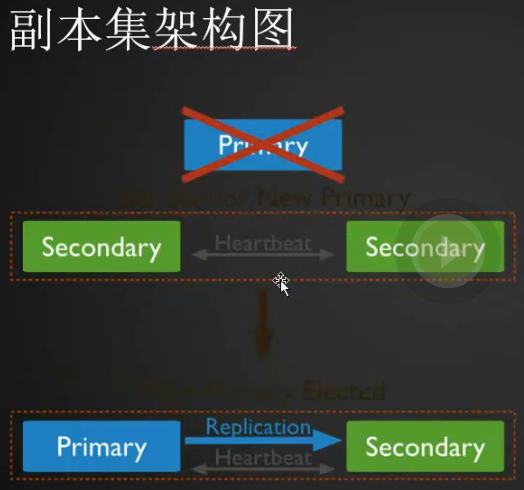
mongodb副本集搭建
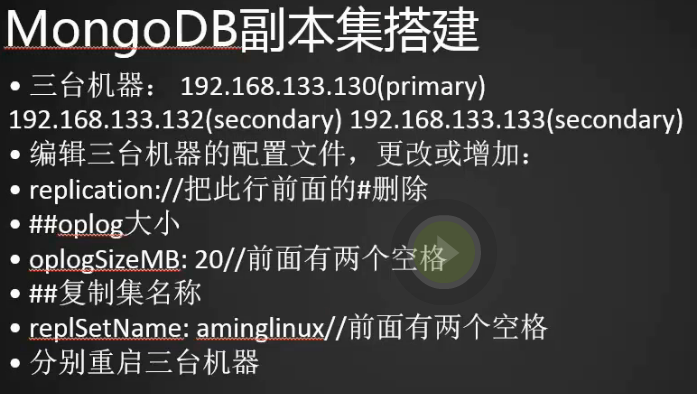
1.三台机器都安装mongodb 192.168.133.44(primary)192.168.133.88(secondary)192.168.133.66(secondary)
2.复制mongo yum源的内容到两台没有安装的机器
1[root@centos-02 ~]# cd /etc/yum.repos.d/
2[root@centos-02 yum.repos.d]# ls
3CentOS-Base.repo       CentOS-Media.repo    epel-testing.repo            zabbix.repo.bak
4CentOS-CR.repo         CentOS-Sources.repo  mongodb.repo
5CentOS-Debuginfo.repo  CentOS-Vault.repo    mysql-community.repo
6CentOS-fasttrack.repo  epel.repo            mysql-community-source.repo
7[root@centos-02 yum.repos.d]# cat mongodb.repo
8[mongodb-org-3.6]
9name=MongoDB Repository
10baseurl=https://repo.mongodb.org/yum/redhat/$releasever/mongodb-org/3.6/x86_64/
11gpgcheck=1
12enabled=1
13gpgkey=https://www.mongodb.org/static/pgp/server-3.6.asc
14[root@centos-02 yum.repos.d]#
15
16[root@centos-01 ~]# vim /etc/yum.repos.d/mongodb.repo
17[root@centos-01 ~]#
18[mongodb-org-3.6]
19name=MongoDB Repository
20baseurl=https://repo.mongodb.org/yum/redhat/$releasever/mongodb-org/3.6/x86_64/
21gpgcheck=1
22enabled=1
23gpgkey=https://www.mongodb.org/static/pgp/server-3.6.asc
24
25[root@centos-03 ~]# vim /etc/yum.repos.d/mongodb.repo
26[root@centos-03 ~]#
27[mongodb-org-3.6]
28name=MongoDB Repository
29baseurl=https://repo.mongodb.org/yum/redhat/$releasever/mongodb-org/3.6/x86_64/
30gpgcheck=1
31enabled=1
32gpgkey=https://www.mongodb.org/static/pgp/server-3.6.asc
3.yum安装
1[root@centos-01 ~]# yum install -y mongodb-org
2[root@centos-03 ~]# yum install -y mongodb-org
4.编辑配置文件
1[root@centos-01 ~]# vim /etc/mongod.conf
2[root@centos-01 ~]# bindIp: 127.0.0.1,192.168.133.44
3replication:
4  oplogSizeMB: 20 (相当于mysql中的binlog)
5  replSetName: mongodbslave (副本集的名字)
6
7[root@centos-02 yum.repos.d]# vim /etc/mongod.conf
8[root@centos-02 yum.repos.d]#
9  bindIp: 127.0.0.1,192.168.133.88
10replication:
11  oplogSizeMB: 20
12  replSetName: mongodbslave
13[root@centos-03 ~]# vim /etc/mongod.conf
14[root@centos-03 ~]#
15  bindIp: 127.0.0.1,192.168.133.66
16replication:
17  oplogSizeMB: 20
18  replSetName: mongodbsla
5.重启mongod
1[root@centos-01 ~]# systemctl restart mongod
2[root@centos-01 ~]# ps aux|grep mongod
3mongod     3169 22.0  4.9 1033844 49960 ?       Sl   06:54   0:02 /usr/bin/mongod -f /etc/mongod.conf
4root       3198  0.0  0.0 112664   928 pts/0    S+   06:54   0:00 grep --color=auto mongod
5[root@centos-01 ~]#
6
7[root@centos-01 ~]# netstat -lntp |grep mongod
8tcp        0      0 192.168.133.44:27017    0.0.0.0:*               LISTEN      3611/mongod
9tcp        0      0 127.0.0.1:27017         0.0.0.0:*               LISTEN      3611/mongod
10[root@centos-01 ~]#
6.关掉三台机器的iptables和selinux
1[root@centos-01 ~]# iptables -F
2[root@centos-01 ~]# iptables -nvL
3Chain INPUT (policy ACCEPT 7 packets, 468 bytes)
4 pkts bytes target     prot opt in     out     source               destination
5
6Chain FORWARD (policy ACCEPT 0 packets, 0 bytes)
7 pkts bytes target     prot opt in     out     source               destination
8
9Chain OUTPUT (policy ACCEPT 4 packets, 448 bytes)
10 pkts bytes target     prot opt in     out     source               destination
11[root@centos-01 ~]#
12
13[root@centos-01 ~]# getenforce
14Disabled
15[root@centos-01 ~]#
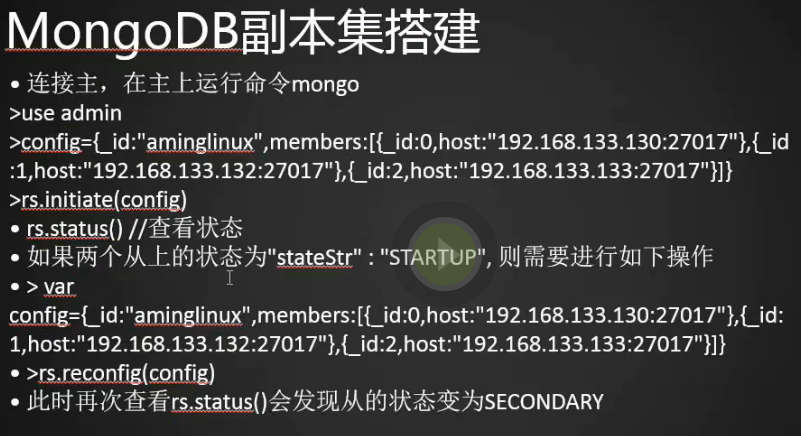
1.进入mongo
[root@centos-01 ~]# mongo
2.配置副本集
1> config={_id:"mongodblinux",members:[{_id:0,host:"192.168.133.44:27017"},{_id:1,host:"192.168.133.88:27017"},{_id:2,host:"192.168.133.66:27017"}]}
2{
3	"_id" : "mongodblinux",
4	"members" : [
5		{
6			"_id" : 0,
7			"host" : "192.168.133.44:27017"
8		},
9		{
10			"_id" : 1,
11			"host" : "192.168.133.88:27017"
12		},
13		{
14			"_id" : 2,
15			"host" : "192.168.133.66:27017"
16		}
17	]
18}
19>
3.初始化
1> rs.initiate(config)
2{
3	"ok" : 1,
4	"operationTime" : Timestamp(1522799670, 1),
5	"$clusterTime" : {
6		"clusterTime" : Timestamp(1522799670, 1),
7		"signature" : {
8			"hash" : BinData(0,"AAAAAAAAAAAAAAAAAAAAAAAAAAA="),
9			"keyId" : NumberLong(0)
10		}
11	}
12}
13mongodbslave:OTHER>
4.查看状态
1mongodbslave:OTHER> rs.status()
2{
3	"set" : "mongodbslave",
4	"date" : ISODate("2018-04-03T23:55:50.921Z"),
5	"myState" : 1,
6	"term" : NumberLong(1),
7	"heartbeatIntervalMillis" : NumberLong(2000),
8	"optimes" : {
9		"lastCommittedOpTime" : {
10			"ts" : Timestamp(1522799710, 1),
11			"t" : NumberLong(1)
12		},
13		"readConcernMajorityOpTime" : {
14			"ts" : Timestamp(1522799710, 1),
15			"t" : NumberLong(1)
16		},
17		"appliedOpTime" : {
18			"ts" : Timestamp(1522799710, 1),
19			"t" : NumberLong(1)
20		},
21		"durableOpTime" : {
22			"ts" : Timestamp(1522799710, 1),
23			"t" : NumberLong(1)
24		}
25	},
26	"members" : [
27		{
28			"_id" : 0,
29			"name" : "192.168.133.44:27017",
30			"health" : 1,
31			"state" : 1,
32			"stateStr" : "PRIMARY",
33			"uptime" : 2986,
34			"optime" : {
35				"ts" : Timestamp(1522799710, 1),
36				"t" : NumberLong(1)
37			},
38			"optimeDate" : ISODate("2018-04-03T23:55:10Z"),
39			"infoMessage" : "could not find member to sync from",
40			"electionTime" : Timestamp(1522799689, 1),
41			"electionDate" : ISODate("2018-04-03T23:54:49Z"),
42			"configVersion" : 1,
43			"self" : true
44		},
45		{
46			"_id" : 1,
47			"name" : "192.168.133.88:27017",
48			"health" : 1,
49			"state" : 2,
50			"stateStr" : "SECONDARY",
51			"uptime" : 80,
52			"optime" : {
53				"ts" : Timestamp(1522799710, 1),
54				"t" : NumberLong(1)
55			},
56			"optimeDurable" : {
57				"ts" : Timestamp(1522799710, 1),
58				"t" : NumberLong(1)
59			},
60			"optimeDate" : ISODate("2018-04-03T23:55:10Z"),
61			"optimeDurableDate" : ISODate("2018-04-03T23:55:10Z"),
62			"lastHeartbeat" : ISODate("2018-04-03T23:55:50.564Z"),
63			"lastHeartbeatRecv" : ISODate("2018-04-03T23:55:50.580Z"),
64			"pingMs" : NumberLong(29),
65			"syncingTo" : "192.168.133.44:27017",
66			"configVersion" : 1
67		},
68		{
69			"_id" : 2,
70			"name" : "192.168.133.66:27017",
71			"health" : 1,
72			"state" : 2,
73			"stateStr" : "SECONDARY",
74			"uptime" : 79,
75			"optime" : {
76				"ts" : Timestamp(1522799710, 1),
77				"t" : NumberLong(1)
78			},
79			"optimeDurable" : {
80				"ts" : Timestamp(1522799710, 1),
81				"t" : NumberLong(1)
82			},
83			"optimeDate" : ISODate("2018-04-03T23:55:10Z"),
84			"optimeDurableDate" : ISODate("2018-04-03T23:55:10Z"),
85			"lastHeartbeat" : ISODate("2018-04-03T23:55:50.608Z"),
86			"lastHeartbeatRecv" : ISODate("2018-04-03T23:55:49.460Z"),
87			"pingMs" : NumberLong(23),
88			"syncingTo" : "192.168.133.44:27017",
89			"configVersion" : 1
90		}
91	],
92	"ok" : 1,
93	"operationTime" : Timestamp(1522799710, 1),
94	"$clusterTime" : {
95		"clusterTime" : Timestamp(1522799710, 1),
96		"signature" : {
97			"hash" : BinData(0,"AAAAAAAAAAAAAAAAAAAAAAAAAAA="),
98			"keyId" : NumberLong(0)
99		}
100	}
101}
102mongodbslave:PRIMARY>
mongodb副本集测试
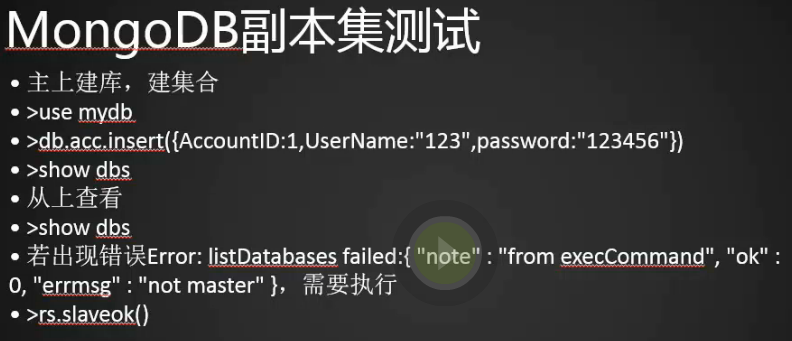
1.创建一个库,创建一个集合
1mongodbslave:PRIMARY> use admin
2switched to db admin
3mongodbslave:PRIMARY> use mydb
4switched to db mydb
5mongodbslave:PRIMARY> db.acc.insert({AccountID:1,UserName:"123",password:"123456"})
6WriteResult({ "nInserted" : 1 })
7mongodbslave:PRIMARY> show dbs;
8admin   0.000GB
9config  0.000GB
10local   0.000GB
11mydb    0.000GB
12mongodbslave:PRIMARY> use mydb
13switched to db mydb
14mongodbslave:PRIMARY> show tables
15acc
16mongodbslave:PRIMARY>
2.从上查看mydb
1[root@centos-02 ~]# mongo
2MongoDB shell version v3.6.3
3connecting to: mongodb://127.0.0.1:27017
4MongoDB server version: 3.6.3
5Server has startup warnings:
62018-04-08T23:52:57.455+0800 I CONTROL  [initandlisten]
72018-04-08T23:52:57.456+0800 I CONTROL  [initandlisten] ** WARNING: Access control is not enabled for the database.
82018-04-08T23:52:57.456+0800 I CONTROL  [initandlisten] **          Read and write access to data and configuration is unrestricted.
92018-04-08T23:52:57.457+0800 I CONTROL  [initandlisten]
102018-04-08T23:52:57.457+0800 I CONTROL  [initandlisten]
112018-04-08T23:52:57.458+0800 I CONTROL  [initandlisten] ** WARNING: /sys/kernel/mm/transparent_hugepage/enabled is 'always'.
122018-04-08T23:52:57.458+0800 I CONTROL  [initandlisten] **        We suggest setting it to 'never'
132018-04-08T23:52:57.459+0800 I CONTROL  [initandlisten]
142018-04-08T23:52:57.459+0800 I CONTROL  [initandlisten] ** WARNING: /sys/kernel/mm/transparent_hugepage/defrag is 'always'.
152018-04-08T23:52:57.460+0800 I CONTROL  [initandlisten] **        We suggest setting it to 'never'
162018-04-08T23:52:57.460+0800 I CONTROL  [initandlisten]
17mongodbslave:SECONDARY>
18mongodbslave:SECONDARY> show dbs
192018-04-09T00:10:50.623+0800 E QUERY    [thread1] Error: listDatabases failed:{
20	"operationTime" : Timestamp(1523232527, 1),
21	"ok" : 0,
22	"errmsg" : "not master and slaveOk=false",
23	"code" : 13435,
24	"codeName" : "NotMasterNoSlaveOk",
25	"$clusterTime" : {
26		"clusterTime" : Timestamp(1523232527, 1),
27		"signature" : {
28			"hash" : BinData(0,"AAAAAAAAAAAAAAAAAAAAAAAAAAA="),
29			"keyId" : NumberLong(0)
30		}
31	}
32} :
33_getErrorWithCode@src/mongo/shell/utils.js:25:13
34Mongo.prototype.getDBs@src/mongo/shell/mongo.js:65:1
35shellHelper.show@src/mongo/shell/utils.js:816:19
36shellHelper@src/mongo/shell/utils.js:706:15
37@(shellhelp2):1:1
38mongodbslave:SECONDARY> rs.slaveOk()
39mongodbslave:SECONDARY> show dbs
40admin   0.000GB
41config  0.000GB
42local   0.000GB
43mydb    0.000GB
44mongodbslave:SECONDARY> use mydb
45switched to db mydb
46mongodbslave:SECONDARY> show tables
47acc
48mongodbslave:SECONDARY>
3.从上查看mydb
1[root@centos-03 ~]# mongo
2MongoDB shell version v3.6.3
3connecting to: mongodb://127.0.0.1:27017
4MongoDB server version: 3.6.3
5Welcome to the MongoDB shell.
6For interactive help, type "help".
7For more comprehensive documentation, see
8	http://docs.mongodb.org/
9Questions? Try the support group
10	http://groups.google.com/group/mongodb-user
11Server has startup warnings:
122018-04-03T23:07:44.471+0800 I CONTROL  [initandlisten]
132018-04-03T23:07:44.472+0800 I CONTROL  [initandlisten] ** WARNING: Access control is not enabled for the database.
142018-04-03T23:07:44.472+0800 I CONTROL  [initandlisten] **          Read and write access to data and configuration is unrestricted.
152018-04-03T23:07:44.473+0800 I CONTROL  [initandlisten]
162018-04-03T23:07:44.555+0800 I CONTROL  [initandlisten]
172018-04-03T23:07:44.555+0800 I CONTROL  [initandlisten] ** WARNING: /sys/kernel/mm/transparent_hugepage/enabled is 'always'.
182018-04-03T23:07:44.555+0800 I CONTROL  [initandlisten] **        We suggest setting it to 'never'
192018-04-03T23:07:44.589+0800 I CONTROL  [initandlisten]
202018-04-03T23:07:44.589+0800 I CONTROL  [initandlisten] ** WARNING: /sys/kernel/mm/transparent_hugepage/defrag is 'always'.
212018-04-03T23:07:44.590+0800 I CONTROL  [initandlisten] **        We suggest setting it to 'never'
222018-04-03T23:07:44.590+0800 I CONTROL  [initandlisten]
23mongodbslave:SECONDARY>
24mongodbslave:SECONDARY> show dbs
252018-04-09T00:12:45.860+0800 E QUERY    [thread1] Error: listDatabases failed:{
26	"operationTime" : Timestamp(1523232687, 1),
27	"ok" : 0,
28	"errmsg" : "not master and slaveOk=false",
29	"code" : 13435,
30	"codeName" : "NotMasterNoSlaveOk",
31	"$clusterTime" : {
32		"clusterTime" : Timestamp(1523232687, 1),
33		"signature" : {
34			"hash" : BinData(0,"AAAAAAAAAAAAAAAAAAAAAAAAAAA="),
35			"keyId" : NumberLong(0)
36		}
37	}
38} :
39_getErrorWithCode@src/mongo/shell/utils.js:25:13
40Mongo.prototype.getDBs@src/mongo/shell/mongo.js:65:1
41shellHelper.show@src/mongo/shell/utils.js:816:19
42shellHelper@src/mongo/shell/utils.js:706:15
43@(shellhelp2):1:1
44mongodbslave:SECONDARY> rs.slaveOk()
45mongodbslave:SECONDARY> show dbs
46admin   0.000GB
47config  0.000GB
48local   0.000GB
49mydb    0.000GB
50mongodbslave:SECONDARY> use mydb
51switched to db mydb
52mongodbslave:SECONDARY> show tables
53acc
54mongodbslave:SECONDARY>
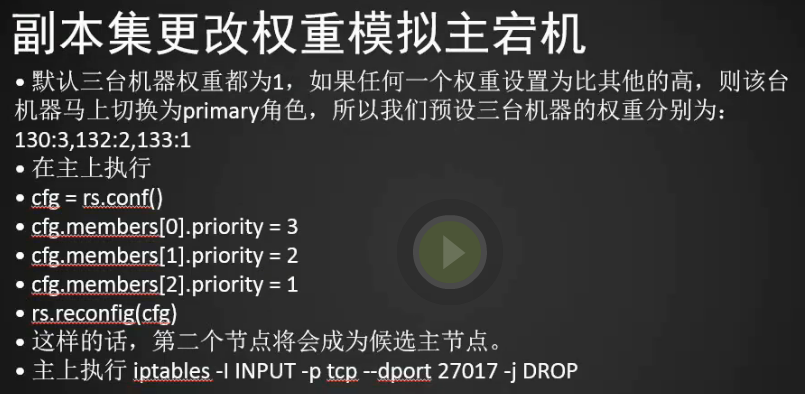
1.查看三个节点的权重
1mongodbslave:PRIMARY> rs.config()
2{
3	"_id" : "mongodbslave",
4	"version" : 1,
5	"protocolVersion" : NumberLong(1),
6	"members" : [
7		{
8			"_id" : 0,
9			"host" : "192.168.133.44:27017",
10			"arbiterOnly" : false,
11			"buildIndexes" : true,
12			"hidden" : false,
13			"priority" : 1,
14			"tags" : {
15
16			},
17			"slaveDelay" : NumberLong(0),
18			"votes" : 1
19		},
20		{
21			"_id" : 1,
22			"host" : "192.168.133.88:27017",
23			"arbiterOnly" : false,
24			"buildIndexes" : true,
25			"hidden" : false,
26			"priority" : 1,
27			"tags" : {
28
29			},
30			"slaveDelay" : NumberLong(0),
31			"votes" : 1
32		},
33		{
34			"_id" : 2,
35			"host" : "192.168.133.66:27017",
36			"arbiterOnly" : false,
37			"buildIndexes" : true,
38			"hidden" : false,
39			"priority" : 1,
40			"tags" : {
41
42			},
43			"slaveDelay" : NumberLong(0),
44			"votes" : 1
45		}
46	],
47	"settings" : {
48		"chainingAllowed" : true,
49		"heartbeatIntervalMillis" : 2000,
50		"heartbeatTimeoutSecs" : 10,
51		"electionTimeoutMillis" : 10000,
52		"catchUpTimeoutMillis" : -1,
53		"catchUpTakeoverDelayMillis" : 30000,
54		"getLastErrorModes" : {
55
56		},
57		"getLastErrorDefaults" : {
58			"w" : 1,
59			"wtimeout" : 0
60		},
61		"replicaSetId" : ObjectId("5ac4143306d5c156f4c42cd9")
62	}
63}
64mongodbslave:PRIMARY>
2.模拟宕机,过了一会儿发现02变成主了(因为权重都是1这个主是随机的)
1[root@centos-01 ~]# iptables -I INPUT -p tcp --dport 27017 -j DROP
2[root@centos-02 ~]# mongo
3MongoDB shell version v3.6.3
4connecting to: mongodb://127.0.0.1:27017
5MongoDB server version: 3.6.3
6Server has startup warnings:
72018-04-08T23:52:57.455+0800 I CONTROL  [initandlisten]
82018-04-08T23:52:57.456+0800 I CONTROL  [initandlisten] ** WARNING: Access control is not enabled for the database.
92018-04-08T23:52:57.456+0800 I CONTROL  [initandlisten] **          Read and write access to data and configuration is unrestricted.
102018-04-08T23:52:57.457+0800 I CONTROL  [initandlisten]
112018-04-08T23:52:57.457+0800 I CONTROL  [initandlisten]
122018-04-08T23:52:57.458+0800 I CONTROL  [initandlisten] ** WARNING: /sys/kernel/mm/transparent_hugepage/enabled is 'always'.
132018-04-08T23:52:57.458+0800 I CONTROL  [initandlisten] **        We suggest setting it to 'never'
142018-04-08T23:52:57.459+0800 I CONTROL  [initandlisten]
152018-04-08T23:52:57.459+0800 I CONTROL  [initandlisten] ** WARNING: /sys/kernel/mm/transparent_hugepage/defrag is 'always'.
162018-04-08T23:52:57.460+0800 I CONTROL  [initandlisten] **        We suggest setting it to 'never'
172018-04-08T23:52:57.460+0800 I CONTROL  [initandlisten]
18mongodbslave:PRIMARY>
3.设置新的权重
1[root@centos-01 ~]# iptables -D INPUT -p tcp --dport 27017 -j DROP
2
3mongodbslave:PRIMARY> cfg=rs.conf()
4{
5	"_id" : "mongodbslave",
6	"version" : 1,
7	"protocolVersion" : NumberLong(1),
8	"members" : [
9		{
10			"_id" : 0,
11			"host" : "192.168.133.44:27017",
12			"arbiterOnly" : false,
13			"buildIndexes" : true,
14			"hidden" : false,
15			"priority" : 1,
16			"tags" : {
17
18			},
19			"slaveDelay" : NumberLong(0),
20			"votes" : 1
21		},
22		{
23			"_id" : 1,
24			"host" : "192.168.133.88:27017",
25			"arbiterOnly" : false,
26			"buildIndexes" : true,
27			"hidden" : false,
28			"priority" : 1,
29			"tags" : {
30
31			},
32			"slaveDelay" : NumberLong(0),
33			"votes" : 1
34		},
35		{
36			"_id" : 2,
37			"host" : "192.168.133.66:27017",
38			"arbiterOnly" : false,
39			"buildIndexes" : true,
40			"hidden" : false,
41			"priority" : 1,
42			"tags" : {
43
44			},
45			"slaveDelay" : NumberLong(0),
46			"votes" : 1
47		}
48	],
49	"settings" : {
50		"chainingAllowed" : true,
51		"heartbeatIntervalMillis" : 2000,
52		"heartbeatTimeoutSecs" : 10,
53		"electionTimeoutMillis" : 10000,
54		"catchUpTimeoutMillis" : -1,
55		"catchUpTakeoverDelayMillis" : 30000,
56		"getLastErrorModes" : {
57
58		},
59		"getLastErrorDefaults" : {
60			"w" : 1,
61			"wtimeout" : 0
62		},
63		"replicaSetId" : ObjectId("5ac4143306d5c156f4c42cd9")
64	}
65}
66mongodbslave:PRIMARY> cfg.members[0].priority = 3
673
68mongodbslave:PRIMARY> cfg.members[1].priority = 2
692
70mongodbslave:PRIMARY> cfg.members[2].priority = 1
711
72mongodbslave:PRIMARY> rs.reconfig(cfg)
73{
74	"ok" : 1,
75	"operationTime" : Timestamp(1523234054, 33),
76	"$clusterTime" : {
77		"clusterTime" : Timestamp(1523234054, 33),
78		"signature" : {
79			"hash" : BinData(0,"AAAAAAAAAAAAAAAAAAAAAAAAAAA="),
80			"keyId" : NumberLong(0)
81		}
82	}
83}
84mongodbslave:PRIMARY> rs.config()
85{
86	"_id" : "mongodbslave",
87	"version" : 2,
88	"protocolVersion" : NumberLong(1),
89	"members" : [
90		{
91			"_id" : 0,
92			"host" : "192.168.133.44:27017",
93			"arbiterOnly" : false,
94			"buildIndexes" : true,
95			"hidden" : false,
96			"priority" : 3,
97			"tags" : {
98
99			},
100			"slaveDelay" : NumberLong(0),
101			"votes" : 1
102		},
103		{
104			"_id" : 1,
105			"host" : "192.168.133.88:27017",
106			"arbiterOnly" : false,
107			"buildIndexes" : true,
108			"hidden" : false,
109			"priority" : 2,
110			"tags" : {
111
112			},
113			"slaveDelay" : NumberLong(0),
114			"votes" : 1
115		},
116		{
117			"_id" : 2,
118			"host" : "192.168.133.66:27017",
119			"arbiterOnly" : false,
120			"buildIndexes" : true,
121			"hidden" : false,
122			"priority" : 1,
123			"tags" : {
124
125			},
126			"slaveDelay" : NumberLong(0),
127			"votes" : 1
128		}
129	],
130	"settings" : {
131		"chainingAllowed" : true,
132		"heartbeatIntervalMillis" : 2000,
133		"heartbeatTimeoutSecs" : 10,
134		"electionTimeoutMillis" : 10000,
135		"catchUpTimeoutMillis" : -1,
136		"catchUpTakeoverDelayMillis" : 30000,
137		"getLastErrorModes" : {
138
139		},
140		"getLastErrorDefaults" : {
141			"w" : 1,
142			"wtimeout" : 0
143		},
144		"replicaSetId" : ObjectId("5ac4143306d5c156f4c42cd9")
145	}
146}
147mongodbslave:PRIMARY>
mongodb分片介绍


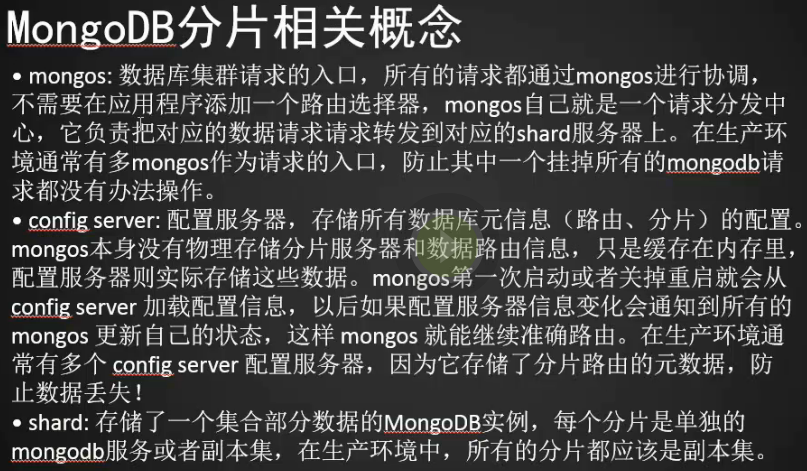
mongodb分片搭建
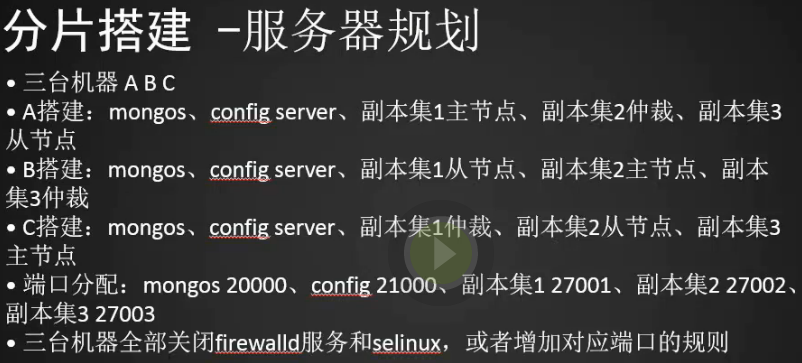
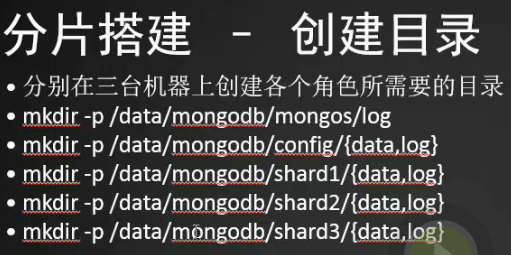
1.三台机器分别创建mongos的日志和其他目录
1[root@centos-01 ~]# mkdir -p /data/mongodb/mongos/log
2[root@centos-01 ~]# mkdir -p /data/mongodb/config/{data,log}
3[root@centos-01 ~]# mkdir -p /data/mongodb/shard1/{data,log}
4[root@centos-01 ~]# mkdir -p /data/mongodb/shard2/{data,log}
5[root@centos-01 ~]# mkdir -p /data/mongodb/shard3/{data,log}
6[root@centos-01 ~]#
7
8[root@centos-02 ~]# mkdir -p /data/mongodb/mongos/log
9[root@centos-02 ~]# mkdir -p /data/mongodb/config/{data,log}
10[root@centos-02 ~]# mkdir -p /data/mongodb/shard1/{data,log}
11[root@centos-02 ~]# mkdir -p /data/mongodb/shard2/{data,log}
12[root@centos-02 ~]# mkdir -p /data/mongodb/shard3/{data,log}
13[root@centos-02 ~]#
14
15[root@centos-03 ~]# mkdir -p /data/mongodb/mongos/log
16[root@centos-03 ~]# mkdir -p /data/mongodb/config/{data,log}
17[root@centos-03 ~]# mkdir -p /data/mongodb/shard1/{data,log}
18[root@centos-03 ~]# mkdir -p /data/mongodb/shard2/{data,log}
19[root@centos-03 ~]# mkdir -p /data/mongodb/shard3/{data,log}
20[root@centos-03 ~]#
1.创建配置文件的目录
1[root@centos-01 ~]# mkdir /etc/mongod/
2[root@centos-01 ~]#
3[root@centos-02 ~]# mkdir /etc/mongod/
4[root@centos-02 ~]#
5[root@centos-03 ~]# mkdir /etc/mongod/
6[root@centos-03 ~]#
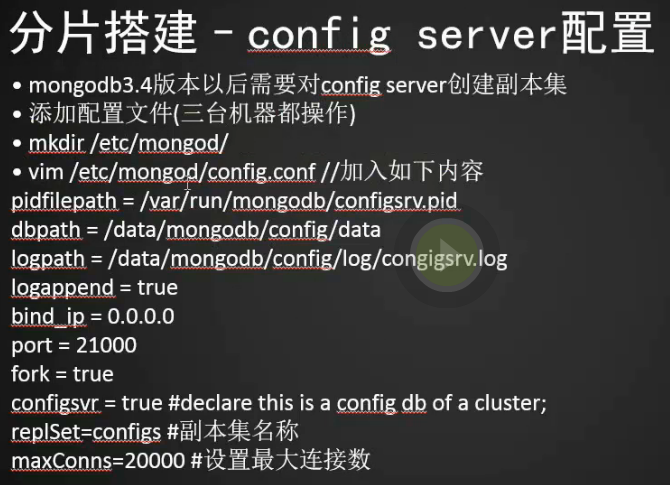
2.编辑configserver的配置文件
1[root@centos-01 ~]# vim /etc/mongod/config.conf
2[root@centos-01 ~]#
3pidfilepath = /var/run/mongodb/configsrv.pid
4dbpath = /data/mongodb/config/data
5logpath = /data/mongodb/config/log/congigsrv.log
6logappend = true
7bind_ip = 192.168.133.44
8port = 21000
9fork = true
10configsvr = true #declare this is a config db of a cluster;
11replSet=configs #副本集名称
12maxConns=20000 #设置最大连接数
13
14[root@centos-02 ~]# vim /etc/mongod/config.conf
15[root@centos-02 ~]#
16pidfilepath = /var/run/mongodb/configsrv.pid
17dbpath = /data/mongodb/config/data
18logpath = /data/mongodb/config/log/congigsrv.log
19logappend = true
20bind_ip = 192.168.133.88
21port = 21000
22fork = true
23configsvr = true #declare this is a config db of a cluster;
24replSet=configs #副本集名称
25maxConns=20000 #设置最大连接数
26
27[root@centos-03 ~]# vim /etc/mongod/config.conf
28[root@centos-03 ~]#
29pidfilepath = /var/run/mongodb/configsrv.pid
30dbpath = /data/mongodb/config/data
31logpath = /data/mongodb/config/log/congigsrv.log
32logappend = true
33bind_ip = 192.168.133.66
34port = 21000
35fork = true
36configsvr = true #declare this is a config db of a cluster;
37replSet=configs #副本集名称
38maxConns=20000 #设置最大连接数
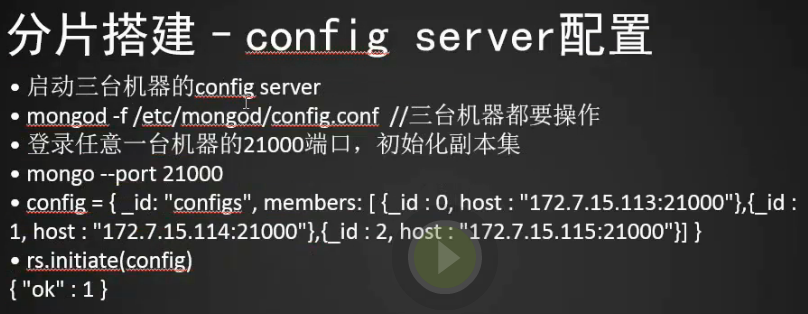
1.启动三台机器的config服务
1[root@centos-01 ~]# mongod -f /etc/mongod/config.conf
2about to fork child process, waiting until server is ready for connections.
3forked process: 5513
4child process started successfully, parent exiting
5[root@centos-01 ~]# ps aux|grep mongo
6mongod     1838  5.4  7.1 1602768 71468 ?       Sl   20:05   5:17 /usr/bin/mongod -f /etc/mongod.conf
7root       5513 41.8  4.5 1074840 45552 ?       Sl   21:41   0:14 mongod -f /etc/mongod/config.conf
8root       5553 11.0  0.0 112668   932 pts/0    S+   21:41   0:00 grep --color=auto mong
9[root@centos-01 ~]#
10
11[root@centos-01 ~]# netstat -lntp|grep mongod
12tcp        0      0 192.168.133.44:21000    0.0.0.0:*               LISTEN      5513/mongod
13tcp        0      0 192.168.133.44:27017    0.0.0.0:*               LISTEN      1838/mongod
14tcp        0      0 127.0.0.1:27017         0.0.0.0:*               LISTEN      1838/mongod
15[root@centos-01 ~]#
16
17[root@centos-02 ~]# mongod -f /etc/mongod/config.conf
18about to fork child process, waiting until server is ready for connections.
19forked process: 3095
20child process started successfully, parent exiting
21[root@centos-02 ~]# ps aux|grep mongod
22mongod     1327  3.7  9.2 1512172 92884 ?       Sl   20:17   3:19 /usr/bin/mongod -f /etc/mongod.conf
23root       3095 31.1  5.0 1074480 50864 ?       Sl   21:46   0:05 mongod -f /etc/mongod/config.conf
24root       3127 10.0  0.0 112684   948 pts/0    R+   21:46   0:00 grep --color=auto mongod
25[root@centos-02 ~]# netstat -lntp|grep mongod
26tcp        0      0 192.168.133.88:21000    0.0.0.0:*               LISTEN      3095/mongod
27tcp        0      0 192.168.133.88:27017    0.0.0.0:*               LISTEN      1327/mongod
28tcp        0      0 127.0.0.1:27017         0.0.0.0:*               LISTEN      1327/mongod
29[root@centos-02 ~]#
30
31[root@centos-03 ~]# mongod -f /etc/mongod/config.conf
32about to fork child process, waiting until server is ready for connections.
33forked process: 10596
34child process started successfully, parent exiting
35[root@centos-03 ~]# ps aux|grep mongod
36mongod     6498  4.7  9.7 1630304 97188 ?       Sl   18:59   8:04 /usr/bin/mongod -f /etc/mongod.conf
37root      10596 36.4  4.5 1071180 45568 ?       Sl   21:48   0:06 mongod -f /etc/mongod/config.conf
38root      10632  0.0  0.0 112668   928 pts/0    S+   21:48   0:00 grep --color=auto mongod
39[root@centos-03 ~]# netstat -lntp|grep mongod
40tcp        0      0 192.168.133.66:21000    0.0.0.0:*               LISTEN      10596/mongod
41tcp        0      0 192.168.133.66:27017    0.0.0.0:*               LISTEN      6498/mongod
42tcp        0      0 127.0.0.1:27017         0.0.0.0:*               LISTEN      6498/mongod
43[root@centos-03 ~]#
2.初始化副本集
1[root@centos-01 ~]# mongo --host 192.168.133.44 --port 21000
2MongoDB shell version v3.6.3
3connecting to: mongodb://192.168.133.44:21000/
4MongoDB server version: 3.6.3
5Server has startup warnings:
62018-04-09T21:41:22.102+0800 I CONTROL  [initandlisten]
72018-04-09T21:41:22.103+0800 I CONTROL  [initandlisten] ** WARNING: Access control is not enabled for the database.
82018-04-09T21:41:22.104+0800 I CONTROL  [initandlisten] **          Read and write access to data and configuration is unrestricted.
92018-04-09T21:41:22.104+0800 I CONTROL  [initandlisten] ** WARNING: You are running this process as the root user, which is not recommended.
102018-04-09T21:41:22.104+0800 I CONTROL  [initandlisten]
112018-04-09T21:41:22.148+0800 I CONTROL  [initandlisten]
122018-04-09T21:41:22.149+0800 I CONTROL  [initandlisten] ** WARNING: /sys/kernel/mm/transparent_hugepage/enabled is 'always'.
132018-04-09T21:41:22.149+0800 I CONTROL  [initandlisten] **        We suggest setting it to 'never'
142018-04-09T21:41:22.150+0800 I CONTROL  [initandlisten]
152018-04-09T21:41:22.151+0800 I CONTROL  [initandlisten] ** WARNING: /sys/kernel/mm/transparent_hugepage/defrag is 'always'.
162018-04-09T21:41:22.151+0800 I CONTROL  [initandlisten] **        We suggest setting it to 'never'
172018-04-09T21:41:22.151+0800 I CONTROL  [initandlisten]
18> config = { _id: "configs", members: [ {_id : 0, host : "192.168.133.44:21000"},{_id : 1, host : "192.168.133.88:21000"},{_id : 2, host : "192.168.133.66:21000"}] }
19{
20	"_id" : "configs",
21	"members" : [
22		{
23			"_id" : 0,
24			"host" : "192.168.133.44:21000"
25		},
26		{
27			"_id" : 1,
28			"host" : "192.168.133.88:21000"
29		},
30		{
31			"_id" : 2,
32			"host" : "192.168.133.66:21000"
33		}
34	]
35}
36> rs.initiate(config)
37{
38	"ok" : 1,
39	"operationTime" : Timestamp(1523282429, 1),
40	"$gleStats" : {
41		"lastOpTime" : Timestamp(1523282429, 1),
42		"electionId" : ObjectId("000000000000000000000000")
43	},
44	"$clusterTime" : {
45		"clusterTime" : Timestamp(1523282429, 1),
46		"signature" : {
47			"hash" : BinData(0,"AAAAAAAAAAAAAAAAAAAAAAAAAAA="),
48			"keyId" : NumberLong(0)
49		}
50	}
51}
3.查看下状态
1configs:OTHER> rs.status()
2{
3	"set" : "configs",
4	"date" : ISODate("2018-04-09T14:02:16.668Z"),
5	"myState" : 1,
6	"term" : NumberLong(1),
7	"configsvr" : true,
8	"heartbeatIntervalMillis" : NumberLong(2000),
9	"optimes" : {
10		"lastCommittedOpTime" : {
11			"ts" : Timestamp(1523282518, 1),
12			"t" : NumberLong(1)
13		},
14		"readConcernMajorityOpTime" : {
15			"ts" : Timestamp(1523282518, 1),
16			"t" : NumberLong(1)
17		},
18		"appliedOpTime" : {
19			"ts" : Timestamp(1523282518, 1),
20			"t" : NumberLong(1)
21		},
22		"durableOpTime" : {
23			"ts" : Timestamp(1523282518, 1),
24			"t" : NumberLong(1)
25		}
26	},
27	"members" : [
28		{
29			"_id" : 0,
30			"name" : "192.168.133.44:21000",
31			"health" : 1,
32			"state" : 1,
33			"stateStr" : "PRIMARY",
34			"uptime" : 1273,
35			"optime" : {
36				"ts" : Timestamp(1523282518, 1),
37				"t" : NumberLong(1)
38			},
39			"optimeDate" : ISODate("2018-04-09T14:01:58Z"),
40			"infoMessage" : "could not find member to sync from",
41			"electionTime" : Timestamp(1523282475, 1),
42			"electionDate" : ISODate("2018-04-09T14:01:15Z"),
43			"configVersion" : 1,
44			"self" : true
45		},
46		{
47			"_id" : 1,
48			"name" : "192.168.133.88:21000",
49			"health" : 1,
50			"state" : 2,
51			"stateStr" : "SECONDARY",
52			"uptime" : 106,
53			"optime" : {
54				"ts" : Timestamp(1523282518, 1),
55				"t" : NumberLong(1)
56			},
57			"optimeDurable" : {
58				"ts" : Timestamp(1523282518, 1),
59				"t" : NumberLong(1)
60			},
61			"optimeDate" : ISODate("2018-04-09T14:01:58Z"),
62			"optimeDurableDate" : ISODate("2018-04-09T14:01:58Z"),
63			"lastHeartbeat" : ISODate("2018-04-09T14:02:16.135Z"),
64			"lastHeartbeatRecv" : ISODate("2018-04-09T14:02:15.510Z"),
65			"pingMs" : NumberLong(37),
66			"syncingTo" : "192.168.133.44:21000",
67			"configVersion" : 1
68		},
69		{
70			"_id" : 2,
71			"name" : "192.168.133.66:21000",
72			"health" : 1,
73			"state" : 2,
74			"stateStr" : "SECONDARY",
75			"uptime" : 106,
76			"optime" : {
77				"ts" : Timestamp(1523282518, 1),
78				"t" : NumberLong(1)
79			},
80			"optimeDurable" : {
81				"ts" : Timestamp(1523282518, 1),
82				"t" : NumberLong(1)
83			},
84			"optimeDate" : ISODate("2018-04-09T14:01:58Z"),
85			"optimeDurableDate" : ISODate("2018-04-09T14:01:58Z"),
86			"lastHeartbeat" : ISODate("2018-04-09T14:02:14.987Z"),
87			"lastHeartbeatRecv" : ISODate("2018-04-09T14:02:16.232Z"),
88			"pingMs" : NumberLong(45),
89			"syncingTo" : "192.168.133.44:21000",
90			"configVersion" : 1
91		}
92	],
93	"ok" : 1,
94	"operationTime" : Timestamp(1523282518, 1),
95	"$gleStats" : {
96		"lastOpTime" : Timestamp(1523282429, 1),
97		"electionId" : ObjectId("7fffffff0000000000000001")
98	},
99	"$clusterTime" : {
100		"clusterTime" : Timestamp(1523282518, 1),
101		"signature" : {
102			"hash" : BinData(0,"AAAAAAAAAAAAAAAAAAAAAAAAAAA="),
103			"keyId" : NumberLong(0)
104		}
105	}
106}
4.下面配置mongos和三个shard

1[root@centos-01 ~]# vim /etc/mongod/shard1.conf
2pidfilepath = /var/run/mongodb/shard1.pid
3dbpath = /data/mongodb/shard1/data
4logpath = /data/mongodb/shard1/log/shard1.log
5logappend = true
6bind_ip = 0.0.0.0
7port = 27001
8fork = true
9httpinterface=true #打开web监控
10rest=true
11replSet=shard1 #副本集名称
12shardsvr = true #declare this is a shard db of a cluster;
13maxConns=20000 #设置最大连接数
14
15[root@centos-02 ~]# vim /etc/mongod/shard1.conf
16pidfilepath = /var/run/mongodb/shard1.pid
17dbpath = /data/mongodb/shard1/data
18logpath = /data/mongodb/shard1/log/shard1.log
19logappend = true
20bind_ip = 0.0.0.0
21port = 27001
22fork = true
23httpinterface=true #打开web监控
24rest=true
25replSet=shard1 #副本集名称
26shardsvr = true #declare this is a shard db of a cluster;
27maxConns=20000 #设置最大连接数
28
29[root@centos-03 ~]# vim /etc/mongod/shard1.conf
30pidfilepath = /var/run/mongodb/shard1.pid
31dbpath = /data/mongodb/shard1/data
32logpath = /data/mongodb/shard1/log/shard1.log
33logappend = true
34bind_ip = 0.0.0.0
35port = 27001
36fork = true
37httpinterface=true #打开web监控
38rest=true
39replSet=shard1 #副本集名称
40shardsvr = true #declare this is a shard db of a cluster;
41maxConns=20000 #设置最大连接数
42
43[root@centos-01 ~]# cd /etc/mongod/
44[root@centos-01 mongod]# cp shard1.conf shard2.conf
45[root@centos-01 mongod]# cp shard1.conf shard3.conf
46[root@centos-01 mongod]# sed -i 's/shard1/shard2/g' shard2.conf
47[root@centos-01 mongod]# sed -i 's/shard1/shard3/g' shard3.conf
48[root@centos-01 mongod]# cat !$
49cat shard3.conf
50pidfilepath = /var/run/mongodb/shard3.pid
51dbpath = /data/mongodb/shard3/data
52logpath = /data/mongodb/shard3/log/shard3.log
53logappend = true
54bind_ip = 0.0.0.0
55port = 27001
56fork = true
57httpinterface=true #打开web监控
58rest=true
59replSet=shard3 #副本集名称
60shardsvr = true #declare this is a shard db of a cluster;
61maxConns=20000 #设置最大连接数
62
63[root@centos-01 mongod]#
64
65[root@centos-01 mongod]# scp shard2.conf shard3.conf 192.168.133.88:/etc/mongod/
66The authenticity of host '192.168.133.88 (192.168.133.88)' can't be established.
67ECDSA key fingerprint is bf:dc:4b:e3:1c:99:f4:12:6f:d0:a8:e0:13:8a:d0:dd.
68Are you sure you want to continue connecting (yes/no)? yes
69Warning: Permanently added '192.168.133.88' (ECDSA) to the list of known hosts.
70root@192.168.133.88's password:
71shard2.conf                                            100%  358     0.4KB/s   00:00
72shard3.conf                                            100%  358     0.4KB/s   00:00
73[root@centos-01 mongod]# scp shard2.conf shard3.conf 192.168.133.66:/etc/mongod/
74The authenticity of host '192.168.133.66 (192.168.133.66)' can't be established.
75ECDSA key fingerprint is bf:dc:4b:e3:1c:99:f4:12:6f:d0:a8:e0:13:8a:d0:dd.
76Are you sure you want to continue connecting (yes/no)? yes
77Warning: Permanently added '192.168.133.66' (ECDSA) to the list of known hosts.
78root@192.168.133.66's password:
79shard2.conf                                            100%  358     0.4KB/s   00:00
80shard3.conf                                            100%  358     0.4KB/s   00:00
81[root@centos-01 mongod]#
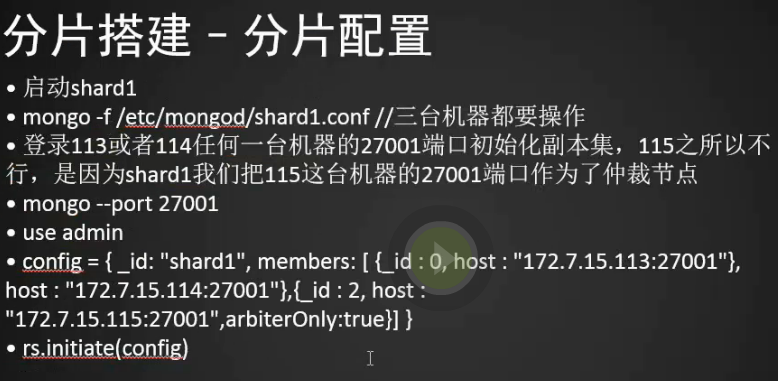
1.启动服务,搭建副本集(3.6版本的需要把配置文件中的httpinterface和rest注释掉)
1[root@centos-01 mongod]# mongod -f /etc/mongod/shard1.conf
2about to fork child process, waiting until server is ready for connections.
3forked process: 6581
4child process started successfully, parent exiting
5[root@centos-01 mongod]#
6
7[root@centos-02 ~]# mongod -f /etc/mongod/shard1.conf
8about to fork child process, waiting until server is ready for connections.
9forked process: 3338
10child process started successfully, parent exiting
11[root@centos-02 ~]#
12
13[root@centos-03 ~]# mongod -f /etc/mongod/shard1.conf
14about to fork child process, waiting until server is ready for connections.
15forked process: 11921
16child process started successfully, parent exiting
17[root@centos-03 ~]#
2.搭建shard1的副本集
1> use admin
2switched to db admin
3> config = { _id: "shard1", members: [ {_id : 0, host : "192.168.133.44:27001"}, {_id: 1,host : "192.168.133.88:27001"},{_id : 2, host : "192.168.133.66:27001",arbiterOnly:true}] }
4{
5	"_id" : "shard1",
6	"members" : [
7		{
8			"_id" : 0,
9			"host" : "192.168.133.44:27001"
10		},
11		{
12			"_id" : 1,
13			"host" : "192.168.133.88:27001"
14		},
15		{
16			"_id" : 2,
17			"host" : "192.168.133.66:27001",
18			"arbiterOnly" : true
19		}
20	]
21}
22>
23
24> rs.initiate(config)
25{ "ok" : 1 }
26shard1:OTHER>
27shard1:PRIMARY>
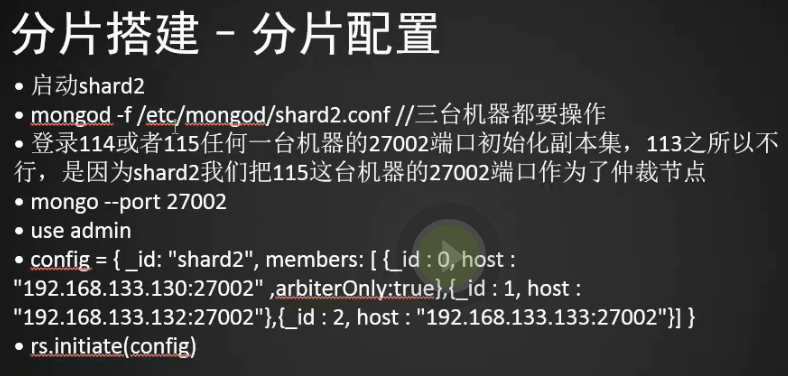
1.启动shard2
1[root@centos-02 ~]# mongod -f /etc/mongod/shard2.conf
2about to fork child process, waiting until server is ready for connections.
3forked process: 3554
4child process started successfully, parent exiting
5[root@centos-02 ~]# mongo --port 27002
6MongoDB shell version v3.6.3
7connecting to: mongodb://127.0.0.1:27002/
8MongoDB server version: 3.6.3
9Server has startup warnings:
102018-04-09T23:31:24.947+0800 I CONTROL  [initandlisten]
112018-04-09T23:31:24.950+0800 I CONTROL  [initandlisten] ** WARNING: Access control is not enabled for the database.
122018-04-09T23:31:24.950+0800 I CONTROL  [initandlisten] **          Read and write access to data and configuration is unrestricted.
132018-04-09T23:31:24.950+0800 I CONTROL  [initandlisten] ** WARNING: You are running this process as the root user, which is not recommended.
142018-04-09T23:31:24.951+0800 I CONTROL  [initandlisten]
152018-04-09T23:31:25.050+0800 I CONTROL  [initandlisten]
162018-04-09T23:31:25.051+0800 I CONTROL  [initandlisten] ** WARNING: /sys/kernel/mm/transparent_hugepage/enabled is 'always'.
172018-04-09T23:31:25.052+0800 I CONTROL  [initandlisten] **        We suggest setting it to 'never'
182018-04-09T23:31:25.052+0800 I CONTROL  [initandlisten]
192018-04-09T23:31:25.052+0800 I CONTROL  [initandlisten] ** WARNING: /sys/kernel/mm/transparent_hugepage/defrag is 'always'.
202018-04-09T23:31:25.053+0800 I CONTROL  [initandlisten] **        We suggest setting it to 'never'
212018-04-09T23:31:25.053+0800 I CONTROL  [initandlisten]
22> config = { _id: "shard2", members: [ {_id : 0, host : "192.168.133.44:27002" ,arbiterOnly:true},{_id : 1, host : "192.168.133.88:27002"},{_id : 2, host : "192.168.133.66:27002"}] }
23{
24	"_id" : "shard2",
25	"members" : [
26		{
27			"_id" : 0,
28			"host" : "192.168.133.44:27002",
29			"arbiterOnly" : true
30		},
31		{
32			"_id" : 1,
33			"host" : "192.168.133.88:27002"
34		},
35		{
36			"_id" : 2,
37			"host" : "192.168.133.66:27002"
38		}
39	]
40}
41> rs.initiate(config)
42{ "ok" : 1 }
43shard2:OTHER> shard2:PRIMARY>
2.配置shard3
1[root@centos-01 mongod]# mongod -f /etc/mongod/shard3.conf
2about to fork child process, waiting until server is ready for connections.
3forked process: 7281
4[root@centos-02 ~]# mongod -f /etc/mongod/shard3.conf
5about to fork child process, waiting until server is ready for connections.
6forked process: 3653
7[root@centos-03 ~]# mongod -f /etc/mongod/shard3.conf
8about to fork child process, waiting until server is ready for connections.
9forked process: 12702
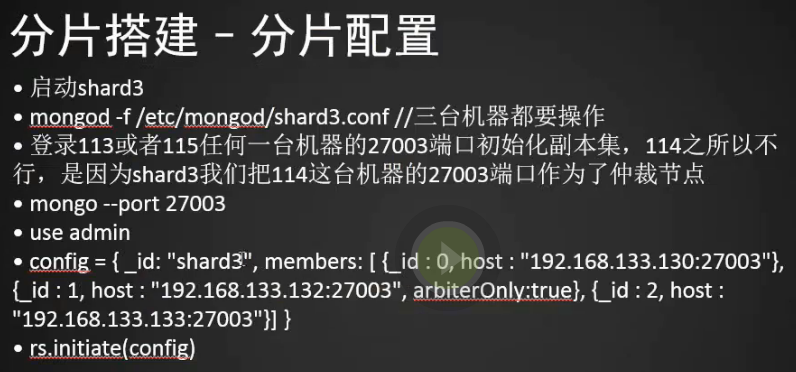
1.启动shard3
1[root@centos-03 ~]# mongod -f /etc/mongod/shard3.conf
2about to fork child process, waiting until server is ready for connections.
3forked process: 12702
4child process started successfully, parent exiting
5[root@centos-03 ~]#
6[root@centos-03 ~]# mongo --port 27003
7MongoDB shell version v3.6.3
8connecting to: mongodb://127.0.0.1:27003/
9MongoDB server version: 3.6.3
10Server has startup warnings:
112018-04-09T23:38:13.623+0800 I CONTROL  [initandlisten]
122018-04-09T23:38:13.625+0800 I CONTROL  [initandlisten] ** WARNING: Access control is not enabled for the database.
132018-04-09T23:38:13.625+0800 I CONTROL  [initandlisten] **          Read and write access to data and configuration is unrestricted.
142018-04-09T23:38:13.625+0800 I CONTROL  [initandlisten] ** WARNING: You are running this process as the root user, which is not recommended.
152018-04-09T23:38:13.626+0800 I CONTROL  [initandlisten]
162018-04-09T23:38:13.627+0800 I CONTROL  [initandlisten]
172018-04-09T23:38:13.627+0800 I CONTROL  [initandlisten] ** WARNING: /sys/kernel/mm/transparent_hugepage/enabled is 'always'.
182018-04-09T23:38:13.627+0800 I CONTROL  [initandlisten] **        We suggest setting it to 'never'
192018-04-09T23:38:13.628+0800 I CONTROL  [initandlisten]
202018-04-09T23:38:13.628+0800 I CONTROL  [initandlisten] ** WARNING: /sys/kernel/mm/transparent_hugepage/defrag is 'always'.
212018-04-09T23:38:13.629+0800 I CONTROL  [initandlisten] **        We suggest setting it to 'never'
222018-04-09T23:38:13.629+0800 I CONTROL  [initandlisten]
23> use admin
24switched to db admin
25> config = { _id: "shard3", members: [ {_id : 0, host : "192.168.133.44:27003"},  {_id : 1, host : "192.168.133.88:27003", arbiterOnly:true}, {_id : 2, host : "192.168.133.66:27003"}] }
26{
27	"_id" : "shard3",
28	"members" : [
29		{
30			"_id" : 0,
31			"host" : "192.168.133.44:27003"
32		},
33		{
34			"_id" : 1,
35			"host" : "192.168.133.88:27003",
36			"arbiterOnly" : true
37		},
38		{
39			"_id" : 2,
40			"host" : "192.168.133.66:27003"
41		}
42	]
43}
44> rs.initiate(config)
45{ "ok" : 1 }
46shard3:OTHER>
47shard3:SECONDARY>
48shard3:SECONDARY> rs.status()
49{
50	"set" : "shard3",
51	"date" : ISODate("2018-04-09T15:45:41.536Z"),
52	"myState" : 1,
53	"term" : NumberLong(1),
54	"heartbeatIntervalMillis" : NumberLong(2000),
55	"optimes" : {
56		"lastCommittedOpTime" : {
57			"ts" : Timestamp(1523288734, 1),
58			"t" : NumberLong(1)
59		},
60		"readConcernMajorityOpTime" : {
61			"ts" : Timestamp(1523288734, 1),
62			"t" : NumberLong(1)
63		},
64		"appliedOpTime" : {
65			"ts" : Timestamp(1523288737, 1),
66			"t" : NumberLong(1)
67		},
68		"durableOpTime" : {
69			"ts" : Timestamp(1523288737, 1),
70			"t" : NumberLong(1)
71		}
72	},
73	"members" : [
74		{
75			"_id" : 0,
76			"name" : "192.168.133.44:27003",
77			"health" : 1,
78			"state" : 5,
79			"stateStr" : "STARTUP2",
80			"uptime" : 80,
81			"optime" : {
82				"ts" : Timestamp(1523288734, 1),
83				"t" : NumberLong(1)
84			},
85			"optimeDurable" : {
86				"ts" : Timestamp(1523288734, 1),
87				"t" : NumberLong(1)
88			},
89			"optimeDate" : ISODate("2018-04-09T15:45:34Z"),
90			"optimeDurableDate" : ISODate("2018-04-09T15:45:34Z"),
91			"lastHeartbeat" : ISODate("2018-04-09T15:45:41.157Z"),
92			"lastHeartbeatRecv" : ISODate("2018-04-09T15:45:40.902Z"),
93			"pingMs" : NumberLong(110),
94			"syncingTo" : "192.168.133.66:27003",
95			"configVersion" : 1
96		},
97		{
98			"_id" : 1,
99			"name" : "192.168.133.88:27003",
100			"health" : 1,
101			"state" : 7,
102			"stateStr" : "ARBITER",
103			"uptime" : 80,
104			"lastHeartbeat" : ISODate("2018-04-09T15:45:41.170Z"),
105			"lastHeartbeatRecv" : ISODate("2018-04-09T15:45:36.949Z"),
106			"pingMs" : NumberLong(64),
107			"configVersion" : 1
108		},
109		{
110			"_id" : 2,
111			"name" : "192.168.133.66:27003",
112			"health" : 1,
113			"state" : 1,
114			"stateStr" : "PRIMARY",
115			"uptime" : 519,
116			"optime" : {
117				"ts" : Timestamp(1523288737, 1),
118				"t" : NumberLong(1)
119			},
120			"optimeDate" : ISODate("2018-04-09T15:45:37Z"),
121			"infoMessage" : "could not find member to sync from",
122			"electionTime" : Timestamp(1523288730, 1),
123			"electionDate" : ISODate("2018-04-09T15:45:30Z"),
124			"configVersion" : 1,
125			"self" : true
126		}
127	],
128	"ok" : 1
129}
130shard3:PRIMARY>
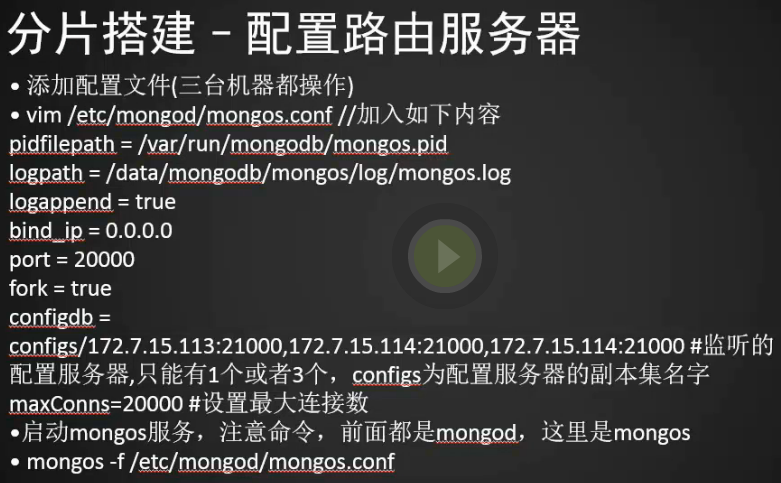
1.为什么将mongos放到最后讲呢,因为mongos想要起来必须先知道configserver和三个shard副本集
2.配置mongos
1[root@centos-01 ~]# vim /etc/mongod/mongos.conf
2[root@centos-01 ~]#
3pidfilepath = /var/run/mongodb/mongos.pid
4logpath = /data/mongodb/mongos/log/mongos.log
5logappend = true
6bind_ip = 0.0.0.0
7port = 20000
8fork = true
9configdb = configs/192.168.133.44:21000,192.168.133.88:21000,192.168.133.66:21000 #监听的
10配置服务器,只能有1个或者3个,configs为配置服务器的副本集名字
11maxConns=20000 #设置最大连接数
3.三台机器都配置mongos
1[root@centos-01 ~]# scp /etc/mongod/mongos.conf 192.168.133.88:/etc/mongod/
2root@192.168.133.88's password:
3mongos.conf                                            100%  364     0.4KB/s   00:00
4[root@centos-01 ~]# scp /etc/mongod/mongos.conf 192.168.133.66:/etc/mongod/
5root@192.168.133.66's password:
6mongos.conf                                            100%  364     0.4KB/s   00:00
7[root@centos-01 ~]#
4.启动mongos
1[root@centos-01 ~]# mongos -f /etc/mongod/mongos.conf
2[root@centos-02 ~]# mongos -f /etc/mongod/mongos.conf
3[root@centos-03 ~]# mongos -f /etc/mongod/mongos.conf
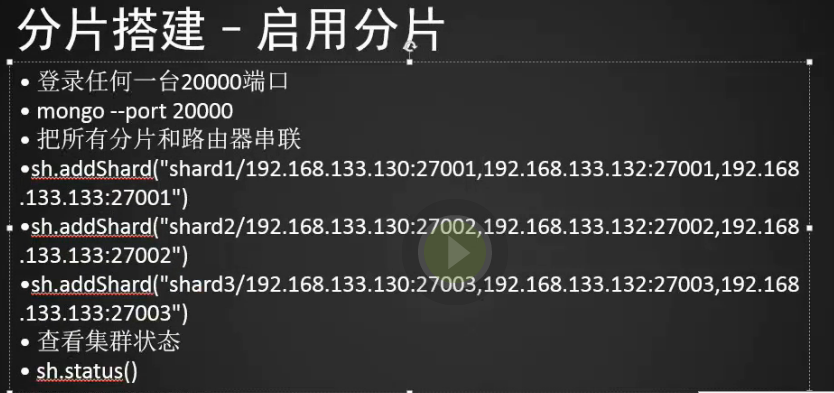
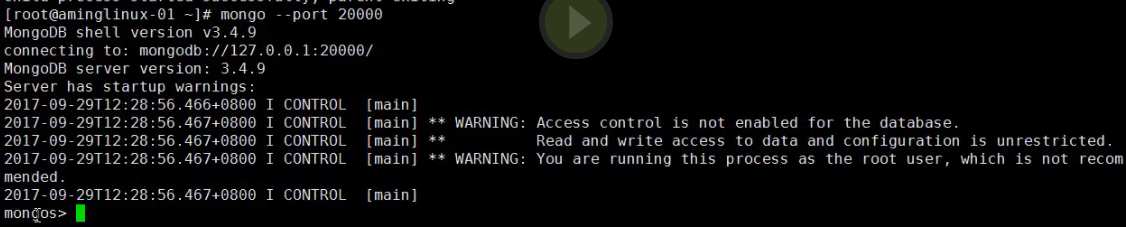
1.登录任何一台机器的20000端口
2.把所有分片的路由器串联(注意IP前不要加空格)

3.查看状态(rs.status是查看副本集,sh.status是查看分片)
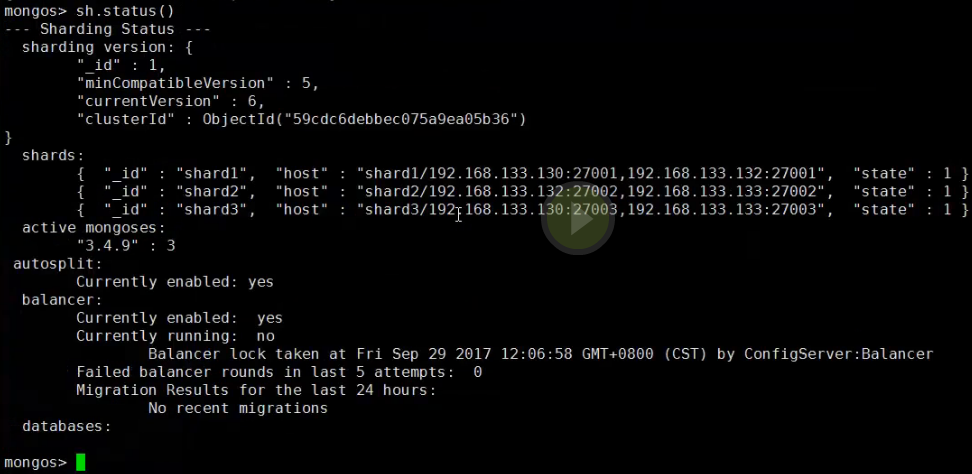
mongodb分片测试
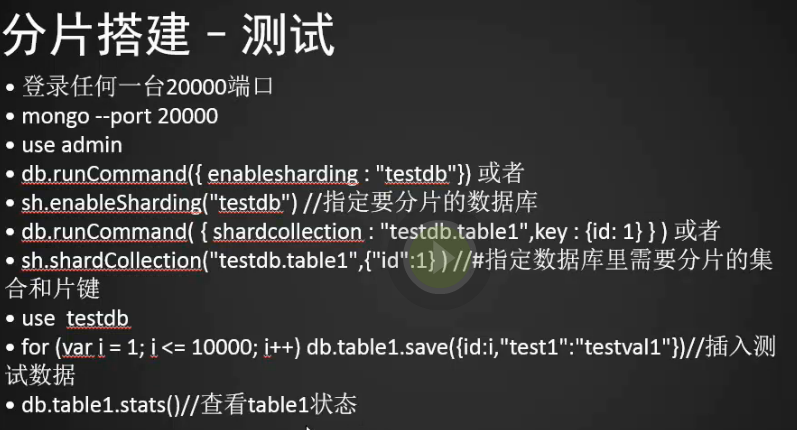
1.登录任意一台20000端口
mongo --port 20000
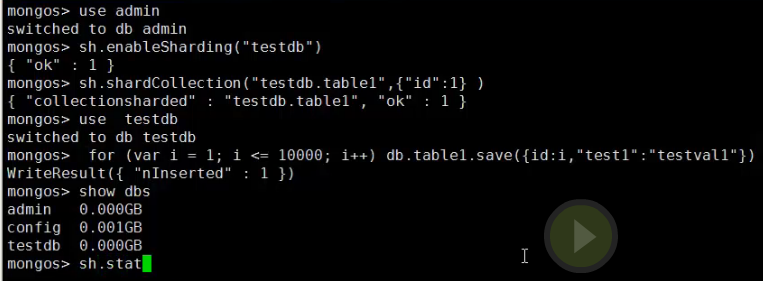
2.执行sh.statas()
mongodb备份恢复
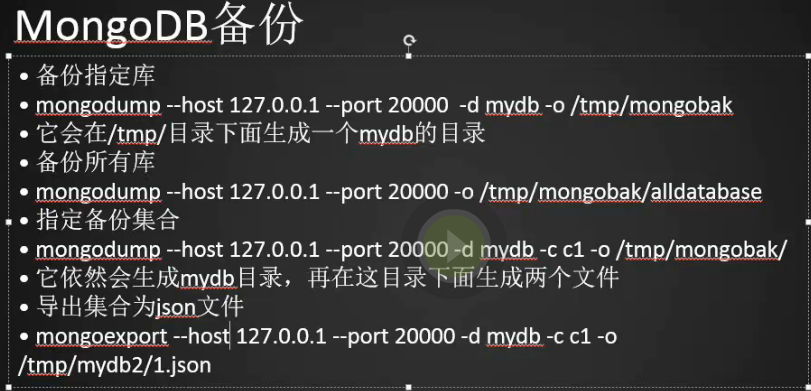
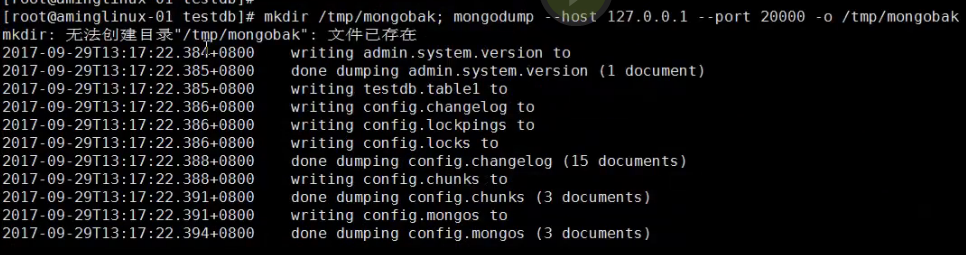
1.使用了分片了,备份的时候也需要到分片的这个端口里面去备份,创建要备份的文件夹并执行备份命令

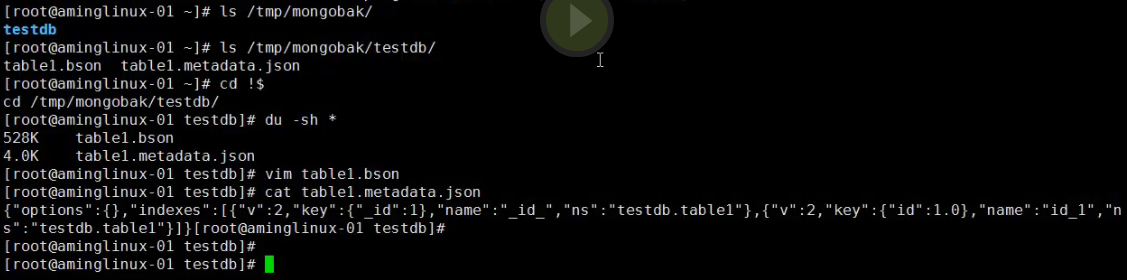
2.备份所有的库
3.备份指定的集合

4.导出集合为json文件

5.恢复数据
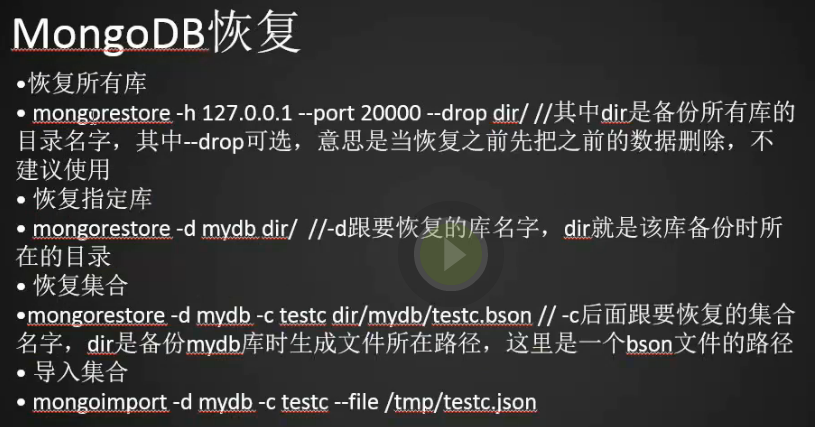
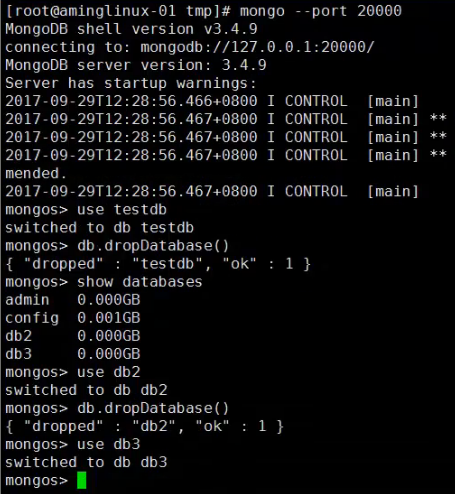
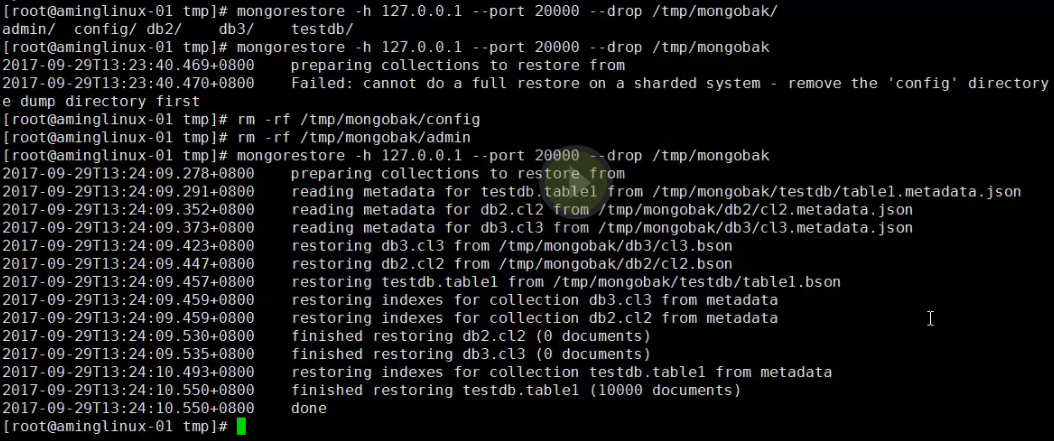
1.如果恢复备份的文件是json用mongoimport命令否则用mongorestore,先删除库
2.执行恢复操作
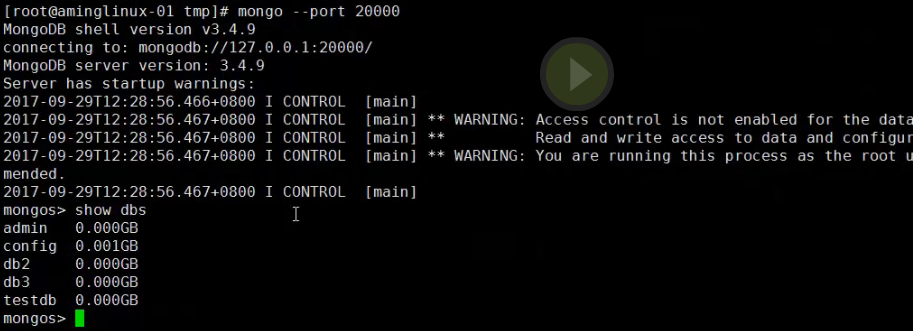
3.查看是否恢复成功,结果库又恢复回来了
4.恢复指定库
