
Shardingsphere整合Atomikos对XA分布式事务的支持
Apache ShardingSphere 是一套开源的分布式数据库中间件解决方案组成的生态圈,它由 JDBC、Proxy 和 Sidecar(规划中)这 3 款相互独立,却又能够混合部署配合使用的产品组成。 它们均提供标准化的数据分片、分布式事务和数据库治理功能,可适用于如 Java 同构、异构语言、云原生等各种多样化的应用场景。
ShardingSphere 已于2020年4月16日成为 Apache 软件基金会的顶级项目。
咋们话不多,接上篇,我们直接进入正题。
Atomikos简单介绍
Atomikos(https://www.atomikos.com/),其实是一家公司的名字,提供了基于JTA规范的XA分布式事务TM的实现。其旗下最著名的产品就是事务管理器。产品分两个版本:
-
TransactionEssentials:开源的免费产品;
-
ExtremeTransactions:上商业版,需要收费。
这两个产品的关系如下图所示: 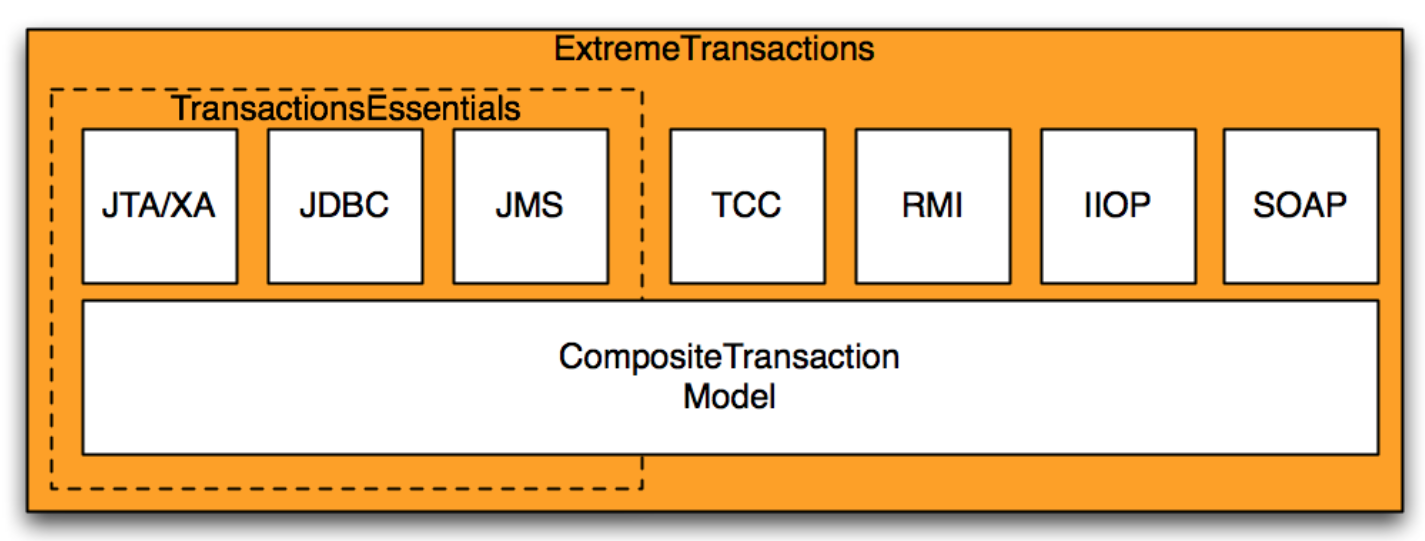
ExtremeTransactions在TransactionEssentials的基础上额外提供了以下功能(重要的):
-
支持TCC:这是一种柔性事务
-
支持通过RMI、IIOP、SOAP这些远程过程调用技术,进行事务传播。
-
事务日志云存储,云端对事务进行恢复,并且提供了完善的管理后台。
org.apache.shardingsphere.transaction.xa.XAShardingTransactionManager详解
我们简单的来回顾下org.apache.shardingsphere.transaction.spi.ShardingTransactionManager
1public interface ShardingTransactionManager extends AutoCloseable {
2
3    /**
4     * Initialize sharding transaction manager.
5     *
6     * @param databaseType database type
7     * @param resourceDataSources resource data sources
8     */
9    void init(DatabaseType databaseType, Collection<ResourceDataSource> resourceDataSources);
10
11    /**
12     * Get transaction type.
13     *
14     * @return transaction type
15     */
16    TransactionType getTransactionType();
17
18    /**
19     * Judge is in transaction or not.
20     *
21     * @return in transaction or not
22     */
23    boolean isInTransaction();
24
25    /**
26     * Get transactional connection.
27     *
28     * @param dataSourceName data source name
29     * @return connection
30     * @throws SQLException SQL exception
31     */
32    Connection getConnection(String dataSourceName) throws SQLException;
33
34    /**
35     * Begin transaction.
36     */
37    void begin();
38
39    /**
40     * Commit transaction.
41     */
42    void commit();
43
44    /**
45     * Rollback transaction.
46     */
47    void rollback();
48}
我们重点县关注init方法,从它的命名,你就应该能够看出来,这是整个框架的初始化方法,让我们来看看它是如何进行初始化的。
1 private final Map<String, XATransactionDataSource> cachedDataSources = new HashMap<>();
2
3 private final XATransactionManager xaTransactionManager = XATransactionManagerLoader.getInstance().getTransactionManager();
4
5    @Override
6    public void init(final DatabaseType databaseType, final Collection<ResourceDataSource> resourceDataSources) {
7        for (ResourceDataSource each : resourceDataSources) {
8            cachedDataSources.put(each.getOriginalName(), new XATransactionDataSource(databaseType, each.getUniqueResourceName(), each.getDataSource(), xaTransactionManager));
9        }
10        xaTransactionManager.init();
11    }
-
首先SPI的方式加载XATransactionManager的具体实现类,这里返回的就是
org.apache.shardingsphere.transaction.xa.atomikos.manager.AtomikosTransactionManager。 -
我们在关注下
new XATransactionDataSource(), 进入org.apache.shardingsphere.transaction.xa.jta.datasource。XATransactionDataSource类的构造方法。public XATransactionDataSource(final DatabaseType databaseType, final String resourceName, final DataSource dataSource, final XATransactionManager xaTransactionManager) { this.databaseType = databaseType; this.resourceName = resourceName; this.dataSource = dataSource; if (!CONTAINER_DATASOURCE_NAMES.contains(dataSource.getClass().getSimpleName())) { // 重点关注 1 ,返回了xaDatasource xaDataSource = XADataSourceFactory.build(databaseType, dataSource); this.xaTransactionManager = xaTransactionManager; // 重点关注2 注册资源 xaTransactionManager.registerRecoveryResource(resourceName, xaDataSource); } }
-
我们重点来关注
XADataSourceFactory.build(databaseType, dataSource),从名字我们就可以看出,这应该是返回JTA规范里面的XADataSource,在ShardingSphere里面很多的功能,可以从代码风格的命名上就能猜出来,这就是优雅代码(吹一波)。不多逼逼,我们进入该方法。public final class XADataSourceFactory {
1public static XADataSource build(final DatabaseType databaseType, final DataSource dataSource) {
2    return new DataSourceSwapper(XADataSourceDefinitionFactory.getXADataSourceDefinition(databaseType)).swap(dataSource);
3}
}
-
首先又是一个SPI定义的
XADataSourceDefinitionFactory,它根据不同的数据库类型,来加载不同的方言。然后我们进入swap方法。public XADataSource swap(final DataSource dataSource) { XADataSource result = createXADataSource(); setProperties(result, getDatabaseAccessConfiguration(dataSource)); return result; }
-
很简明,第一步创建,
XADataSource,第二步给它设置属性(包含数据的连接,用户名密码等),然后返回。 -
返回
XATransactionDataSource类,关注xaTransactionManager.registerRecoveryResource(resourceName, xaDataSource);从名字可以看出,这是注册事务恢复资源。这个我们在事务恢复的时候详解。 -
返回
XAShardingTransactionManager.init(),我们重点来关注:xaTransactionManager.init();,最后进入AtomikosTransactionManager.init()。流程图如下:
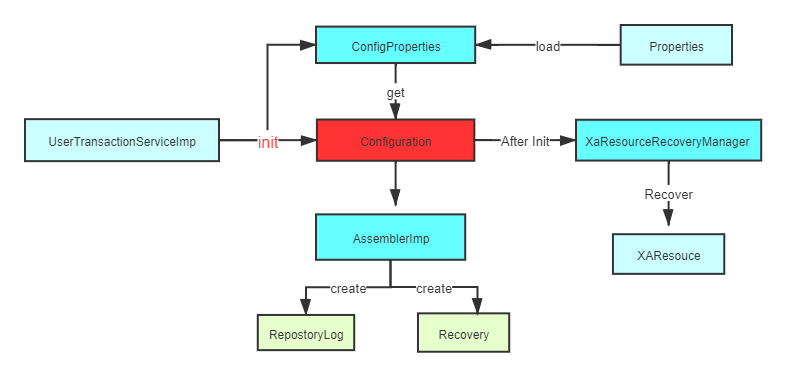
代码:
1public final class AtomikosTransactionManager implements XATransactionManager {
2
3    private final UserTransactionManager transactionManager = new UserTransactionManager();
4
5    private final UserTransactionService userTransactionService = new UserTransactionServiceImp();
6
7    @Override
8    public void init() {
9        userTransactionService.init();
10    }
11
12}
-
进入
UserTransactionServiceImp.init()private void initialize() { //添加恢复资源 不用关心 for (RecoverableResource resource : resources_) { Configuration.addResource ( resource ); } for (LogAdministrator logAdministrator : logAdministrators_) { Configuration.addLogAdministrator ( logAdministrator ); } //注册插件 不用关心 for (TransactionServicePlugin nxt : tsListeners_) { Configuration.registerTransactionServicePlugin ( nxt ); } //获取配置属性 重点关心 ConfigProperties configProps = Configuration.getConfigProperties(); configProps.applyUserSpecificProperties(properties_); //进行初始化 Configuration.init(); }
-
我们重点关注,获取配置属性。最后进入
com.atomikos.icatch.provider.imp.AssemblerImp.initializeProperties()方法。1@Override 2public ConfigProperties initializeProperties() { 3 //读取classpath下的默认配置transactions-defaults.properties 4 Properties defaults = new Properties(); 5 loadPropertiesFromClasspath(defaults, DEFAULT_PROPERTIES_FILE_NAME); 6 //读取classpath下,transactions.properties配置,覆盖transactions-defaults.properties中相同key的值 7 Properties transactionsProperties = new Properties(defaults); 8 loadPropertiesFromClasspath(transactionsProperties, TRANSACTIONS_PROPERTIES_FILE_NAME); 9 //读取classpath下,jta.properties,覆盖transactions-defaults.properties、transactions.properties中相同key的值 10 Properties jtaProperties = new Properties(transactionsProperties); 11 loadPropertiesFromClasspath(jtaProperties, JTA_PROPERTIES_FILE_NAME); 12 13 //读取通过java -Dcom.atomikos.icatch.file方式指定的自定义配置文件路径,覆盖之前的同名配置 14 Properties customProperties = new Properties(jtaProperties); 15 loadPropertiesFromCustomFilePath(customProperties); 16 //最终构造一个ConfigProperties对象,来表示实际要使用的配置 17 Properties finalProperties = new Properties(customProperties); 18 return new ConfigProperties(finalProperties); 19} -
接下来重点关注,
Configuration.init(), 进行初始化。ublic static synchronized boolean init() { boolean startupInitiated = false; if (service_ == null) { startupInitiated = true; //SPI方式加载插件注册,无需过多关心 addAllTransactionServicePluginServicesFromClasspath(); ConfigProperties configProperties = getConfigProperties(); //调用插件的beforeInit方法进行初始化话,无需过多关心 notifyBeforeInit(configProperties); //进行事务日志恢复的初始化,很重要,接下来详解 assembleSystemComponents(configProperties); //进入系统注解的初始化,一般重要 initializeSystemComponents(configProperties); notifyAfterInit(); if (configProperties.getForceShutdownOnVmExit()) { addShutdownHook(new ForceShutdownHook()); } } return startupInitiated; }
-
我们先来关注
assembleSystemComponents(configProperties);进入它,进入com.atomikos.icatch.provider.imp.AssemblerImp.assembleTransactionService()方法:@Override public TransactionServiceProvider assembleTransactionService( ConfigProperties configProperties) { RecoveryLog recoveryLog =null; //打印日志 logProperties(configProperties.getCompletedProperties()); //生成唯一名字 String tmUniqueName = configProperties.getTmUniqueName();
1 long maxTimeout = configProperties.getMaxTimeout(); 2 int maxActives = configProperties.getMaxActives(); 3 boolean threaded2pc = configProperties.getThreaded2pc(); 4 //SPI方式加载OltpLog ,这是最重要的扩展地方,如果用户没有SPI的方式去扩展那么就为null 5 OltpLog oltpLog = createOltpLogFromClasspath(); 6 if (oltpLog == null) { 7 LOGGER.logInfo("Using default (local) logging and recovery..."); 8 //创建事务日志存储资源 9 Repository repository = createRepository(configProperties); 10 oltpLog = createOltpLog(repository); 11 //??? Assemble recoveryLog 12 recoveryLog = createRecoveryLog(repository); 13 } 14 StateRecoveryManagerImp recoveryManager = new StateRecoveryManagerImp(); 15 recoveryManager.setOltpLog(oltpLog); 16 //生成唯一id生成器,以后生成XID会用的到 17 UniqueIdMgr idMgr = new UniqueIdMgr ( tmUniqueName ); 18 int overflow = idMgr.getMaxIdLengthInBytes() - MAX_TID_LENGTH; 19 if ( overflow > 0 ) { 20 // see case 73086 21 String msg = "Value too long : " + tmUniqueName; 22 LOGGER.logFatal ( msg ); 23 throw new SysException(msg); 24 } 25 return new TransactionServiceImp(tmUniqueName, recoveryManager, idMgr, maxTimeout, maxActives, !threaded2pc, recoveryLog); 26} -
我们重点来分析
createOltpLogFromClasspath(), 采用SPI的加载方式来获取,默认这里会返回null, 什么意思呢? 就是当没有扩展的时候,atomikos,会创建框架自定义的资源,来存储事务日志。private OltpLog createOltpLogFromClasspath() { OltpLog ret = null; ServiceLoader<OltpLogFactory> loader = ServiceLoader.load(OltpLogFactory.class,Configuration.class.getClassLoader()); int i = 0; for (OltpLogFactory l : loader ) { ret = l.createOltpLog(); i++; } if (i > 1) { String msg = "More than one OltpLogFactory found in classpath - error in configuration!"; LOGGER.logFatal(msg); throw new SysException(msg); } return ret; }
-
我们跟着进入
Repository repository = createRepository(configProperties);1private CachedRepository createCoordinatorLogEntryRepository( 2 ConfigProperties configProperties) throws LogException { 3 //创建内存资源存储 4 InMemoryRepository inMemoryCoordinatorLogEntryRepository = new InMemoryRepository(); 5 //进行初始化 6 inMemoryCoordinatorLogEntryRepository.init(); 7 //创建使用文件存储资源作为backup 8 FileSystemRepository backupCoordinatorLogEntryRepository = new FileSystemRepository(); 9 //进行初始化 10 backupCoordinatorLogEntryRepository.init(); 11 //内存与file资源进行合并 12 CachedRepository repository = new CachedRepository(inMemoryCoordinatorLogEntryRepository, backupCoordinatorLogEntryRepository); 13 repository.init(); 14 return repository; 15} -
这里就会创建出
CachedRepository,里面包含了InMemoryRepository与FileSystemRepository -
回到主线
com.atomikos.icatch.config.Configuration.init(), 最后来分析下notifyAfterInit();1private static void notifyAfterInit() { 2 //进行插件的初始化 3 for (TransactionServicePlugin p : tsListenersList_) { 4 p.afterInit(); 5 } 6 for (LogAdministrator a : logAdministrators_) { 7 a.registerLogControl(service_.getLogControl()); 8 } 9 //设置事务恢复服务,进行事务的恢复 10 for (RecoverableResource r : resourceList_ ) { 11 r.setRecoveryService(recoveryService_); 12 } 13 14} -
插件的初始化会进入
com.atomikos.icatch.jta.JtaTransactionServicePlugin.afterInit()1public void afterInit() { 2 TransactionManagerImp.installTransactionManager(Configuration.getCompositeTransactionManager(), autoRegisterResources); 3 //如果我们自定义扩展了 OltpLog ,这里就会返回null,如果是null,那么XaResourceRecoveryManager就是null 4 RecoveryLog recoveryLog = Configuration.getRecoveryLog(); 5 long maxTimeout = Configuration.getConfigProperties().getMaxTimeout(); 6 if (recoveryLog != null) { 7 XaResourceRecoveryManager.installXaResourceRecoveryManager(new DefaultXaRecoveryLog(recoveryLog, maxTimeout),Configuration.getConfigProperties().getTmUniqueName()); 8 } 9 10} -
重点注意
RecoveryLog recoveryLog = Configuration.getRecoveryLog();,如果用户采用SPI的方式,扩展了com.atomikos.recovery.OltpLog,这里就会返回 null。 如果是null,则不会对XaResourceRecoveryManager进行初始化。 -
回到
notifyAfterInit(), 我们来分析setRecoveryService。public void setRecoveryService ( RecoveryService recoveryService ) throws ResourceException {
1 if ( recoveryService != null ) { 2 if ( LOGGER.isTraceEnabled() ) LOGGER.logTrace ( "Installing recovery service on resource " 3 + getName () ); 4 this.branchIdentifier=recoveryService.getName(); 5 recover(); 6 } 7} -
我们进入
recover()方法:public void recover() { XaResourceRecoveryManager xaResourceRecoveryManager = XaResourceRecoveryManager.getInstance(); //null for LogCloud recovery if (xaResourceRecoveryManager != null) { try { xaResourceRecoveryManager.recover(getXAResource()); } catch (Exception e) { refreshXAResource(); //cf case 156968 }
1 } 2} -
看到最关键的注释了吗,如果用户采用
SPI的方式,扩展了com.atomikos.recovery.OltpLog,那么XaResourceRecoveryManager为null,则就会进行云端恢复,反之则进行事务恢复。 事务恢复很复杂,我们会单独来讲。
到这里atomikos的基本的初始化已经完成。
atomikos事务begin流程
我们知道,本地的事务,都会有一个 trainsaction.begin, 对应XA分布式事务来说也不另外,我们再把思路切换回XAShardingTransactionManager.begin(), 会调用com.atomikos.icatch.jta.TransactionManagerImp.begin()。流程图如下: 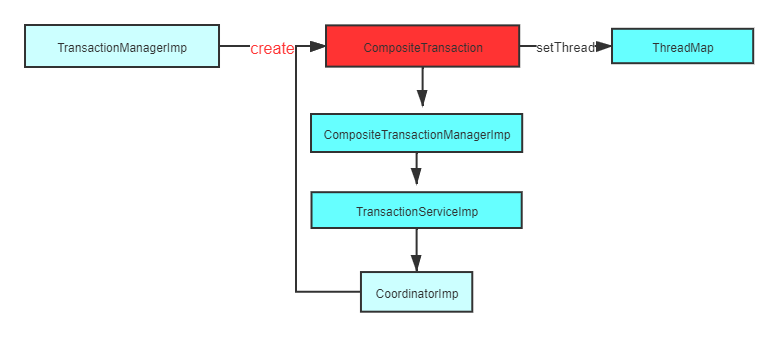
代码:
1  public void begin ( int timeout ) throws NotSupportedException,
2            SystemException
3    {
4        CompositeTransaction ct = null;
5        ResumePreviousTransactionSubTxAwareParticipant resumeParticipant = null;
6
7        ct = compositeTransactionManager.getCompositeTransaction();
8        if ( ct != null && ct.getProperty (  JTA_PROPERTY_NAME ) == null ) {
9            LOGGER.logWarning ( "JTA: temporarily suspending incompatible transaction: " + ct.getTid() +
10                    " (will be resumed after JTA transaction ends)" );
11            ct = compositeTransactionManager.suspend();
12            resumeParticipant = new ResumePreviousTransactionSubTxAwareParticipant ( ct );
13        }
14
15        try {
16      //创建事务补偿点
17            ct = compositeTransactionManager.createCompositeTransaction ( ( ( long ) timeout ) * 1000 );
18            if ( resumeParticipant != null ) ct.addSubTxAwareParticipant ( resumeParticipant );
19            if ( ct.isRoot () && getDefaultSerial () )
20                ct.setSerial ();
21            ct.setProperty ( JTA_PROPERTY_NAME , "true" );
22        } catch ( SysException se ) {
23        	String msg = "Error in begin()";
24        	LOGGER.logError( msg , se );
25            throw new ExtendedSystemException ( msg , se );
26        }
27        recreateCompositeTransactionAsJtaTransaction(ct);
28    }
-
这里我们主要关注
compositeTransactionManager.createCompositeTransaction(),public CompositeTransaction createCompositeTransaction ( long timeout ) throws SysException { CompositeTransaction ct = null , ret = null;
1 ct = getCurrentTx (); 2 if ( ct == null ) { 3 ret = getTransactionService().createCompositeTransaction ( timeout ); 4 if(LOGGER.isDebugEnabled()){ 5 LOGGER.logDebug("createCompositeTransaction ( " + timeout + " ): " 6 + "created new ROOT transaction with id " + ret.getTid ()); 7 } 8 } else { 9 if(LOGGER.isDebugEnabled()) LOGGER.logDebug("createCompositeTransaction ( " + timeout + " )"); 10 ret = ct.createSubTransaction (); 11 12 } 13 14 Thread thread = Thread.currentThread (); 15 setThreadMappings ( ret, thread ); 16 17 return ret; 18} -
创建了事务补偿点,然后把他放到了用当前线程作为key的Map当中,这里思考,
为啥它不用 threadLocal。
到这里atomikos的事务begin流程已经完成。 大家可能有些疑惑,begin好像什么都没有做,XA start 也没调用? 别慌,下一节继续来讲。
XATransactionDataSource getConnection() 流程
我们都知道想要执行SQL语句,必须要获取到数据库的connection。让我们再回到 XAShardingTransactionManager.getConnection() 最后会调用到org.apache.shardingsphere.transaction.xa.jta.datasourceXATransactionDataSource.getConnection()。流程图如下: 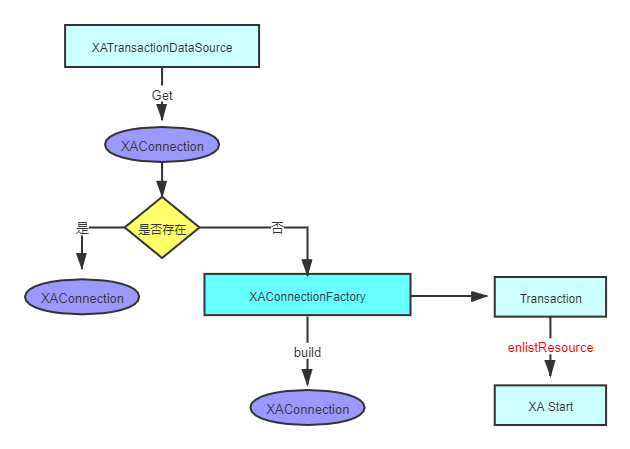
代码 :
1 public Connection getConnection() throws SQLException, SystemException, RollbackException {
2      //先检查是否已经有存在的connection,这一步很关心,也是XA的关键,因为XA事务,必须在同一个connection
3        if (CONTAINER_DATASOURCE_NAMES.contains(dataSource.getClass().getSimpleName())) {
4            return dataSource.getConnection();
5        }
6      //获取数据库连接
7        Connection result = dataSource.getConnection();
8      //转成XAConnection,其实是同一个连接
9        XAConnection xaConnection = XAConnectionFactory.createXAConnection(databaseType, xaDataSource, result);
10      //获取JTA事务定义接口
11        Transaction transaction = xaTransactionManager.getTransactionManager().getTransaction();
12        if (!enlistedTransactions.get().contains(transaction)) {
13      //进行资源注册
14            transaction.enlistResource(new SingleXAResource(resourceName, xaConnection.getXAResource()));
15            transaction.registerSynchronization(new Synchronization() {
16                @Override
17                public void beforeCompletion() {
18                    enlistedTransactions.get().remove(transaction);
19                }
20
21                @Override
22                public void afterCompletion(final int status) {
23                    enlistedTransactions.get().clear();
24                }
25            });
26            enlistedTransactions.get().add(transaction);
27        }
28        return result;
29    }
-
首先第一步很关心,尤其是对shardingsphere来说,因为在一个事务里面,会有多个SQL语句,打到相同的数据库,所以对相同的数据库,必须获取同一个XAConnection,这样才能进行XA事务的提交与回滚。
-
我们接下来关心
transaction.enlistResource(new SingleXAResource(resourceName, xaConnection.getXAResource()));, 会进入com.atomikos.icatch.jta.TransactionImp.enlistResource(), 代码太长,截取一部分。try { restx = (XAResourceTransaction) res .getResourceTransaction(this.compositeTransaction);
1 // next, we MUST set the xa resource again, 2 // because ONLY the instance we got as argument 3 // is available for use now ! 4 // older instances (set in restx from previous sibling) 5 // have connections that may be in reuse already 6 // ->old xares not valid except for 2pc operations 7 8 restx.setXAResource(xares); 9 restx.resume(); 10 } catch (ResourceException re) { 11 throw new ExtendedSystemException( 12 "Unexpected error during enlist", re); 13 } catch (RuntimeException e) { 14 throw e; 15 } 16 17 addXAResourceTransaction(restx, xares); -
我们直接看
restx.resume();public synchronized void resume() throws ResourceException { int flag = 0; String logFlag = ""; if (this.state.equals(TxState.LOCALLY_DONE)) {// reused instance flag = XAResource.TMJOIN; logFlag = "XAResource.TMJOIN"; } else if (!this.knownInResource) {// new instance flag = XAResource.TMNOFLAGS; logFlag = "XAResource.TMNOFLAGS"; } else throw new IllegalStateException("Wrong state for resume: " + this.state);
1 try { 2 if (LOGGER.isDebugEnabled()) { 3 LOGGER.logDebug("XAResource.start ( " + this.xidToHexString 4 + " , " + logFlag + " ) on resource " 5 + this.resourcename 6 + " represented by XAResource instance " 7 + this.xaresource); 8 } 9 this.xaresource.start(this.xid, flag); 10 11 } catch (XAException xaerr) { 12 String msg = interpretErrorCode(this.resourcename, "resume", 13 this.xid, xaerr.errorCode); 14 LOGGER.logWarning(msg, xaerr); 15 throw new ResourceException(msg, xaerr); 16 } 17 setState(TxState.ACTIVE); 18 this.knownInResource = true; 19} -
哦多尅,看见了吗,各位,看见了
this.xaresource.start(this.xid, flag);了吗????,我们进去,假设我们使用的Mysql数据库:public void start(Xid xid, int flags) throws XAException { StringBuilder commandBuf = new StringBuilder(300); commandBuf.append("XA START "); appendXid(commandBuf, xid); switch(flags) { case 0: break; case 2097152: commandBuf.append(" JOIN"); break; case 134217728: commandBuf.append(" RESUME"); break; default: throw new XAException(-5); }
1 this.dispatchCommand(commandBuf.toString()); 2 this.underlyingConnection.setInGlobalTx(true); 3} -
组装
XA start XidSQL语句,进行执行。
到这里,我们总结下,在获取数据库连接的时候,我们执行了XA协议接口中的 XA start xid
atomikos事务commit流程
好了,上面我们已经开启了事务,现在我们来分析下事务commit流程,我们再把视角切换回XAShardingTransactionManager.commit(),最后我们会进入com.atomikos.icatch.imp.CompositeTransactionImp.commit() 方法。流程图如下: 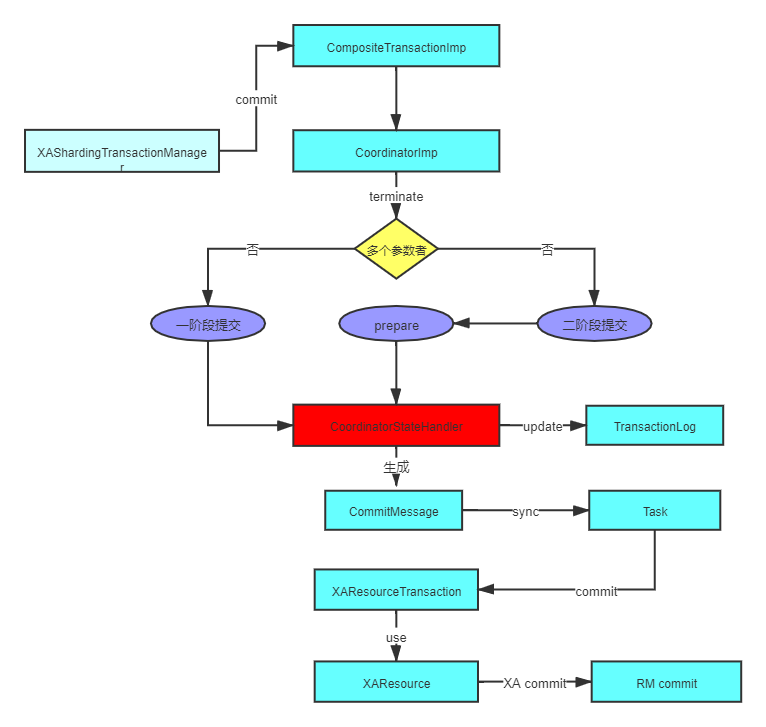
代码:
1 public void commit () throws HeurRollbackException, HeurMixedException,
2            HeurHazardException, SysException, SecurityException,
3            RollbackException
4    {
5       //首先更新下事务日志的状态
6        doCommit ();
7        setSiblingInfoForIncoming1pcRequestFromRemoteClient();
8
9        if ( isRoot () ) {
10         //真正的commit操作
11          coordinator.terminate ( true );
12        }
13    }
-
我们关注
coordinator.terminate ( true );protected void terminate ( boolean commit ) throws HeurRollbackException, HeurMixedException, SysException, java.lang.SecurityException, HeurCommitException, HeurHazardException, RollbackException, IllegalStateException
1{ 2 synchronized ( fsm_ ) { 3 if ( commit ) { 4 //判断有几个参与者,如果只有一个,直接提交 5 if ( participants_.size () <= 1 ) { 6 commit ( true ); 7 } else { 8 //否则,走XA 2阶段提交流程,先prepare, 再提交 9 int prepareResult = prepare (); 10 // make sure to only do commit if NOT read only 11 if ( prepareResult != Participant.READ_ONLY ) 12 commit ( false ); 13 } 14 } else { 15 rollback (); 16 } 17 } 18} -
首先会判断参与者的个数,这里我们可以理解为MySQL的database数量,如果只有一个,退化成一阶段,直接提交。 如果有多个,则走标准的XA二阶段提交流程。
-
我们来看
prepare ();流程,最后会走到com.atomikos.icatch.imp.PrepareMessage.send()--->com.atomikos.datasource.xa.XAResourceTransaction.prepare()int ret = 0; terminateInResource();
1 if (TxState.ACTIVE == this.state) { 2 // tolerate non-delisting apps/servers 3 suspend(); 4 } 5 6 // duplicate prepares can happen for siblings in serial subtxs!!! 7 // in that case, the second prepare just returns READONLY 8 if (this.state == TxState.IN_DOUBT) 9 return Participant.READ_ONLY; 10 else if (!(this.state == TxState.LOCALLY_DONE)) 11 throw new SysException("Wrong state for prepare: " + this.state); 12 try { 13 // refresh xaresource for MQSeries: seems to close XAResource after 14 // suspend??? 15 testOrRefreshXAResourceFor2PC(); 16 if (LOGGER.isTraceEnabled()) { 17 LOGGER.logTrace("About to call prepare on XAResource instance: " 18 + this.xaresource); 19 } 20 ret = this.xaresource.prepare(this.xid); 21 22 } catch (XAException xaerr) { 23 String msg = interpretErrorCode(this.resourcename, "prepare", 24 this.xid, xaerr.errorCode); 25 if (XAException.XA_RBBASE <= xaerr.errorCode 26 && xaerr.errorCode <= XAException.XA_RBEND) { 27 LOGGER.logWarning(msg, xaerr); // see case 84253 28 throw new RollbackException(msg); 29 } else { 30 LOGGER.logError(msg, xaerr); 31 throw new SysException(msg, xaerr); 32 } 33 } 34 setState(TxState.IN_DOUBT); 35 if (ret == XAResource.XA_RDONLY) { 36 if (LOGGER.isDebugEnabled()) { 37 LOGGER.logDebug("XAResource.prepare ( " + this.xidToHexString 38 + " ) returning XAResource.XA_RDONLY " + "on resource " 39 + this.resourcename 40 + " represented by XAResource instance " 41 + this.xaresource); 42 } 43 return Participant.READ_ONLY; 44 } else { 45 if (LOGGER.isDebugEnabled()) { 46 LOGGER.logDebug("XAResource.prepare ( " + this.xidToHexString 47 + " ) returning OK " + "on resource " 48 + this.resourcename 49 + " represented by XAResource instance " 50 + this.xaresource); 51 } 52 return Participant.READ_ONLY + 1; 53 } -
终于,我们看到了这么一句
ret = this.xaresource.prepare(this.xid);但是等等,我们之前不是说了,XA start xid以后要先XA end xid吗? 答案就在suspend();里面。public synchronized void suspend() throws ResourceException {
1	// BugzID: 20545
2	// State may be IN_DOUBT or TERMINATED when a connection is closed AFTER
3	// commit!
4	// In that case, don't call END again, and also don't generate any
5	// error!
6	// This is required for some hibernate connection release strategies.
7	if (this.state.equals(TxState.ACTIVE)) {
8		try {
9			if (LOGGER.isDebugEnabled()) {
10				LOGGER.logDebug("XAResource.end ( " + this.xidToHexString
11						+ " , XAResource.TMSUCCESS ) on resource "
12						+ this.resourcename
13						+ " represented by XAResource instance "
14						+ this.xaresource);
15			}
16             //执行了 xa end 语句
17			this.xaresource.end(this.xid, XAResource.TMSUCCESS);
18
19		} catch (XAException xaerr) {
20			String msg = interpretErrorCode(this.resourcename, "end",
21					this.xid, xaerr.errorCode);
22			if (LOGGER.isTraceEnabled())
23				LOGGER.logTrace(msg, xaerr);
24			// don't throw: fix for case 102827
25		}
26		setState(TxState.LOCALLY_DONE);
27	}
28}
到了这里,我们已经执行了 XA start xid -> XA end xid --> XA prepare xid, 接下来就是最后一步 commit
-
我们再回到
terminate(false)方法,来看 commit()流程。其实和 prepare流程一样,最后会走到com.atomikos.datasource.xa.XAResourceTransaction.commit()。 commit执行完,数据提交//繁杂代码过多,就显示核心的 this.xaresource.commit(this.xid, onePhase);
思考:这里的参与者提交是在一个循环里面,一个一个提交的,如果之前的提交了,后面的参与者提交的时候,挂了,就会造成数据的不一致性。
Atomikos rollback() 流程
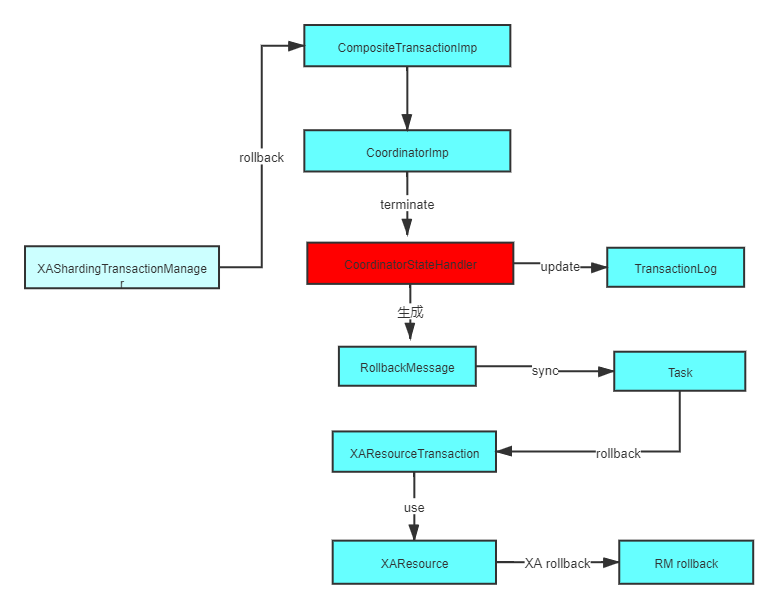 上面我们已经分析了commit流程,其实rollback流程和commit流程一样,我们在把目光切换回
 org.apache.shardingsphere.transaction.xa.XAShardingTransactionManager.rollback() ,最后会执行到com.atomikos.icatch.imp.CompositeTransactionImp.rollback()。
1    public void rollback () throws IllegalStateException, SysException
2    {
3        //清空资源,更新事务日志状态等
4    	doRollback ();
5        if ( isRoot () ) {
6            try {
7                coordinator.terminate ( false );
8            } catch ( Exception e ) {
9                throw new SysException ( "Unexpected error in rollback: " + e.getMessage (), e );
10            }
11        }
12    }
-
重点关注
coordinator.terminate ( false );,这个和 commit流程是一样的,只不过在 commit流程里面,参数传的是true。protected void terminate ( boolean commit ) throws HeurRollbackException, HeurMixedException, SysException, java.lang.SecurityException, HeurCommitException, HeurHazardException, RollbackException, IllegalStateException
1{ 2 synchronized ( fsm_ ) { 3 if ( commit ) { 4 if ( participants_.size () <= 1 ) { 5 commit ( true ); 6 } else { 7 int prepareResult = prepare (); 8 // make sure to only do commit if NOT read only 9 if ( prepareResult != Participant.READ_ONLY ) 10 commit ( false ); 11 } 12 } else { 13 //如果是false,走的是rollback 14 rollback (); 15 } 16 } 17} -
我们重点关注
rollback(),最后会走到com.atomikos.datasource.xa.XAResourceTransaction.rollback()。public synchronized void rollback() throws HeurCommitException, HeurMixedException, HeurHazardException, SysException { terminateInResource();
1 if (rollbackShouldDoNothing()) { 2 return; 3 } 4 if (this.state.equals(TxState.TERMINATED)) { 5 return; 6 } 7 8 if (this.state.equals(TxState.HEUR_MIXED)) 9 throw new HeurMixedException(); 10 if (this.state.equals(TxState.HEUR_COMMITTED)) 11 throw new HeurCommitException(); 12 if (this.xaresource == null) { 13 throw new HeurHazardException("XAResourceTransaction " 14 + getXid() + ": no XAResource to rollback?"); 15 } 16 17 try { 18 if (this.state.equals(TxState.ACTIVE)) { // first suspend xid 19 suspend(); 20 } 21 22 // refresh xaresource for MQSeries: seems to close XAResource after 23 // suspend??? 24 testOrRefreshXAResourceFor2PC(); 25 if (LOGGER.isDebugEnabled()) { 26 LOGGER.logDebug("XAResource.rollback ( " + this.xidToHexString 27 + " ) " + "on resource " + this.resourcename 28 + " represented by XAResource instance " 29 + this.xaresource); 30 } 31 this.xaresource.rollback(this.xid); -
先在
supend()方法里面执行了XA end xid语句, 接下来执行this.xaresource.rollback(this.xid);进行数据的回滚。
文章到此,已经写的很长很多了,我们分析了ShardingSphere对于XA方案,提供了一套SPI解决方案,对Atomikos进行了整合,也分析了Atomikos初始化流程,开始事务流程,获取连接流程,提交事务流程,回滚事务流程。希望对大家理解XA的原理有所帮助。
作者介绍: 肖宇,Apache ShardingSphere Committer,开源hmily分布式事务框架作者, 开源soul网关作者,热爱开源,追求写优雅代码。目前就职入京东数科,参与ShardingSphere的开源建设,以及分布式数据库的研发工作。