学习在 Spring Cloud 中使用 Nacos 实现服务配置中心和注册中心,类似 Spring Cloud Config 和 Spring Cloud Netflix Eureka 提供的功能。
1 概述
Spring Cloud Alibaba 是阿里巴巴提供的一套微服务开发一站式解决方案。
主要提供的功能:
- 分布式配置中心
- 服务注册与发现
- 服务限流降级
- 消息驱动
- 分布式事务
- 阿里云对象存储(绑定阿里云)
- 阿里云短信(绑定阿里云)
提供的组件:
- Nacos:主要提供了服务动态配置、服务及元数据管理、服务注册与发现、动态 DNS 服务。
- Sentinel:熔断、限流等。
优势:
- 中文文档。
- 没有另起炉灶,可以方便的集成到现有项目中。
- 阿里本身在高并发、高性能上的经验,让我们有理由相信这些组件足够可靠。
2 安装
下载安装包:
- Linux:https://github.com/alibaba/nacos/releases/download/1.3.0-beta/nacos-server-1.3.0-BETA.tar.gz
- Windows:https://github.com/alibaba/nacos/releases/download/1.3.0-beta/nacos-server-1.3.0-BETA.zip
解压后启动:
- Windows:在 bin 目录下双击
startup.cmd - Linux:在 bin 目录下执行
sh startup.sh -m standalone
注意:需要 java 和 javac 两个命令,可以先测试下。
Nacos 启动成功后,访问 http://127.0.0.1:8848/nacos 就能看到后台页面。如果有登录页面,登录的默认用户名/密码都是 nacos 。

3 配置中心
Nacos 做配置中心,可以代替 Spring Cloud Config 。
创建 Spring Boot 项目 nacos-config ,添加 Web/Nacos Configuration 依赖,如下:
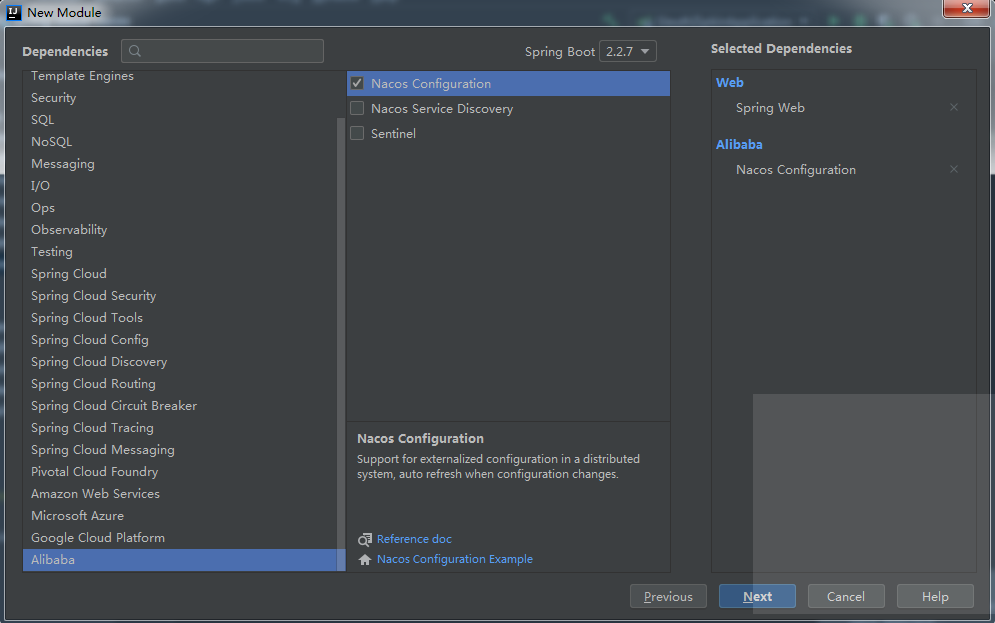
最终的依赖如下:
1<dependencies>
2    <dependency>
3        <groupId>org.springframework.boot</groupId>
4        <artifactId>spring-boot-starter-web</artifactId>
5    </dependency>
6    <dependency>
7        <groupId>com.alibaba.cloud</groupId>
8        <artifactId>spring-cloud-starter-alibaba-nacos-config</artifactId>
9    </dependency>
10
11    <dependency>
12        <groupId>org.springframework.boot</groupId>
13        <artifactId>spring-boot-starter-test</artifactId>
14        <scope>test</scope>
15        <exclusions>
16            <exclusion>
17                <groupId>org.junit.vintage</groupId>
18                <artifactId>junit-vintage-engine</artifactId>
19            </exclusion>
20        </exclusions>
21    </dependency>
22</dependencies>
首先,在 Nacos 服务端后台配置,页面上依次点击 配置管理 -> 配置列表 -> + ,这里主要配置三个东西,Data ID(nacos-config.properties)、Group 以及要配置的内容。其中 Data ID 的格式为 ${prefix}-${spring.profile.active}.${file-extension} :
- ${prefix}:默认为 spring.application.name 的值,如
nacos-config。 - ${spring.profile.active}:表示项目当前所处的环境,如
dev/test/prod。 - ${file-extension}:表示配置文件的扩展名,如
properties。
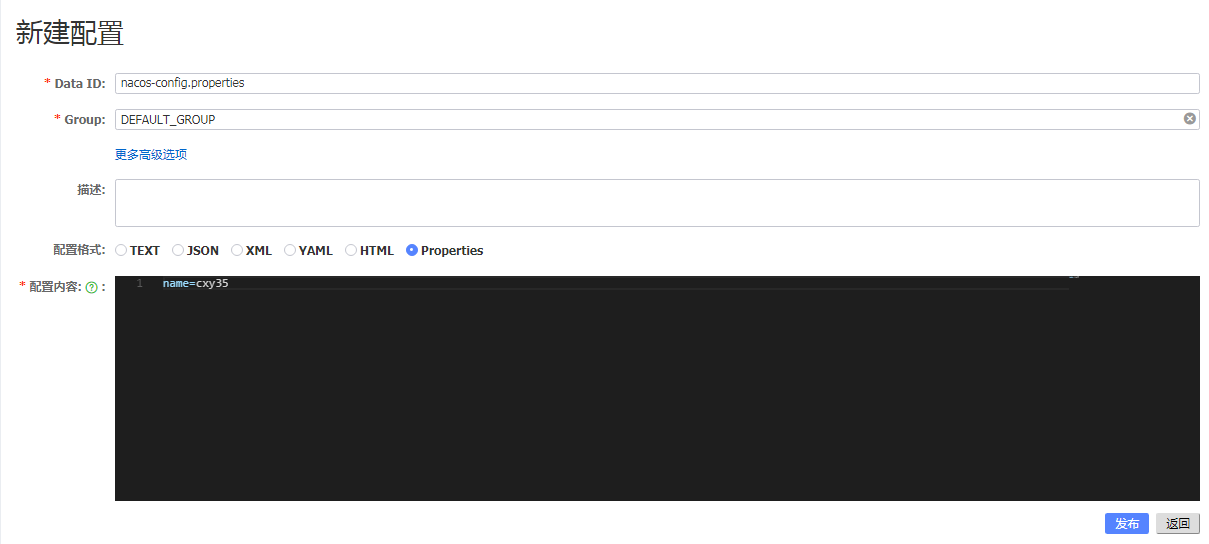
然后,新建 bootstrap.properties 配置文件,配置 Nacos 相关信息:
1spring.application.name=nacos-config
2server.port=8080
3
4spring.cloud.nacos.server-addr=127.0.0.1:8848
5spring.cloud.nacos.config.file-extension=properties
最后,提供一个 hello 接口,注意要添加 @RefreshScope 注解。
1@RestController
2@RefreshScope
3public class HelloController {
4    @Value("${name}")
5    String name;
6
7    @GetMapping("/hello")
8    public String hello() {
9        return "hello : " + name;
10    }
11}
启动项目,访问 http://127.0.0.1:8080/hello 可以正常获取到 Nacos 服务端后台配置的配置文件中的属性值。在 Nacos 后台修改属性值,保存后可以实时生效。
4 注册中心
Nacos 做注册中心,可以代替 Spring Cloud Netflix Eureka 。
4.2 服务注册
创建 Spring Boot 项目 nacos-client-provider ,作为我们的服务提供者,添加 Web/Nacos Service Discovery 依赖,如下:
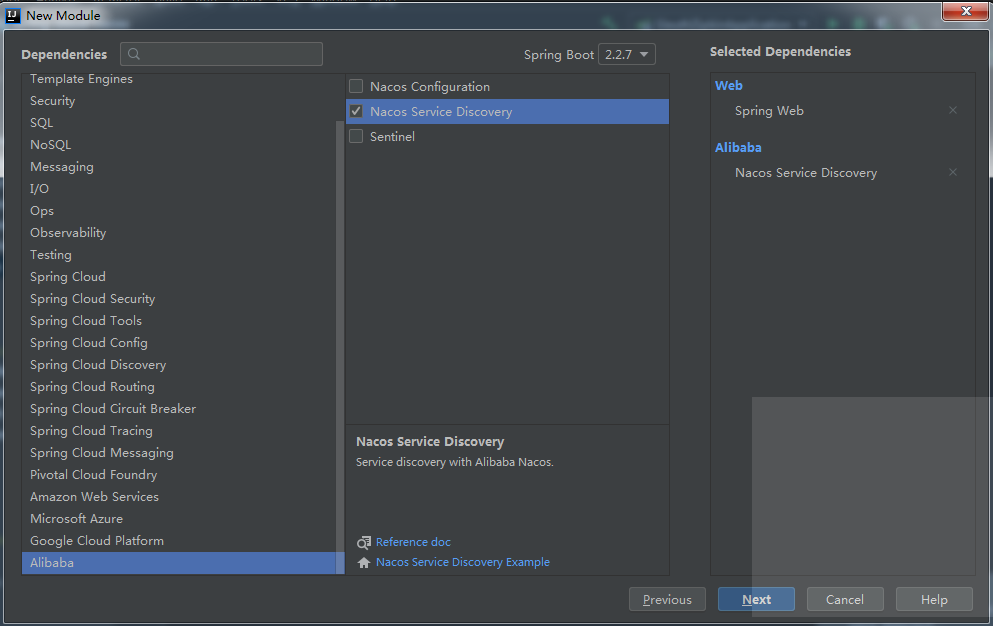
最终的依赖如下:
1<dependencies>
2    <dependency>
3        <groupId>org.springframework.boot</groupId>
4        <artifactId>spring-boot-starter-web</artifactId>
5    </dependency>
6    <dependency>
7        <groupId>com.alibaba.cloud</groupId>
8        <artifactId>spring-cloud-starter-alibaba-nacos-discovery</artifactId>
9    </dependency>
10
11    <dependency>
12        <groupId>org.springframework.boot</groupId>
13        <artifactId>spring-boot-starter-test</artifactId>
14        <scope>test</scope>
15        <exclusions>
16            <exclusion>
17                <groupId>org.junit.vintage</groupId>
18                <artifactId>junit-vintage-engine</artifactId>
19            </exclusion>
20        </exclusions>
21    </dependency>
22</dependencies>
项目创建成功后,修改 application.properties 配置文件,如下:
1spring.application.name=nacos-client-provider
2server.port=9000
3
4spring.cloud.nacos.discovery.server-addr=127.0.0.1:8848
然后,启动项目,在 Nacos 后台页面上可以看到这个实例。
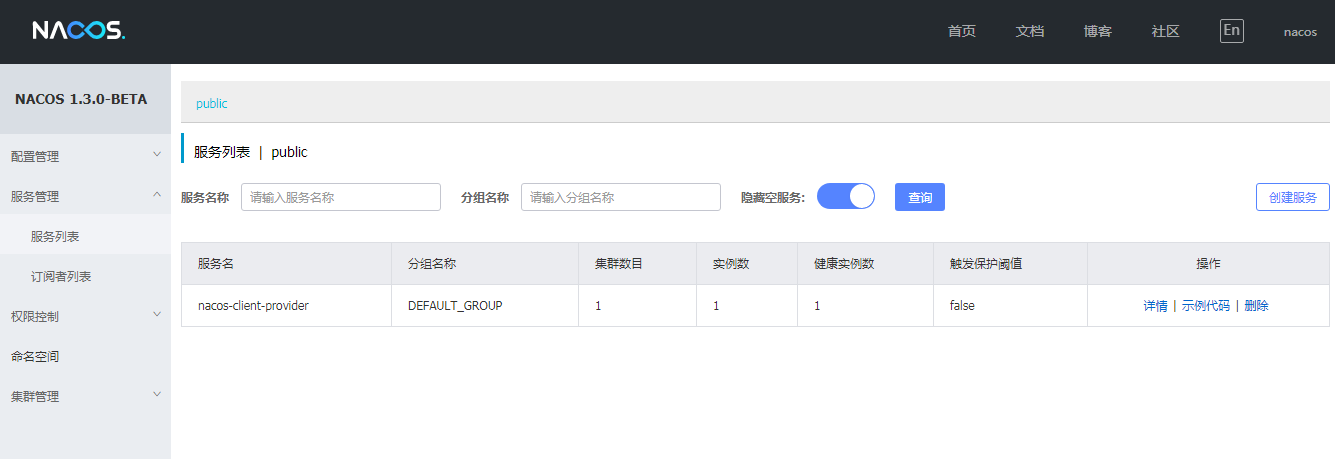
当然 provider 也可以集群化部署,下面对 nacos-client-provider 进行打包,之后我们在命令行启动两个 provider 实例:
1java -jar nacos-client-provider-0.0.1-SNAPSHOT.jar --server.port=9000
2java -jar nacos-client-provider-0.0.1-SNAPSHOT.jar --server.port=9001
启动成功后,在 Nacos 后台页面上可以看到这 2 个实例。
最后,在 provider 提供一个 hello 接口,用于后续服务消费者 consumer 来消费,如下:
1@RestController
2public class ProviderController {
3    @Value("${server.port}")
4    Integer port; // 支持启动多个实例,做负载均衡,用端口区分
5
6    @GetMapping("/hello")
7    public String hello() {
8        return "hello cxy35: " + port;
9    }
10}
4.2 服务消费
创建 Spring Boot 项目 nacos-client-consumer ,作为我们的服务消费者,添加 Web/Nacos Service Discovery 依赖,如下:
最终的依赖如下:
1<dependencies>
2    <dependency>
3        <groupId>org.springframework.boot</groupId>
4        <artifactId>spring-boot-starter-web</artifactId>
5    </dependency>
6    <dependency>
7        <groupId>com.alibaba.cloud</groupId>
8        <artifactId>spring-cloud-starter-alibaba-nacos-discovery</artifactId>
9    </dependency>
10
11    <dependency>
12        <groupId>org.springframework.boot</groupId>
13        <artifactId>spring-boot-starter-test</artifactId>
14        <scope>test</scope>
15        <exclusions>
16            <exclusion>
17                <groupId>org.junit.vintage</groupId>
18                <artifactId>junit-vintage-engine</artifactId>
19            </exclusion>
20        </exclusions>
21    </dependency>
22</dependencies>
项目创建成功后,修改 application.properties 配置文件,如下:
1spring.application.name=nacos-client-consumer
2server.port=9002
3
4spring.cloud.nacos.discovery.server-addr=127.0.0.1:8848
然后,启动项目,在 Nacos 后台页面上可以看到这个实例。
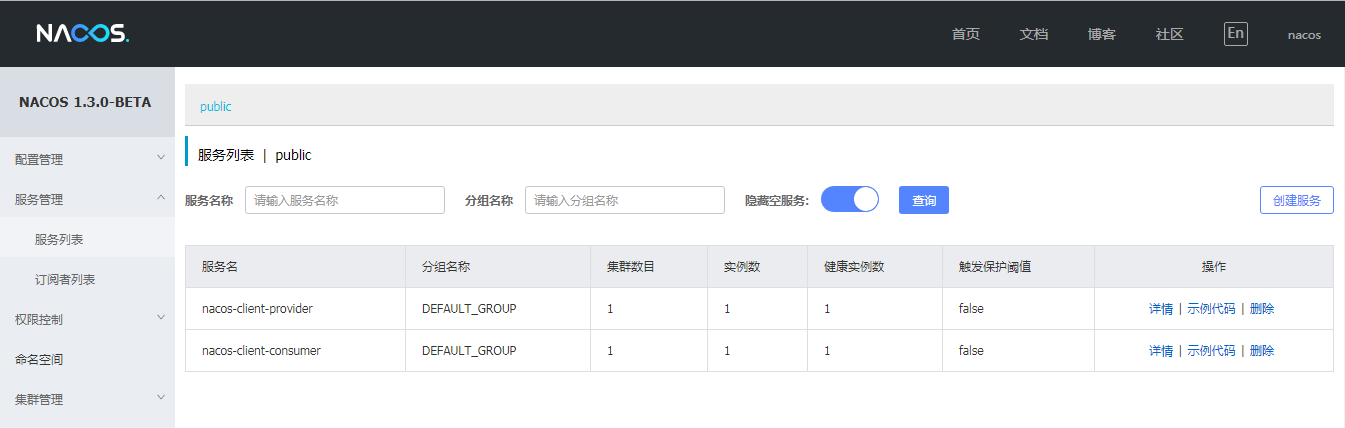
接着,在项目启动类中添加 RestTemplate ,如下:
1@SpringBootApplication
2public class NacosClientConsumerApplication {
3
4    public static void main(String[] args) {
5        SpringApplication.run(NacosClientConsumerApplication.class, args);
6    }
7
8    @Bean
9    @LoadBalanced // 开启负载均衡
10    RestTemplate restTemplate() {
11        return new RestTemplate();
12    }
13}
最后在 consumer 中新增测试接口,去实现服务调用,从而消费 provider 中提供的接口,如下:
1@RestController
2public class ConsumerController {
3    @Autowired
4    RestTemplate restTemplate;
5
6    @GetMapping("/hello")
7    public String hello() {
8        return restTemplate.getForObject("http://nacos-client-provider/hello", String.class);
9    }
10}
访问 http://127.0.0.1:9002/hello 完成测试。
- Spring Cloud 教程合集(微信左下方阅读全文可直达)。
- Spring Cloud 教程合集示例代码:https://github.com/cxy35/spring-cloud-samples
- 本文示例代码:https://github.com/cxy35/spring-cloud-samples/tree/master/spring-cloud-nacos
扫码关注微信公众号 程序员35 ,获取最新技术干货,畅聊 #程序员的35,35的程序员# 。独立站点:https://cxy35.com