
前面实验了使用docker搭建一个jenkins,下面实验使用docker作为jenkins的slave节点
1. 环境准备
- 一个运行Docker的主机或者群集
- Jenkins应该能访问互联网,方便安装插件。
- Jenkins服务器能够和GitHub通信。
- Jenkinss对Java所需要的Git,和Maven配置应该配置好。
- 一个Jenkins master.
2. 在Docker主机上开启远端的访问API
此处针对Docker 18.03
/etc/docker/daemon.json会被docker.service的配置文件覆盖,直接添加daemon.json不起作用。可以有如下几种设置:
直接编辑配置文件:Centos中docker daemon配置文件在/lib/systemd/system/docker.service,找到以下字段,在后面添加如下,注意,此处不能用”fd://”,否则报错
1[Unit]
2Description=Docker Application Container Engine
3Documentation=https://docs.docker.com
4BindsTo=containerd.service
5After=network-online.target firewalld.service containerd.service
6Wants=network-online.target
7Requires=docker.socket
8
9[Service]
10Type=notify
11# the default is not to use systemd for cgroups because the delegate issues still
12# exists and systemd currently does not support the cgroup feature set required
13# for containers run by docker
14#ExecStart=/usr/bin/dockerd -H fd:// --containerd=/run/containerd/containerd.sock
15ExecStart=/usr/bin/dockerd -H unix:///var/run/docker.sock -H tcp://0.0.0.0:2375    #添加
16ExecReload=/bin/kill -s HUP $MAINPID
17TimeoutSec=0
18RestartSec=2
19Restart=always
20
21# Note that StartLimit* options were moved from "Service" to "Unit" in systemd 229.
22# Both the old, and new location are accepted by systemd 229 and up, so using the old location
23# to make them work for either version of systemd.
24StartLimitBurst=3
25
26# Note that StartLimitInterval was renamed to StartLimitIntervalSec in systemd 230.
27# Both the old, and new name are accepted by systemd 230 and up, so using the old name to make
28# this option work for either version of systemd.
29StartLimitInterval=60s
30
31# Having non-zero Limit*s causes performance problems due to accounting overhead
32# in the kernel. We recommend using cgroups to do container-local accounting.
33LimitNOFILE=infinity
34LimitNPROC=infinity
35LimitCORE=infinity
36
37# Comment TasksMax if your systemd version does not support it.
38# Only systemd 226 and above support this option.
39TasksMax=infinity
40
41# set delegate yes so that systemd does not reset the cgroups of docker containers
42Delegate=yes
执行
[root@node6 ~]# systemctl daemon-reload
[root@node6 ~]# systemctl restart docker.service
安装Docker插件
点击【管理Jenkins】–【管理插件】–【可选插件】然后安装此插件

3. 配置Docker插件
点击系统管理----->系统设置

添加配置

然后点击保存
4. 创建Docker镜像
需要创建一个Docker的镜像在Docker主机上,方便我们在创建Jenkins slaves时使用。
查看Docker的镜像
[root@node6 ~]# docker images
1REPOSITORY          TAG                 IMAGE ID            CREATED             SIZE
2jenkins/jenkins     lts                 fac78e370c0b        6 days ago          568MB
拉取ubuntu的镜像
由于拉取的Ubuntu安装git有点问题,重新拉去一个ubuntu16.04的镜像
[root@node6 ~]# docker pull dftbcros.mirror.aliyuncs.com/library/ubuntu:16.04
116.04: Pulling from library/ubuntu
2e80174c8b43b: Pull complete
3d1072db285cc: Pull complete
4858453671e67: Pull complete
53d07b1124f98: Pull complete
6Digest: sha256:bb5b48c7750a6a8775c74bcb601f7e5399135d0a06de004d000e05fd25c1a71c
7Status: Downloaded newer image for dftbcros.mirror.aliyuncs.com/library/ubuntu:16.04
8dftbcros.mirror.aliyuncs.com/library/ubuntu:16.04
[root@node6 ~]# docker images
1REPOSITORY                                    TAG                 IMAGE ID            CREATED             SIZE
2dftbcros.mirror.aliyuncs.com/library/ubuntu   16.04               5f2bf26e3524        3 days ago          123MB
3jenkins/jenkins                               lts                 fac78e370c0b        6 days ago          568MB
4centos                                        latest              0f3e07c0138f        4 weeks ago         220MB
[root@node6 ~]# docker pull centos
1Using default tag: latest
2latest: Pulling from library/centos
3729ec3a6ada3: Pull complete
4Digest: sha256:f94c1d992c193b3dc09e297ffd54d8a4f1dc946c37cbeceb26d35ce1647f88d9
5Status: Downloaded newer image for centos:latest
6docker.io/library/centos:latest
执行下面的命令运行Docker容器并在容器中执行命令。
root@37e4f2be0a41:/# apt-get update
1Get:1 http://archive.ubuntu.com/ubuntu xenial InRelease [247 kB]
2Get:2 http://security.ubuntu.com/ubuntu xenial-security InRelease [109 kB]
3Get:3 http://security.ubuntu.com/ubuntu xenial-security/main amd64 Packages [985 kB]
4Get:4 http://archive.ubuntu.com/ubuntu xenial-updates InRelease [109 kB]
5Get:5 http://archive.ubuntu.com/ubuntu xenial-backports InRelease [107 kB]
6Get:6 http://archive.ubuntu.com/ubuntu xenial/main amd64 Packages [1558 kB]
7Get:7 http://security.ubuntu.com/ubuntu xenial-security/restricted amd64 Packages [12.7 kB]
8Get:8 http://security.ubuntu.com/ubuntu xenial-security/universe amd64 Packages [589 kB]
9Get:9 http://security.ubuntu.com/ubuntu xenial-security/multiverse amd64 Packages [6281 B]
10Get:10 http://archive.ubuntu.com/ubuntu xenial/restricted amd64 Packages [14.1 kB]
11Get:11 http://archive.ubuntu.com/ubuntu xenial/universe amd64 Packages [9827 kB]
12Get:12 http://archive.ubuntu.com/ubuntu xenial/multiverse amd64 Packages [176 kB]
13Get:13 http://archive.ubuntu.com/ubuntu xenial-updates/main amd64 Packages [1362 kB]
14Get:14 http://archive.ubuntu.com/ubuntu xenial-updates/restricted amd64 Packages [13.1 kB]
15Get:15 http://archive.ubuntu.com/ubuntu xenial-updates/universe amd64 Packages [993 kB]
16Get:16 http://archive.ubuntu.com/ubuntu xenial-updates/multiverse amd64 Packages [19.3 kB]
17Get:17 http://archive.ubuntu.com/ubuntu xenial-backports/main amd64 Packages [7942 B]
18Get:18 http://archive.ubuntu.com/ubuntu xenial-backports/universe amd64 Packages [8807 B]
19Fetched 16.1 MB in 6min 48s (39.5 kB/s)
20Reading package lists... Done
安装git
root@37e4f2be0a41:/# apt-get install -y git
添加用户
1root@:37e4f2be0a41/# adduser  jenkins
2Adding user `jenkins' ...
3Adding new group `jenkins' (1000) ...
4Adding new user `jenkins' (1000) with group `jenkins' ...
5Creating home directory `/home/jenkins' ...
6Copying files from `/etc/skel' ...
7Enter new UNIX password:
8Retype new UNIX password:
9passwd: password updated successfully
10Changing the user information for jenkins
11Enter the new value, or press ENTER for the default
12    Full Name []: 123
13    Room Number []: 12
14    Work Phone []: 312
15    Home Phone []: 21
16    Other []: 21
17Is the information correct? [Y/n] Y
安装SSH server
root@37e4f2be0a41:/# apt-get install openssh-serverd
root@37e4f2be0a41:/# mkdir /var/run/sshd
5. 安装所需的应用
root@37e4f2be0a41:/# apt-get install openjdk-8-jdk -y
root@37e4f2be0a41:/# apt-get install maven
root@37e4f2be0a41:/# exit
[root@node6 ~]# docker ps -a
37e4f2be0a41 5f2bf26e3524 "/bin/bash" About an hour ago Exited (0) 20 seconds ago sweet_hypatia
6. 保存镜像
[root@node6 ~]# docker commit b119e7f28b50 maven-build-slave-0.2
sha256:3a444723b0557cf81661b3f95947c3deae8c93008476ac3a86cbb8b7979815ce
[root@node6 ~]# docker images
maven-build-slave-0.2 latest 3a444723b055 About a minute ago 568MB
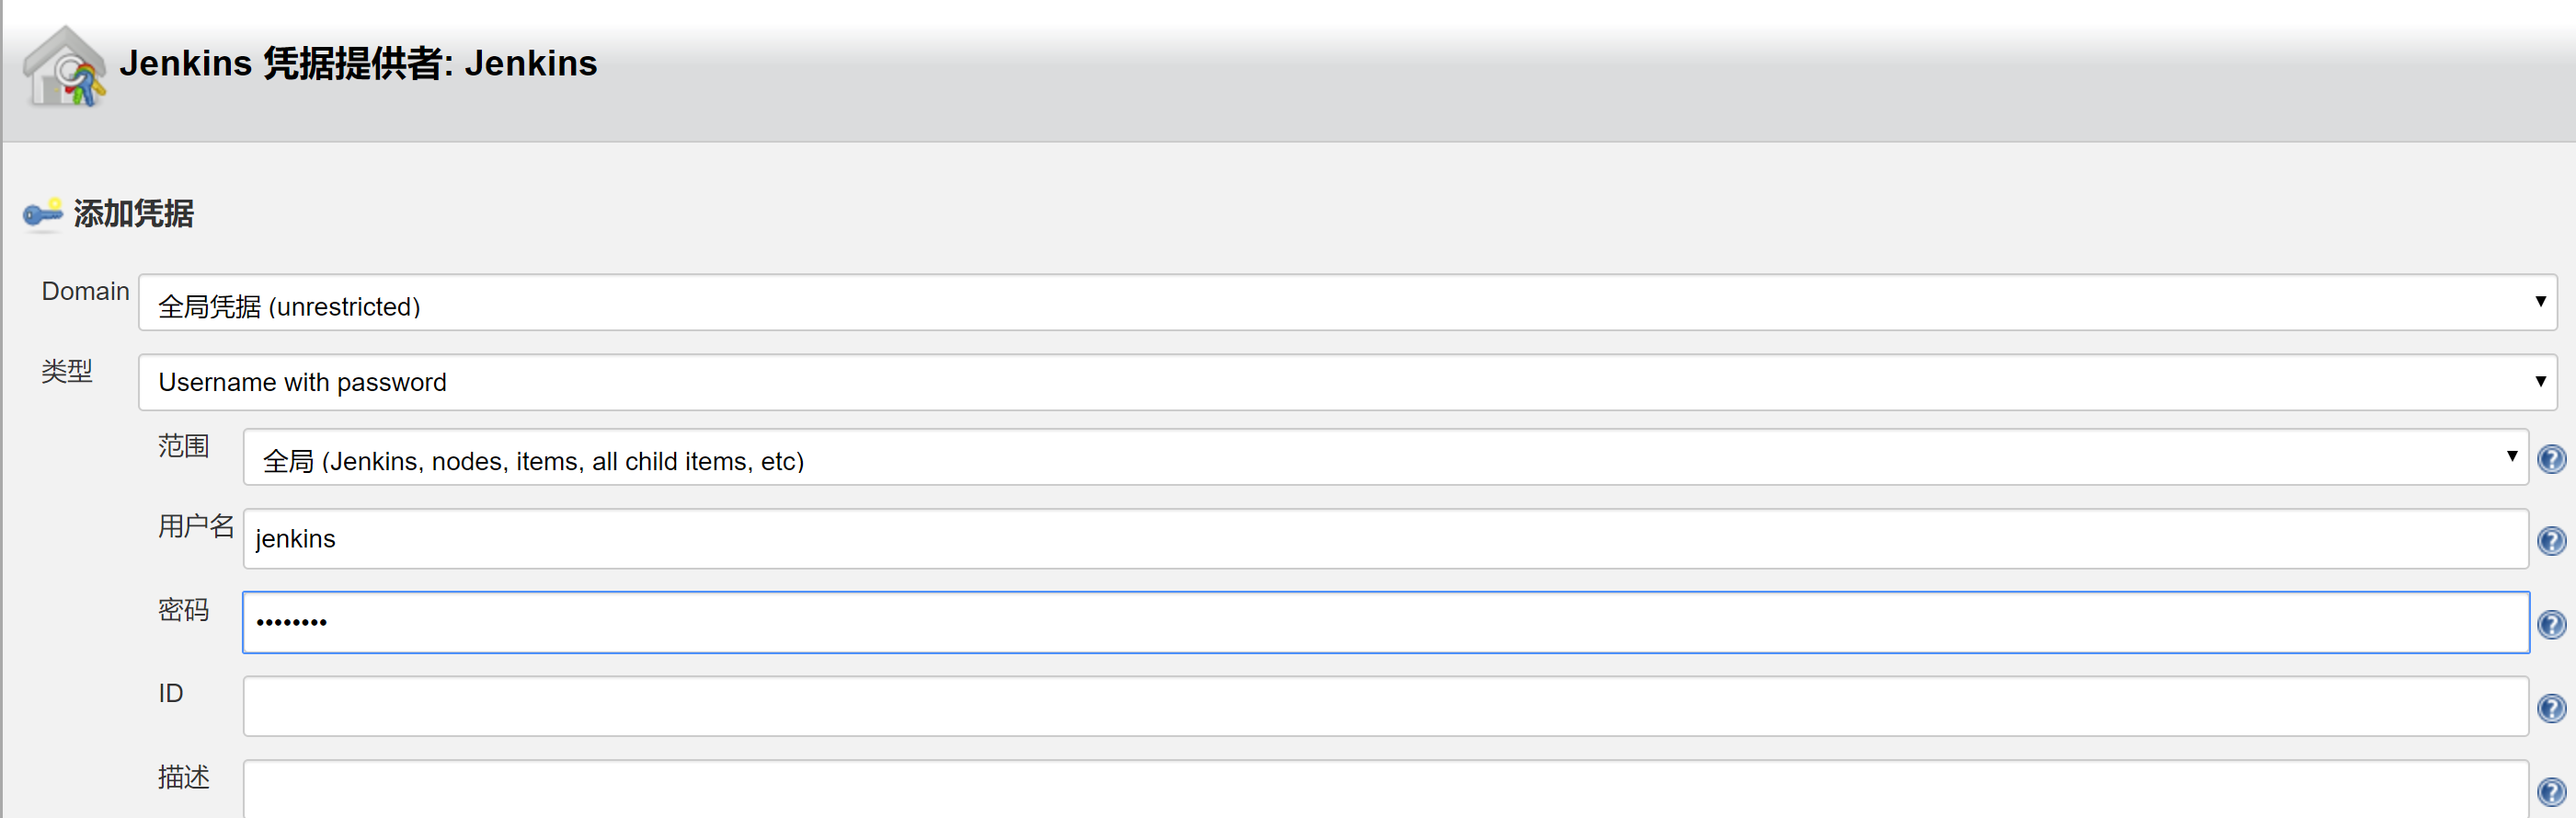
7. jenkins配置docker凭据
系统管理----->系统设置

创建凭据
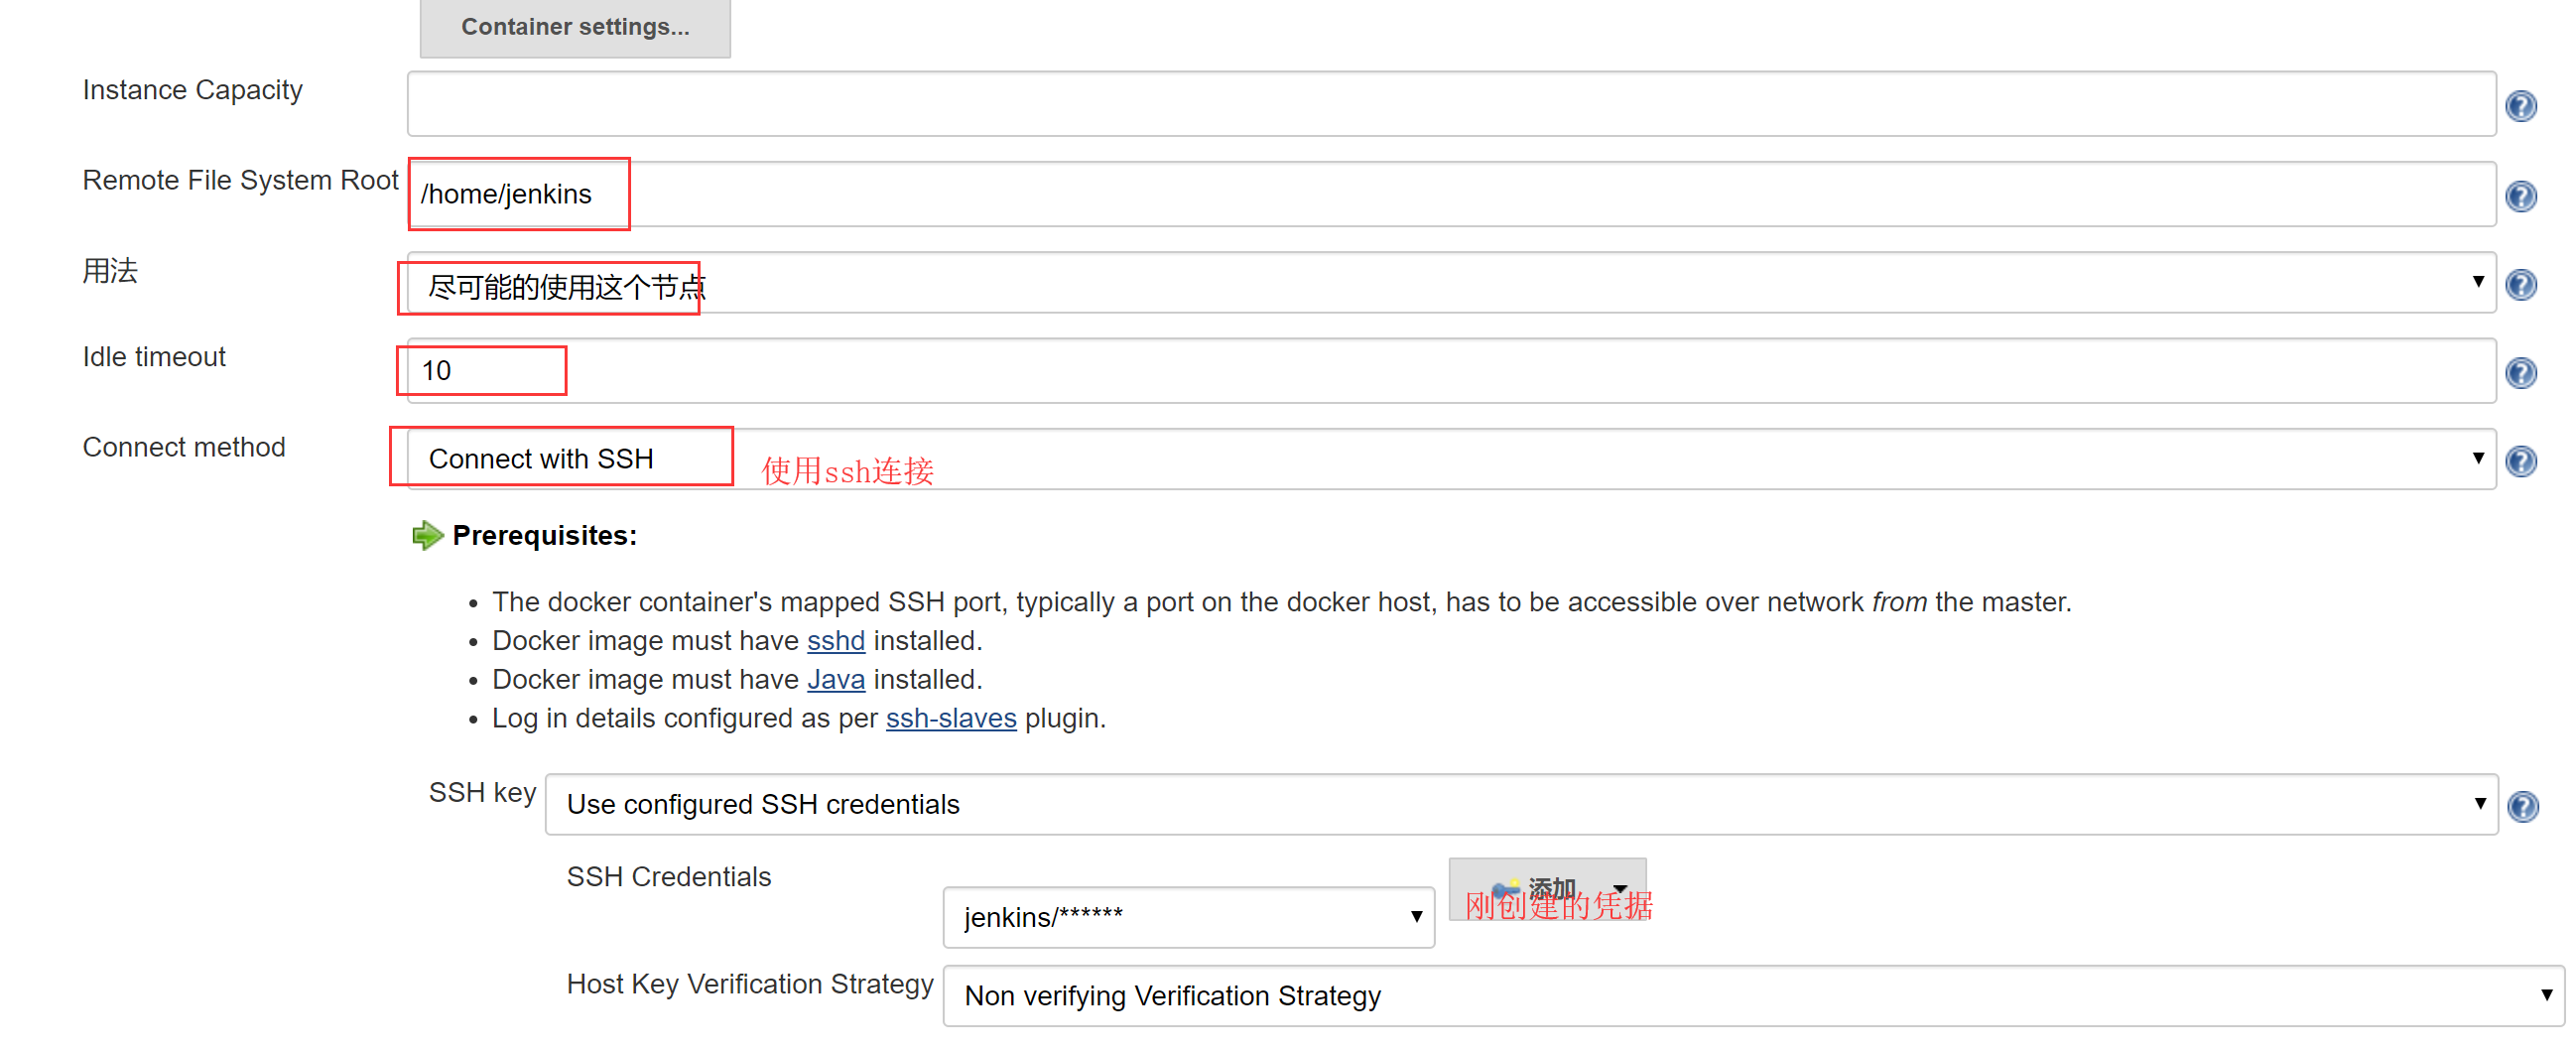
配置模板

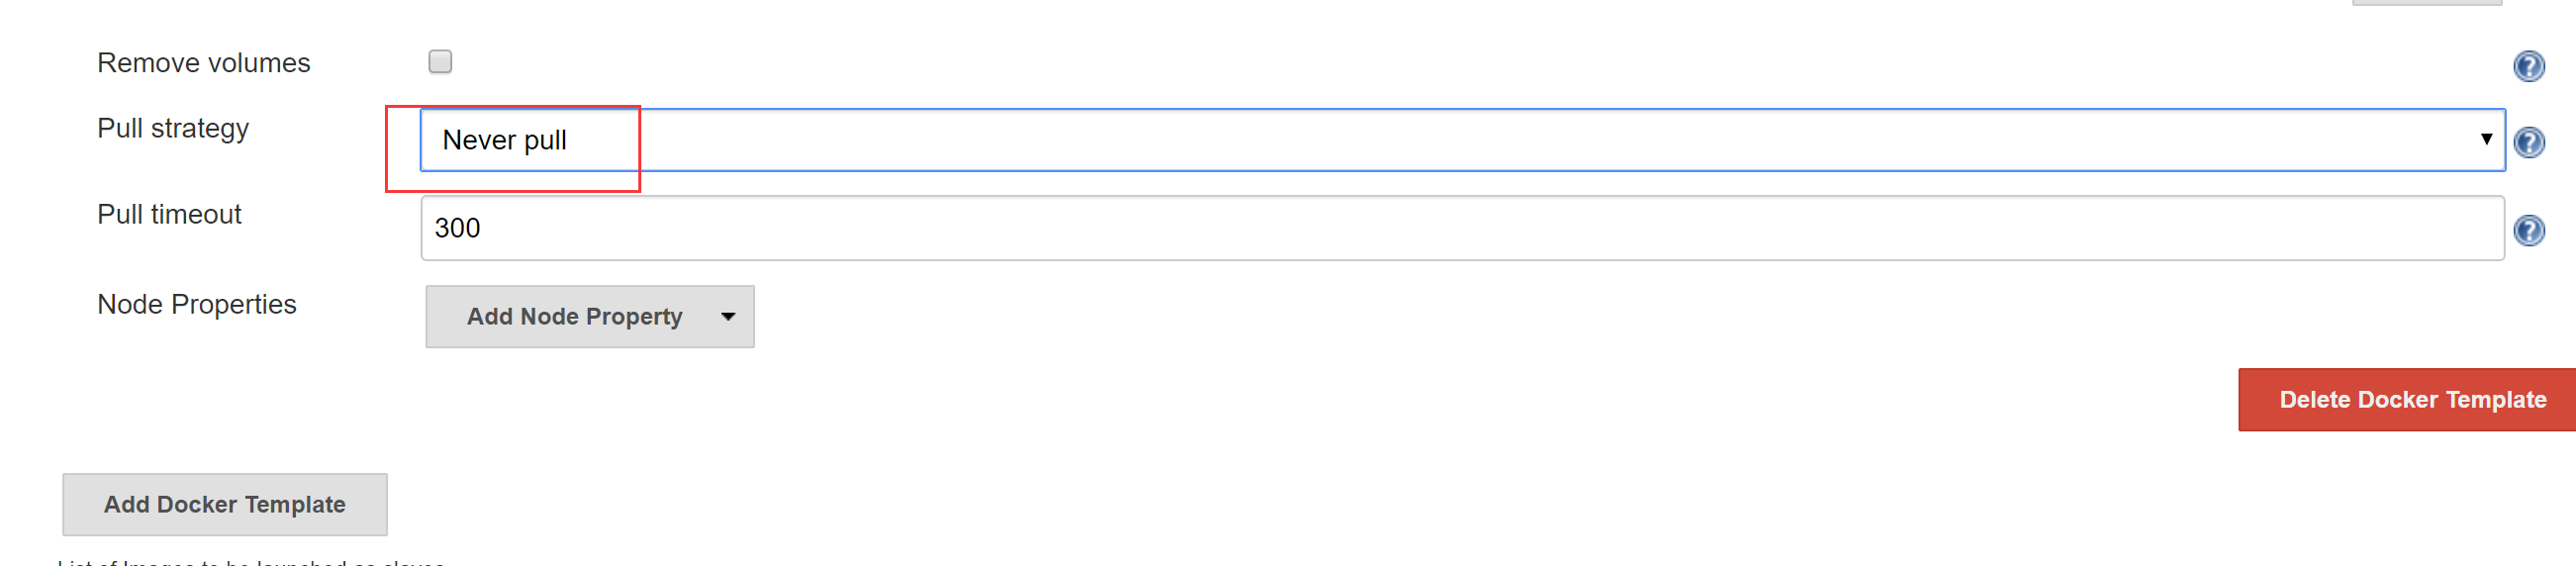
保存
8. jenkins测试
使用这个项目

pipeline语法
1node('docker') {
2    // some block
3    stage('Preparation') {
4    // some block
5    //step
6    git 'https://github.com/jglick/simple-maven-project-with-tests.git'
7}
8    stage('Build') {
9    // some block
10    //step
11    withMaven(maven: 'M3') {
12    // some block
13    sh label: '', script: 'mvn -Dmaven.test.failuer.ignore clean install package'
14}
15}
16}
构建即可