
论文阅读:Adaptive Fusion for RGB-D Salient Object Detection
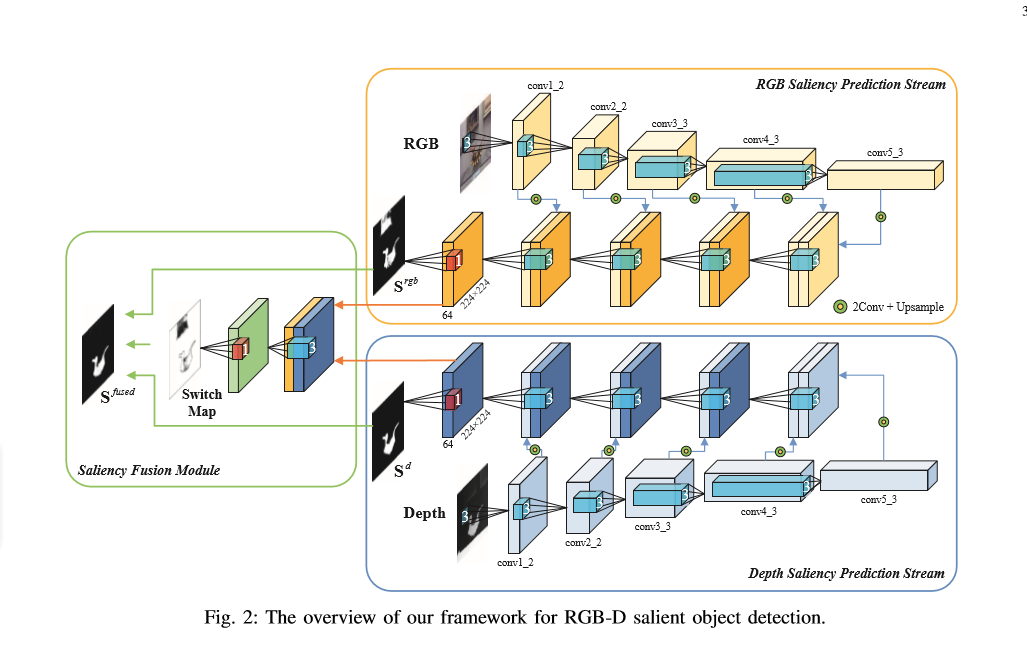
这篇代码的创新点在于使用了SW层,使用SW_logits * img_logits + (1 - SW_logits) * (1 - depth_logits) 来获得最终的预测结果
另外一个关键点是使用了3种loss损失值
第一种损失值,即经过归一化的标签g_t 与 输出的结果logits的sigmoid的损失值
第二种损失值, 即将im_logits进行sigmoid转换为0, 1之间,然后使用sigmoid_im * label + (1 - sigmoid_im) * (1 - label) # 获得标签值与图片值的交叉熵损失值
将计算好的交叉熵损失函数与SW_map 计算-log的交叉熵损失函数,个人认为这个loss存在问题
第三种损失值,即edge_loss即边界的损失值
将预测的结果进行sigmoid操作,转换为(0, 1)
使用tf.reshape(tf.constant([-1, 0, 1], tf.float32), [1, 3, 1, 1]) 构造x方向的边界卷积
使用tf.reshape(x_weight, [3, 1, 1, 1]) # 构造y方向的边界卷积
使用tf.nn.conv2d(g_t, x_weight, [1, 1, 1, 1], 'SAME') 进行标签的x轴方向和y轴方向上的边界卷积
使用tf.nn.conv2d(sigmoid_p, x_weight, [1, 1, 1, 1], 'SAME') 进行预测结果的x轴方向和y轴方向上的边界卷积
最后使用tf.losses.mean_squre_error(xgrad_gt, xgrad_sal) + tf.losses.mean_squre_error(ygrad_gt, ygrad_sal) 获得最终的mse损失函数
论文中的网络结构图
run_saliency.py 用于执行代码
1from __future__ import print_function
2import tensorflow as tf
3import numpy as np
4import scipy.misc as misc
5import os
6import cv2
7from net import *
8from loss import *
9
10
11
12FLAGS = tf.flags.FLAGS
13tf.flags.DEFINE_string('data_dir', './data/', 'path to dataset')
14tf.flags.DEFINE_string('ckpt_file', './model/AF-Net', 'checkpoint file')
15tf.flags.DEFINE_string('save_dir', './result', 'path to prediction direction')
16tf.flags.DEFINE_string('train_data', './train_data/', 'path to train_data')
17IMAGE_SIZE = 224
18BATCH_SIZE = 1
19train_num = 1500
20num_epoch = 1000
21
22
23
24
25
26
27
28
29
30
31
32
33
34
35
36
37
38def _transform(filename, _channels=True):
39    image = misc.imread(filename)
40    if _channels and len(image.shape) < 3:
41        image = np.array([image for _ in range(3)])
42
43    resize_image = misc.imresize(image, [IMAGE_SIZE, IMAGE_SIZE], interp='nearest')
44    return image
45
46
47def main(argv=None, is_training=True):
48    image = tf.placeholder(tf.float32, [None, IMAGE_SIZE, IMAGE_SIZE, 3], name='input_image')
49    depth_2 = tf.placeholder(tf.float32, [None, IMAGE_SIZE, IMAGE_SIZE], name='input_depth')
50    depth = tf.expand_dims(depth_2, axis=3)
51    processed_image = image - [123.64, 116.779, 103.939]  # 减去最后一个维度的均值
52    gt_2 = tf.placeholder(tf.float32, [None, IMAGE_SIZE, IMAGE_SIZE], name='label')
53    gt = tf.expand_dims(gt_2, axis=3)
54    net_handler = NetHandler()
55    logits, im_logits, SW_map = net_handler.RGBD_SW_net(processed_image, depth)
56    pred_annotation = tf.sigmoid(logits)  # 将其转换为0, 1
57    # 构造sal损失值
58    loss_sal = sigmoid_CEloss(logits, gt)
59    # 构造SW损失值
60    loss_sw = SW_loss(im_logits, SW_map, gt)
61    # 计算边缘损失值
62    loss_edge = edge_loss(logits, gt)
63    # 计算总的损失值loss
64    loss = loss_sal + loss_sw + loss_edge
65    # 构造损失值的优化器
66    train_op = tf.train.AdamOptimizer(1e-6, beta1=0.5).minimize(loss)
67    # 构造执行函数
68    sess = tf.Session()
69    # 变量初始化
70    sess.run(tf.global_variables_initializer())
71    # 打印保存的参数的地址
72    print('Rreading params from {}'.format(FLAGS.ckpt_file))
73    # 如果已经保存了参数就加载
74    if tf.train.get_checkpoint_state('model'):
75        saver = tf.train.Saver(None)
76        saver.restore(sess, FLAGS.ckpt_file)
77    # 进行图片结果的保存
78    if not os.path.exists(FLAGS.save_dir):
79        os.makedirs(FLAGS.save_dir)
80
81    if is_training == False:
82        files = os.listdir(os.path.join(FLAGS.data_dir + '/RGB/'))
83        test_num = len(files)
84        test_RGB = np.array([_transform(os.path.join(FLAGS.data_dir + '/RGB/' + filename), _channels=True) for filename in files])
85        # 这里是不对的
86        test_depth = np.array([np.expand_dims(_transform(os.path.join(FLAGS.data_dir + '/depth/' + filename), _channels=True) for filename in files)])
87
88        # 进行测试操作
89        for k in range(test_num):
90            # 进行结果的预测,这里结果的范围为0,1之间
91            test_prediction = sess.run(pred_annotation, feed_dict={image:test_RGB[k], depth:test_depth[k]})
92
93            test_origin_RGB = misc.imread(os.path.join(FLAGS.data_dir + '/RGB/' + files[k].split('.')[0] + '.jpg'))
94            image_shape = test_origin_RGB.shape
95            # 将图片转换为原来的图片的大小
96            test_pred = misc.imresize(test_prediction[0, :, :, 0], image_shape, interp='bilinear')
97            misc.imsave('{}/{}'.format(FLAGS.save_dir, files[k].split('.')[0] + '.jpg'), test_pred.astype(np.uint8))
98
99        print('Save results in to %s' % (FLAGS.save_dir))
100
101    else:
102        iter = 0
103        for epoch in range(num_epoch):
104            # 载入数据
105            for i in range(train_num // BATCH_SIZE):
106
107                deep_img, GT_image, Img_img = read_data_some('train_data.npy', BATCH_SIZE)
108                _, _loss = sess.run([train_op, loss], feed_dict={image:Img_img, depth_2:deep_img, gt_2:GT_image})
109                if iter % 100 == 0 and iter != 0:
110                    print('iter', iter, 'loss', _loss)
111
112                saver = tf.train.Saver()
113                if epoch % 10 == 0:
114                    saver.save(sess, FLAGS.ckpt_file, write_meta_graph=FLAGS)
115                    test_deep, test_GT, test_RGB = read_data_some('test_data.npy', 1)
116                    test_prediction = sess.run(pred_annotation, feed_dict={image:test_RGB, depth_2:test_deep, gt_2:test_GT})
117
118                    # 进行图片保存
119                    cv2.imwrite('train_result/deep.png', test_deep)
120                    cv2.imwrite('train_result/GT.png', test_GT)
121                    cv2.imwrite('train_result/RGB.png', test_RGB)
122                    cv2.imwrite('train_result/pred.png', test_prediction)
123
124
125                iter += 1
126
127
128if __name__ == '__main__':
129    tf.app.run()
net.py 网络结构
1import tensorflow as tf
2import tensorflow.contrib.slim as slim
3
4
5
6class NetHandler(object):
7    def __int__(self,
8                weights_initializer = tf.contrib.layers.xavier_initializer(),
9                weight_decay = 0.0001,
10                padding='SAME'):
11        self.padding = padding
12        self.weight_initializer = weights_initializer
13        self.weight_decay = weight_decay
14
15    def vgg16_net(self, inputs, depth_suf = ''):
16        layers = (
17            'conv1_1', 'relu1_1', 'conv1_2', 'relu1_2', 'pool1',
18
19            'conv2_1', 'relu2_1', 'conv2_2', 'relu2_2', 'pool2',
20
21            'conv3_1', 'relu3_1', 'conv3_2', 'relu3_2', 'conv3_3',
22            'relu3_3', 'pool3',
23
24            'conv4_1', 'relu4_1', 'conv4_2', 'relu4_2', 'conv4_3', 'relu4_3',
25            'pool4',
26
27            'conv5_1', 'relu5_1', 'conv5_2', 'relu5_2', 'conv5_3', 'relu5_3',
28            'pool5'
29        )
30
31        kernel_size  =  3
32        num_outputs = 64
33        net = {}
34        current = inputs # 当前输入
35        for i, name in enumerate(layers):
36            if depth_suf == '_d' and i == 0:
37                current = slim.conv2d(current, 64, [3, 3],
38                                      weights_initializer=self.weight_initializer,
39                                      padding=self.padding,
40                                      stride=1,
41                                      activation_fn=None)
42                net[name] = current
43                continue
44
45            kind = name[:4]
46            if kind == 'conv':
47                if name[:5] == 'conv1':
48                    num_outputs = 64 # 构造第一个卷积的输出fiter
49                elif name[:5] == 'conv2':
50                    num_outputs = 128
51                elif name[:5] == 'conv3':
52                    num_outputs = 256
53                elif name[:5] == 'conv4':
54                    num_outputs = 512
55                elif name[:5] == 'conv5':
56                    num_outputs = 512
57
58                _, _, _, c = current.get_shape()
59                kernels = tf.get_variable(name=name + '_w' + depth_suf, shape=[kernel_size, kernel_size, c, num_outputs],
60
61                                          initializer=self.weight_initializer,
62                                          regularizer=tf.contrib.layers.l2_regularizer(self.weight_decay),
63                                          trainable=True)
64                _, _, _, bias_size = kernels.get_shape()
65                bias = tf.get_variable(name=name + '_b' + depth_suf, shape=[bias_size],
66                                       initializer=tf.zeros_initializer(),
67                                       trainable=True)
68                conv = tf.nn.conv2d(current, kernels, strides=[1, 1, 1, 1], padding=self.padding)
69                current = tf.nn.bias_add(conv, bias)
70
71            elif kind == 'relu':
72                current = tf.nn.relu(current, name=name)
73
74            elif kind == 'pool':
75                current = tf.nn.max_pool(current, kernel_size=[1, 2, 2, 1], strides=[1, 2, 2, 1], padding=self.padding)
76            net[name] = current
77
78        return net
79
80
81
82
83
84
85
86    def RGBD_SW_net(self, image, depth):
87        image_net = self.vgg16_net(image)
88        depth_net = self.vgg16_net(depth, depth_suf='_d')
89        conv_5 = image_net['relu5_3']   # 获得第一层到最后一层卷积的结果
90        conv_4 = image_net['relu4_3']
91        conv_3 = image_net['relu3_3']
92        conv_2 = image_net['relu2_2']
93        conv_1 = image_net['relu1_2']
94
95        depth_5 = depth_net['relu5_3']
96        depth_4 = depth_net['relu4_3']
97        depth_3 = depth_net['relu3_3']
98        depth_2 = depth_net['relu2_2']
99        depth_1 = depth_net['relu1_2']
100
101        with slim.arg_scope([slim.conv2d],
102                            weights_initializer=self.weight_initializer,
103                            weight_regularizer=slim.l2_regularizer(self.weight_decay),
104                            padding=self.padding,
105                            stride=1,
106                            activation_fn=tf.nn.relu):
107            conv5 = slim.repeat(conv_5, 2, slim.conv2d, 64, [3, 3], scope='conv5')  # 2表示进行了两次的卷积操作
108            conv4 = slim.repeat(conv_4, 2, slim.conv2d, 64, [3, 3], scope='conv4')  # 进行两次卷积
109            conv3 = slim.repeat(conv_3, 2, slim.conv2d, 64, [3, 3], scope='conv3')  #
110            conv2 = slim.repeat(conv_2, 2, slim.conv2d, 64, [3, 3], scope='conv2')
111            conv1 = slim.repeat(conv_1, 2, slim.conv2d, 64, [3, 3], scope='conv1')
112
113            depth5 = slim.repeat(depth_5, 2, slim.conv2d, 64, [3, 3], scope='depth5')
114            depth4 = slim.repeat(depth_4, 2, slim.conv2d, 64, [3, 3], scope='depth4')
115            depth3 = slim.repeat(depth_3, 2, slim.conv2d, 64, [3, 3], scope='depth3')
116            depth2 = slim.repeat(depth_2, 2, slim.conv2d, 64, [3, 3], scope='depth2')
117            depth1 = slim.repeat(depth_1, 2, slim.conv2d, 64, [3, 3], scope='depth1')
118
119            conv5_up = tf.image.resize_images(conv5, [224, 224])
120            conv4_up = tf.image.resize_images(conv4, [224, 224])
121            conv3_up = tf.image.resize_images(conv3, [224, 224])
122            conv2_up = tf.image.resize_images(conv2, [224, 224])
123
124            depth5_up = tf.image.resize_images(depth5, [224, 224])
125            depth4_up = tf.image.resize_images(depth4, [224, 224])
126            depth3_up = tf.image.resize_images(depth3, [224, 224])
127            depth2_up = tf.image.resize_images(depth2, [224, 224])
128            # 将卷积层进行维度变化,卷积后的结果输入到下一层
129            concat4_im = tf.concat([conv5_up, conv4_up], 3)
130            feat4_im = slim.conv2d(concat4_im, 64, [3, 3], scope='feat4_im')
131            concat3_im = tf.concat([feat4_im, conv3_up], 3)
132            feat3_im = slim.conv2d(concat3_im, 64, [3, 3], scope='feat3_im')
133            concat2_im = tf.concat([feat3_im, conv2_up], 3)
134            feat2_im = slim.conv2d(concat2_im, 64, [3, 3], scope='feat2_im')
135            concat1_im = tf.concat([feat2_im, conv1], 3)
136            feat1_im = slim.conv2d(concat1_im, 64, [3, 3], scope='feat1_im')
137#           # 同理对深度图做相同的操作
138
139            concat4_d = tf.concat([depth4_up, depth5_up], 3)
140            feat4_d = slim.conv2d(concat4_d, 64, [3, 3], scope='feat4_d')
141            concat3_d = tf.concat([feat4_d, depth3])
142            feat3_d = slim.conv2d(concat3_d, 64, [3, 3], scope='feat3_d')
143            concat2_d = tf.concat([feat3_d, depth2])
144            feat2_d = slim.conv2d(concat2_d, 64, [3, 3], scope='feat2_d')
145            concat1_d = tf.concat([feat2_d, depth])
146            feat1_d = slim.conv2d(concat1_d, 64, [3, 3], scope='feat1_d')
147
148            # 进行1*1的卷积, 时期维度变化为1
149            conv1_im_logits = slim.conv2d(feat1_im, 1, [1, 1], activation_fn=None, scope='conv1_im_logits')
150            conv1_d_logits = slim.conv2d(feat1_d, 1, [1, 1], activation_fn=None, scope='conv1_d_logits')
151            # 将图像卷积图与深度卷积图合并
152            feat1 = slim.conv2d(tf.concat([feat1_im, feat1_d], 3), 64, [3, 3], scope='feat1')
153            SW_map = tf.nn.sigmoid(slim.conv2d(feat1, 1, [1, 1], activation_fn=None, scope='feat1_attn'))
154
155            conv1_fused_logits = SW_map * conv1_im_logits + (1 - SW_map) * conv1_d_logits
156
157            return conv1_fused_logits, conv1_im_logits, SW_map
loss.py 定义的损失值
1import tensorflow as tf
2
3def sigmoid_CEloss(logits, gt):
4    loss = tf.reduce_mean(
5        tf.nn.sigmoid_cross_entropy_with_logits(logits=logits, labels=tf.cast(gt, tf.float32))
6    )
7
8def SW_loss(im_logits, SW_map, gt):
9
10    label = tf.cast(gt, tf.float32)
11    sigmoid_im = tf.nn.sigmoid(im_logits)
12    SW_gt = label * sigmoid_im + (1 - label) * (1 - sigmoid_im)
13    cost = -SW_gt * tf.log(tf.clip_by_value(SW_map, 1e-8, 1.0)) \
14            - (1 - SW_gt) * tf.log(tf.clip_by_value(1 - SW_map, 1e-8, 1.0))
15
16    return tf.reduce_mean(cost)
17
18
19# 边缘轮廓的损失值
20def edge_loss(logits, gt):
21    gt = tf.cast(gt, tf.float32)
22    sigmoid_p = tf.nn.sigmoid(logits)
23    x_weight = tf.reshape(tf.constant([-1, 0, +1], tf.float32), [1, 3, 1, 1]) # 构造了一个卷积核
24    y_weight = tf.reshape(x_weight, [3, 1, 1, 1])  # 构造了卷积核
25    # 获得其标签边缘的梯度值,获得x边缘的损失值
26    xgrad_gt = tf.nn.conv2d(gt, x_weight, [1, 1, 1, 1], 'SAME')
27    ygrad_gt = tf.nn.conv2d(gt, y_weight, [1, 1, 1, 1], 'SAME')
28    # 获得输出结果的边缘梯度值
29    xgrad_sal = tf.nn.conv2d(sigmoid_p, x_weight, [1, 1, 1, 1], 'SAME')
30    ygrad_sal = tf.nn.conv2d(sigmoid_p, y_weight, [1, 1, 1, 1], 'SAME')
31    # 计算平方根误差
32    loss = tf.losses.mean_squared_error(xgrad_gt, xgrad_sal) + tf.losses.mean_squared_error(ygrad_gt, ygrad_sal)
33
34    return loss
read_data 读取一个batch_size的数据
1import numpy as np
2import cv2
3
4
5def read_data_some(path, bacth_size):
6
7    data = np.array(np.load('npy/' + path))
8    num = len(data)
9    indx = np.random.randint(0, num, bacth_size)
10    deep_img, GT_img, Img_imgs = data[indx][:, 0], data[indx][:, 1], data[indx][:, 2]
11    deep_imgs = []
12    GT_imgs = []
13    for i in range(bacth_size):
14        deep_imgs.append(cv2.cvtColor(deep_img[i], cv2.COLOR_BGR2GRAY))
15        GT_imgs.append(cv2.cvtColor(GT_img[i], cv2.COLOR_BGR2GRAY))
16
17
18    return deep_imgs, GT_imgs, Img_imgs
19
20
21if __name__ == '__main__':
22
23    read_train_data(64)
save_data 保存数据为.npy
1import random
2import os
3import cv2
4import numpy as np
5import glob
6
7
8
9def save_data(path):
10
11    data = []
12
13    for root, dirs, files in os.walk(path):
14        if len(dirs) != 0:
15
16            file_names = glob.glob(path + dirs[0] + '/*.png')
17            for deep_name in file_names:
18                GT_name = deep_name.replace('deep', 'GT')
19                Img_name = deep_name.replace('deep', 'Img').replace('png', 'jpg')
20                # 图片的读取
21                deep_img = cv2.imread(deep_name)
22                deep_img = cv2.resize(deep_img, (224, 224))
23                GT_img = cv2.imread(GT_name)
24                GT_img = cv2.resize(GT_img, (224, 224))
25                Img_img = cv2.imread(Img_name)
26                Img_img = cv2.resize(Img_img, (224, 224))
27                data.append((deep_img, GT_img, Img_img))
28
29    # 进行数据的清洗
30    random.shuffle(data)
31
32
33    np.save('npy/' + path[:-1] + '.npy', data)