
一、概述
前一篇给大家装简单演示了EventBus的onEventMainThread()函数的接收,其实EventBus还有另外有个不同的函数,他们分别是:
1、onEvent
2、onEventMainThread
3、onEventBackgroundThread
4、onEventAsync
这四种订阅函数都是使用onEvent开头的,它们的功能稍有不同,在介绍不同之前先介绍两个概念:
告知观察者事件发生时通过EventBus.post函数实现,这个过程叫做事件的发布,观察者被告知事件发生叫做事件的接收,是通过下面的订阅函数实现的。
**onEvent:如果使用onEvent作为订阅函数,那么该事件在哪个线程发布出来的,onEvent就会在这个线程中运行,也就是说发布事件和接收事件线程在同一个线程。使用这个方法时,在onEvent方法中不能执行耗时操作,如果执行耗时操作容易导致事件分发延迟。
onEventMainThread:**如果使用onEventMainThread作为订阅函数,那么不论事件是在哪个线程中发布出来的,onEventMainThread都会在UI线程中执行,接收事件就会在UI线程中运行,这个在Android中是非常有用的,因为在Android中只能在UI线程中跟新UI,所以在onEvnetMainThread方法中是不能执行耗时操作的。
**onEventBackground:**如果使用onEventBackgrond作为订阅函数,那么如果事件是在UI线程中发布出来的,那么onEventBackground就会在子线程中运行,如果事件本来就是子线程中发布出来的,那么onEventBackground函数直接在该子线程中执行。
**onEventAsync:**使用这个函数作为订阅函数,那么无论事件在哪个线程发布,都会创建新的子线程在执行onEventAsync.
二、实战
1、解析
上面列出的这四个函数,关键问题在于,我们怎么指定调用哪个函数呢?
我们先研究一下,上一篇中是怎么调用的onEventMainThread函数,除了在接收端注册与反注册以后,关键问题在于新建的一个类:
新建一个类:
package com.harvic.other;
public class FirstEvent {
1private String mMsg;
2public FirstEvent(String msg) {
3	// TODO Auto-generated constructor stub
4	mMsg = msg;
5}
6public String getMsg(){
7	return mMsg;
8}
}
发送时:
EventBus.getDefault().post(new FirstEvent("FirstEvent btn clicked"));
接收时:
public void onEventMainThread(FirstEvent event) {
1    ……
2}
发现什么问题了没?
没错,发送时发送的是这个类的实例,接收时参数就是这个类实例。
所以!!!!!!当发过来一个消息的时候,EventBus怎么知道要调哪个函数呢,就看哪个函数传进去的参数是这个类的实例,哪个是就调哪个。那如果有两个是呢,那两个都会被调用!!!!
为了证明这个问题,下面写个例子,先看下效果
2、实例
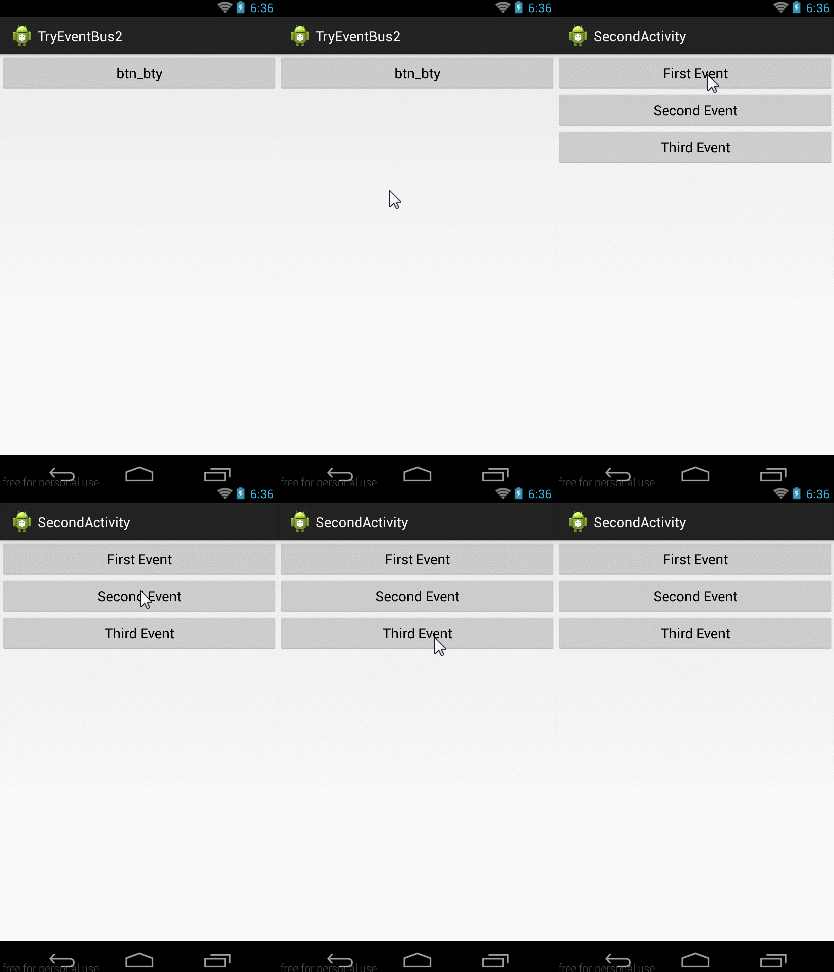
先看看我们要实现的效果:
这次我们在上一篇的基础上,新建三个类:FirstEvent、SecondEvent、ThirdEvent,在第二个Activity中发送请求,在MainActivity中接收这三个类的实例,接收时的代码为:
public void onEventMainThread(FirstEvent event) {
Log.d("harvic", "onEventMainThread收到了消息:" + event.getMsg());
}
public void onEventMainThread(SecondEvent event) {
Log.d("harvic", "onEventMainThread收到了消息:" + event.getMsg());
}
public void onEvent(ThirdEvent event) { Log.d("harvic", "OnEvent收到了消息:" + event.getMsg()); }
使用两个onEventMainThread分别接收FirstEvent实例的消息和SecondEvent实例的消息,使用onEvent接收ThirdEvent实例的消息。界面操作及结果如下:
Log输出结果:

可以看到,在发送FirstEvent时,在MainActiviy中虽然有三个函数,但只有第一个onEventMainThread函数的接收参数是FirstEvent,所以会传到它这来接收。所以这里识别调用EventBus中四个函数中哪个函数,是通过参数中的实例来决定的。
因为我们是在上一篇例子的基础上完成的,所以这里的代码就不详细写了,只写改动的部分。
1、三个类
package com.harvic.other;
public class FirstEvent {
1private String mMsg;
2public FirstEvent(String msg) {
3	// TODO Auto-generated constructor stub
4	mMsg = msg;
5}
6public String getMsg(){
7	return mMsg;
8}
}
package com.harvic.other;
public class SecondEvent{
1private String mMsg;
2public SecondEvent(String msg) {
3	// TODO Auto-generated constructor stub
4	mMsg = "MainEvent:"+msg;
5}
6public String getMsg(){
7	return mMsg;
8}
}
package com.harvic.other;
public class ThirdEvent {
1private String mMsg;
2public ThirdEvent(String msg) {
3	// TODO Auto-generated constructor stub
4	mMsg = msg;
5}
6public String getMsg(){
7	return mMsg;
8}
}
2、发送
然后在SecondActivity中新建三个按钮,分别发送不同的类的实例,代码如下:
package com.harvic.tryeventbus2;
import com.harvic.other.FirstEvent; import com.harvic.other.SecondEvent; import com.harvic.other.ThirdEvent;
import de.greenrobot.event.EventBus; import android.app.Activity; import android.os.Bundle; import android.view.View; import android.widget.Button;
public class SecondActivity extends Activity { private Button btn_FirstEvent, btn_SecondEvent, btn_ThirdEvent;
1@Override
2protected void onCreate(Bundle savedInstanceState) {
3	super.onCreate(savedInstanceState);
4	setContentView(R.layout.activity\_second);
5	btn\_FirstEvent = (Button) findViewById(R.id.btn\_first\_event);
6	btn\_SecondEvent = (Button) findViewById(R.id.btn\_second\_event);
7	btn\_ThirdEvent = (Button) findViewById(R.id.btn\_third\_event);
8
9	btn\_FirstEvent.setOnClickListener(new View.OnClickListener() {
10
11		@Override
12		public void onClick(View v) {
13			// TODO Auto-generated method stub
14			EventBus.getDefault().post(
15					new FirstEvent("FirstEvent btn clicked"));
16		}
17	});
18
19	btn\_SecondEvent.setOnClickListener(new View.OnClickListener() {
20
21		@Override
22		public void onClick(View v) {
23			// TODO Auto-generated method stub
24			EventBus.getDefault().post(
25					new SecondEvent("SecondEvent btn clicked"));
26		}
27	});
28
29	btn\_ThirdEvent.setOnClickListener(new View.OnClickListener() {
30
31		@Override
32		public void onClick(View v) {
33			// TODO Auto-generated method stub
34			EventBus.getDefault().post(
35					new ThirdEvent("ThirdEvent btn clicked"));
36
37		}
38	});
39
40}
}
3、接收
在MainActivity中,除了注册与注册,我们利用onEventMainThread(FirstEvent event)来接收来自FirstEvent的消息,使用onEventMainThread(SecondEvent event)接收来自SecondEvent 实例的消息,使用onEvent(ThirdEvent event) 来接收ThirdEvent 实例的消息。
package com.harvic.tryeventbus2;
import com.harvic.other.FirstEvent; import com.harvic.other.SecondEvent; import com.harvic.other.ThirdEvent;
import de.greenrobot.event.EventBus; import android.app.Activity; import android.content.Intent; import android.os.Bundle; import android.util.Log; import android.view.Menu; import android.view.MenuItem; import android.view.View; import android.widget.Button; import android.widget.TextView;
public class MainActivity extends Activity {
1Button btn;
2TextView tv;
3EventBus eventBus;
4
5@Override
6protected void onCreate(Bundle savedInstanceState) {
7	super.onCreate(savedInstanceState);
8	setContentView(R.layout.activity\_main);
9
10	EventBus.getDefault().register(this);
11
12	btn = (Button) findViewById(R.id.btn\_try);
13
14	btn.setOnClickListener(new View.OnClickListener() {
15
16		@Override
17		public void onClick(View v) {
18			// TODO Auto-generated method stub
19			Intent intent = new Intent(getApplicationContext(),
20					SecondActivity.class);
21			startActivity(intent);
22		}
23	});
24}
25
26public void onEventMainThread(FirstEvent event) {
27
28	Log.d("harvic", "onEventMainThread收到了消息:" + event.getMsg());
29}
30
31public void onEventMainThread(SecondEvent event) {
32
33	Log.d("harvic", "onEventMainThread收到了消息:" + event.getMsg());
34}
35
36public void onEvent(ThirdEvent event) {
37	Log.d("harvic", "OnEvent收到了消息:" + event.getMsg());
38}
39
40@Override
41protected void onDestroy() {
42	// TODO Auto-generated method stub
43	super.onDestroy();
44	EventBus.getDefault().unregister(this);
45}
}
在MainActivity中接收时,我们在接收SecondEvent时,在上面onEventMainThread基础上另加一个onEventBackgroundThread和onEventAsync,即下面的代码:
//SecondEvent接收函数一 public void onEventMainThread(SecondEvent event) {
1	Log.d("harvic", "onEventMainThread收到了消息:" + event.getMsg());
2}
3//SecondEvent接收函数二
4public void onEventBackgroundThread(SecondEvent event){
5	Log.d("harvic", "onEventBackground收到了消息:" + event.getMsg());
6}
7//SecondEvent接收函数三
8public void onEventAsync(SecondEvent event){
9	Log.d("harvic", "onEventAsync收到了消息:" + event.getMsg());
10}
完整的代码在这里:
package com.harvic.tryeventbus2;
import com.harvic.other.FirstEvent; import com.harvic.other.SecondEvent; import com.harvic.other.ThirdEvent;
import de.greenrobot.event.EventBus; import android.app.Activity; import android.content.Intent; import android.os.Bundle; import android.util.Log; import android.view.Menu; import android.view.MenuItem; import android.view.View; import android.widget.Button; import android.widget.TextView;
public class MainActivity extends Activity {
1Button btn;
2TextView tv;
3EventBus eventBus;
4
5@Override
6protected void onCreate(Bundle savedInstanceState) {
7	super.onCreate(savedInstanceState);
8	setContentView(R.layout.activity\_main);
9
10	EventBus.getDefault().register(this);
11
12	btn = (Button) findViewById(R.id.btn\_try);
13
14	btn.setOnClickListener(new View.OnClickListener() {
15
16		@Override
17		public void onClick(View v) {
18			// TODO Auto-generated method stub
19			Intent intent = new Intent(getApplicationContext(),
20					SecondActivity.class);
21			startActivity(intent);
22		}
23	});
24}
25
26public void onEventMainThread(FirstEvent event) {
27
28	Log.d("harvic", "onEventMainThread收到了消息:" + event.getMsg());
29}
30
31//SecondEvent接收函数一
32public void onEventMainThread(SecondEvent event) {
33
34	Log.d("harvic", "onEventMainThread收到了消息:" + event.getMsg());
35}
36//SecondEvent接收函数二
37public void onEventBackgroundThread(SecondEvent event){
38	Log.d("harvic", "onEventBackground收到了消息:" + event.getMsg());
39}
40//SecondEvent接收函数三
41public void onEventAsync(SecondEvent event){
42	Log.d("harvic", "onEventAsync收到了消息:" + event.getMsg());
43}
44
45public void onEvent(ThirdEvent event) {
46	Log.d("harvic", "OnEvent收到了消息:" + event.getMsg());
47}
48
49@Override
50protected void onDestroy() {
51	// TODO Auto-generated method stub
52	super.onDestroy();
53	EventBus.getDefault().unregister(this);
54}
}
经过上面的分析,当发送SecondEvent实例的消息过来的时候,这三个函数会同时接收到并各自执行,所以当点击Second Event这个button的时候,会出现下面的结果:

参考文章:
《Android解耦库EventBus的使用和源码分析》:http://blog.csdn.net/yuanzeyao/article/details/38174537
《EventBus的使用初试》:http://blog.csdn.net/pp_hdsny/article/details/14523561
《EventBusExplained 》:https://code.google.com/p/guava-libraries/wiki/EventBusExplained
项目实例代码: