
Linux系统sersync数据实时同步

Linux系统sersync数据实时同步

Linux系统sersync数据实时同步

前面介绍了以守护进程的方式传输或同步数据rsync软件,linux系统数据同步软件很多,今天来介绍下sersync数据同步软件
一:sersync介绍
sersync其实是利用inotify和rsync两种软件技术来实现数据实时同步功能的,inotify是用于监听sersync所在服务器上的文件变化,结合rsync软件来进行数据同步,将数据实时同步给客户端服务器
二:sersync工作过程
在同步主服务器上开启sersync,负责监听文件系统的变化,然后调用rsync命令把更新的文件同步到目标服务器上,主服务器上安装sersync软件,目标服务器上安装rsync服务
三:整体环境拓扑图
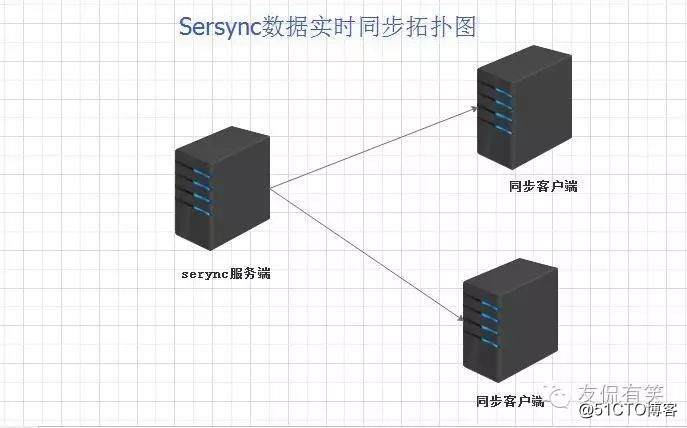
Linux系统sersync数据实时同步
四:客户端安装配置rsync服务
[root@Client ~]# cat /etc/rsyncd.conf
cat: /etc/rsyncd.conf: No such file or directory
如果有此文件,配置前要进行备份,再进行相关配置
[root@Client etc]# vi /etc/rsyncd.conf
##rsync config start
##created by root 2016-08-08 15:00
##rsync.conf config start
uid = rsync
gid = rsync
use chroot = no
max connetctions = 200
timeout = 100
pid file = /var/run/rsyncd.pid
lock file = /var/run/rsync.lock
log file = /var/log/rsyncd.log
[backup]
path = /backup/
ignore errors
read only = false
list = false
hosts allow = 192.168.1.0/24
hosts deny = 0.0.0.0/32
auth users = rsync_backup
secrets file = /etc/rsync.password
##rsync config end
"rsyncd.conf" [New] 21L, 458C written
添加用户
[root@Client ~]# useradd rsync -s /sbin/nologin -M
改变目录权限
[root@Client ~]# chown -R rsync.rsync /backup
配置密码文件
[root@Client ~]# echo "rsync_backup:rsync.conf">>/etc/rsync.password
[root@Client ~]# cat /etc/rsync.password
rsync_backup:rsync.conf
改变密码文件权限
[root@Client ~]# chmod 600 /etc/rsync.password
[root@Client ~]# ls -ld /etc/rsync.password
-rw-------. 1 root root 24 Sep 9 13:06 /etc/rsync.password
格式化文件
[root@Client ~]# dos2unix /etc/rsyncd.conf
dos2unix: converting file /etc/rsyncd.conf to UNIX format ...
开启服务后台运行
[root@Client ~]# rsync --daemon
[root@Client ~]# netstat -lntup|grep rsync
tcp 0 0 0.0.0.0:873 0.0.0.0: _LISTEN 2002/rsync
tcp 0 0 :::873 :::_LISTEN 2002/rsync
五:主服务器上配置密码文件
[root@Master ~]# echo "rsync.conf">>/etc/rsync.password
[root@Master ~]# cat /etc/rsync.password
rsync.conf
[root@Master ~]# chmod 600 /etc/rsync.password
[root@Master ~]# ls -ld /etc/rsync.password
-rw-------. 1 root root 11 Sep 8 06:25 /etc/rsync.password
六:测试手工同步
[root@Master /]# rsync -avzP /etc/hosts rsync_backup@192.168.1.3::rsync --password-file=/etc/rsync.password
sending incremental file list
hosts
158 100% 0.00kB/s 0:00:00 (xfer#1, to-check=0/1)
sent 120 bytes received 27 bytes 26.73 bytes/sec
total size is 158 speedup is 1.07
[root@Master /]# cat /etc/hosts
127.0.0.1 localhost localhost.localdomain localhost4 localhost4.localdomain4
::1 localhost localhost.localdomain localhost6 localhost6.localdomain6
[root@Client ~]# cat /backup/hosts
127.0.0.1 localhost localhost.localdomain localhost4 localhost4.localdomain4
::1 localhost localhost.localdomain localhost6 localhost6.localdomain6
经过对比两边数据一致,表明同步成功,手工同步成功之后,然后再进行后面的配置
七:安装sersync服务
首先下载好安装软件
sersync_64bit_binary_stable_final.tar.gz
[root@Master tools]# tar -zxvf sersync_64bit_binary_stable_final.tar.gz -C
/usr/local/
GNU-Linux-x86/
GNU-Linux-x86/sersync2
GNU-Linux-x86/confxml.xml
[root@Master tools]# cd /usr/local/
[root@Master local]# ls
bin games include lib64 sbin src
etc GNU-Linux-x86 lib libexec share
GNU-Linux-x86就是sersync安装软件,为了方便将它改名
[root@Master local]# mv GNU-Linux-x86 sersync
为了后续方便管理,创建几个目录用于存放各类文件
[root@Master sersync]# mkdir -p conf bin logs
[root@Master sersync]# mv confxml.xml conf
[root@Master sersync]# ls
bin conf logs sersync2
[root@Master sersync]# cd conf
[root@Master conf]# ls
confxml.xml
在配置配置文件之前备份
[root@Master conf]# cp confxml.xml confxml.xml.$(date +%F)
[root@Master conf]# ls
confxml.xml confxml.xml.2016-09-08
修改配置文件内容(confxml.xml)
1、修改24-28行
<localpath watch="/opt/tongbu">
<remote ip="127.0.0.1" name="tongbu1"/>

<!--<remote ip="192.168.8.39" name="tongbu"/>-->注释内容 <!--<remote ip="192.168.8.40" name="tongbu"/>-->注释内容 </localpath> 修改后的内容为 <localpath watch="/opt/backup"> 本地数据的路径 <remote ip="192.168.1.3" name="rsync"/>远端IP与模块名称 </localpath> <!#################################### -->注释内容 2、修改31-34行内容——认证 <commonParams params="-artuz"/> <auth start="false" users="root" passwordfile="/etc/rsync.pas"/> <userDefinedPort start="false" port="874"/><!-- port=874 --> <timeout start="false" time="100"/><!-- timeout=100 --> <ssh start="false"/> 修改后的内容为 <commonParams params="-aruz"/> <auth start="true" users="rsync\_backup" passwordfile="/etc/rsync.password"/> <userDefinedPort start="false" port="874"/><!-- port=874 --> <timeout start="true" time="100"/><!-- timeout=100 --> <ssh start="false"/> 3、修改36-37行 <failLog path="/tmp/rsync\_fail\_log.sh" timeToExecute="60"/><!--default every 60mins execute once--> 修改成我们刚刚创建好的logs目录 <failLog path="/usr/local/sersync/logs/rsync\_fail\_log.sh" timeToExecut e="60"/><!--default every 60mins execute once--> 修改完成后最终的配置文件如下 \[root@Master conf\]# cat /usr/local/sersync/conf/confxml.xml <?xml version="1.0" encoding="ISO-8859-1"?> <head version="2.5"> <host hostip="localhost" port="8008"></host> <debug start="false"/> <fileSystem xfs="false"/> <filter start="false"> <exclude expression="(._).svn"></exclude> <exclude expression="(. _).gz"></exclude> <exclude expression="^info/_"></exclude> <exclude expression="^static/ _"></exclude> </filter> <inotify> <delete start="true"/> <createFolder start="true"/> <createFile start="false"/> <closeWrite start="true"/> <moveFrom start="true"/> <moveTo start="true"/> <attrib start="false"/> <modify start="false"/> </inotify> <sersync> <localpath watch="/opt/backup"> <remote ip="192.168.1.3" name="rsync"/> </localpath> <!#################################### --> <rsync> <commonParams params="-aruz"/> <auth start="true" users="rsync\_backup" passwordfile="/etc/rsync.password"/> <userDefinedPort start="false" port="874"/><!-- port=874 --> <timeout start="true" time="100"/><!-- timeout=100 --> <ssh start="false"/> </rsync> <failLog path="/usr/local/sersync/logs/rsync\_fail\_log.sh" timeToExecute="60"/><!--default every 60mins execute once--> <crontab start="false" schedule="600"><!--600mins--> <crontabfilter start="false"> <exclude expression="_.php"></exclude> <exclude expression="info/ _"></exclude> </crontabfilter> </crontab> <plugin start="false" name="command"/> </sersync> <plugin name="command"> <param prefix="/bin/sh" suffix="" ignoreError="true"/> <!--prefix /opt/tongbu/mmm.sh suffix--> <filter start="false"> <include expression="(._).php"/> <include expression="(. _).sh"/> </filter> </plugin> <plugin name="socket"> <localpath watch="/opt/tongbu"> <deshost ip="192.168.138.20" port="8009"/> </localpath> </plugin> <plugin name="refreshCDN"> <localpath watch="/data0/htdocs/cms.xoyo.com/site/"> <cdninfo domainname="ccms.chinacache.com" port="80" username="xxxx" passwd="xxxx"/> <sendurl base="[http://pic.xoyo.com/cms"/>](https://www.oschina.net/action/GoToLink?url=http%3A%2F%2Fpic.xoyo.com%2Fcms); <regexurl regex="false" match="cms.xoyo.com/site(\[/a-zA-Z0-9\]\*).xoyo.com/images"/> </localpath> </plugin> </head> 八:开启sersync守护进程 首先配置全局环境变量,使得后同可以直接调用sersync命令 \[root@Master conf\]# echo 'export PATH=$PATH:/usr/local/sersync/bin'>>/etc/profile \[root@Master conf\]# tail -1 /etc/profile export PATH=$PATH:/usr/local/sersync/bin \[root@Master conf\]# source /etc/profile \[root@Master conf\]# which sersync /usr/local/sersync/bin/sersync 启动sersync服务 serync -r -d -o /usr/local/sersync/conf/confxml.xml \-r初始化数据 \-d后台启动 \-o指定路径 如果需要将命令开启动,只需将命令去掉参数-r定入/etc/rc.local 启动后结果如下 \[root@Master backup\]# sersync -r -d -o /usr/local/sersync/conf/confxml.xml set the system param execute:echo 50000000 > /proc/sys/fs/inotify/max\_user\_watches execute:echo 327679 > /proc/sys/fs/inotify/max\_queued\_events parse the command param option: -r rsync all the local files to the remote servers before the sersync work option: -d run as a daemon option: -o config xml name: /usr/local/sersync/conf/confxml.xml daemon thread num: 10 parse xml config file host ip : localhost host port: 8008 daemon start,sersync run behind the console use rsync password-file : user is rsync\_backup passwordfile is /etc/rsync.password config xml parse success please set /etc/rsyncd.conf max connections=0 Manually sersync working thread 12 = 1(primary thread) + 1(fail retry thread) + 10(daemon sub threads) Max threads numbers is: 22 = 12(Thread pool nums) + 10(Sub threads) please according your cpu ,use -n param to adjust the cpu rate

rsync the directory recursivly to the remote servers once
working please wait...
execute command: cd /opt/backup && rsync -aruz -R --delete ./ --timeout=100 rsync_backup@192.168.1.3::rsync --password-file=/etc/rsync.password >/dev/null 2>&1
run the sersync:
watch path is: /opt/backup
九:测试数据同步
[root@Master sersync]# cd /opt/backup/
[root@Master backup]# ls
[root@Master backup]# ls -ll
total 0
[root@Master backup]# touch 123
[root@Master backup]# touch 1234
[root@Master backup]# touch 1235
[root@Master backup]# touch 12333
[root@Master backup]# ls -ll
total 0
-rw-r--r--. 1 root root 0 Sep 8 09:26 123
-rw-r--r--. 1 root root 0 Sep 8 09:26 12333
-rw-r--r--. 1 root root 0 Sep 8 09:26 1234
-rw-r--r--. 1 root root 0 Sep 8 09:26 1235
目标服务器查看同步情况
[root@Client backup]# ls -ll
total 0
-rw-r--r--. 1 rsync rsync 0 Sep 8 04:26 123
-rw-r--r--. 1 rsync rsync 0 Sep 8 04:26 12333
-rw-r--r--. 1 rsync rsync 0 Sep 8 04:26 1234
-rw-r--r--. 1 rsync rsync 0 Sep 8 04:26 1235
测试结果表明数据同步正常,能够实时同步

Linux系统sersync数据实时同步

长按关注公众号——友侃有笑

点赞
收藏

评论区

加载中...

相关推荐

MySQL:[Err] 1292 - Incorrect datetime value: ‘0000-00-00 00:00:00‘ for column ‘CREATE_TIME‘ at row 1

文章目录问题用navicat导入数据时,报错:原因这是因为当前的MySQL不支持datetime为0的情况。解决修改sql\mode:sql\mode:SQLMode定义了MySQL应支持的SQL语法、数据校验等,这样可以更容易地在不同的环境中使用MySQL。全局s

Oracle 分组与拼接字符串同时使用

SELECTT.,ROWNUMIDFROM(SELECTT.EMPLID,T.NAME,T.BU,T.REALDEPART,T.FORMATDATE,SUM(T.S0)S0,MAX(UPDATETIME)CREATETIME,LISTAGG(TOCHAR(

MySQL部分从库上面因为大量的临时表tmp_table造成慢查询

背景描述Time:20190124T00:08:14.70572408:00User@Host:@Id:Schema:sentrymetaLast_errno:0Killed:0Query_time:0.315758Lock_

皕杰报表之UUID

​在我们用皕杰报表工具设计填报报表时,如何在新增行里自动增加id呢?能新增整数排序id吗?目前可以在新增行里自动增加id,但只能用uuid函数增加UUID编码,不能新增整数排序id。uuid函数说明:获取一个UUID,可以在填报表中用来创建数据ID语法:uuid()或uuid(sep)参数说明:sep布尔值,生成的uuid中是否包含分隔符'',缺省为

手写Java HashMap源码

HashMap的使用教程HashMap的使用教程HashMap的使用教程HashMap的使用教程HashMap的使用教程22

2020年前端实用代码段,为你的工作保驾护航

有空的时候,自己总结了几个代码段,在开发中也经常使用,谢谢。1、使用解构获取json数据let jsonData  id: 1,status: "OK",data: 'a', 'b';let  id, status, data: number   jsonData;console.log(id, status, number )