
1. 从注解入手找到对应核心类
最近工作中我都是基于注解实现AOP功能,常用的开启AOP的注解是@EnableAspectJAutoProxy,我们就从它入手。
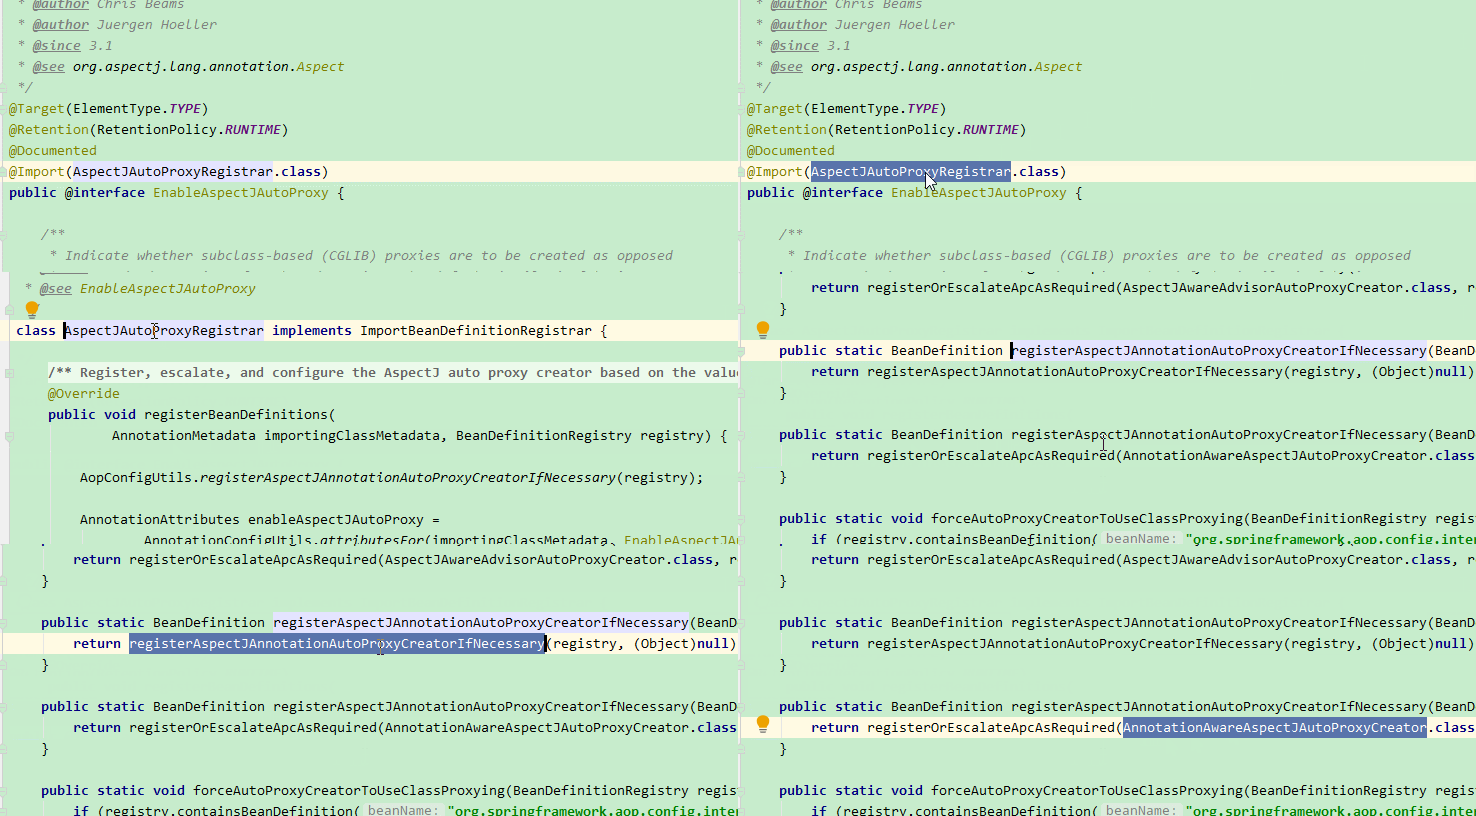
上面的动图的流程的步骤就是:
@EnableAspectJAutoProxy
--> AspectJAutoProxyRegistrar
-->AopConfigUtils .registerAspectJAnnotationAutoProxyCreatorIfNecessary
-->AnnotationAwareAspectJAutoProxyCreator.class
AnnotationAwareAspectJAutoProxyCreator查看其中文注释(如下),确定它就是AOP的核心类!--温安适 20191020
1/**
21.AspectJAwareAdvisorAutoProxyCreator的子类
3,用于处理当前应用上下文中的注解切面
42.任何被AspectJ注解的类将自动被识别。
53.若SpringAOP代理模式可以识别,优先使用Spring代理模式。
64.它覆盖了方法执行连接点
75.如果使用<aop:include>元素,
8  则只有名称与include模式匹配的@aspectj bean才被视为切面
9  ,并由spring自动代理。
106. Spring Advisors的处理请查阅,
11org.springframework.aop
12.framework.autoproxy.AbstractAdvisorAutoProxyCreator
13 */
14@SuppressWarnings("serial")
15public class AnnotationAwareAspectJAutoProxyCreator
16extends AspectJAwareAdvisorAutoProxyCreator {
17    //...省略实现
18    }注解切面
虽然找到了核心类,但是并没有找到核心方法!下面我们尝试画类图确定核心方法。
2.画核心类类图,猜测核心方法
AnnotationAwareAspectJAutoProxyCreator的部分类图。
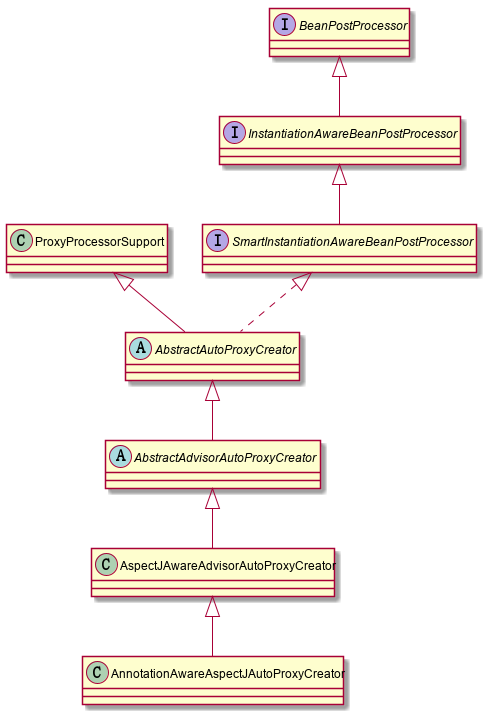
从类图看到了AnnotationAwareAspectJAutoProxyCreator实现了BeanPostProcessor,而AOP功能应该在创建完Bean之后执行,猜测AnnotationAwareAspectJAutoProxyCreator实现BeanPostProcessor的postProcessAfterInitialization(实例化bean后处理)是核心方法。 查看AnnotationAwareAspectJAutoProxyCreator实现的postProcessAfterInitialization方法,实际该方法在其父类AbstractAutoProxyCreator中。
1//AbstractAutoProxyCreator中的postProcessAfterInitialization实现
2@Override
3public Object postProcessAfterInitialization(Object bean, String beanName)
4 throws BeansException {
5   if (bean != null) {
6      Object cacheKey = getCacheKey(bean.getClass(), beanName);
7      if (!this.earlyProxyReferences.contains(cacheKey)) {
8         return wrapIfNecessary(bean, beanName, cacheKey);
9      }
10   }
11   return bean;
12}
发现发现疑似方法wrapIfNecessary,查看其源码如下,发现createProxy方法。确定找对了地方。
1protected Object wrapIfNecessary
2        (Object bean, String beanName, Object cacheKey) {
3   if (beanName != null && this.targetSourcedBeans.contains(beanName)) {
4      return bean;
5   }
6   if (Boolean.FALSE.equals(this.advisedBeans.get(cacheKey))) {
7      return bean;
8   }
9   if (isInfrastructureClass(bean.getClass())
10                   || shouldSkip(bean.getClass(), beanName)) {
11      this.advisedBeans.put(cacheKey, Boolean.FALSE);
12      return bean;
13   }
14
15   // 创建代理
16   Object[] specificInterceptors =
17       getAdvicesAndAdvisorsForBean(bean.getClass(), beanName, null);
18   if (specificInterceptors != DO_NOT_PROXY) {
19      this.advisedBeans.put(cacheKey, Boolean.TRUE);
20      Object proxy = createProxy(
21            bean.getClass(), beanName,
22            specificInterceptors, new SingletonTargetSource(bean));
23      this.proxyTypes.put(cacheKey, proxy.getClass());
24      return proxy;
25   }
26
27   this.advisedBeans.put(cacheKey, Boolean.FALSE);
28   return bean;
29}
即AnnotationAwareAspectJAutoProxyCreator实现BeanPostProcessor的postProcessAfterInitialization方法,在该方法中由wrapIfNecessary实现了AOP的功能。 wrapIfNecessary中有2个和核心方法
- getAdvicesAndAdvisorsForBean获取当前bean匹配的增强器
- createProxy为当前bean创建代理
要想明白核心流程还需要分析这2个方法。
3.读重点方法,理核心流程
3.1 getAdvicesAndAdvisorsForBean获取当前bean匹配的增强器
查看源码如下,默认实现在AbstractAdvisorAutoProxyCreator中。
1@Override
2@Nullable
3protected Object[] getAdvicesAndAdvisorsForBean(
4      Class<?> beanClass, String beanName,
5      @Nullable TargetSource targetSource) {
6   List<Advisor> advisors = findEligibleAdvisors(beanClass, beanName);
7   if (advisors.isEmpty()) {
8      return DO_NOT_PROXY;
9   }
10   return advisors.toArray();
11}
查阅findEligibleAdvisors方法,就干了3件事
-
找所有增强器,也就是所有@Aspect注解的Bean
-
找匹配的增强器,也就是根据@Before,@After等注解上的表达式,与当前bean进行匹配,暴露匹配上的。
-
对匹配的增强器进行扩展和排序,就是按照@Order或者PriorityOrdered的getOrder的数据值进行排序,越小的越靠前。
protected List<Advisor> findEligibleAdvisors(Class<?> beanClass, String beanName) { //找所有增强器 List<Advisor> candidateAdvisors = findCandidateAdvisors(); //找所有匹配的增强器 List<Advisor> eligibleAdvisors = findAdvisorsThatCanApply(candidateAdvisors, beanClass, beanName); extendAdvisors(eligibleAdvisors); if (!eligibleAdvisors.isEmpty()) { //排序 eligibleAdvisors = sortAdvisors(eligibleAdvisors); } return eligibleAdvisors; }
AnnotationAwareAspectJAutoProxyCreator 重写了findCandidateAdvisors,下面我们看看具体实现了什么
3.1.1findCandidateAdvisors找所有增强器,也就是所有@Aspect注解的Bean
1@Override
2protected List<Advisor> findCandidateAdvisors() {
3   // Add all the Spring advisors found according to superclass rules.
4   List<Advisor> advisors = super.findCandidateAdvisors();
5   // Build Advisors for all AspectJ aspects in the bean factory.
6   if (this.aspectJAdvisorsBuilder != null) {
7      //@Aspect注解的类在这里除了
8      advisors.addAll(this.aspectJAdvisorsBuilder.buildAspectJAdvisors());
9   }
10   return advisors;
11}
从该方法我们可以看到处理@Aspect注解的bean的方法是:this.aspectJAdvisorsBuilder.buildAspectJAdvisors()。 这个方法如下:
1public List<Advisor> buildAspectJAdvisors() {
2   List<String> aspectNames = this.aspectBeanNames;
3
4   if (aspectNames == null) {
5      synchronized (this) {
6         aspectNames = this.aspectBeanNames;
7         if (aspectNames == null) {
8            List<Advisor> advisors = new ArrayList<>();
9            aspectNames = new ArrayList<>();
10            //找到所有BeanName
11            String[] beanNames = BeanFactoryUtils.beanNamesForTypeIncludingAncestors(
12                  this.beanFactory, Object.class, true, false);
13            for (String beanName : beanNames) {
14               if (!isEligibleBean(beanName)) {
15                  continue;
16               }
17               // 必须注意,bean会提前暴露,并被Spring容器缓存,但是这时还不能织入。
18               Class<?> beanType = this.beanFactory.getType(beanName);
19               if (beanType == null) {
20                  continue;
21               }
22               if (this.advisorFactory.isAspect(beanType)) {
23                  //找到所有被@Aspect注解的类
24                  aspectNames.add(beanName);
25                  AspectMetadata amd = new AspectMetadata(beanType, beanName);
26                  if (amd.getAjType().getPerClause().getKind() == PerClauseKind.SINGLETON) {
27                     MetadataAwareAspectInstanceFactory factory =
28                           new BeanFactoryAspectInstanceFactory(this.beanFactory, beanName);
29                     //解析封装为Advisor返回
30                     List<Advisor> classAdvisors = this.advisorFactory.getAdvisors(factory);
31                     if (this.beanFactory.isSingleton(beanName)) {
32                        this.advisorsCache.put(beanName, classAdvisors);
33                     }
34                     else {
35                        this.aspectFactoryCache.put(beanName, factory);
36                     }
37                     advisors.addAll(classAdvisors);
38                  }
39                  else {
40                     // Per target or per this.
41                     if (this.beanFactory.isSingleton(beanName)) {
42                        throw new IllegalArgumentException("Bean with name '" + beanName +
43                              "' is a singleton, but aspect instantiation model is not singleton");
44                     }
45                     MetadataAwareAspectInstanceFactory factory =
46                           new PrototypeAspectInstanceFactory(this.beanFactory, beanName);
47                     this.aspectFactoryCache.put(beanName, factory);
48                     advisors.addAll(this.advisorFactory.getAdvisors(factory));
49                  }
50               }
51            }
52            this.aspectBeanNames = aspectNames;
53            return advisors;
54         }
55      }
56   }
57
58   if (aspectNames.isEmpty()) {
59      return Collections.emptyList();
60   }
61   List<Advisor> advisors = new ArrayList<>();
62   for (String aspectName : aspectNames) {
63      List<Advisor> cachedAdvisors = this.advisorsCache.get(aspectName);
64      if (cachedAdvisors != null) {
65         advisors.addAll(cachedAdvisors);
66      }
67      else {
68         MetadataAwareAspectInstanceFactory factory = this.aspectFactoryCache.get(aspectName);
69         advisors.addAll(this.advisorFactory.getAdvisors(factory));
70      }
71   }
72   return advisors;
73}
这个方法可以概括为:
- 找到所有BeanName
- 根据BeanName筛选出被@Aspect注解的类
- 针对类中被Around.class, Before.class, After.class, AfterReturning.class, AfterThrowing.class注解的方法,先按上边的注解顺序排序后按方法名称排序,每一个方法对应一个Advisor。
3.2 createProxy为当前bean创建代理。
3.2.1 创建代理的2种方式
众所周知,创建代理的常用的2种方式是:JDK创建和CGLIB,下面我们就看看这2中创建代理的例子。
3.2.1 .1 jdk创建代理的例子
1import java.lang.reflect.InvocationHandler;
2import java.lang.reflect.Method;
3import java.lang.reflect.Proxy;
4
5public class JDKProxyMain {
6
7    public static void main(String[] args) {
8        JDKProxyTestInterface target = new JDKProxyTestInterfaceImpl();
9        // 根据目标对象创建代理对象
10        JDKProxyTestInterface proxy =
11         (JDKProxyTestInterface) Proxy
12         .newProxyInstance(target.getClass().getClassLoader(),
13                target.getClass().getInterfaces(),
14                new JDKProxyTestInvocationHandler(target));
15        // 调用代理对象方法
16        proxy.testProxy();
17    }
18
19    interface JDKProxyTestInterface {
20        void testProxy();
21    }
22    static class JDKProxyTestInterfaceImpl
23                    implements JDKProxyTestInterface {
24        @Override
25        public void testProxy() {
26            System.out.println("testProxy");
27        }
28    }
29   static class JDKProxyTestInvocationHandler
30                           implements InvocationHandler {
31        private  Object target;
32        public JDKProxyTestInvocationHandler(Object target){
33            this.target=target;
34        }
35        @Override
36        public Object invoke(Object proxy, Method method,
37                             Object[] args) throws Throwable {
38            System.out.println("执行前");
39            Object result=  method.invoke(this.target,args);
40            System.out.println("执行后");
41            return result;
42        }
43    }
3.2.1 .2 cglib创建代理的例子
1import org.springframework.cglib.proxy.Enhancer;
2import org.springframework.cglib.proxy.MethodInterceptor;
3import org.springframework.cglib.proxy.MethodProxy;
4import java.lang.reflect.Method;
5public class CglibProxyTest {
6
7   static class CglibProxyService {
8        public  CglibProxyService(){
9        }
10        void sayHello(){
11            System.out.println(" hello !");
12        }
13    }
14
15    static class CglibProxyInterceptor implements MethodInterceptor{
16        @Override
17        public Object intercept(Object sub, Method method,
18             Object[] objects, MethodProxy methodProxy)
19                                          throws Throwable {
20            System.out.println("before hello");
21            Object object = methodProxy.invokeSuper(sub, objects);
22            System.out.println("after hello");
23            return object;
24        }
25    }
26
27    public static void main(String[] args) {
28        // 通过CGLIB动态代理获取代理对象的过程
29        Enhancer enhancer = new Enhancer();
30        // 设置enhancer对象的父类
31        enhancer.setSuperclass(CglibProxyService.class);
32        // 设置enhancer的回调对象
33        enhancer.setCallback(new CglibProxyInterceptor());
34        // 创建代理对象
35        CglibProxyService proxy= (CglibProxyService)enhancer.create();
36        System.out.println(CglibProxyService.class);
37        System.out.println(proxy.getClass());
38        // 通过代理对象调用目标方法
39        proxy.sayHello();
40    }
41}
3.2.1 .3 jdk创建代理与cglib创建代理的区别
类型
jdk创建动态代理
cglib创建动态代理
原理
java动态代理是利用反射机制生成一个实现代理接口的匿名类,在调用具体方法前调用InvokeHandler来处理
cglib动态代理是利用asm开源包,对代理对象类的class文件加载进来,通过修改其字节码生成子类来处理
核心类
Proxy 创建代理利用反射机制生成一个实现代理接口的匿名类InvocationHandler 方法拦截器接口,需要实现invoke方法
net.sf.cglib.proxy.Enhancer:主要增强类,通过字节码技术动态创建委托类的子类实例net.sf.cglib.proxy.MethodInterceptor:方法拦截器接口,需要实现intercept方法
局限性
只能代理实现了接口的类
不能对final修饰的类进行代理,也不能处理final修饰的方法
3.2.2 Spring如何选择的使用哪种方式
Spring的选择选择如何代理时在DefaultAopProxyFactory 中。
1public class DefaultAopProxyFactory implements AopProxyFactory,
2                                                        Serializable {
3   @Override
4   public AopProxy createAopProxy(AdvisedSupport config)
5                                   throws AopConfigException {
6      if (config.isOptimize()
7          || config.isProxyTargetClass()
8          || hasNoUserSuppliedProxyInterfaces(config)) {
9         Class<?> targetClass = config.getTargetClass();
10         if (targetClass == null) {
11            throw new AopConfigException(
12            "TargetSource cannot determine target class: "
13            +"Either an interface or a target "+
14           " is required for proxy creation.");
15         }
16         if (targetClass.isInterface()
17                 || Proxy.isProxyClass(targetClass)) {
18            return new JdkDynamicAopProxy(config);
19         }
20         return new ObjenesisCglibAopProxy(config);
21      }
22      else {
23         return new JdkDynamicAopProxy(config);
24      }
25   }
26   //...
27   }
- config.isOptimize() 查看源码注释时发现,这个是配置使用cglib代理时,是否使用积极策略。这个值一般不建议使用!
- config.isProxyTargetClass() 就是@EnableAspectJAutoProxy中的proxyTargetClass属性。
//exposeProxy=true AopContext 可以访问,proxyTargetClass=true CGLIB生成代理 @EnableAspectJAutoProxy(exposeProxy=true,proxyTargetClass=true)
- hasNoUserSuppliedProxyInterfaces 是否存在可代理的接口
总结下Spring如何选择创建代理的方式:
- 如果设置了proxyTargetClass=true,一定是CGLIB代理
- 如果proxyTargetClass=false,目标对象实现了接口,走JDK代理
- 如果没有实现接口,走CGLIB代理
4.总结
Spring如何实现AOP?,您可以这样说:
- AnnotationAwareAspectJAutoProxyCreator是AOP核心处理类
- AnnotationAwareAspectJAutoProxyCreator实现了BeanProcessor,其中postProcessAfterInitialization是核心方法。
- 核心实现分为2步
getAdvicesAndAdvisorsForBean获取当前bean匹配的增强器 createProxy为当前bean创建代理 - getAdvicesAndAdvisorsForBean核心逻辑如下
a. 找所有增强器,也就是所有@Aspect注解的Bean
b. 找匹配的增强器,也就是根据@Before,@After等注解上的表达式,与当前bean进行匹配,暴露匹配上的。
c. 对匹配的增强器进行扩展和排序,就是按照@Order或者PriorityOrdered的getOrder的数据值进行排序,越小的越靠前。 - createProxy有2种创建方法,JDK代理或CGLIB
a. 如果设置了proxyTargetClass=true,一定是CGLIB代理
b. 如果proxyTargetClass=false,目标对象实现了接口,走JDK代理
c. 如果没有实现接口,走CGLIB代理