
1. Cobbler介绍
Cobbler是一个Linux服务器安装的服务,可以通过网络启动(PXE)的方式来快速安装、重装物理服务器和虚拟机,同时还可以管理DHCP,DNS等。
Cobbler可以使用命令行方式管理,也提供了基于Web的界面管理工具(cobbler-web),还提供了API接口,可以方便二次开发使用。
Cobbler是较早前的kickstart的升级版,优点是比较容易配置,还自带web界面比较易于管理。
Cobbler内置了一个轻量级配置管理系统,但它也支持和其它配置管理系统集成,如Puppet,暂时不支持SaltStack。
Cobbler集成的服务:
PXE服务支持
DHCP服务管理
DNS服务管理(可选bind,dnsmasq)
电源管理
Kickstart服务支持
YUM仓库管理
TFTP(PXE启动时需要)
Apache(提供kickstart的安装源,并提供定制化的kickstart配置)
2、系统环境准备
1[root@linux-node2 ~]# cat /etc/redhat-release
2CentOS Linux release 7.4.1708 (Core)
3[root@linux-node2 ~]# uname -r
43.10.0-693.5.2.el7.x86_64
5[root@linux-node2 ~]#  getenforce
6Disabled
7[root@linux-node2 ~]# systemctl status firewalld
8Unit firewalld.service could not be found.
9[root@linux-node2 ~]# ifconfig eth0|awk -F "[ :]+" 'NR==2 {print $3}'
10192.168.56.12
11[root@linux-node2 ~]# hostname
12linux-node2
13#配置阿里云epel源
14[root@linux-node2 ~]# wget -O /etc/yum.repos.d/epel.repo http://mirrors.aliyun.com/repo/epel-7.repo
3、Cobbler安装配置
3.1、Cobbler安装
1[root@linux-node2 ~]# yum install -y httpd tftp dhcp cobbler cobbler-web pykickstart
2[root@linux-node2 ~]# rpm -ql cobbler
3/etc/cobbler                  # 配置文件目录
4/etc/cobbler/settings         # cobbler主配置文件,这个文件是YAML格式,Cobbler是python写的程序。
5/etc/cobbler/dhcp.template    # DHCP服务的配置模板
6/etc/cobbler/tftpd.template   # tftp服务的配置模板
7/etc/cobbler/rsync.template   # rsync服务的配置模板
8/etc/cobbler/iso              # iso模板配置文件目录
9/etc/cobbler/pxe              # pxe模板文件目录
10/etc/cobbler/power            # 电源的配置文件目录
11/etc/cobbler/users.conf       # Web服务授权配置文件
12/etc/cobbler/users.digest     # 用于web访问的用户名密码配置文件
13/etc/cobbler/dnsmasq.template # DNS服务的配置模板
14/etc/cobbler/modules.conf     # Cobbler模块配置文件
15/var/lib/cobbler              # Cobbler数据目录
16/var/lib/cobbler/config       # 配置文件
17/var/lib/cobbler/kickstarts   # 默认存放kickstart文件
18/var/lib/cobbler/loaders      # 存放的各种引导程序
19/var/www/cobbler              # 系统安装镜像目录
20/var/www/cobbler/ks_mirror    # 导入的系统镜像列表
21/var/www/cobbler/images       # 导入的系统镜像启动文件
22/var/www/cobbler/repo_mirror  # yum源存储目录
23/var/log/cobbler              # 日志目录
24/var/log/cobbler/install.log  # 客户端系统安装日志
25/var/log/cobbler/cobbler.log  # cobbler日志
3.2 、cobbler配置
1[root@linux-node2 ~]# systemctl start httpd
2[root@linux-node2 ~]# systemctl start cobblerd
3[root@linux-node2 ~]# cobbler check      #通过该命令可以查看cobbler的服务是否正常,需要解决哪些问题
4The following are potential configuration items that you may want to fix:
5
61 : The 'server' field in /etc/cobbler/settings must be set to something other than localhost, or kickstarting features will not work.  This should be a resolvable hostname or IP for the boot server as reachable by all machines that will use it.
72 : For PXE to be functional, the 'next_server' field in /etc/cobbler/settings must be set to something other than 127.0.0.1, and should match the IP of the boot server on the PXE network.
83 : change 'disable' to 'no' in /etc/xinetd.d/tftp
94 : Some network boot-loaders are missing from /var/lib/cobbler/loaders, you may run 'cobbler get-loaders' to download them, or, if you only want to handle x86/x86_64 netbooting, you may ensure that you have installed a *recent* version of the syslinux package installed and can ignore this message entirely.  Files in this directory, should you want to support all architectures, should include pxelinux.0, menu.c32, elilo.efi, and yaboot. The 'cobbler get-loaders' command is the easiest way to resolve these requirements.
105 : enable and start rsyncd.service with systemctl
116 : debmirror package is not installed, it will be required to manage debian deployments and repositories
127 : The default password used by the sample templates for newly installed machines (default_password_crypted in /etc/cobbler/settings) is still set to 'cobbler' and should be changed, try: "openssl passwd -1 -salt 'random-phrase-here' 'your-password-here'" to generate new one
138 : fencing tools were not found, and are required to use the (optional) power management features. install cman or fence-agents to use them
14
15Restart cobblerd and then run 'cobbler sync' to apply changes.
16# 看着上面的结果,一个一个解决。
17#1.2问题server,Cobbler服务器的IP。
18[root@linux-node2 ~]# vim /etc/cobbler/settings
19384 server: 192.168.56.12
20272 next_server: 192.168.56.12
21#3问题解决启用tftp
22[root@linux-node2 ~]# yum install -y xinetd
23[root@linux-node2 ~]# vim /etc/xinetd.d/tftp
24disable                 = no
25[root@linux-node2 ~]# systemctl start xinetd
26#4问题解决bootload的插件安装,会自动从官网下载
27[root@linux-node2 ~]# cobbler get-loaders
28task started: 2018-01-11_155827_get_loaders
29task started (id=Download Bootloader Content, time=Thu Jan 11 15:58:27 2018)
30downloading https://cobbler.github.io/loaders/README to /var/lib/cobbler/loaders/README
31downloading https://cobbler.github.io/loaders/COPYING.elilo to /var/lib/cobbler/loaders/COPYING.elilo
32downloading https://cobbler.github.io/loaders/COPYING.yaboot to /var/lib/cobbler/loaders/COPYING.yaboot
33downloading https://cobbler.github.io/loaders/COPYING.syslinux to /var/lib/cobbler/loaders/COPYING.syslinux
34downloading https://cobbler.github.io/loaders/elilo-3.8-ia64.efi to /var/lib/cobbler/loaders/elilo-ia64.efi
35downloading https://cobbler.github.io/loaders/yaboot-1.3.17 to /var/lib/cobbler/loaders/yaboot
36downloading https://cobbler.github.io/loaders/pxelinux.0-3.86 to /var/lib/cobbler/loaders/pxelinux.0
37downloading https://cobbler.github.io/loaders/menu.c32-3.86 to /var/lib/cobbler/loaders/menu.c32
38downloading https://cobbler.github.io/loaders/grub-0.97-x86.efi to /var/lib/cobbler/loaders/grub-x86.efi
39downloading https://cobbler.github.io/loaders/grub-0.97-x86_64.efi to /var/lib/cobbler/loaders/grub-x86_64.efi
40*** TASK COMPLETE ***
41#5问题解决rsyncd服务依赖
42[root@linux-node2 ~]# systemctl enable rsyncd.service
43Created symlink from /etc/systemd/system/multi-user.target.wants/rsyncd.service to /usr/lib/systemd/system/rsyncd.service.
44[root@linux-node2 ~]# systemctl start  rsyncd.service
45#7问题解决设置新装系统的默认root密码123123。下面的命令来源于提示7。random-phrase-here为干扰码,可以自行设定。
46[root@linux-node2 ~]# openssl passwd -1 -salt '123123' '123123'
47$1$123123$MAV.kVI/b3swmFLErPD2b0
48[root@linux-node2 ~]# vim /etc/cobbler/settings
49101 default_password_crypted: "$1$123123$MAV.kVI/b3swmFLErPD2b0"
50
51#重启cobbler服务,再检查
52[root@linux-node2 ~]# systemctl restart cobblerd
53[root@linux-node2 ~]# cobbler check
54The following are potential configuration items that you may want to fix:
55
561 : debmirror package is not installed, it will be required to manage debian deployments and repositories    # 和debian系统相关,不需要
572 : fencing tools were not found, and are required to use the (optional) power management features. install cman or fence-agents to use them  # fence设备相关,不需要
58
59Restart cobblerd and then run 'cobbler sync' to apply changes.
3.3、配置DHCP
1# 修改cobbler的dhcp模版,不要直接修改dhcp本身的配置文件,因为cobbler会覆盖。
2[root@linux-node2 ~]# vim /etc/cobbler/settings
3manage_dchp: 1   #启用dchp服务
4[root@linux-node2 ~]# vim /etc/cobbler/dhcp.template
5subnet 192.168.56.0 netmask 255.255.255.0 {
6     option routers             192.168.56.2;
7     option domain-name-servers 192.168.56.2;
8     option subnet-mask         255.255.255.0;
9     range dynamic-bootp        192.168.56.100 192.168.56.254;
10     default-lease-time         21600;
11     max-lease-time             43200;
12     next-server                $next_server;
3.4、同步cobbler配置
1[root@linux-node2 ~]# systemctl restart cobblerd
2[root@linux-node2 ~]# cobbler sync
3task started: 2018-01-11_161740_sync
4task started (id=Sync, time=Thu Jan 11 16:17:40 2018)
5running pre-sync triggers
6cleaning trees
7removing: /var/lib/tftpboot/grub/images
8copying bootloaders
9trying hardlink /var/lib/cobbler/loaders/pxelinux.0 -> /var/lib/tftpboot/pxelinux.0
10trying hardlink /var/lib/cobbler/loaders/menu.c32 -> /var/lib/tftpboot/menu.c32
11trying hardlink /var/lib/cobbler/loaders/yaboot -> /var/lib/tftpboot/yaboot
12trying hardlink /usr/share/syslinux/memdisk -> /var/lib/tftpboot/memdisk
13trying hardlink /var/lib/cobbler/loaders/grub-x86.efi -> /var/lib/tftpboot/grub/grub-x86.efi
14trying hardlink /var/lib/cobbler/loaders/grub-x86_64.efi -> /var/lib/tftpboot/grub/grub-x86_64.efi
15copying distros to tftpboot
16copying images
17generating PXE configuration files
18generating PXE menu structure
19rendering DHCP files
20generating /etc/dhcp/dhcpd.conf
21rendering TFTPD files
22generating /etc/xinetd.d/tftp
23cleaning link caches
24running post-sync triggers
25running python triggers from /var/lib/cobbler/triggers/sync/post/*
26running python trigger cobbler.modules.sync_post_restart_services
27running: dhcpd -t -q
28received on stdout:
29received on stderr:
30running: service dhcpd restart
31received on stdout:
32received on stderr: Redirecting to /bin/systemctl restart dhcpd.service
33
34running shell triggers from /var/lib/cobbler/triggers/sync/post/*
35running python triggers from /var/lib/cobbler/triggers/change/*
36running python trigger cobbler.modules.scm_track
37running shell triggers from /var/lib/cobbler/triggers/change/*
38*** TASK COMPLETE ***
4、Cobbler导入镜像
4.1、Cobbler命令
1cobbler check    核对当前设置是否有问题
2cobbler list     列出所有的cobbler元素
3cobbler report   列出元素的详细信息
4cobbler sync     同步配置到数据目录,更改配置最好都要执行下
5cobbler reposync 同步yum仓库
6cobbler distro   查看导入的发行版系统信息
7cobbler system   查看添加的系统信息
8cobbler profile  查看配置信息
4.2、Cobbler导入镜像


1#此处上传的centos官网镜像千万千万别用Minimal,虽然有几百兆,但是无法安装kickstarts的文件指定的软件包,已踩坑!!!
2[root@linux-node2 ~]# mount -o loop /opt/CentOS-7-x86_64-DVD-1708.iso /mnt/    # 挂载CentOS7.4的系统镜像。
3mount: /dev/loop0 写保护,将以只读方式挂载
4[root@linux-node2 ~]# cobbler import --path=/mnt/ --name=Centos-7.4-x86_64 --arch=x86_64
5# --path 镜像路径
6# --name 为安装源定义一个名字
7# --arch 指定安装源是32位、64位、ia64, 目前支持的选项有: x86│x86_64│ia64
8# 安装源的唯一标示就是根据name参数来定义,本例导入成功后,安装源的唯一标示就是:CentOS-7.1-x86_64,如果重复,系统会提示导入失败。
9task started: 2018-01-11_163234_import
10task started (id=Media import, time=Thu Jan 11 16:32:34 2018)
11Found a candidate signature: breed=redhat, version=rhel6
12Found a candidate signature: breed=redhat, version=rhel7
13Found a matching signature: breed=redhat, version=rhel7
14Adding distros from path /var/www/cobbler/ks_mirror/Centos-7.4-x86_64:
15creating new distro: Centos-7.4-x86_64
16trying symlink: /var/www/cobbler/ks_mirror/Centos-7.4-x86_64 -> /var/www/cobbler/links/Centos-7.4-x86_64
17creating new profile: Centos-7.4-x86_64
18associating repos
19checking for rsync repo(s)
20checking for rhn repo(s)
21checking for yum repo(s)
22starting descent into /var/www/cobbler/ks_mirror/Centos-7.4-x86_64 for Centos-7.4-x86_64
23processing repo at : /var/www/cobbler/ks_mirror/Centos-7.4-x86_64
24need to process repo/comps: /var/www/cobbler/ks_mirror/Centos-7.4-x86_64
25looking for /var/www/cobbler/ks_mirror/Centos-7.4-x86_64/repodata/*comps*.xml
26Keeping repodata as-is :/var/www/cobbler/ks_mirror/Centos-7.4-x86_64/repodata
27*** TASK COMPLETE ***
28[root@linux-node2 ~]# ll /var/www/cobbler/ks_mirror/     #导入镜像的位置
29总用量 4
30drwxr-xr-x 8 root root 4096 9月   5 21:36 Centos-7.4-x86_64
31drwxr-xr-x 2 root root   35 1月  11 16:34 config
32[root@linux-node2 ~]# cobbler list     #查看镜像
33distros:
34   Centos-7.4-x86_64
35
36profiles:
37   Centos-7.4-x86_64
38
39systems:
40
41repos:
42
43images:
44
45mgmtclasses:
46
47packages:
48
49files:
View Code
4.3、指定ks.cfg文件及调整内核参数


1(1)默认的ks.cfg文件
2[root@linux-node2 ~]# ll /var/lib/cobbler/kickstarts
3总用量 56
4-rw-r--r-- 1 root root  115 9月  17 01:33 default.ks
5-rw-r--r-- 1 root root   22 9月  17 01:33 esxi4-ks.cfg
6-rw-r--r-- 1 root root   22 9月  17 01:33 esxi5-ks.cfg
7drwxr-xr-x 2 root root   54 1月  11 15:54 install_profiles
8-rw-r--r-- 1 root root 1424 9月  17 01:33 legacy.ks
9-rw-r--r-- 1 root root  292 9月  17 01:33 pxerescue.ks
10-rw-r--r-- 1 root root 2825 9月  17 01:33 sample_autoyast.xml
11-rw-r--r-- 1 root root 1856 9月  17 01:33 sample_end.ks
12-rw-r--r-- 1 root root    0 9月  17 01:33 sample_esx4.ks
13-rw-r--r-- 1 root root  324 9月  17 01:33 sample_esxi4.ks
14-rw-r--r-- 1 root root  386 9月  17 01:33 sample_esxi5.ks
15-rw-r--r-- 1 root root  386 9月  17 01:33 sample_esxi6.ks
16-rw-r--r-- 1 root root 1913 9月  17 01:33 sample.ks
17-rw-r--r-- 1 root root 3419 9月  17 01:33 sample_old.seed
18-rw-r--r-- 1 root root 6658 9月  17 01:33 sample.seed
19(2)查看所有profile的设置
20[root@linux-node2 ~]# cobbler profile report
21Name                           : Centos-7.4-x86_64
22TFTP Boot Files                : {}
23Comment                        :
24DHCP Tag                       : default
25Distribution                   : Centos-7.4-x86_64
26Enable gPXE?                   : 0
27Enable PXE Menu?               : 1
28Fetchable Files                : {}
29Kernel Options                 : {}
30Kernel Options (Post Install)  : {}
31Kickstart                      : /var/lib/cobbler/kickstarts/sample_end.ks
32Kickstart Metadata             : {}
33Management Classes             : []
34Management Parameters          : <<inherit>>
35Name Servers                   : []
36Name Servers Search Path       : []
37Owners                         : ['admin']
38Parent Profile                 :
39Internal proxy                 :
40Red Hat Management Key         : <<inherit>>
41Red Hat Management Server      : <<inherit>>
42Repos                          : []
43Server Override                : <<inherit>>
44Template Files                 : {}
45Virt Auto Boot                 : 1
46Virt Bridge                    : xenbr0
47Virt CPUs                      : 1
48Virt Disk Driver Type          : raw
49Virt File Size(GB)             : 5
50Virt Path                      :
51Virt RAM (MB)                  : 512
52Virt Type                      : kvm
53[root@linux-node2 ~]# cobbler profile list    #查看可用的镜像
54   Centos-7.4-x86_64
55(3)# 编辑profile,修改关联的ks文件
56[root@linux-node2 ~]# cobbler profile edit --name=Centos-7.4-x86_64 --kickstart=/var/lib/cobbler/kickstarts/Centos-7.4-x86_64.cfg
57[root@linux-node2 ~]# cobbler profile report
58Name                           : Centos-7.4-x86_64
59TFTP Boot Files                : {}
60Comment                        :
61DHCP Tag                       : default
62Distribution                   : Centos-7.4-x86_64
63Enable gPXE?                   : 0
64Enable PXE Menu?               : 1
65Fetchable Files                : {}
66Kernel Options                 : {}
67Kernel Options (Post Install)  : {}
68Kickstart                      : /var/lib/cobbler/kickstarts/Centos-7.4-x86_64.cfg    #关联后,此处会变成修改的配置
69Kickstart Metadata             : {}
70Management Classes             : []
71Management Parameters          : <<inherit>>
72Name Servers                   : []
73Name Servers Search Path       : []
74Owners                         : ['admin']
75Parent Profile                 :
76Internal proxy                 :
77Red Hat Management Key         : <<inherit>>
78Red Hat Management Server      : <<inherit>>
79Repos                          : []
80Server Override                : <<inherit>>
81Template Files                 : {}
82Virt Auto Boot                 : 1
83Virt Bridge                    : xenbr0
84Virt CPUs                      : 1
85Virt Disk Driver Type          : raw
86Virt File Size(GB)             : 5
87Virt Path                      :
88Virt RAM (MB)                  : 512
89Virt Type                      : kvm
90(4)修改安装系统的内核参数,修改网卡名称
91[root@linux-node2 ~]# cobbler profile edit --name=Centos-7.4-x86_64 --kopts='net.ifnames=0 biosdevname=0'
92[root@linux-node2 ~]# cobbler profile report
93Name                           : Centos-7.4-x86_64
94TFTP Boot Files                : {}
95Comment                        :
96DHCP Tag                       : default
97Distribution                   : Centos-7.4-x86_64
98Enable gPXE?                   : 0
99Enable PXE Menu?               : 1
100Fetchable Files                : {}
101Kernel Options                 : {'biosdevname': '0', 'net.ifnames': '0'}     #此处会增加内核选项参数
102Kernel Options (Post Install)  : {}
103Kickstart                      : /var/lib/cobbler/kickstarts/Centos-7.4-x86_64.cfg
104Kickstart Metadata             : {}
105Management Classes             : []
106Management Parameters          : <<inherit>>
107Name Servers                   : []
108Name Servers Search Path       : []
109Owners                         : ['admin']
110Parent Profile                 :
111Internal proxy                 :
112Red Hat Management Key         : <<inherit>>
113Red Hat Management Server      : <<inherit>>
114Repos                          : []
115Server Override                : <<inherit>>
116Template Files                 : {}
117Virt Auto Boot                 : 1
118Virt Bridge                    : xenbr0
119Virt CPUs                      : 1
120Virt Disk Driver Type          : raw
121Virt File Size(GB)             : 5
122Virt Path                      :
123Virt RAM (MB)                  : 512
124Virt Type                      : kvm
125[root@linux-node2 ~]# cobbler sync    #同步
View Code
5、安装系统
5.1、去除vm的DHCP
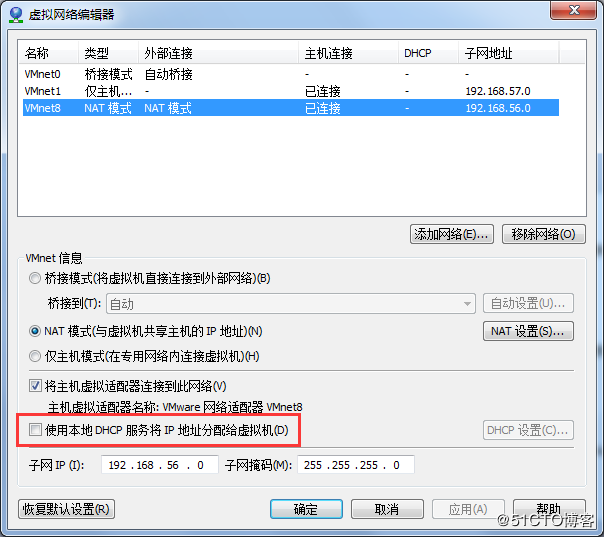
5.2开始安装
新建一台虚拟机(不解释)内存给2G不然坑呀
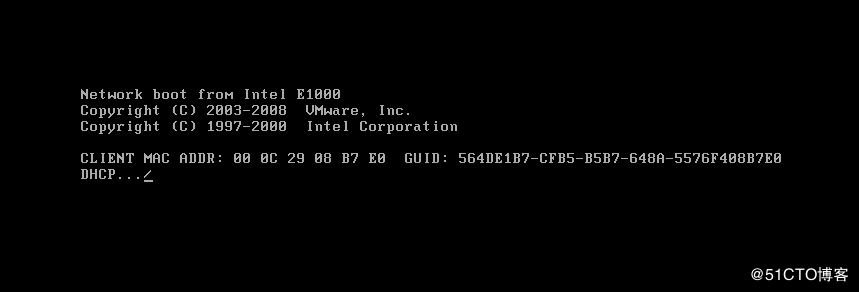
选择Centos-7.4-x86_64
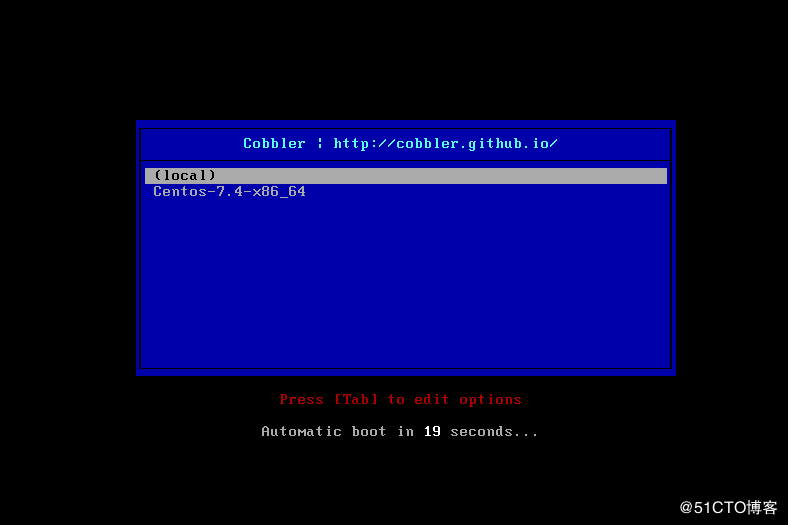
5.3、Centos-7.4-x86_64.cfg文件


1# Cobbler for Kickstart Configurator for CentOS 7.4 by Jason Zhao
2# System language
3lang en_US
4# System keyboard
5keyboard us
6# System timezone
7timezone Asia/Shanghai
8#Root password
9rootpw  --iscrypted $default_password_crypted
10#Use text mode install
11text
12#Install OS instead of upgrade
13install
14#Use NFS installation Media
15url --url=$tree
16#System bootloader configuration
17bootloader --location=mbr
18#Clear the Master Boot Record
19zerombr
20#Partition clearing information
21clearpart --all --initlabel
22#Disk partitioning information
23part /boot --fstype xfs --size 1024 --ondisk sda
24part swap --size 1024 --ondisk sda
25part / --fstype xfs --size 1 --grow --ondisk sda
26#System authorization --enablemd5
27auth --useshadow --enablemd5
28# Network information
29$SNIPPET('network_config')
30reboot
31firewall --disabled
32selinux --disabled
33skipx
34
35%pre
36$SNIPPET('log_ks_pre')
37$SNIPPET('kickstart_start')
38$SNIPPET('pre_install_network_config')
39$SNIPPET('pre_anamon')
40%end
41
42%packages
43@base
44@core
45tree
46nmap
47sysstat
48lrzsz
49dos2unix
50telnet
51iptraf
52ncurses-devel
53openssl-devel
54zlib-devel
55OpenIPMI-tools
56screen
57%end
58
59%post
60systemctl disable postfix.service
61%end
View Code
6、使用koan重装系统


1在新安装的系统中安装koan
2[root@localhost ~]# yum install -y epel-release
3[root@localhost ~]# yum install -y koan
4[root@localhost ~]# koan --server=192.168.56.12 --list=profiles   #查看可使用的安装包
5- looking for Cobbler at http://192.168.56.12:80/cobbler_api
6Centos-7.4-x86_64
7Centos-7.2-x86_64
8[root@localhost ~]# koan --replace-self --server=92.168.56.12 --profile=Centos-7.4-x86_64
9- looking for Cobbler at http://192.168.56.12:80/cobbler_api
10- reading URL: http://192.168.56.12/cblr/svc/op/ks/profile/Centos-7.4-x86_64
11install_tree: http://192.168.56.12/cblr/links/Centos-7.4-x86_64
12downloading initrd initrd.img to /boot/initrd.img_koan
13url=http://192.168.56.12/cobbler/images/Centos-7.4-x86_64/initrd.img
14- reading URL: http://192.168.56.12/cobbler/images/Centos-7.4-x86_64/initrd.img
15downloading kernel vmlinuz to /boot/vmlinuz_koan
16url=http://192.168.56.12/cobbler/images/Centos-7.4-x86_64/vmlinuz
17- reading URL: http://192.168.56.12/cobbler/images/Centos-7.4-x86_64/vmlinuz
18- ['/sbin/grubby', '--add-kernel', '/boot/vmlinuz_koan', '--initrd', '/boot/initrd.img_koan', '--args', '"ks=http://192.168.56.12/cblr/svc/op/ks/profile/Centos-7.4-x86_64 ksdevice=link kssendmac lang= text "', '--copy-default', '--make-default', '--title=kick1515987084']
19- ['/sbin/grubby', '--update-kernel', '/boot/vmlinuz_koan', '--remove-args=root']
20- reboot to apply changes
21[root@localhost ~]# reboot   #重启自动安装
22
23#那么koan是怎么实现重装的呢?koan会在grub增加一个启动项,从告诉系统从该启动项进行启动
24[root@localhost grub2]# cat grub.cfg |grep "linux16"
25    linux16 /vmlinuz_koan ro crashkernel=auto rhgb quiet LANG=en_US.UTF-8 ks=http://192.168.56.12/cblr/svc/op/ks/profile/Centos-7.4-x86_64 ksdevice=link kssendmac lang= text
26    linux16 /vmlinuz-3.10.0-693.el7.x86_64 root=UUID=e9311a84-0787-488b-ab34-3c80d81d86eb ro crashkernel=auto rhgb quiet LANG=en_US.UTF-8
27    linux16 /vmlinuz-0-rescue-ee1532c207654bf4b416357cc26f7eee root=UUID=e9311a84-0787-488b-ab34-3c80d81d86eb ro crashkernel=auto rhgb quiet
View Code
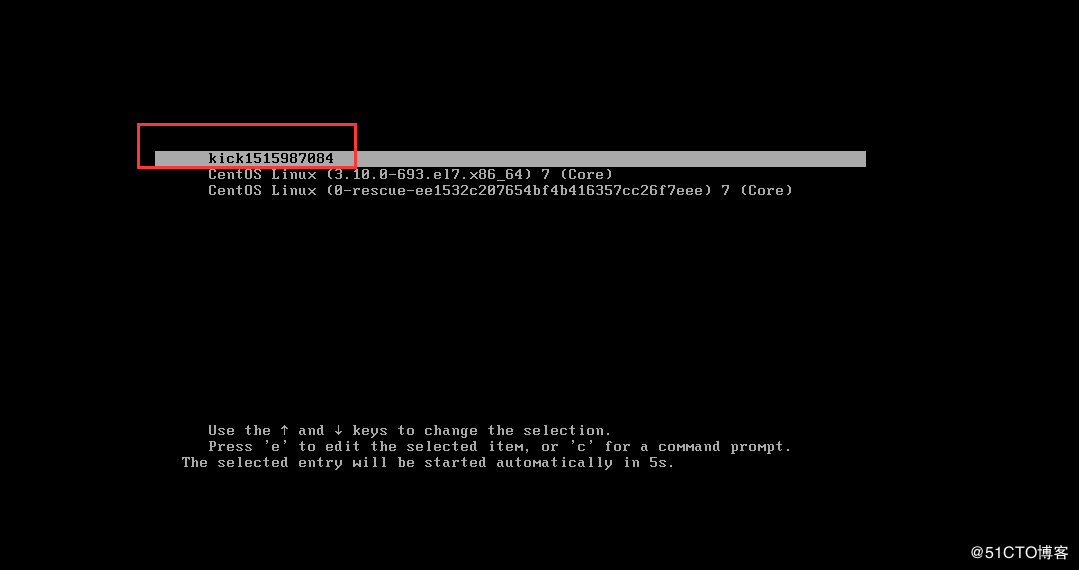
到此就能实现自动重装了!
7、Cobbler的图形界面
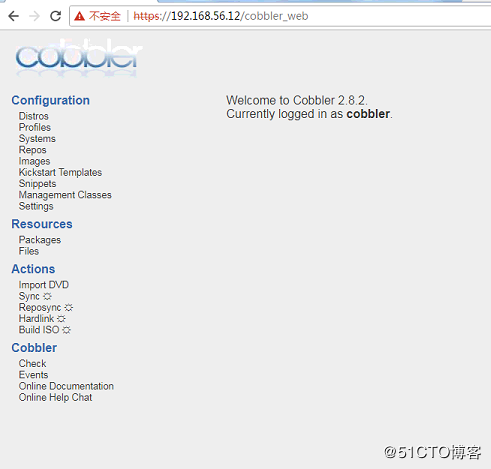
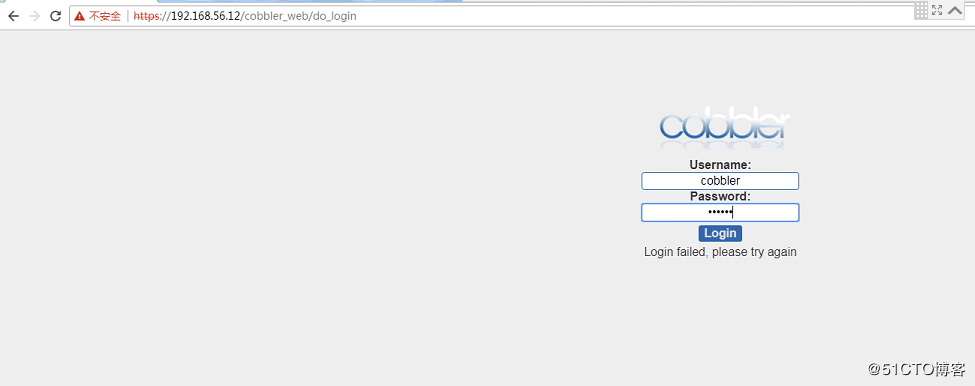
1cobbler的图形界面需要安装cobbler_web,前面已经安装,启动httpd后,直接访问:https://192.168.56.12/cobbler_web,默认的用户名密码是cobbler,cobbler
2在图形界面可以对导入镜像,kickstarts文件的修改与配置等操作。
1[root@linux-node2 ~]# cat /etc/cobbler/users.digest      #cobbler的密码存放位置
2cobbler:Cobbler:a2d6bae81669d707b72c0bd9806e01f3
3[root@linux-node2 ~]# htdigest /etc/cobbler/users.digest "Cobbler" cobbler    #修改cobbler界面的密码
4Changing password for user cobbler in realm Cobbler
5New password: 123123
6Re-type new password: 123123
7[root@linux-node2 ~]# cat /etc/cobbler/users.digest
8cobbler:Cobbler:37af732f18fe2c533372649699188af3
8、Cobbler的基本组件
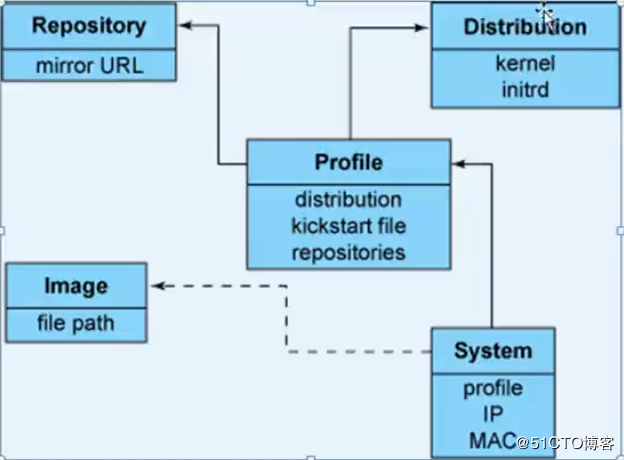
1Disribution : 发行内核,initrd等东西
2Repository: 创建仓库,比如yum仓库等。
3system: 通过mac地址来定制化系统
4profile: 对需要安装某个系统的所有配置。
9、创建yum仓库
cobbler不但可以装机,还可以自建yum仓库,这个仓库可以从公网的yum源进行同步到公司内网,节省带宽。同步命令如下所示:


1#添加阿里云的epel源
2cobbler repo add --name=Centos-7.x86-64-epel --mirror=https://mirrors.aliyun.com/epel/7Server/x86_64/ --arch=x86_64 --breed=yum
3
4#添加阿里云的openstack-newton源
5cobbler repo add --name=openstack-newton --mirror=https://mirrors.aliyun.com/centos/7.4.1708/cloud/x86_64/openstack-newton/ --arch=x86_64 --breed=yum
6cobbler reposync --tries=3 --no-fail
7
8#参数解释:
9
10repo add : 添加一个repo源
11name : 为这个yum源命名
12mirror : 指定一个源的地址。
13arch : 指定平台
14breed: 类型为yum
15
16#演示:
17[root@linux-node2 opt]# cobbler repo add --name=openstack-newton --mirror=https://mirrors.aliyun.com/centos/7.4.1708/cloud/x86_64/openstack-newton/ --arch=x86_64 --breed=yum   #添加openstack-newton源
18[root@linux-node2 opt]# cobbler profile edit --name=Centos-7.4-x86_64 --repos=openstack-newton    #关联repos仓库
19[root@linux-node2 opt]# cobbler profile report
20Name                           : Centos-7.4-x86_64
21TFTP Boot Files                : {}
22Comment                        :
23DHCP Tag                       : default
24Distribution                   : Centos-7.4-x86_64
25Enable gPXE?                   : 0
26Enable PXE Menu?               : 1
27Fetchable Files                : {}
28Kernel Options                 : {}
29Kernel Options (Post Install)  : {}
30Kickstart                      : /var/lib/cobbler/kickstarts/Centos-7.4-x86_64.cfg
31Kickstart Metadata             : {}
32Management Classes             : []
33Management Parameters          : <<inherit>>
34Name Servers                   : []
35Name Servers Search Path       : []
36Owners                         : ['admin']
37Parent Profile                 :
38Internal proxy                 :
39Red Hat Management Key         : <<inherit>>
40Red Hat Management Server      : <<inherit>>
41Repos                          : ['openstack-newton']             #添加成功
42Server Override                : <<inherit>>
43Template Files                 : {}
44Virt Auto Boot                 : 1
45Virt Bridge                    : xenbr0
46Virt CPUs                      : 1
47Virt Disk Driver Type          : raw
48Virt File Size(GB)             : 5
49Virt Path                      :
50Virt RAM (MB)                  : 512
51Virt Type                      : kvm
52
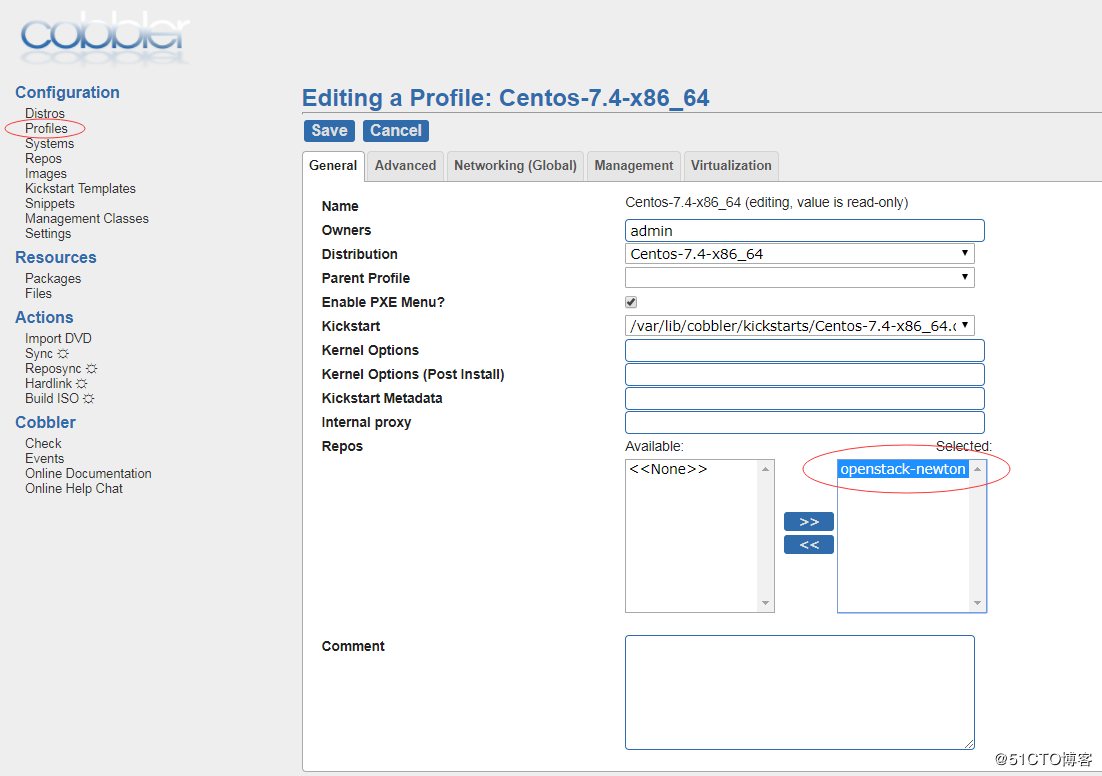
53以上的操作也可以在cobbler界面上,把yum源添加到Centos-7.4-x86_64的profile中。如图:
View Code
10、Cobbler定制安装
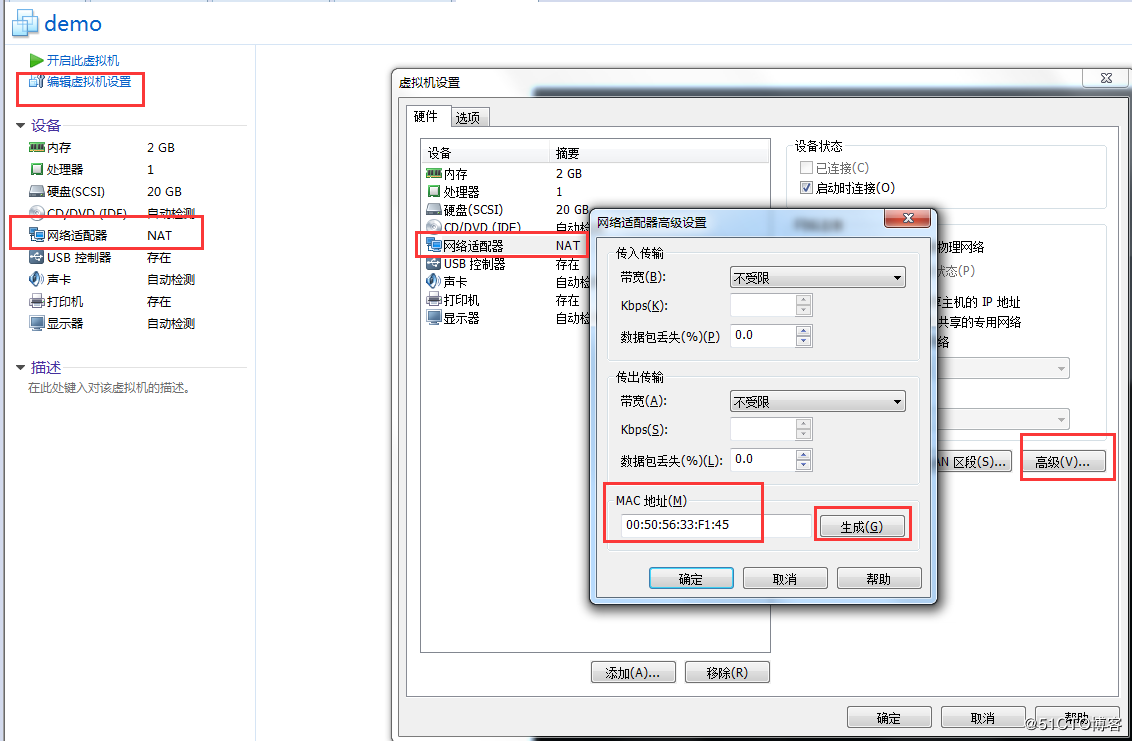
(1)生成mac地址
(2)定制系统


1[root@linux-node2 ~]# cobbler system add --name=linux-node4 --mac=00:50:56:33:F1:45 \
2> --profile=Centos-7.3-x86_64 \
3> --ip-address=192.168.56.110 --subnet=255.255.255.0 \
4> --gateway=192.168.56.2 --interface=eth0 \
5> --static=1 --hostname=linux-node4.example.com \
6> --name-servers="192.168.56.2" \
7> --kickstart=/var/lib/cobbler/kickstarts/Centos-7.3-x86_64.cfg
8[root@linux-node2 ~]# cobbler system list
9   linux-node4
10
11参数解释:
12
13system add 添加一个系统定制
14name 定义这个新添加的系统定制的名字
15mac 指定MAC
16profile 指定profile,通过cobbler profile list查看
17ip-address 指定静态IP
18subnet 指定子网掩码
19gateway 指定网关
20interface 指定网卡
21static=1 设置为静态IP
22hostname 这是主机名
23name-servers 设置dns服务器
24kickstart 设置kickstart,通过cobbler profile report来查看。
View Code
(3)开机自动安装
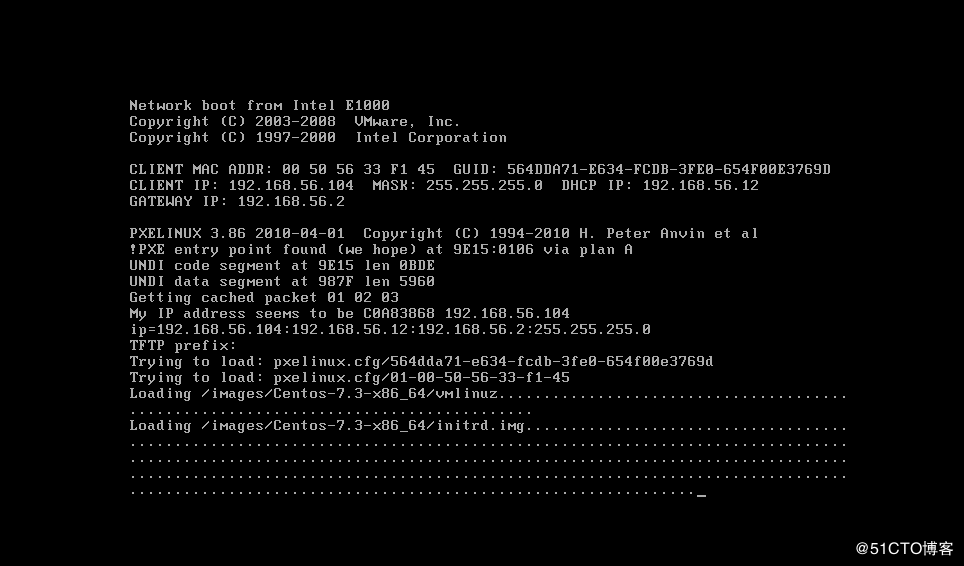
创建一个虚拟机,mac地址为00:50:56:33:F1:45,启动后你就会发现自动进入安装系统了,等安装完以后,所有的配置都和我们当初设置的一样。
11、Cobbler的API
cobbler也是通过restful-api来调用对应的接口,下面请看两个小脚本:
都是采用opython2.7版本运行的
1[root@linux-node2 ~]# cat cobbler_list.py
2#!/usr/bin/python
3import xmlrpclib
4server = xmlrpclib.Server("http://192.168.56.12/cobbler_api")
5print server.get_distros()
6print server.get_profiles()
7print server.get_systems()
8print server.get_images()
9print server.get_repos()
使用api的方式,定制安装系统,python脚本如下:


1[root@linux-node2 ~]# cat cobbler-api.py
2#!/usr/bin/env python
3# -*- coding: utf-8 -*-
4import xmlrpclib
5
6class CobblerAPI(object):
7    def __init__(self,url,user,password):
8        self.cobbler_user= user
9        self.cobbler_pass = password
10        self.cobbler_url = url
11
12    def add_system(self,hostname,ip_add,mac_add,profile):
13        '''
14        Add Cobbler System Infomation
15        '''
16        ret = {
17            "result": True,
18            "comment": [],
19        }
20        #get token
21        remote = xmlrpclib.Server(self.cobbler_url)
22        token = remote.login(self.cobbler_user,self.cobbler_pass)
23
24        #add system
25        system_id = remote.new_system(token)
26        remote.modify_system(system_id,"name",hostname,token)
27        remote.modify_system(system_id,"hostname",hostname,token)
28        remote.modify_system(system_id,'modify_interface', {
29            "macaddress-eth0" : mac_add,
30            "ipaddress-eth0" : ip_add,
31            "dnsname-eth0" : hostname,
32        }, token)
33        remote.modify_system(system_id,"profile",profile,token)
34        remote.save_system(system_id, token)
35        try:
36            remote.sync(token)
37        except Exception as e:
38            ret['result'] = False
39            ret['comment'].append(str(e))
40        return ret
41
42def main():
43    cobbler = CobblerAPI("http://192.168.56.12/cobbler_api","cobbler","123123")
44    ret = cobbler.add_system(hostname='cobbler-api-test',ip_add='192.168.56.101',mac_add='00:50:56:33:F1:45',profile='CentOS-7.3-x86_64')
45    print ret
46
47if __name__ == '__main__':
48main()
View Code