
⭐️基础链接导航⭐️
服务器 → ☁️ 阿里云活动地址
看样例 → 🐟 摸鱼小网站地址
学代码 → 💻 源码库地址
一、前言
在本系列文章的早期章节中,我们已经成功地购买了服务器并配置了MySQL、Redis等核心中间件。紧接着,我们不仅建立了后端服务,还开发了我们的首个爬虫程序。后面我们还把爬取到的数据进行了保存,生成了一整套MVC的后端代码,并且提供了一个接口出来。
这篇文章呢我要开始前端开发部分了。与后端开发相比,前端开发的优势在于其直观性和即时反馈。开发者可以迅速看到自己代码的成果,这种“所见即所得”的体验极大地提升了开发的乐趣和满足感。在接下来的篇章中,我将展示如何将爬取到的热搜数据整合到前端界面中,使之以一种用户友好的方式呈现,大家姑妄看之。
二、前端应用搭建
我的前端技术栈还停留在四年前,那时候我主要使用的是Vue2和ElementUI。并不是说我认为Vue3或React不好,只是我更习惯使用我熟悉的技术。即便如此,这些技术依然能够带来不错的效果。如果你想要尝试不同的技术或组件库,那也是完全可以的。
1. 前端环境搭建
(1)安装node.js,下载相应版本的node.js,下载地址:https://nodejs.org/en/download/ ,下载完双击安装,点击下一步直到安装完成,建议下载版本的是:
v16.20.2
(2)安装完成后,附件里选择命令提示符(或者在开始的搜索框里输入cmd回车调出命令面板)输入:node -v回车,出现相应版本证明安装成功, node环境已经安装完成。
由于有些npm有些资源被屏蔽或者是国外资源的原因,经常会导致用npm安装依赖包的时候失败,所有我还需要npm的 国内镜像---cnpm。在命令行中输入:
npm install -g cnpm --registry=https://registry.npmmirror.com回车,大约需要3分钟,如果一直没有反应使用管理员身份运行cmd重试。
(3)安装全局vue-cli脚手架,用于帮助搭建所需的模板框架。输入命令:
cnpm install -g @vue/cli回车等待完成。
(4)创建项目,首先我们要选定目录,然后再命令行中把目录转到选定的目录,假如我们打算把项目新建在e盘下的vue文件夹中则输入下面的命令: e:回车,然后cd vue,然后输入命令:
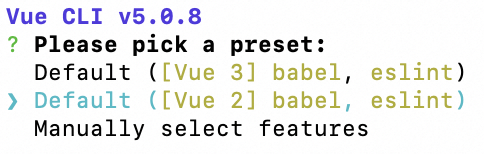
vue create summo-sbmy-front-web,回车,然后它就会让你选择vue2还是vue3,选择vue2后点击enter,它就会创建好项目并且下载好依赖。
(5)启动项目,首先切换到summo-sbmy-front-web目录,然后执行
npm run serve,项目运行成功后,浏览器会自动打开localhost:8080(如果浏览器没有自动打开 ,可以手动输入)。运行成功后,会看到Welcome to Your Vue.js App页面。

2. 脚手架处理
我的开发工具是VS Code,免费的,下载地址如下:https://code.visualstudio.com/。
(1)文件和代码清理
删除components下的HelloWorld.vue文件 删除assets下的logo.png文件
原始App.vue代码如下
1<template>
2  <div id="app">
3    <img alt="Vue logo" src="./assets/logo.png">
4    <HelloWorld msg="Welcome to Your Vue.js App"/>
5  </div>
6</template>
7
8<script>
9import HelloWorld from './components/HelloWorld.vue'
10
11export default {
12  name: 'App',
13  components: {
14    HelloWorld
15  }
16}
17</script>
18
19<style>
20#app {
21  font-family: Avenir, Helvetica, Arial, sans-serif;
22  -webkit-font-smoothing: antialiased;
23  -moz-osx-font-smoothing: grayscale;
24  text-align: center;
25  color: #2c3e50;
26  margin-top: 60px;
27}
28</style>
删除不必要的代码,不然启动会报错
1<template>
2  <div id="app">
3  </div>
4</template>
5
6<script>
7
8export default {
9  name: 'App',
10  components: {
11  }
12}
13</script>
14
15<style>
16#app {
17  font-family: Avenir, Helvetica, Arial, sans-serif;
18  -webkit-font-smoothing: antialiased;
19  -moz-osx-font-smoothing: grayscale;
20  text-align: center;
21  color: #2c3e50;
22  margin-top: 60px;
23}
24</style>
(2)axios和element-ui依赖引入
执行安装命令
1//axios依赖引入
2cnpm install axios
3
4//element-ui依赖引入
5cnpm install element-ui
下载完上面这两个组件后,去main.js中注册组件,然后才能使用,main.js代码如下:
1import Vue from 'vue'
2import App from './App.vue'
3
4//引入饿了么UI
5import {
6  Calendar,
7  Row,
8  Col,
9  Link,
10  Button,
11  Loading,
12  Container,
13  Header,
14  Footer,
15  Main,
16  Form,
17  Autocomplete,
18  Tooltip,
19  Card,
20  Dialog
21}  from 'element-ui';
22Vue.use(Calendar)
23Vue.use(Row)
24Vue.use(Col)
25Vue.use(Link)
26Vue.use(Button)
27Vue.use(Loading)
28Vue.use(Container)
29Vue.use(Header)
30Vue.use(Footer)
31Vue.use(Form)
32Vue.use(Autocomplete)
33Vue.use(Tooltip)
34Vue.use(Card)
35Vue.use(Main)
36Vue.use(Dialog)
37import "element-ui/lib/theme-chalk/index.css"
38
39//引入axios
40import axios from 'axios';
41Vue.prototype.$ajax = axios;
42
43Vue.config.productionTip = false
44
45new Vue({
46  render: h => h(App),
47}).$mount('#app')
48
(3)封装apiService.js方便调用接口
在src目录下创建一个文件夹名为config,创建一个apiService.js,代码如下:
1// apiService.js
2import axios from "axios";
3
4// 创建axios实例并配置基础URL
5const apiClient = axios.create({
6  baseURL: "http://localhost:80/api",
7  headers: {
8    "Content-Type": "application/json"
9  },
10});
11
12export default {
13  // 封装Get接口
14  get(fetchUrl) {
15    return apiClient.get(fetchUrl);
16  }
17};
三、前端热搜组件
1. 组件介绍
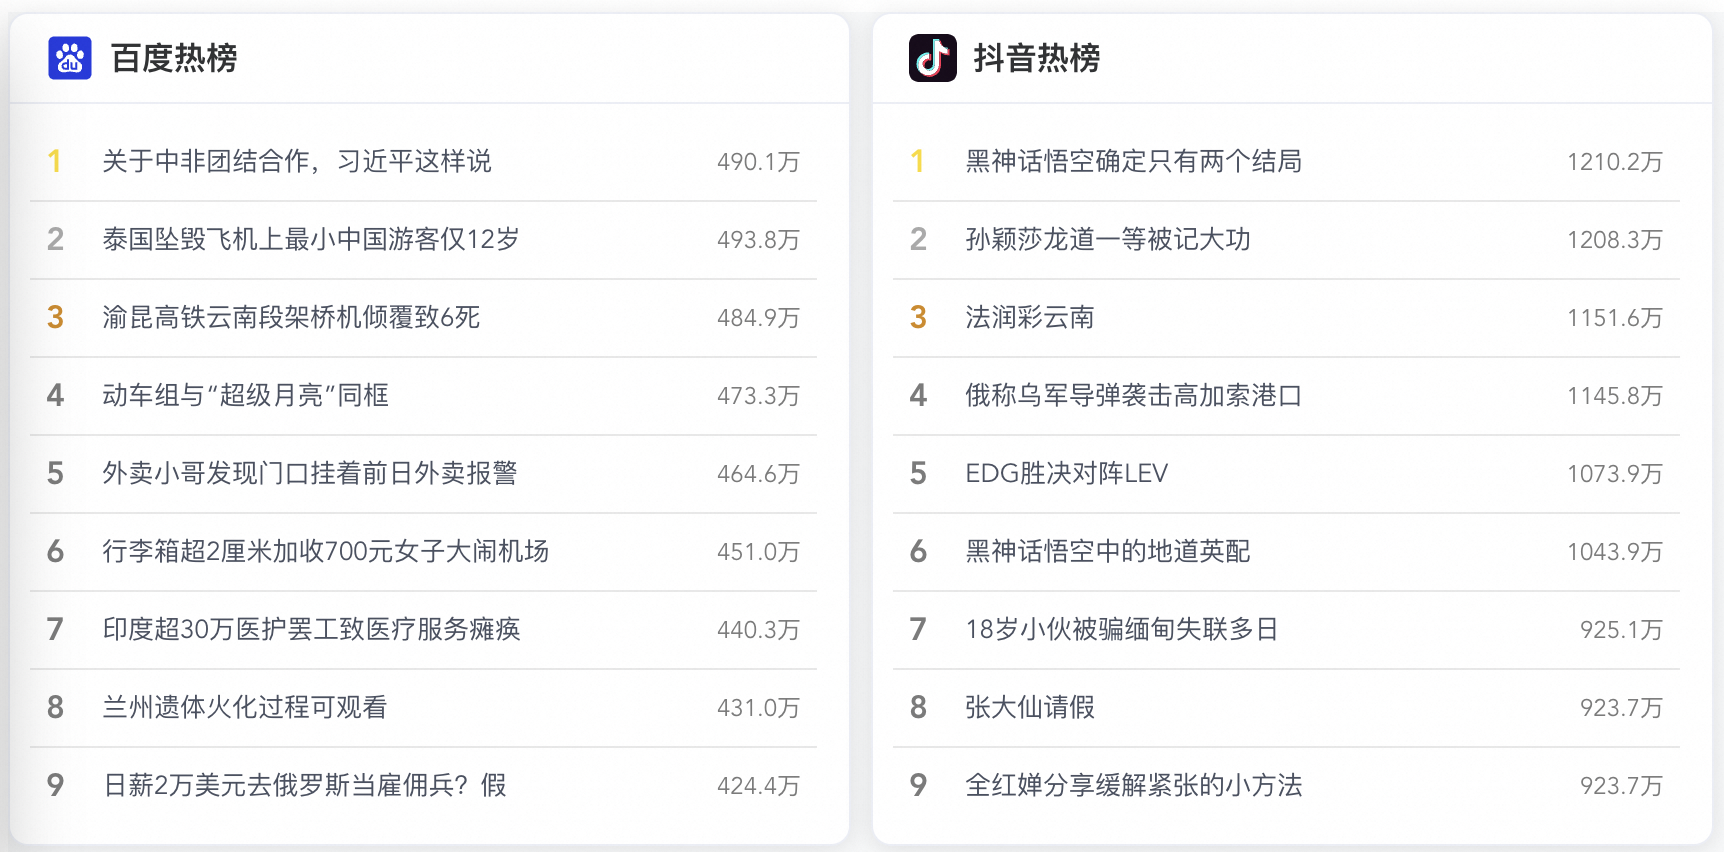
首先,成品的热搜组件样式如下,包括标题(图标+名称)、内容区(排序、标题、热度),点击标题可以跳转到指定的热搜文章。
2. 组件实现
在components目录下创建HotSearchBoard.vue文件,代码如下:
1<template>
2  <el-card class="custom-card" v-loading="loading">
3    <template #header>
4      <div class="card-title">
5        <img :src="icon" class="card-title-icon" />
6        {{ title }}热榜
7      </div>
8    </template>
9    <div class="cell-group-scrollable">
10      <div
11        v-for="item in hotSearchData"
12        :key="item.hotSearchOrder"
13        :class="getRankingClass(item.hotSearchOrder)"
14        class="cell-wrapper"
15      >
16        <span class="cell-order">{{ item.hotSearchOrder }}</span>
17        <span
18          class="cell-title hover-effect"
19          @click="openLink(item.hotSearchUrl)"
20        >
21          {{ item.hotSearchTitle }}
22        </span>
23        <span class="cell-heat">{{ formatHeat(item.hotSearchHeat) }}</span>
24      </div>
25    </div>
26  </el-card>
27</template>
28
29<script>
30import apiService from "@/config/apiService.js";
31export default {
32  props: {
33    title: String,
34    icon: String,
35    type: String,
36  },
37  data() {
38    return {
39      hotSearchData: [],
40      loading:false
41    };
42  },
43  created() {
44    this.fetchData(this.type);
45  },
46  methods: {
47    fetchData(type) {
48      this.loading = true
49      apiService
50        .get("/hotSearch/queryByType?type=" + type)
51        .then((res) => {
52          // 处理响应数据
53          this.hotSearchData = res.data.data;
54        })
55        .catch((error) => {
56          // 处理错误情况
57          console.error(error);
58        }).finally(() => {
59          // 加载结束
60          this.loading = false;
61        });
62    },
63    getRankingClass(order) {
64      if (order === 1) return "top-ranking-1";
65      if (order === 2) return "top-ranking-2";
66      if (order === 3) return "top-ranking-3";
67      return "";
68    },
69    formatHeat(heat) {
70      // 如果 heat 已经是字符串,并且以 "万" 结尾,那么直接返回
71      if (typeof heat === "string" && heat.endsWith("万")) {
72        return heat;
73      }
74      let number = parseFloat(heat); // 确保转换为数值类型进行比较
75      if (isNaN(number)) {
76        return heat; // 如果无法转换为数值,则原样返回
77      }
78
79      // 如果数值小于1000,直接返回该数值
80      if (number < 1000) {
81        return number.toString();
82      }
83
84      // 如果数值在1000到9999之间,转换为k为单位
85      if (number >= 1000 && number < 10000) {
86        return (number / 1000).toFixed(1) + "k";
87      }
88
89      // 如果数值大于等于10000,转换为万为单位
90      if (number >= 10000) {
91        return (number / 10000).toFixed(1) + "万";
92      }
93    },
94    openLink(url) {
95      if (url) {
96        // 使用window.open在新标签页中打开链接
97        window.open(url, "_blank");
98      }
99    },
100  },
101};
102</script>
103
104<style scoped>
105.custom-card {
106  background-color: #ffffff;
107  border-radius: 10px;
108  box-shadow: 0 4px 8px rgba(0, 0, 0, 0.1);
109  margin-bottom: 20px;
110}
111.custom-card:hover {
112  box-shadow: 0 6px 8px rgba(0, 0, 0, 0.25);
113}
114
115>>> .el-card__header {
116  padding: 10px 18px;
117}
118>>> .el-card__body {
119  display: flex;
120  padding: 10px 0px 10px 10px;
121}
122.card-title {
123  display: flex;
124  align-items: center;
125  font-weight: bold;
126  font-size: 16px;
127}
128
129.card-title-icon {
130  fill: currentColor;
131  width: 24px;
132  height: 24px;
133  margin-right: 8px;
134}
135
136.cell-group-scrollable {
137  max-height: 350px;
138  overflow-y: auto;
139  padding-right: 16px; /* 恢复内容区域的内边距 */
140  flex: 1;
141}
142
143.cell-wrapper {
144  display: flex;
145  align-items: center;
146  padding: 8px 8px; /* 减小上下内边距以减少间隔 */
147  border-bottom: 1px solid #e8e8e8; /* 为每个项之间添加分割线 */
148}
149
150.cell-order {
151  width: 20px;
152  text-align: left;
153  font-size: 16px;
154  font-weight: 700;
155  margin-right: 8px;
156  color: #7a7a7a; /* 统一非特殊序号颜色 */
157}
158
159/* 通过在cell-heat类前面添加更多的父级选择器,提高了特异性 */
160.cell-heat {
161  min-width: 50px;
162  text-align: right;
163  font-size: 12px;
164  color: #7a7a7a;
165}
166.cell-title {
167  font-size: 13px;
168  color: #495060;
169  line-height: 22px;
170  flex-grow: 1;
171  overflow: hidden;
172  text-align: left; /* 左对齐 */
173  text-overflow: ellipsis; /* 超出部分显示省略号 */
174}
175.top-ranking-1 .cell-order {
176  color: #fadb14;
177} /* 金色 */
178.top-ranking-2 .cell-order {
179  color: #a9a9a9;
180} /* 银色 */
181.top-ranking-3 .cell-order {
182  color: #d48806;
183} /* 铜色 */
184/* 新增的.hover-effect类用于标题的hover状态 */
185.cell-title.hover-effect {
186  cursor: pointer; /* 鼠标悬停时显示指针形状 */
187  transition: color 0.3s ease; /* 平滑地过渡颜色变化 */
188}
189
190/* 当鼠标悬停在带有.hover-effect类的元素上时改变颜色 */
191.cell-title.hover-effect:hover {
192  color: #409eff; /* 或者使用你喜欢的颜色 */
193}
194</style>
195
在App.vue中添加热搜组件,由于不止一个热搜,我把它做成了一个数组
1<template>
2  <div id="app">
3    <el-row :gutter="10">
4      <el-col :span="6" v-for="(board, index) in hotBoards" :key="index">
5        <hot-search-board
6          :title="board.title"
7          :icon="board.icon"
8          :fetch-url="board.fetchUrl"
9          :type="board.type"
10        />
11      </el-col>
12    </el-row>
13  </div>
14</template>
15
16<script>
17import HotSearchBoard from "@/components/HotSearchBoard.vue";
18export default {
19  name: "App",
20  components: {
21    HotSearchBoard,
22  },
23  data() {
24    return {
25      hotBoards: [
26        {
27          title: "百度",
28          icon: require("@/assets/icons/baidu-icon.svg"),
29          type: "baidu",
30        },
31        {
32          title: "抖音",
33          icon: require("@/assets/icons/douyin-icon.svg"),
34          type: "douyin",
35        },
36      ],
37    };
38  },
39};
40</script>
41
42<style>
43#app {
44  font-family: Avenir, Helvetica, Arial, sans-serif;
45  -webkit-font-smoothing: antialiased;
46  -moz-osx-font-smoothing: grayscale;
47  text-align: center;
48  color: #2c3e50;
49  margin-top: 60px;
50  background: #f8f9fa; /* 提供一个柔和的背景色 */
51  min-height: 100vh; /* 使用视口高度确保填满整个屏幕 */
52  padding: 0; /* 保持整体布局紧凑,无额外内边距 */
53}
54</style>
55
最终的项目结构和文件如下
代码不难,无非就是使用卡片和列表对热搜进行展示,还有就是我加了一些样式,比如前三名的排序有颜色,字体改了改。
四、小结一下
在本篇文章中,我主要展示前端代码逻辑。至于后端,也做了一些更新,比如新增了queryType接口和跨域请求的处理,但这些内容都是基础的,你下载代码后就能一目了然,不懂的评论区交流,或者加我微信:hb1766435296。之前的准备工作终于开始见到成效,虽然看起来简单,但实际上解决了不少复杂问题。现在,服务器、前端和后端的基础都打好了,接下来我会继续开发,增加更多功能。
关于爬虫部分,我已经成功实现了针对12个不同网站的爬取功能。考虑到爬虫的逻辑相对简单,无需单独撰写文章来详细说明。因此,我计划在每篇文章的附录或额外部分简要介绍各个热搜网站的爬虫逻辑。这样的安排既能保证信息的完整性,又不会让文章显得过于冗长。
番外:知乎热搜爬虫
1. 爬虫方案评估
知乎热搜是这样的, 接口是:https://www.zhihu.com/api/v3/feed/topstory/hot-lists/total

数据还算完备,有标题、热度、封面、排序等,知乎的热搜接口返回的数据格式是JSON,这种比返回HTML更简单。
2. 网页解析代码
这个就可以使用Postman生成调用代码,流程我就不赘述了,直接上代码,ZhihuHotSearchJob:
1package com.summo.sbmy.job.zhihu;
2
3import java.io.IOException;
4import java.util.List;
5
6import com.alibaba.fastjson.JSONArray;
7import com.alibaba.fastjson.JSONObject;
8
9import com.google.common.collect.Lists;
10import com.summo.sbmy.dao.entity.SbmyHotSearchDO;
11import com.summo.sbmy.service.SbmyHotSearchService;
12import lombok.extern.slf4j.Slf4j;
13import okhttp3.OkHttpClient;
14import okhttp3.Request;
15import okhttp3.Response;
16import org.springframework.beans.factory.annotation.Autowired;
17import org.springframework.scheduling.annotation.Scheduled;
18import org.springframework.stereotype.Component;
19
20import static com.summo.sbmy.common.enums.HotSearchEnum.ZHIHU;
21
22/**
23 * @author summo
24 * @version DouyinHotSearchJob.java, 1.0.0
25 * @description 知乎热搜Java爬虫代码
26 * @date 2024年08月09
27 */
28@Component
29@Slf4j
30public class ZhihuHotSearchJob {
31
32    @Autowired
33    private SbmyHotSearchService sbmyHotSearchService;
34
35    /**
36     * 定时触发爬虫方法,1个小时执行一次
37     */
38    @Scheduled(fixedRate = 1000 * 60 * 60)
39    public void hotSearch() throws IOException {
40        try {
41            //查询知乎热搜数据
42            OkHttpClient client = new OkHttpClient().newBuilder().build();
43            Request request = new Request.Builder().url("https://www.zhihu.com/api/v3/feed/topstory/hot-lists/total")
44                .method("GET", null).build();
45            Response response = client.newCall(request).execute();
46            JSONObject jsonObject = JSONObject.parseObject(response.body().string());
47            JSONArray array = jsonObject.getJSONArray("data");
48            List<SbmyHotSearchDO> sbmyHotSearchDOList = Lists.newArrayList();
49            for (int i = 0, len = array.size(); i < len; i++) {
50                //获取知乎热搜信息
51                JSONObject object = (JSONObject)array.get(i);
52                JSONObject target = object.getJSONObject("target");
53                //构建热搜信息榜
54                SbmyHotSearchDO sbmyHotSearchDO = SbmyHotSearchDO.builder().hotSearchResource(ZHIHU.getCode()).build();
55                //设置知乎三方ID
56                sbmyHotSearchDO.setHotSearchId(target.getString("id"));
57                //设置文章连接
58                sbmyHotSearchDO.setHotSearchUrl("https://www.zhihu.com/question/" + sbmyHotSearchDO.getHotSearchId());
59                //设置文章标题
60                sbmyHotSearchDO.setHotSearchTitle(target.getString("title"));
61                //设置作者名称
62                sbmyHotSearchDO.setHotSearchAuthor(target.getJSONObject("author").getString("name"));
63                //设置作者头像
64                sbmyHotSearchDO.setHotSearchAuthorAvatar(target.getJSONObject("author").getString("avatar_url"));
65                //设置文章摘要
66                sbmyHotSearchDO.setHotSearchExcerpt(target.getString("excerpt"));
67                //设置热搜热度
68                sbmyHotSearchDO.setHotSearchHeat(object.getString("detail_text").replace("热度", ""));
69                //按顺序排名
70                sbmyHotSearchDO.setHotSearchOrder(i + 1);
71                sbmyHotSearchDOList.add(sbmyHotSearchDO);
72            }
73            //数据持久化
74            sbmyHotSearchService.saveCache2DB(sbmyHotSearchDOList);
75        } catch (IOException e) {
76            log.error("获取知乎数据异常", e);
77        }
78    }
79
80}
81
知乎的热搜数据是自带唯一ID的,不需要我们手动生成,非常方便。