
Volley设计与实现分析
我们平时在开发Android应用的时候,不可避免地经常要通过网络来进行数据的收发,而多数情况下都是会用HTTP协议来做这些事情。Android系统主要提供了HttpURLConnection和Apache HttpClient这两种方式来帮我们进行HTTP通信。对于这两种方式,Google官方的一份文档 Android’s HTTP Clients 有做一个对比说明。是说,Apache HttpClient提供的API非常多,实现稳定,bug也比较少,正因如此,为了保持API兼容性而非常难以做优化。HttpURLConnection的API比较少,故而比较容易做优化。但在Android 2.3之前,HttpURLConnection的实现又有一些比较严重的问题。Google官方建议在2.2及之前的Android上,用Apache HttpClient来执行HTTP请求,在2.3及之后的Android上,则用HttpURLConnection接口。
另外,HttpURLConnection和HttpClient的用法还是有些复杂的,提供的功能也比较基础,如果不进行适当封装的话,很容易写出大量重复代码。于是乎,一些Android网络通信框架也就应运而生,比如说AsyncHttpClient等,它把HTTP所有的通信细节全部封装在内部,同时提供更为强大的API,我们只需简单调用几行代码就可以完成通信操作。
Volley是Google提供的一个HTTP网络库,其功能大体是提供对通信细节的封装,以方便网络操作的调用,volley在内部实现中,会根据运行的android的版本,来决定是使用HttpURLConnection和Apache HttpClient接口;提供缓存机制,以加速网络访问;提供HTTP请求异步执行的能力。这里我们就来看一下Volley的设计和实现。
Volley的获取
我们先来了解一些怎么下载到volley的代码。我们可以通过如下的命令,下载的volley的代码:
git clone https://android.googlesource.com/platform/frameworks/volley
下载了volley之后,将代码导入到Android Studio中,根据volley工程的配置对于工具版本的要求,下载必要的工具,比如Android SDK platform,SDK Build tools,Gradle插件,或者根据本地工具链的版本,适当修改volley工程的设置,随后就可以对volley进行编译,产生aar包了。
Volley的使用
这里我们通过一个简单的例子来看一下volley的使用。比如,我们利用淘宝的接口抓取某一个IP地址的相关信息:
1public class MainActivity extends AppCompatActivity {
2    private static final String TAG = "myapplication";
3    private TextView mWeatherDataText;
4
5    @Override
6    protected void onCreate(Bundle savedInstanceState) {
7        super.onCreate(savedInstanceState);
8        setContentView(R.layout.activity_main);
9        mWeatherDataText = (TextView)findViewById(R.id.weather_data);
10        getIpData();
11    }
12
13    private void getIpData() {
14        String RegionServiceUrl = "http://ip.taobao.com/service/getIpInfo.php?ip=112.65.189.212";
15        RequestQueue requestQueue = Volley.newRequestQueue(this);
16        StringRequest request = new StringRequest(RegionServiceUrl, new Response.Listener<String>() {
17            @Override
18            public void onResponse(String response) {
19                Log.i(TAG, "response = " + response);
20                mWeatherDataText.setText(response);
21            }
22        }, new Response.ErrorListener() {
23            @Override
24            public void onErrorResponse(VolleyError error) {
25                Log.i(TAG, "error = " + error.getMessage());
26                mWeatherDataText.setText(error.getMessage());
27            }
28        });
29        requestQueue.add(request);
30    }
31}
主要关注getIpData(),实际是在这个方法中利用volley,执行了网络请求。可以看到,使用volley执行网络请求,大概分为如下的几个步骤:
- 通过Volley类获取一个RequestQueue对象。
- 创建Listener来处理网络操作的返回值。Response.Listener和Response.ErrorListener分别用于处理正常的和异常的返回值。
- 传入Url,HTTP Method,Listener等参数创建Request。
- 将前面创建的Request添加到RequestQueue。
通过volley执行基本的网络请求就是这么简单。要执行更复杂的网络请求的话,可以自行探索。
Volley项目的结构
这里我们以2016.5.27 clone下来的代码为基础进行volley整个设计与实现的分析。我们先来看一下Volley的代码结构:
1com/android/volley/AuthFailureError.java
2com/android/volley/Cache.java
3com/android/volley/CacheDispatcher.java
4com/android/volley/ClientError.java
5com/android/volley/DefaultRetryPolicy.java
6com/android/volley/ExecutorDelivery.java
7com/android/volley/Network.java
8com/android/volley/NetworkDispatcher.java
9com/android/volley/NetworkError.java
10com/android/volley/NetworkResponse.java
11com/android/volley/NoConnectionError.java
12com/android/volley/ParseError.java
13com/android/volley/Request.java
14com/android/volley/RequestQueue.java
15com/android/volley/Response.java
16com/android/volley/ResponseDelivery.java
17com/android/volley/RetryPolicy.java
18com/android/volley/ServerError.java
19com/android/volley/TimeoutError.java
20com/android/volley/VolleyError.java
21com/android/volley/VolleyLog.java
22com/android/volley/toolbox/AndroidAuthenticator.java
23com/android/volley/toolbox/Authenticator.java
24com/android/volley/toolbox/BasicNetwork.java
25com/android/volley/toolbox/ByteArrayPool.java
26com/android/volley/toolbox/ClearCacheRequest.java
27com/android/volley/toolbox/DiskBasedCache.java
28com/android/volley/toolbox/HttpClientStack.java
29com/android/volley/toolbox/HttpHeaderParser.java
30com/android/volley/toolbox/HttpStack.java
31com/android/volley/toolbox/HurlStack.java
32com/android/volley/toolbox/ImageLoader.java
33com/android/volley/toolbox/ImageRequest.java
34com/android/volley/toolbox/JsonArrayRequest.java
35com/android/volley/toolbox/JsonObjectRequest.java
36com/android/volley/toolbox/JsonRequest.java
37com/android/volley/toolbox/NetworkImageView.java
38com/android/volley/toolbox/NoCache.java
39com/android/volley/toolbox/PoolingByteArrayOutputStream.java
40com/android/volley/toolbox/RequestFuture.java
41com/android/volley/toolbox/StringRequest.java
42com/android/volley/toolbox/Volley.java
可以看到volley的所有代码都在两个package中,一个是com.android.volley,另一个是com.android.volley.toolbox,前者可以认为是定义了volley的框架架构及接口,而后者则是相关接口的实现,提供实际的诸如HTTP网络访问、缓存等功能。
Volley设计
这里先分析com.android.volley包,来看一下volley整体的框架架构。com.android.volley包中,类名以Error结尾的所有类都是Exception,用来指示某种异常。所有这些类的层次结构如下图: 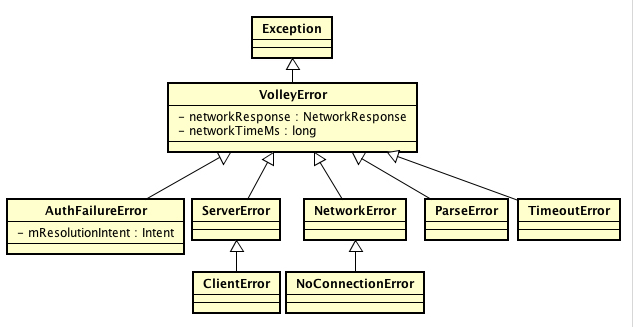
对于这些Exception类,没有需要过多说明的地方。接下来,我们从网络请求的执行及执行结果的发布的角度来看一下com.android.volley包中各个类之间的关系,如下图: 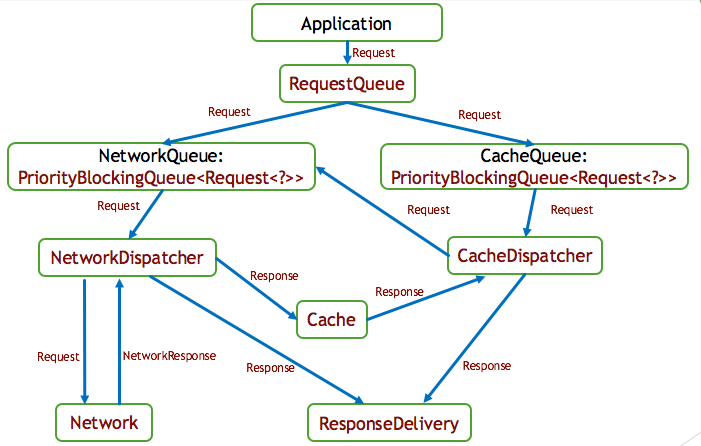
如我们在上面 Volley的使用 一节中看到的,应用程序在创建了Request之后,会将这个Request丢给RequestQueue,RequestQueue负责这个Request的处理及结果的Post。
RequestQueue在拿到Request之后,会根据这个Request是否应该缓存而将这个Request丢进NetworkQueue或CacheQueue,若Request应该缓存它会被放进CacheQueue中,若不需要则会被直接放进NetworkQueue中。NetworkQueue和CacheQueue都是类型为PriorityBlockingQueue<Request<?>>的容器。
NetworkDispatcher和CacheDispatcher都是Thread。NetworkDispatcher主要的职责是通过Network执行HTTP请求并抛出执行结果。NetworkDispatcher线程在被启动之后,会不断地从NetworkQueue中取出Request来执行,执行之后得到NetworkReponse,NetworkReponse会得到解析并被重新构造为Response,构造后的Response会被丢给ResponseDelivery,并由后者发布给volley的调用者,同时在Request应该被缓存时,获得的Response数据还会被放进Cache中。在Volley中,会创建NetworkDispatcher线程的线程池,其中包含固定的4个线程。
CacheDispatcher的主要职责则是访问缓存,找到之前缓存的下载的数据,并通过ResponseDelivery发布给volley的调用者,在没找到时,则将Request丢进NetworkQueue中,以便于从网络中获取。在Volley中,只有一个CacheDispatcher线程。
Cache主要定义了缓存接口。RetryPolicy定义了缓存策略的接口,每个Request都会有自己的RetryPolicy,用于帮助Network确定重试的策略。ResponseDelivery定义了Request的发布者的行为,ExecutorDelivery是ResponseDelivery的一个实现,它主要是将结果post到一个Executor中。
Volley的实现
接下来通过代码来看一下Volley的实现。
RequestQueue对象的创建
在Volley中,主要通过Volley类的newRequest来创建RequestQueue对象。Volley类就像胶水一样,把Network的实现BasicNetwork/HurlStack/HttpClientStack和Cache的实现DiskBasedCache粘到一起,创建出可用的RequestQueue。其代码如下:
1public class Volley {
2
3    /** Default on-disk cache directory. */
4    private static final String DEFAULT_CACHE_DIR = "volley";
5
6    /**
7     * Creates a default instance of the worker pool and calls {@link RequestQueue#start()} on it.
8     *
9     * @param context A {@link Context} to use for creating the cache dir.
10     * @param stack An {@link HttpStack} to use for the network, or null for default.
11     * @return A started {@link RequestQueue} instance.
12     */
13    public static RequestQueue newRequestQueue(Context context, HttpStack stack) {
14        File cacheDir = new File(context.getCacheDir(), DEFAULT_CACHE_DIR);
15
16        String userAgent = "volley/0";
17        try {
18            String packageName = context.getPackageName();
19            PackageInfo info = context.getPackageManager().getPackageInfo(packageName, 0);
20            userAgent = packageName + "/" + info.versionCode;
21        } catch (NameNotFoundException e) {
22        }
23
24        if (stack == null) {
25            if (Build.VERSION.SDK_INT >= 9) {
26                stack = new HurlStack();
27            } else {
28                // Prior to Gingerbread, HttpUrlConnection was unreliable.
29                // See: http://android-developers.blogspot.com/2011/09/androids-http-clients.html
30                stack = new HttpClientStack(AndroidHttpClient.newInstance(userAgent));
31            }
32        }
33
34        Network network = new BasicNetwork(stack);
35
36        RequestQueue queue = new RequestQueue(new DiskBasedCache(cacheDir), network);
37        queue.start();
38
39        return queue;
40    }
41
42    /**
43     * Creates a default instance of the worker pool and calls {@link RequestQueue#start()} on it.
44     *
45     * @param context A {@link Context} to use for creating the cache dir.
46     * @return A started {@link RequestQueue} instance.
47     */
48    public static RequestQueue newRequestQueue(Context context) {
49        return newRequestQueue(context, null);
50    }
51}
不带HttpStack参数的newRequestQueue()方法就是我们前面用到的那个,它会直接传入null HttpStack调用带HttpStack参数的newRequestQueue()方法。带参数的newRequestQueue()方法的实现,感觉改为下面这样似乎更加清晰一点:
1    public static RequestQueue newRequestQueue(Context context, HttpStack stack) {
2        if (stack == null) {
3            if (Build.VERSION.SDK_INT >= 9) {
4                stack = new HurlStack();
5            } else {
6                String userAgent = "volley/0";
7                try {
8                    String packageName = context.getPackageName();
9                    PackageInfo info = context.getPackageManager().getPackageInfo(packageName, 0);
10                    userAgent = packageName + "/" + info.versionCode;
11                } catch (NameNotFoundException e) {
12                }
13
14                // Prior to Gingerbread, HttpUrlConnection was unreliable.
15                // See: http://android-developers.blogspot.com/2011/09/androids-http-clients.html
16                stack = new HttpClientStack(AndroidHttpClient.newInstance(userAgent));
17            }
18        }
19
20        Network network = new BasicNetwork(stack);
21
22        File cacheDir = new File(context.getCacheDir(), DEFAULT_CACHE_DIR);
23        RequestQueue queue = new RequestQueue(new DiskBasedCache(cacheDir), network);
24        queue.start();
25
26        return queue;
27    }
以上面的这段代码为基础,来分析newRequestQueue()方法做的事情。可以看到它主要做了如下这样几件事情:
-
在HttpStack参数为空时,创建HttpStack。HttpStack的职责主要是直接的执行网络请求,并返回HttpResponse。BasicNetwork通过HttpStack执行网络请求,对返回的HttpResponse做一些处理,然后构造NetworkResponse返回给调用者。这里会根据系统当前的版本,来选择是使用HttpClient接口还是HttpURLConnection接口,也就是使用HttpClientStack还是HurlStack,这两个class都是实现了HttpStack接口。这里可以来看一下HttpStack接口的定义:
public interface HttpStack { /** * Performs an HTTP request with the given parameters. * * A GET request is sent if request.getPostBody() == null. A POST request is sent otherwise, * and the Content-Type header is set to request.getPostBodyContentType().
1 *
2 * @param request the request to perform
3 * @param additionalHeaders additional headers to be sent together with
4 *         {@link Request#getHeaders()}
5 * @return the HTTP response
6 */
7public HttpResponse performRequest(Request<?> request, Map<String, String> additionalHeaders)
8    throws IOException, AuthFailureError;
}
HurlStack的对象创建过程:
1    /**
2     * An interface for transforming URLs before use.
3     */
4    public interface UrlRewriter {
5        /**
6         * Returns a URL to use instead of the provided one, or null to indicate
7         * this URL should not be used at all.
8         */
9        public String rewriteUrl(String originalUrl);
10    }
11
12    private final UrlRewriter mUrlRewriter;
13    private final SSLSocketFactory mSslSocketFactory;
14
15    public HurlStack() {
16        this(null);
17    }
18
19    /**
20     * @param urlRewriter Rewriter to use for request URLs
21     */
22    public HurlStack(UrlRewriter urlRewriter) {
23        this(urlRewriter, null);
24    }
25
26    /**
27     * @param urlRewriter Rewriter to use for request URLs
28     * @param sslSocketFactory SSL factory to use for HTTPS connections
29     */
30    public HurlStack(UrlRewriter urlRewriter, SSLSocketFactory sslSocketFactory) {
31        mUrlRewriter = urlRewriter;
32        mSslSocketFactory = sslSocketFactory;
33    }
然后是HttpClientStack对象的创建过程:
1    protected final HttpClient mClient;
2
3    private final static String HEADER_CONTENT_TYPE = "Content-Type";
4
5    public HttpClientStack(HttpClient client) {
6        mClient = client;
7    }
2. 利用HttpStack创建BasicNetwork对象,其过程为:
1    protected final HttpStack mHttpStack;
2
3    protected final ByteArrayPool mPool;
4
5    /**
6     * @param httpStack HTTP stack to be used
7     */
8    public BasicNetwork(HttpStack httpStack) {
9        // If a pool isn't passed in, then build a small default pool that will give us a lot of
10        // benefit and not use too much memory.
11        this(httpStack, new ByteArrayPool(DEFAULT_POOL_SIZE));
12    }
13
14    /**
15     * @param httpStack HTTP stack to be used
16     * @param pool a buffer pool that improves GC performance in copy operations
17     */
18    public BasicNetwork(HttpStack httpStack, ByteArrayPool pool) {
19        mHttpStack = httpStack;
20        mPool = pool;
21    }
3. 创建DiskBasedCache对象。
1    /** Default maximum disk usage in bytes. */
2    private static final int DEFAULT_DISK_USAGE_BYTES = 5 * 1024 * 1024;
3
4    /** High water mark percentage for the cache */
5    private static final float HYSTERESIS_FACTOR = 0.9f;
6
7    /** Magic number for current version of cache file format. */
8    private static final int CACHE_MAGIC = 0x20150306;
9
10    /**
11     * Constructs an instance of the DiskBasedCache at the specified directory.
12     * @param rootDirectory The root directory of the cache.
13     * @param maxCacheSizeInBytes The maximum size of the cache in bytes.
14     */
15    public DiskBasedCache(File rootDirectory, int maxCacheSizeInBytes) {
16        mRootDirectory = rootDirectory;
17        mMaxCacheSizeInBytes = maxCacheSizeInBytes;
18    }
19
20    /**
21     * Constructs an instance of the DiskBasedCache at the specified directory using
22     * the default maximum cache size of 5MB.
23     * @param rootDirectory The root directory of the cache.
24     */
25    public DiskBasedCache(File rootDirectory) {
26        this(rootDirectory, DEFAULT_DISK_USAGE_BYTES);
27    }
可以看到,volley创建了一个最大大小为5MB的一个基于磁盘的缓存,缓存目录的位置为application的缓存目录。 4. 传递BasicNetwork对象和DiskBasedCache对象,构造RequestQueue对象。 5. 执行RequestQueue的start()方法,启动Request内部的线程。 整体地来看一下RequestQueue对象的构造,和start()初始化过程:
1    /** Number of network request dispatcher threads to start. */
2    private static final int DEFAULT_NETWORK_THREAD_POOL_SIZE = 4;
3
4    /** Cache interface for retrieving and storing responses. */
5    private final Cache mCache;
6
7    /** Network interface for performing requests. */
8    private final Network mNetwork;
9
10    /** Response delivery mechanism. */
11    private final ResponseDelivery mDelivery;
12
13    /** The network dispatchers. */
14    private NetworkDispatcher[] mDispatchers;
15
16    /** The cache dispatcher. */
17    private CacheDispatcher mCacheDispatcher;
18
19    private List<RequestFinishedListener> mFinishedListeners =
20            new ArrayList<RequestFinishedListener>();
21
22    /**
23     * Creates the worker pool. Processing will not begin until {@link #start()} is called.
24     *
25     * @param cache A Cache to use for persisting responses to disk
26     * @param network A Network interface for performing HTTP requests
27     * @param threadPoolSize Number of network dispatcher threads to create
28     * @param delivery A ResponseDelivery interface for posting responses and errors
29     */
30    public RequestQueue(Cache cache, Network network, int threadPoolSize,
31            ResponseDelivery delivery) {
32        mCache = cache;
33        mNetwork = network;
34        mDispatchers = new NetworkDispatcher[threadPoolSize];
35        mDelivery = delivery;
36    }
37
38    /**
39     * Creates the worker pool. Processing will not begin until {@link #start()} is called.
40     *
41     * @param cache A Cache to use for persisting responses to disk
42     * @param network A Network interface for performing HTTP requests
43     * @param threadPoolSize Number of network dispatcher threads to create
44     */
45    public RequestQueue(Cache cache, Network network, int threadPoolSize) {
46        this(cache, network, threadPoolSize,
47                new ExecutorDelivery(new Handler(Looper.getMainLooper())));
48    }
49
50    /**
51     * Creates the worker pool. Processing will not begin until {@link #start()} is called.
52     *
53     * @param cache A Cache to use for persisting responses to disk
54     * @param network A Network interface for performing HTTP requests
55     */
56    public RequestQueue(Cache cache, Network network) {
57        this(cache, network, DEFAULT_NETWORK_THREAD_POOL_SIZE);
58    }
59
60    /**
61     * Starts the dispatchers in this queue.
62     */
63    public void start() {
64        stop();  // Make sure any currently running dispatchers are stopped.
65        // Create the cache dispatcher and start it.
66        mCacheDispatcher = new CacheDispatcher(mCacheQueue, mNetworkQueue, mCache, mDelivery);
67        mCacheDispatcher.start();
68
69        // Create network dispatchers (and corresponding threads) up to the pool size.
70        for (int i = 0; i < mDispatchers.length; i++) {
71            NetworkDispatcher networkDispatcher = new NetworkDispatcher(mNetworkQueue, mNetwork,
72                    mCache, mDelivery);
73            mDispatchers[i] = networkDispatcher;
74            networkDispatcher.start();
75        }
76    }
77
78    /**
79     * Stops the cache and network dispatchers.
80     */
81    public void stop() {
82        if (mCacheDispatcher != null) {
83            mCacheDispatcher.quit();
84        }
85        for (int i = 0; i < mDispatchers.length; i++) {
86            if (mDispatchers[i] != null) {
87                mDispatchers[i].quit();
88            }
89        }
90    }
在RequestQueue对象的构造过程中,会创建ExecutorDelivery对象,该对象被用于发布网络请求的执行结果,向application的主UI线程中发布,后面我们分析结果发布时,会更详细地来分析这个类。还会创建一个NetworkDispatcher的数组,其中包含了4个元素,也即是说,volley的网络请求是通过后台一个含有4个线程的固定线程池来执行的。 在RequestQueue的start()方法中,则主要是清理掉老的CacheDispatcher和NetworkDispatcher线程,创建新的并启动他们。
Request对象的添加
这里通过RequestQueue.add()的代码,来具体看一下,向RequestQueue中添加一个Request的执行过程:
1    /**
2     * Adds a Request to the dispatch queue.
3     * @param request The request to service
4     * @return The passed-in request
5     */
6    public <T> Request<T> add(Request<T> request) {
7        // Tag the request as belonging to this queue and add it to the set of current requests.
8        request.setRequestQueue(this);
9        synchronized (mCurrentRequests) {
10            mCurrentRequests.add(request);
11        }
12
13        // Process requests in the order they are added.
14        request.setSequence(getSequenceNumber());
15        request.addMarker("add-to-queue");
16
17        // If the request is uncacheable, skip the cache queue and go straight to the network.
18        if (!request.shouldCache()) {
19            mNetworkQueue.add(request);
20            return request;
21        }
22
23        // Insert request into stage if there's already a request with the same cache key in flight.
24        synchronized (mWaitingRequests) {
25            String cacheKey = request.getCacheKey();
26            if (mWaitingRequests.containsKey(cacheKey)) {
27                // There is already a request in flight. Queue up.
28                Queue<Request<?>> stagedRequests = mWaitingRequests.get(cacheKey);
29                if (stagedRequests == null) {
30                    stagedRequests = new LinkedList<Request<?>>();
31                }
32                stagedRequests.add(request);
33                mWaitingRequests.put(cacheKey, stagedRequests);
34                if (VolleyLog.DEBUG) {
35                    VolleyLog.v("Request for cacheKey=%s is in flight, putting on hold.", cacheKey);
36                }
37            } else {
38                // Insert 'null' queue for this cacheKey, indicating there is now a request in
39                // flight.
40                mWaitingRequests.put(cacheKey, null);
41                mCacheQueue.add(request);
42            }
43            return request;
44        }
45    }
可以看到RequestQueue.add()为Request设置了RquestQueue。