
Spring Cloud Config简介
在传统的单体式应用系统中,我们通常会将配置文件和代码放在一起,但随着系统越来越大,需要实现的功能越来越多时,我们又不得不将系统升级为分布式系统,同时也会将系统的功能进行更加细化的拆分。拆分后,所有的服务应用都会有自己的配置文件,当需要修改某个服务的配置时,我们可能需要修改很多处,并且为了某一项配置的修改,可能需要重启这个服务相关的所有服务,这显然是非常麻烦的。
在传统的单体式应用系统中,我们通常会将配置文件和代码放在一起,但随着系统越来越大,需要实现的功能越来越多时,我们又不得不将系统升级为分布式系统,同时也会将系统的功能进行更加细化的拆分。拆分后,所有的服务应用都会有自己的配置文件,当需要修改某个服务的配置时,我们可能需要修改很多处,并且为了某一项配置的修改,可能需要重启这个服务相关的所有服务,这显然是非常麻烦的。
Spring Cloud Config是Spring Cloud团队创建的一个全新的项目,该项目主要用来为分布式系统中的外部配置提供服务器(Config Server)和客户端(Config Client)支持。
·服务器端(Config Server):也被称之为分布式配置中心,它是一个独立的微服务应用,主要用于集中管理应用程序各个环境下的配置,默认使用Git存储配置文件内容,也可以使用SVN存储,或者是本地文件存储。
·客户端(Config Client):是Config Server的客户端,即微服务架构中的各个微服务应用。它们通过指定的配置中心(Config Server)来管理应用资源以及与业务相关的配置内容,并在启动时从配置中心获取和加载配置信息。
Spring Cloud Config的工作流程如图5-17所示。
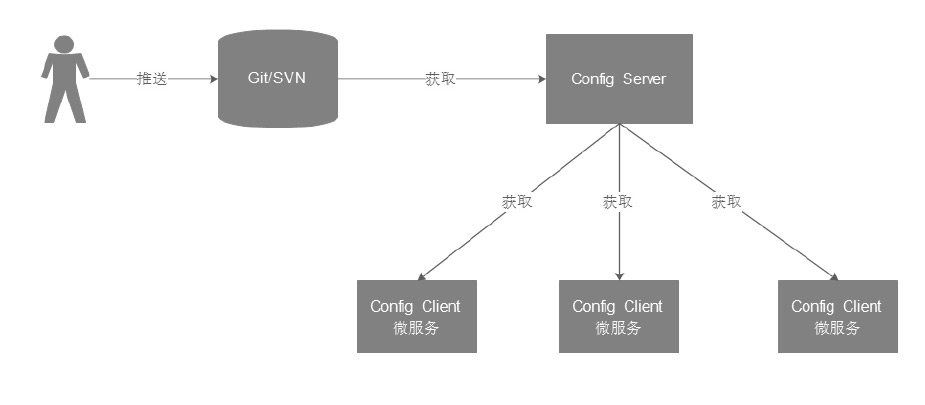
在图5-17中,用户会先将配置文件推送到Git或SVN中,然后在微服务应用(Config Client)启动时,会从配置中心(Config Server)中获取配置信息,而配置中心会根据配置从Git或SVN中获取相应的配置信息。
使用本地存储的方式实现配置管理
通过上一小节的学习,我们已经知道Spring Cloud Config支持本地、Git和SVN的存储方式。接下来本小节将以本地存储方式为例,讲解Spring Cloud Config的使用。
1. 搭建Config Server
(1)创建配置中心工程microservice-config-server,并在其pom.xml中引入Config Server的依赖,如文件5-12所示。
文件5-12 pom.xml
1<?xml version="1.0" encoding="UTF-8"?>
2<project xmlns="http://maven.apache.org/POM/4.0.0" xmlns:xsi="http://www.w3.org/2001/XMLSchema-instance"
3         xsi:schemaLocation="http://maven.apache.org/POM/4.0.0 http://maven.apache.org/xsd/maven-4.0.0.xsd">
4    <modelVersion>4.0.0</modelVersion>
5    <parent>
6        <groupId>com.xc</groupId>
7        <artifactId>xcservice-springcloud</artifactId>
8        <version>0.0.1-SNAPSHOT</version>
9    </parent>
10    <groupId>com.xc</groupId>
11    <artifactId>xcservice-config-server</artifactId>
12    <version>0.0.1-SNAPSHOT</version>
13    <name>xcservice-config-server</name>
14    <description>配置管理</description>
15
16    <properties>
17        <java.version>1.8</java.version>
18    </properties>
19
20    <dependencies>
21        <dependency><!--Config Server的依赖-->
22            <groupId>org.springframework.cloud</groupId>
23            <artifactId>spring-cloud-config-server</artifactId>
24        </dependency>
25
26        <dependency>
27            <groupId>org.springframework.boot</groupId>
28            <artifactId>spring-boot-starter-test</artifactId>
29            <scope>test</scope>
30        </dependency>
31    </dependencies>
32
33    <build>
34        <plugins>
35            <plugin>
36                <groupId>org.springframework.boot</groupId>
37                <artifactId>spring-boot-maven-plugin</artifactId>
38            </plugin>
39        </plugins>
40    </build>
41
42</project>
(2)编写配置文件application.yml,添加服务端口号和存储属性等信息,如文件5-13所示。
文件5-13 application.yml
1server:
2  port: 8888
3
4spring:
5  application:
6    name: xcservice-config-server # 指定应用名称
7  profiles:
8    active: native # 使用本地文件系统的存储方式来保存配置信息
(3)在src/main/resources目录下创建3个分别用于表示开发、预发布和测试的资源配置文件,并在文件中编写如下内容。
·application-dev.yml中编写内容:clientParam:native-dev-1.0
·application-prod.yml中编写内容:clientParam:native-prod-1.0
·application-test.yml中编写内容:clientParam:native-test-1.0
上述资源文件是按照“应用名+环境名+格式”的规范来命名的,其常见文件的命名方式如下:
1/{application}/{profile}[/{label}]
2/{application}-{profile}.yml
3/{label}/{application}-{profile}.yml
4/{application}-{profile}.properties
5/{label}/{application}-{profile}.properties
其中application表示的是应用名称,profile表示变化的文件,而label是可选的,表示Git的分支,默认是master。
(4)创建启动类,并在类上增加@EnableConfigServer注解以开启服务端功能,如文件5-14所示。
文件5-14 Application.java
1package com.xc.xcserviceconfigserver;
2
3import org.springframework.boot.SpringApplication;
4import org.springframework.boot.autoconfigure.SpringBootApplication;
5import org.springframework.cloud.config.server.EnableConfigServer;
6
7/**
8 * http://localhost:8888/microservice-config-server/dev
9 * http://localhost:8888/application-dev.yml
10 */
11@EnableConfigServer
12@SpringBootApplication
13public class XcserviceConfigServerApplication {
14
15    public static void main(String[] args) {
16        SpringApplication.run(XcserviceConfigServerApplication.class, args);
17    }
18
19}
(5)启动工程,测试应用。应用启动成功后,按照如下格式的URL发起请求:
http://localhost:8888/{applicationname}/{env}/{label}本应用中的访问地址为http://localhost:8888/microservice-config-server/dev,浏览器中的JSON信息显示出了应用名microservice-config-server、环境名dev,以及资源文件路径和文件内容等信息。
除此之外,我们也可以直接访问资源文件,来查看资源文件内的配置信息。通过浏览器访问地址http://localhost:8888/ap-plication-dev.yml
2. 搭建Config Client
(1)创建客户端工程microservice-config-client,并在其pom.xml中添加Config和Web的依赖,如文件5-15所示。
文件5-15 pom.xml
1<?xml version="1.0" encoding="UTF-8"?>
2<project xmlns="http://maven.apache.org/POM/4.0.0" xmlns:xsi="http://www.w3.org/2001/XMLSchema-instance"
3         xsi:schemaLocation="http://maven.apache.org/POM/4.0.0 http://maven.apache.org/xsd/maven-4.0.0.xsd">
4    <modelVersion>4.0.0</modelVersion>
5    <parent>
6        <groupId>com.xc</groupId>
7        <artifactId>xcservice-springcloud</artifactId>
8        <version>0.0.1-SNAPSHOT</version>
9    </parent>
10    <groupId>com.xc</groupId>
11    <artifactId>xcservice-config-client</artifactId>
12    <version>0.0.1-SNAPSHOT</version>
13    <name>xcservice-config-client</name>
14    <description>Config Client</description>
15
16    <properties>
17        <java.version>1.8</java.version>
18    </properties>
19
20    <dependencies>
21        <dependency>
22            <groupId>org.springframework.cloud</groupId>
23            <artifactId>spring-cloud-starter-config</artifactId>
24        </dependency>
25
26        <dependency>
27            <groupId>org.springframework.boot</groupId>
28            <artifactId>spring-boot-starter-web</artifactId>
29        </dependency>
30
31        <dependency>
32            <groupId>org.springframework.boot</groupId>
33            <artifactId>spring-boot-starter-test</artifactId>
34            <scope>test</scope>
35        </dependency>
36    </dependencies>
37
38    <build>
39        <plugins>
40            <plugin>
41                <groupId>org.springframework.boot</groupId>
42                <artifactId>spring-boot-maven-plugin</artifactId>
43            </plugin>
44        </plugins>
45    </build>
46
47</project>
(2)编写配置文件bootstrap.yml,在其中配置应用名称、服务中心地址、需要访问的文件和端口号等信息,如文件5-16所示。
文件5-16 bootstrap.yml
1server:
2  port: 8801
3
4spring:
5  application:
6    name: xcservice-config-client
7  cloud:
8    config:
9      profile: test # 配置服务中的{profile}
10      uri: http://localhost:8888/  # 配置中心的地址
需要注意的是,上述配置文件的名称必须为bootstrap.yml或bootstrap.properties,只有这样配置中心才能够正常加载(虽然application.yml也可以被Spring Boot加载,但是boot-strap.yml会优先加载)。
(3)创建启动类,并在类上添加@RestController注解,编辑后如文件5-17所示。
文件5-17 Application.java
1package com.xc.xcserviceconfigclient;
2
3import org.springframework.beans.factory.annotation.Value;
4import org.springframework.boot.SpringApplication;
5import org.springframework.boot.autoconfigure.SpringBootApplication;
6import org.springframework.stereotype.Repository;
7import org.springframework.web.bind.annotation.RequestMapping;
8import org.springframework.web.bind.annotation.RestController;
9
10/**
11 * http://localhost:8801/client-Param
12 */
13@SpringBootApplication
14@RestController
15public class XcserviceConfigClientApplication {
16
17    @Value("${clientParam}")
18    private String clientParam;
19
20    @RequestMapping("/clientParam")
21    public String getParam() {
22        return this.clientParam;
23    }
24
25    /**
26     * http://localhost:8801/hello
27     *
28     * @return
29     */
30    @RequestMapping("/hello")
31    public String hello() {
32        return "hello world";
33    }
34
35    public static void main(String[] args) {
36        SpringApplication.run(XcserviceConfigClientApplication.class, args);
37    }
38
39}
(4)启动工程,测试应用。应用启动成功后,可以通过地址http://localhost:8801/hello测试应用是否能够正常访问
此时通过浏览器访问地址http://localhost:8801/clientParam,即可获取配置文件中的信息
当我们需要访问其他配置文件的信息时,只需修改bootstrap.yml中的profile的属性值即可。
使用Git存储的方式实现配置管理
Spring Cloud Config的服务端默认采用的是Git配置仓库,通过Git可以非常方便地使用各种第三方工具来对其内容进行更新管理和版本控制,并且Git仓库的Webhooks功能还可以实时地监控配置内容的修改,所以使用Git存储的方式是十分方便的。
掌握了本地存储方式的使用后,Git存储方式的使用就很容易掌握了。下面我们同样以上一小节的案例为例,来讲解如何通过Spring Cloud Config的客户端从服务端获取Git仓库中不同版本配置信息。
(1)配置Git。在Git上创建xcservice-study-config目录,并在目录中增加开发、预发布和测试的配置文件,分别编辑三个文件中的内容如下:
·application-dev.yml中编写内容:clientParam:git-dev-1.0
·application-prod.yml中编写内容:clientParam:git-prod-1.0
·application-test.yml中编写内容:clientParam:git-test-1.0
(2)修改服务端配置文件。将xcservice-config-server工程的配置文件中本地文件存储方式的配置删除(或注释),并添加git的配置信息,如文件5-18所示。
文件5-18 application.yml
1server:
2  port: 8888
3
4spring:
5  application:
6    name: xcservice-config-server # 指定应用名称
7  #profiles:
8  #  active: native # 使用本地文件系统的存储方式来保存配置信息
9  cloud:
10    config:
11      server:
12        git: # 使用git的方式
13          uri: https://gitee.com/secret8/microservice-study-config.git
在上述配置中,spring.cloud.config.server.git.uri属性用来指定Git仓库的网络地址。由于这里配置的是公共仓库,所以不需要填写用户名和密码信息。如果是私有仓库,则需要填写账号信息,此时可以在git属性下增加username和password属性。
(3)修改客户端配置文件。在xcservice-config-client工程的配置文件中添加属性label,并将其属性值设置为mas-ter(label属性表示Git中的分支,其属性默认值为master),编辑后如文件5-19所示。
文件5-19 bootstrap.yml
1server:
2  port: 8801
3
4spring:
5  application:
6    name: xcservice-config-client
7  cloud:
8    config:
9      profile: test # 配置服务中的{profile}
10      label: master # 对应git中的分支,默认为master
11      uri: http://localhost:8888/  # 配置中心的地址的地址
(4)启动工程,测试应用。分别启动Spring Cloud Config的服务端和客户端工程,通过访问地址http://localhost:8801/clientParam,发现已经可以获取Git中的配置信息了
手动更新运行中的配置文件
在实际项目应用中,我们可能需要对配置文件的内容做一些修改,而要想使修改的配置文件生效,通常做法是将应用重启。此种方式对于小型应用,以及使用人数不多的应用来说比较适用,但是对于大型企业和互联网应用来说,重启应用是行不通的。这也就要求运维人员在修改完应用的配置后,要保证配置及时生效。Spring Cloud Config正好提供了这种功能,我们可以在客户端用POST请求refresh方法来刷新配置内容。
以上一小节的案例为例,要实现配置文件的实时更新,需要执行以下几步。
(1)在客户端的pom.xml中添加依赖spring-boot-starter-actuator。该依赖可以监控程序在运行时的状态,其中包括/refresh的功能。pom.xml中添加的依赖信息如下:
1<dependency><!--监控程序在运行时的状态-->
2    <groupId>org.springframework.boot</groupId>
3    <artifactId>spring-boot-starter-actuator</artifactId>
4</dependency>
(2)在启动类上添加@RefreshScope注解,开启refresh机制。添加此注解后,在执行/refresh时会更新该注解标注类下的所有变量值,包括Config Client从Git仓库中所获取的配置。
(3)在配置文件中将安全认证信息的enabled属性设置为false,其代码如下:
1management:
2  security:
3    enabled: false # 是否开启actuator安全认证
执行完上述3步后,下面来检测应用是否可以实现更新运行中的配置文件。启动应用并访问http://localhost:8801/clientParam
此时修改Git中的配置文件application-prod.yml,将其内容clientParam:git-prod-1.0,修改为clientParam:git-prod-2.0后,再次通过浏览器访问上述地址,会发现浏览器的内容并没有变化,但通过地址 http://localhost:8888/application/prod访问时,会发现服务器端已经获取到了Git中的更新配置信息
使用POST请求访问地址http://localhost:8801/refresh后,此时再次通过浏览器访问http://localhost:8801/clientParam时,浏览器中已成功显示了更新后的配置文件内容,这也就说明我们已成功实现了手动更新运行中的配置文件。