
1 前提准备
1.1 创建一个springboot项目
技巧01:本博文基于springboot2.0创建
1.2 安装redis
1.2.1 linux版本
1.2.2 windows版本
到redis官网下载windows版本的压缩包后,解压即可
1.3 redis使用
本博文以window版本为例子,linux版本请参见
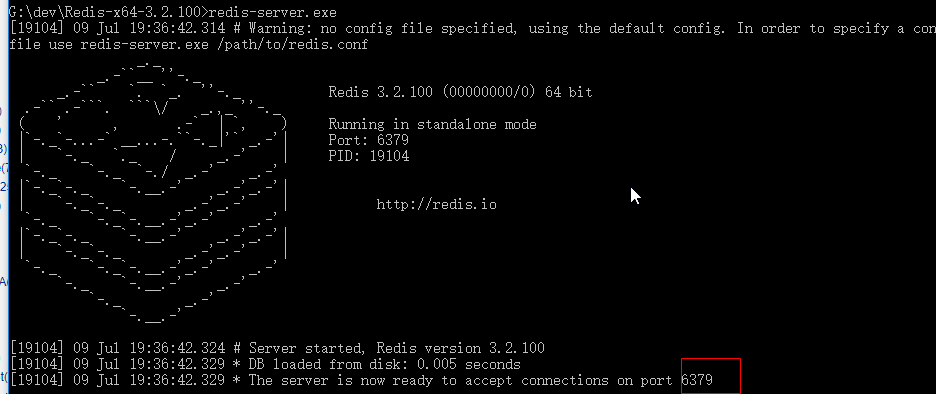
1.3.1 开启服务端
》进入到解压后的redis根目录
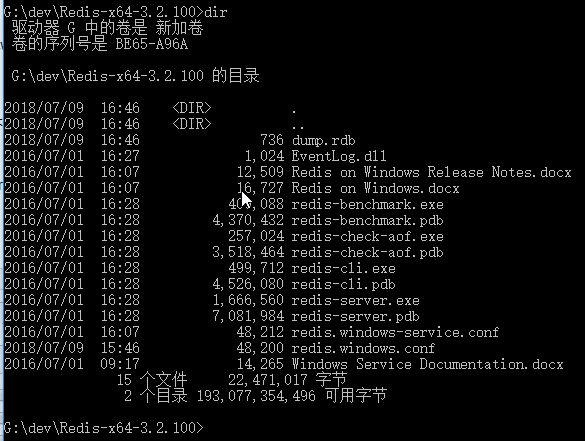
》执行 redis-server.exe
1.3.2 开启客户端
进入到redis解压目录 -> 执行 redis-cli.exe

1.3.3 测试redis服务端和客户端的通信
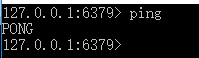
在redis客户端执行 ping,如果返回了 PONG 就表明redis前后端通信正常
1.3.4 关闭
客户端和服务端都用 Ctrl + C 就可以关闭了
2 SpringBoot 集成 Redis
2.1 创建一个SpringBoot项目
技巧01:创建时引入 spring-boot-starter-web 和 spring-boot-starter-data-redis


1<?xml version="1.0" encoding="UTF-8"?>
2<project xmlns="http://maven.apache.org/POM/4.0.0" xmlns:xsi="http://www.w3.org/2001/XMLSchema-instance"
3    xsi:schemaLocation="http://maven.apache.org/POM/4.0.0 http://maven.apache.org/xsd/maven-4.0.0.xsd">
4    <modelVersion>4.0.0</modelVersion>
5
6    <groupId>cn.xiangxu</groupId>
7    <artifactId>redis_pub_sub</artifactId>
8    <version>0.0.1-SNAPSHOT</version>
9    <packaging>jar</packaging>
10
11    <name>redis_pub_sub</name>
12    <description>Demo project for Spring Boot</description>
13
14    <parent>
15        <groupId>org.springframework.boot</groupId>
16        <artifactId>spring-boot-starter-parent</artifactId>
17        <version>2.0.3.RELEASE</version>
18        <relativePath/> <!-- lookup parent from repository -->
19    </parent>
20
21    <properties>
22        <project.build.sourceEncoding>UTF-8</project.build.sourceEncoding>
23        <project.reporting.outputEncoding>UTF-8</project.reporting.outputEncoding>
24        <java.version>1.8</java.version>
25    </properties>
26
27    <dependencies>
28        <dependency>
29            <groupId>org.springframework.boot</groupId>
30            <artifactId>spring-boot-starter-data-redis</artifactId>
31        </dependency>
32        <!--<dependency>-->
33            <!--<groupId>org.springframework.boot</groupId>-->
34            <!--<artifactId>spring-boot-starter-data-redis-reactive</artifactId>-->
35        <!--</dependency>-->
36        <dependency>
37            <groupId>org.springframework.boot</groupId>
38            <artifactId>spring-boot-starter-web</artifactId>
39        </dependency>
40
41        <dependency>
42            <groupId>org.springframework.boot</groupId>
43            <artifactId>spring-boot-devtools</artifactId>
44            <optional>true</optional>
45        </dependency>
46
47        <!-- https://mvnrepository.com/artifact/org.projectlombok/lombok -->
48        <dependency>
49            <groupId>org.projectlombok</groupId>
50            <artifactId>lombok</artifactId>
51            <version>1.18.0</version>
52        </dependency>
53
54
55        <dependency>
56            <groupId>org.springframework.boot</groupId>
57            <artifactId>spring-boot-starter-test</artifactId>
58            <scope>test</scope>
59        </dependency>
60    </dependencies>
61
62    <build>
63        <plugins>
64            <plugin>
65                <groupId>org.springframework.boot</groupId>
66                <artifactId>spring-boot-maven-plugin</artifactId>
67                <configuration>
68                    <fork>true</fork>
69                </configuration>
70            </plugin>
71        </plugins>
72    </build>
73
74
75</project>
pom.xml
2.2 配置redis服务器
技巧01:springboot的启动包已经给我们配置好了redis相关的配置类,所以我们只需要在配置文件中对redis服务器进行相关的配置即可

2.3 使用redis服务器
坑01:外部的redis客户端在连接redis服务器时需要关闭redis服务器的守护进程,否则会出现连接失败;修改redis.conf配置文件即可,windows版本的redis配置文件在根目录下的 redis.windows.conf 中;将配置文件中protected-mode 配置值从 yes 改为 no 即可。
技巧01:因为springboot已经为我们配置好了一切,所以我们直接调用 RedisTemplate 或者 StringRedisTemplate 的相关API就可以对redis服务器进行相关的操作了
》依赖注入 RedisTemplate 或者 StringRedisTemplate
》利用依赖注入的 RedisTemplate 或者 StringRedisTemplate 对象进行操作即可


1package cn.xiangxu.redis_pub_sub.web;
2
3import lombok.extern.slf4j.Slf4j;
4import org.junit.Test;
5import org.junit.runner.RunWith;
6import org.springframework.beans.factory.annotation.Autowired;
7import org.springframework.boot.test.context.SpringBootTest;
8import org.springframework.data.redis.core.RedisTemplate;
9import org.springframework.test.context.junit4.SpringRunner;
10
11import static org.junit.Assert.*;
12
13@RunWith(SpringRunner.class)
14@SpringBootTest
15@Slf4j
16public class TestControllerTest {
17
18    /**
19     * 依赖注入RedisTemplate,直接利用RedisTemplate操作redis即可
20     */
21    @Autowired
22    private RedisTemplate<String, String> redisTemplate;
23
24    @Test
25    public void test01(){
26        log.info("Hello Boy");
27
28        // 设置数据
29        redisTemplate.opsForValue().set("age", "33");
30
31        // 获取数据
32        String result = redisTemplate.opsForValue().get("name");
33        System.out.println(result.toString());
34//        System.out.println(redisTemplate.getClientList());;
35    }
36
37}
View Code
3 SpringBoot 利用 Redis 实现队列的效果
3.1 流程介绍
3.2 源代码


1package cn.xiangxu.redis_pub_sub.domain;
2
3import lombok.extern.slf4j.Slf4j;
4import org.springframework.beans.factory.annotation.Autowired;
5
6import java.util.concurrent.CountDownLatch;
7
8/**
9 * @author 王杨帅
10 * @create 2018-07-09 16:13
11 * @desc
12 **/
13@Slf4j
14public class Receiver {
15    private CountDownLatch latch;
16    @Autowired
17    public Receiver(CountDownLatch latch) {
18        this.latch = latch;
19    }
20
21    public void receiveMessage(String message) {
22        log.info("Received <" + message + ">");
23        latch.countDown();
24    }
25
26
27}
View Code


1package cn.xiangxu.redis_pub_sub;
2
3import cn.xiangxu.redis_pub_sub.domain.Receiver;
4import lombok.extern.slf4j.Slf4j;
5import org.springframework.boot.SpringApplication;
6import org.springframework.boot.autoconfigure.SpringBootApplication;
7import org.springframework.context.ApplicationContext;
8import org.springframework.context.annotation.Bean;
9import org.springframework.data.redis.connection.RedisConnectionFactory;
10import org.springframework.data.redis.core.StringRedisTemplate;
11import org.springframework.data.redis.listener.PatternTopic;
12import org.springframework.data.redis.listener.RedisMessageListenerContainer;
13import org.springframework.data.redis.listener.adapter.MessageListenerAdapter;
14
15import java.util.concurrent.CountDownLatch;
16
17@SpringBootApplication
18@Slf4j
19public class RedisPubSubApplication {
20
21    /*
22     * Redis消息监听器容器
23     * 这个容器加载了RedisConnectionFactory和消息监听器
24     */
25    @Bean
26    RedisMessageListenerContainer container(RedisConnectionFactory connectionFactory,
27                                            MessageListenerAdapter listenerAdapter){
28        RedisMessageListenerContainer container = new RedisMessageListenerContainer();
29        container.setConnectionFactory(connectionFactory);
30        container.addMessageListener(listenerAdapter, new PatternTopic("sprinboot-redis-messaage"));
31        return container;
32    }
33
34    /*
35     * 将Receiver注册为一个消息监听器,并指定消息接收的方法(receiveMessage)
36     * 如果不指定消息接收的方法,消息监听器会默认的寻找Receiver中的handleMessage这个方法作为消息接收的方法
37     */
38    @Bean
39    MessageListenerAdapter listenerAdapter(Receiver receiver){
40        return new MessageListenerAdapter(receiver, "receiveMessage");
41    }
42
43    /*
44     * Receiver实例
45     */
46    @Bean
47    Receiver receiver(CountDownLatch latch){
48        return new Receiver(latch);
49    }
50
51    @Bean
52    CountDownLatch latch(){
53        return new CountDownLatch(1);
54    }
55
56    /*
57     * Redis Template 用来发送消息
58     */
59    @Bean
60    StringRedisTemplate template(RedisConnectionFactory connectionFactory){
61        return new StringRedisTemplate(connectionFactory);
62    }
63
64    public static void main(String[] args) {
65        ApplicationContext ctx = SpringApplication.run(RedisPubSubApplication.class, args);
66
67        StringRedisTemplate template = ctx.getBean(StringRedisTemplate.class);
68//      CountDownLatch latch = ctx.getBean(CountDownLatch.class);
69
70        log.info("Sending message......");
71        template.convertAndSend("sprinboot-redis-messaage", "Hello, SpringBoot redis message!!!!");
72//      latch.wait();
73
74//        System.exit(0);
75    }
76}
View Code
3.3 效果测试
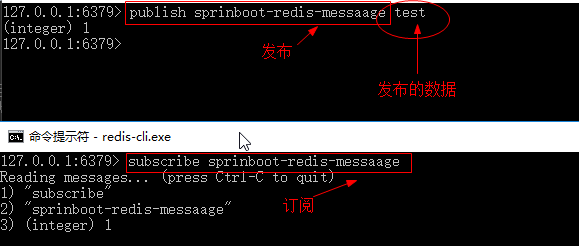
3.3.1 利用redis服务器中的客户端测试发布订阅效果
3.3.2 启动springBoot项目
在redis服务器中发布的消息会自动打印到控制台上
