
战斗前准备:新建Spring Boot项目选择Thymeleaf和WebSocket依赖
广播式主要有7大步骤
- 1.配置WebSocket
- 2.编写浏览器向服务端发送消息(服务端用该类接收)
- 3. 编写服务端向浏览器发送消息(服务端用该类发送)
- 4. 编写一个Controller用于模拟发送和接收
- 5.添加脚本
- 6. 编写一个页面来演示
- 7. 配置ViewController
1.配置WebSocket
配置WebSocket.需要在配置类上使用@EnableWebSocketMessageBroker开启WebSocket支持,并实现WebSocketMessageBrokerConfigurer接口,重写方法来配置WebSocket
(SpringBoot颠覆者里是继承AbstractWebSocketMessageBrokerConfigurer 类,但是那个类已经过时了)
1import org.springframework.context.annotation.Configuration;
2import org.springframework.messaging.simp.config.MessageBrokerRegistry;
3import org.springframework.web.socket.config.annotation.EnableWebSocketMessageBroker;
4import org.springframework.web.socket.config.annotation.StompEndpointRegistry;
5import org.springframework.web.socket.config.annotation.WebSocketMessageBrokerConfigurer;
6/**
7 * 第一步,配置WebSocket.需要在配置类上使用@EnableWebSocketMessageBroker开启WebSocket支持
8 * 并实现WebSocketMessageBrokerConfigurer接口
9 * 重写方法来配置WebSocket
10 */
11@Configuration
12//通过@EnableWebSocketMessageBroker注解开启使用STOMP协议在传输基于代理(message broker)的消息
13@EnableWebSocketMessageBroker
14public class WebSocketConfig implements WebSocketMessageBrokerConfigurer {
15
16
17    //注册STOMP协议的节点(endpoint),并映射指定的URL
18    public void registerStompEndpoints(StompEndpointRegistry registry){
19
20
21        //注册一个STOMP的endpoint,并指定使用SockJS协议
22        registry.addEndpoint("/endpointWisely").withSockJS();
23    }
24    //配置消息代理(Message Broker)
25    public void configureMessageBroker(MessageBrokerRegistry registry){
26
27
28        //广播式配置一个/topic消息代理
29        registry.enableSimpleBroker("/topic");
30    }
31}
2.编写浏览器向服务端发送消息(服务端用该类接收)
1//浏览器向服务端发送的消息用此类接收
2public class WiselyMessage {
3
4
5    public String name;
6    public String getName(){
7
8
9        return  name;
10    }
11}
3. 编写服务端向浏览器发送消息(服务端用该类发送)
1//服务端向浏览器发送的此类的消息
2public class WiselyResponse {
3
4
5    private String responseMessage;
6    public WiselyResponse(String responseMessage){
7
8
9        this.responseMessage = responseMessage;
10    }
11
12    public String getResponseMessage() {
13
14
15        return responseMessage;
16    }
17}
4. 编写一个Controller用于模拟发送和接收
1import org.springframework.messaging.handler.annotation.MessageMapping;
2import org.springframework.messaging.handler.annotation.SendTo;
3import org.springframework.stereotype.Controller;
4import test.demo4.domain.WiselyMessage;
5import test.demo4.domain.WiselyResponse;
6
7@Controller
8public class WsController {
9
10
11    //当浏览器向服务端发送请求时,通过@MessageMapping映射/welcome这个地址,类似于@RequestMapping
12    @MessageMapping("/welcome")
13    //当服务端有消息时,会订阅了@SendTo中的路径的浏览器发送消息
14    @SendTo("/topic/getResponse")
15    public WiselyResponse say(WiselyMessage message)throws Exception{
16
17
18        Thread.sleep(3000);
19        return new WiselyResponse("Welcome   "+message.getName()+"  !");
20    }
21}
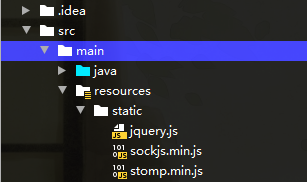
5.添加脚本
将stomp.min.js、scokjs.min.js和jquery.js放置在src/main/resources/static下
找资源太难的话,当然已经为你们准备好啦!
链接失效的话后台私信我哦!
链接:https://pan.baidu.com/s/1UsP-4w1OkTUiz\_YvVgFlVQ
提取码:9wpf
6. 编写一个页面来演示
1<!DOCTYPE html>
2<html lang="en" xmlns:th="http://www.thymeleaf.org">
3<head>
4  <meta charset="UTF-8">
5  <title>Spring Boot+WebSoc+广播式</title>
6</head>
7<body onload="disconnect()">
8  <noscript><h2 style="color: #ff0000">貌似浏览器不支持WebSocket</h2></noscript>
9<div>
10  <div>
11    <button id="connect" onclick="connect();">连接</button>
12    <button id="disconnect" onclick="disconnect();">断开连接</button>
13  </div>
14  <div id="conversationDiv">
15    <label>输入你的名字</label><input type="text" id="name"/>
16    <button id="sendName" onclick="sendName();">发送</button>
17    <p id="response"></p>
18  </div>
19  <script th:src="@{sockjs.min.js}"></script>
20  <script th:src="@{stomp.min.js}"></script>
21  <script th:src="@{jquery.js}"></script>
22  <script type="text/javascript">
23    var stompClient  = null;
24    function setConnected(connected) {
25
26
27      document.getElementById('connect').disabled = connected;
28      document.getElementById('disconnect').disabled = !connected;
29      document.getElementById('conversationDiv').style.visibility = connected ? 'visible':'hidden';
30      $("#response").html();
31    }
32
33    function connect() {
34
35
36      //连接SockJS的endpoint名称为"/endpointWisely"
37      var socket = new SockJS('/endpointWisely');
38      //使用STOMP子协议的WebSocket客户端
39      stompClient = Stomp.over(socket);
40      //连接WebSocket服务端
41      stompClient.connect({
42
43   },function (frame) {
44
45
46        setConnected(true);
47        console.log('Connected:'+frame);
48        //通过stompClient.subscribe订阅/topic/getResponse目标(destination)发送消息
49        //这个是在控制器的@SendTo中定义的
50        stompClient.subscribe('/topic/getResponse',function (response) {
51
52
53          showResponse(JSON.parse(response.body).responseMessage);
54        });
55      });
56    }
57
58    function disconnect() {
59
60
61      if (stompClient != null){
62
63
64        stompClient.disconnect();
65      }
66      setConnected(false);
67      console.log("Disconnected");
68    }
69    function sendName() {
70
71
72      var name = $("#name").val();
73      //通过stompClient.send向/welcome目标(destination)发送消息
74      //这个是在控制器的@MessageMapping中定义的
75      stompClient.send("/welcome",{
76
77   },JSON.stringify({
78
79   "name":name}));
80    }
81    function showResponse(message) {
82
83
84      var response = $("#response");
85      response.html(message);
86    }
87  </script>
88</div>
89</body>
90</html>
7. 配置ViewController
为ws.html提供便捷的路径映射
将所有/static/** 访问都映射到classpath:/static/ 目录下
1import org.springframework.context.annotation.Configuration;
2import org.springframework.web.servlet.config.annotation.ResourceHandlerRegistry;
3import org.springframework.web.servlet.config.annotation.ViewControllerRegistry;
4import org.springframework.web.servlet.config.annotation.WebMvcConfigurer;
5
6@Configuration
7public class WebMvcConfig implements WebMvcConfigurer {
8
9
10	//为ws.html提供便捷的路径映射
11    public void addViewControllers(ViewControllerRegistry registry){
12
13
14        registry.addViewController("/ws").setViewName("/ws");
15    }
16  	//将所有/static/** 访问都映射到classpath:/static/ 目录下
17    public void addResourceHandlers(ResourceHandlerRegistry registry) {
18
19
20        System.out.println("==========静态资源拦截!============");
21        registry.addResourceHandler("/static/**/").addResourceLocations("classpath:/static/");
22    }
23}
跑跑跑起来…

ps:以上内容参考SpringBoot颠覆者,学习笔记,仅供参考