

SpringBean的生命周期
一:单例与多例对象是如何初始化
单例默认情况下是在容器被加载的时候就会初始化
多例是在每次获取Bean对象的时候初始化
代码验证:
@Component public class UserEntity { public UserEntity() { System.out.println(">>>>UserEntity无参数构造函数执行..."); }
@Configuration @ComponentScan("com.mayikt.entity") public class MyConfig { }
>>>>UserEntity无参数构造函数执行...
当加上@Scope("prototype"),没有输出结果
@Component @Scope("prototype") public class UserEntity { public UserEntity() { System.out.println(">>>>UserEntity无参数构造函数执行..."); }
说明单例默认是在容器被加载的时候初始化,多例是在每次获取Bean对象的时候初始化。
二:Bean对象的初始化与销毁过程01
Bean初始化:指的就是对象已经创建,里面的所有set方法都已经执行完毕了。
举个例子:
@Configuration @ComponentScan("com.mayikt.entity") public class MyConfig {
1/\*\*
2 \* initMethod:指定初始化方法执行
3 \* destroyMethod:指定销毁方法
4 \* @return
5 \*/
6@Bean(initMethod = "**initMethod**",destroyMethod = "**destroyMethod**")
7public UserEntity userEntity(){
8    return new UserEntity();
9}
}
@Component public class UserEntity { public UserEntity() { System.out.println(">>>>UserEntity无参数构造函数执行..."); } /** * 思考:initMethod是在无参构造函数之前执行还是后执行.. */ private void initMethod() { System.out.println(">>>>UserEntity initMethod 执行..."); } private void destroyMethod() { System.out.println(">>>>UserEntity destroyMethod 执行..."); } }
public static void main(String[] args) { /** * IOC容器初始化单例对象都是循环遍历调用getBean方法 */ AnnotationConfigApplicationContext applicationContext = new AnnotationConfigApplicationContext(MyConfig.class); applicationContext.close();
返回结果
>>>>UserEntity无参数构造函数执行...
>>>>UserEntity initMethod 执行...
>>>>UserEntity destroyMethod 执行...
构造函数:Bean的创建,Map集合存储对象
initMethod:表示对象已经创建成功之后执行
destroyMethod:表示对象被销毁之后执行,clean
destroyMethod方法执行时,相当于调用了close方法去销毁Bean
applicationContext.close();
public void close() { synchronized (this.startupShutdownMonitor) { doClose(); // If we registered a JVM shutdown hook, we don't need it anymore now: // We've already explicitly closed the context. if (this.shutdownHook != null) { try { Runtime.getRuntime().removeShutdownHook(this.shutdownHook); } catch (IllegalStateException ex) { // ignore - VM is already shutting down } } } }
protected void doClose() { if (this.active.get() && this.closed.compareAndSet(false, true)) { .... // Destroy all cached singletons in the context's BeanFactory. destroyBeans();
1  // Close the state of this context itself.
2  closeBeanFactory();
3
4  // Let subclasses do some final clean-up if they wish...
5  onClose();
6
7  this.active.set(false);
} }
protected void destroyBeans() { getBeanFactory().destroySingletons(); }

public void destroySingletons() { super.destroySingletons(); this.manualSingletonNames.clear(); this.clearByTypeCache(); }
private void clearByTypeCache() { this.allBeanNamesByType.clear(); this.singletonBeanNamesByType.clear(); }
上面执行了clear操作,再回到前面
这里给用户自定义关闭操作:模板方法设计模式
protected void onClose() { // For subclasses: do nothing by default. }
再把活跃状态设置为false。
三:Bean对象的初始化与销毁过程02
1.实现InitializingBean,DisposableBean两个接口
@Component public class MemberEntity implements InitializingBean,DisposableBean{ // implements InitializingBean, DisposableBean public MemberEntity() { System.out.println("无参构造函数执行.."); } // afterPropertiesSet initMet hod // 1.对象创建 对象属性赋值 set方法全部走完 @Override public void afterPropertiesSet() throws Exception { System.out.println("MemberEntity >>>afterPropertiesSet"); } @Override public void destroy() throws Exception { System.out.println("MemberEntity >>> destroy"); } }
输出结果:
无参构造函数执行..
MemberEntity >>>afterPropertiesSet
MemberEntity >>> destroy
2.使用Java封装的注解方式@PostConstruct, @PreDestroy
@Component public class MemberEntity{ // implements InitializingBean, DisposableBean public MemberEntity() { System.out.println("无参构造函数执行.."); } // afterPropertiesSet initMet hod // 1.对象创建 对象属性赋值 set方法全部走完 @PostConstruct public void afterPropertiesSet() throws Exception { System.out.println("MemberEntity >>>afterPropertiesSet"); } @PreDestroy public void destroy() throws Exception { System.out.println("MemberEntity >>> destroy"); } }
输出结果
无参构造函数执行..
MemberEntity >>>afterPropertiesSet
MemberEntity >>> destroy
四:现在我们开始分析SpringBean的生命周期
SpringBean生命周期有个很好的理念就是后置处理器BeanPostProcessor
后置处理器:BeanPostProcessor
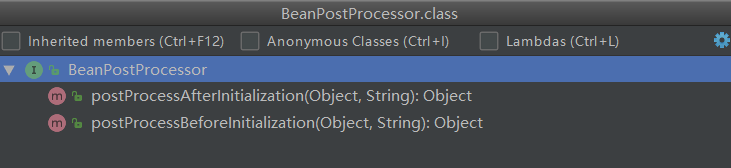
BeanPostProcessor引入:
@Component public class MyApplicationContext implements ApplicationContextAware { private ApplicationContext applicationContext; /** * spring底层中为什么能够实现ApplicationContextAware接口 就能够拿到ApplicationContext * @param applicationContext * @throws BeansException */ @Override public void setApplicationContext(ApplicationContext applicationContext) throws BeansException { MemberEntity memberEntity = applicationContext.getBean("memberEntity", MemberEntity.class); System.out.println("memberEntity:" + memberEntity); } }
@Configuration @ComponentScan("com.mayikt.entity") @Import(MyApplicationContext.class)//这里注入到spring容器中 public class MyConfig {}
输出结果:对象初始化,赋值完毕,就可以通过setApplicationContext拿到bean对象
memberEntity:com.mayikt.entity.MemberEntity@11e21d0e
思考问题:spring底层中为什么能够实现ApplicationContextAware接口 就能够拿到ApplicationContext
关键就是在于:BeanPostProcessor
下面我们开始分析:BeanPostProcessor后置处理器(非常重要!!!)
AnnotationConfigApplicationContext applicationContext = new AnnotationConfigApplicationContext(MyConfig.class);
public AnnotationConfigApplicationContext(Class<?>... annotatedClasses) { this(); register(annotatedClasses); refresh(); }
public void refresh() throws BeansException, IllegalStateException { synchronized (this.startupShutdownMonitor) { .... try { .... // Instantiate all remaining (non-lazy-init) singletons. finishBeanFactoryInitialization(beanFactory); } .... }
protected void finishBeanFactoryInitialization(ConfigurableListableBeanFactory beanFactory) { .... // Instantiate all remaining (non-lazy-init) singletons. beanFactory.preInstantiateSingletons(); }
@Override public void preInstantiateSingletons() throws BeansException { .... List<String> beanNames = new ArrayList<>(this.beanDefinitionNames);
for (String beanName : beanNames) { RootBeanDefinition bd = getMergedLocalBeanDefinition(beanName); if (!bd.isAbstract() && bd.isSingleton() && !bd.isLazyInit()) { if (isFactoryBean(beanName)) { final FactoryBean<?> factory = (FactoryBean<?>) getBean(FACTORY_BEAN_PREFIX + beanName); boolean isEagerInit; if (System.getSecurityManager() != null && factory instanceof SmartFactoryBean) { isEagerInit = AccessController.doPrivileged((PrivilegedAction<Boolean>) () -> ((SmartFactoryBean<?>) factory).isEagerInit(), getAccessControlContext()); } else { isEagerInit = (factory instanceof SmartFactoryBean && ((SmartFactoryBean<?>) factory).isEagerInit()); } if (isEagerInit) { getBean(beanName); } } else { getBean(beanName); } } } .... }
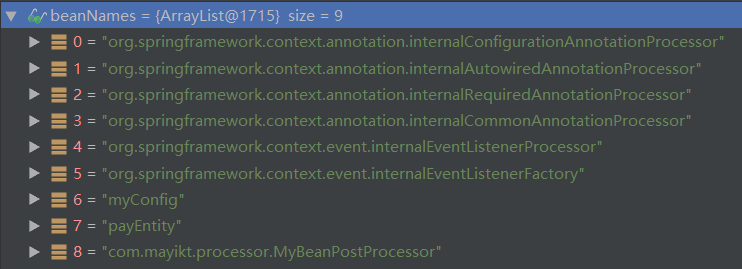
@Override public Object getBean(String name) throws BeansException { return doGetBean(name, null, null, false); }
protected <T> T doGetBean(final String name, @Nullable final Class<T> requiredType, @Nullable final Object[] args, boolean typeCheckOnly) throws BeansException { .... Object sharedInstance = getSingleton(beanName);//检测缓存中或者实例工厂中是否有对应的实例 if (sharedInstance != null && args == null) { if (logger.isDebugEnabled()) { if (isSingletonCurrentlyInCreation(beanName)) { logger.debug("Returning eagerly cached instance of singleton bean '" + beanName + "' that is not fully initialized yet - a consequence of a circular reference"); } else { logger.debug("Returning cached instance of singleton bean '" + beanName + "'"); } } bean = getObjectForBeanInstance(sharedInstance, name, beanName, null);//返回对应的实例,有时候存在诸如BeanFactory的情况并不是直接返回实例本身而是返回指定方法返回的实例 }
else { // Fail if we're already creating this bean instance: // We're assumably within a circular reference. if (isPrototypeCurrentlyInCreation(beanName)) {//只有在单例情况下才会去尝试解决循环依赖 throw new BeanCurrentlyInCreationException(beanName); }
1  // Check if bean definition exists in this factory.
2  BeanFactory parentBeanFactory = **getParentBeanFactory**();
3  if (parentBeanFactory != null && !containsBeanDefinition(beanName)) {//如果beaanDefinitionMap中也就是在所有已经加载的类中不包括beanName则尝试从parentBeanFactory中检测
4     // Not found -> check parent.
5     String nameToLookup = originalBeanName(name);
6     if (parentBeanFactory instanceof AbstractBeanFactory) {
7        return ((AbstractBeanFactory) parentBeanFactory).doGetBean(
8              nameToLookup, requiredType, args, typeCheckOnly);
9     }
10     else if (args != null) {//递归到BeanFactory中寻找
11        // Delegation to parent with explicit args.
12        return (T) parentBeanFactory.getBean(nameToLookup, args);
13     }
14     else {
15        // No args -> delegate to standard getBean method.
16        return parentBeanFactory.getBean(nameToLookup, requiredType);
17     }
18  }
19
20  if (!typeCheckOnly) {//如果不是仅仅做类型检查,则是创建Bean,这里进行记录
21     markBeanAsCreated(beanName);
22  }
23
24  try {
25     final RootBeanDefinition mbd = **getMergedLocalBeanDefinition**(beanName);//转换为RootBeanDefinition
26     checkMergedBeanDefinition(mbd, beanName, args);
27
28     // Guarantee initialization of beans that the current bean depends on.
29     String\[\] dependsOn = mbd.getDependsOn();
30     if (dependsOn != null) {//若存在依赖则需要递归实例化依赖的Bean
31        for (String dep : dependsOn) {
32           if (isDependent(beanName, dep)) {
33              throw new BeanCreationException(mbd.getResourceDescription(), beanName,
34                    "Circular depends-on relationship between '" + beanName + "' and '" + dep + "'");
35           }
36           **registerDependentBean**(dep, beanName);//缓存依赖调用
37           getBean(dep);
38        }
39     }
40
41     // Create bean instance.
42     if (mbd.isSingleton()) {//实例化依赖的bean后,便可实例化mbd本身了,单例模式的创建
43        sharedInstance = **getSingleton**(beanName, () -> {
44           try {
45              return **createBean**(beanName, mbd, args);
46           }
47           catch (BeansException ex) {
48              destroySingleton(beanName);
49              throw ex;
50           }
51        });
52        bean = **getObjectForBeanInstance**(sharedInstance, name, beanName, mbd);
53     }
54
55     else if (mbd.isPrototype()) {//prototype模式的创建
56        // It's a prototype -> create a new instance.
57        Object prototypeInstance = null;
58        try {
59           beforePrototypeCreation(beanName);
60           prototypeInstance = **createBean**(beanName, mbd, args);
61        }
62        finally {
63           afterPrototypeCreation(beanName);
64        }
65        bean = **getObjectForBeanInstance**(prototypeInstance, name, beanName, mbd);
66     }
67
68     else {
69        String scopeName = mbd.getScope();
70        final Scope scope = this.scopes.get(scopeName);
71        if (scope == null) {
72           throw new IllegalStateException("No Scope registered for scope name '" + scopeName + "'");
73        }
74        try {
75           Object scopedInstance = scope.get(beanName, () -> {
76              beforePrototypeCreation(beanName);
77              try {
78                 return **createBean**(beanName, mbd, args);
79              }
80              finally {
81                 afterPrototypeCreation(beanName);
82              }
83           });
84           bean = **getObjectForBeanInstance**(scopedInstance, name, beanName, mbd);
85        }
86        catch (IllegalStateException ex) {
87           throw new BeanCreationException(beanName,
88                 "Scope '" + scopeName + "' is not active for the current thread; consider " +
89                 "defining a scoped proxy for this bean if you intend to refer to it from a singleton",
90                 ex);
91        }
92     }
93  }
94  catch (BeansException ex) {
95     cleanupAfterBeanCreationFailure(beanName);
96     throw ex;
97  }
}
// Check if required type matches the type of the actual bean instance. if (requiredType != null && !requiredType.isInstance(bean)) {//检测需要的类型是否符合实际bean的类型 try { T convertedBean = getTypeConverter().convertIfNecessary(bean, requiredType); if (convertedBean == null) { throw new BeanNotOfRequiredTypeException(name, requiredType, bean.getClass()); } return convertedBean; } catch (TypeMismatchException ex) { if (logger.isDebugEnabled()) { logger.debug("Failed to convert bean '" + name + "' to required type '" + ClassUtils.getQualifiedName(requiredType) + "'", ex); } throw new BeanNotOfRequiredTypeException(name, requiredType, bean.getClass()); } } return (T) bean; }
步骤大致如下:
1.转换BeanName
2.尝试从缓存中加载单例bean
3.Bean的实例化
4.原型模式的依赖检查
5.检查parentBeanFactory
6.将存储XML配置文件的GernericBeanDefinition转换为RootBeanDefinition
7.寻找依赖
8.针对不同的scope进行bean的创建
9.类型转换
判断是单例:
if (mbd.isSingleton()) { sharedInstance = getSingleton(beanName, () -> { try { return createBean(beanName, mbd, args); } catch (BeansException ex) { destroySingleton(beanName); throw ex; } }); bean = getObjectForBeanInstance(sharedInstance, name, beanName, mbd); }
@Override protected Object createBean(String beanName, RootBeanDefinition mbd, @Nullable Object[] args) throws BeanCreationException { .... Object beanInstance = doCreateBean(beanName, mbdToUse, args); .... }
protected Object doCreateBean(final String beanName, final RootBeanDefinition mbd, final @Nullable Object[] args) throws BeanCreationException {
final Object bean = instanceWrapper.getWrappedInstance(); .... Object exposedObject = bean; try { populateBean(beanName, mbd, instanceWrapper);//循环给属性赋值 exposedObject = initializeBean(beanName, exposedObject, mbd); } .... }
protected Object initializeBean(String beanName, Object bean, @Nullable RootBeanDefinition mbd) { if (System.getSecurityManager() != null) { AccessController.doPrivileged(() -> { this.invokeAwareMethods(beanName, bean); return null; }, this.getAccessControlContext()); } else { this.invokeAwareMethods(beanName, bean); }
1Object wrappedBean = bean;
2if (mbd == null || !mbd.isSynthetic()) {
3    wrappedBean = this.**applyBeanPostProcessorsBeforeInitialization**(bean, beanName);
4}
5
6try {
7    this.**invokeInitMethods**(beanName, wrappedBean, mbd);**//执行自定义的init方法**
8} catch (Throwable var6) {
9    throw new BeanCreationException(mbd != null ? mbd.getResourceDescription() : null, beanName, "Invocation of init method failed", var6);
10}
11
12if (mbd == null || !mbd.isSynthetic()) {
13    wrappedBean = this.**applyBeanPostProcessorsAfterInitialization**(wrappedBean, beanName);
14}
15
16return wrappedBean;
}
private void invokeAwareMethods(String beanName, Object bean) { if (bean instanceof Aware) { if (bean instanceof BeanNameAware) { //判断类型并设置beanName ((BeanNameAware)bean).setBeanName(beanName); }
1    if (bean instanceof BeanClassLoaderAware) {
2        ClassLoader bcl = this.getBeanClassLoader();
3        if (bcl != null) {
4            ((BeanClassLoaderAware)bean).setBeanClassLoader(bcl);
5        }
6    }
7    if (bean instanceof BeanFactoryAware) {
8        ((BeanFactoryAware)bean).setBeanFactory(this);
9    }
10}
}
我们就明白了:IOC容器初始化单例对象都是循环遍历调用getBean方法。
下面我们手写看下springBean的生命周期
@Component public class PayEntity implements BeanNameAware, BeanFactoryAware, InitializingBean, ApplicationContextAware { public PayEntity() { System.out.println("1.对象的实例化完成.."); }
1@Override
2public void setBeanName(String name) {
3    System.out.println("2.对象beanName:" + name);
4}
5@Override
6public void **setBeanFactory**(BeanFactory beanFactory) throws BeansException {
7    System.out.println("3.beanFactory:" + beanFactory);
8}
9@Override
10public void **setApplicationContext**(ApplicationContext applicationContext) throws BeansException {
11    System.out.println("4.获取到applicationContext对象");
12}
13@Override
14public void **afterPropertiesSet**() throws Exception {
15    System.out.println("5.bean init方法执行..");
16}
输出结果
11.对象的实例化完成..
22.对象beanName:payEntity
33.beanFactory:org.springframework.beans.factory.support.DefaultListableBeanFactory@55f3ddb1: defining beans [org.springframework.context.annotation.internalConfigurationAnnotationProcessor,org.springframework.context.annotation.internalAutowiredAnnotationProcessor,org.springframework.context.annotation.internalRequiredAnnotationProcessor,org.springframework.context.annotation.internalCommonAnnotationProcessor,org.springframework.context.event.internalEventListenerProcessor,org.springframework.context.event.internalEventListenerFactory,myConfig,payEntity]; root of factory hierarchy
44.获取到applicationContext对象
55.bean init方法执行..
BeanPostProcessor的作用
protected Object initializeBean(final String beanName, final Object bean, @Nullable RootBeanDefinition mbd) { .... if (mbd == null || !mbd.isSynthetic()) { wrappedBean = applyBeanPostProcessorsBeforeInitialization(wrappedBean, beanName);//init之前处理操作 } .... try { invokeInitMethods(beanName, wrappedBean, mbd);//init执行逻辑 } .... if (mbd == null || !mbd.isSynthetic()) { wrappedBean = applyBeanPostProcessorsAfterInitialization(wrappedBean, beanName);//init之后处理操作 }
return wrappedBean; }
BeanPostProcessor后置处理器的前置处理逻辑和后置处理逻辑:
public Object applyBeanPostProcessorsBeforeInitialization(Object existingBean, String beanName) throws BeansException { for (BeanPostProcessor beanProcessor : getBeanPostProcessors()) { Object current = beanProcessor.postProcessBeforeInitialization(result, beanName); ... }
public Object applyBeanPostProcessorsAfterInitialization(Object existingBean, String beanName) throws BeansException { for (BeanPostProcessor beanProcessor : getBeanPostProcessors()) { Object current = beanProcessor.postProcessAfterInitialization(result, beanName); ... }
我们自定义类实现BeanPostProcessor
@Component public class MyBeanPostProcessor implements BeanPostProcessor { //BeanPostProcessor 后置处理器 对我们bean的对象实现增强 @Override // 执行自定义init方法之前处理 public Object postProcessBeforeInitialization(Object bean, String beanName) throws BeansException { System.out.println("执行init方法之前处理 : " + beanName); return bean; }
1@Override
2// 执行自定义init方法之后处理
3public Object **postProcessAfterInitialization**(Object bean, String beanName) throws BeansException {
4    System.out.println("执行init方法之后处理 :" + beanName);
5    return bean;
6}
7//BeanPostProcessor  后置处理
8// Aware    实现
}
输出结果:
1执行init方法之前处理 : org.springframework.context.event.internalEventListenerProcessor
2执行init方法之后处理 :org.springframework.context.event.internalEventListenerProcessor
3执行init方法之前处理 : org.springframework.context.event.internalEventListenerFactory
4执行init方法之后处理 :org.springframework.context.event.internalEventListenerFactory
5执行init方法之前处理 : myConfig
6执行init方法之后处理 :myConfig
71.对象的实例化完成..
82.对象beanName:payEntity
93.beanFactory:org.springframework.beans.factory.support.DefaultListableBeanFactory@55f3ddb1: defining beans [org.springframework.context.annotation.internalConfigurationAnnotationProcessor,org.springframework.context.annotation.internalAutowiredAnnotationProcessor,org.springframework.context.annotation.internalRequiredAnnotationProcessor,org.springframework.context.annotation.internalCommonAnnotationProcessor,org.springframework.context.event.internalEventListenerProcessor,org.springframework.context.event.internalEventListenerFactory,myConfig,payEntity,com.mayikt.processor.MyBeanPostProcessor]; root of factory hierarchy
104.获取到applicationContext对象
11执行init方法之前处理 : payEntity
125.bean init方法执行..
13执行init方法之后处理 :payEntity
ApplicationAware接口原理
实现ApplicationAware接口怎么就可以setApplicationContext呢?
@Override public void setApplicationContext(ApplicationContext applicationContext) throws BeansException { System.out.println("4.获取到applicationContext对象"); }
public Object applyBeanPostProcessorsAfterInitialization(Object existingBean, String beanName) throws BeansException {
Object result = existingBean; for (BeanPostProcessor beanProcessor : getBeanPostProcessors()) { Object current = beanProcessor.postProcessAfterInitialization(result, beanName); if (current == null) { return result; } result = current; } return result; }
@Override public Object postProcessAfterInitialization(Object bean, String beanName) { return bean; }
发现BeanPostProcessor后置处理器的postProcessAfterInitialization后置处理什么也没做:
再去前置找:
public Object applyBeanPostProcessorsBeforeInitialization(Object existingBean, String beanName) throws BeansException {
Object result = existingBean; for (BeanPostProcessor beanProcessor : getBeanPostProcessors()) { Object current = beanProcessor.postProcessBeforeInitialization(result, beanName); if (current == null) { return result; } result = current; } return result; }
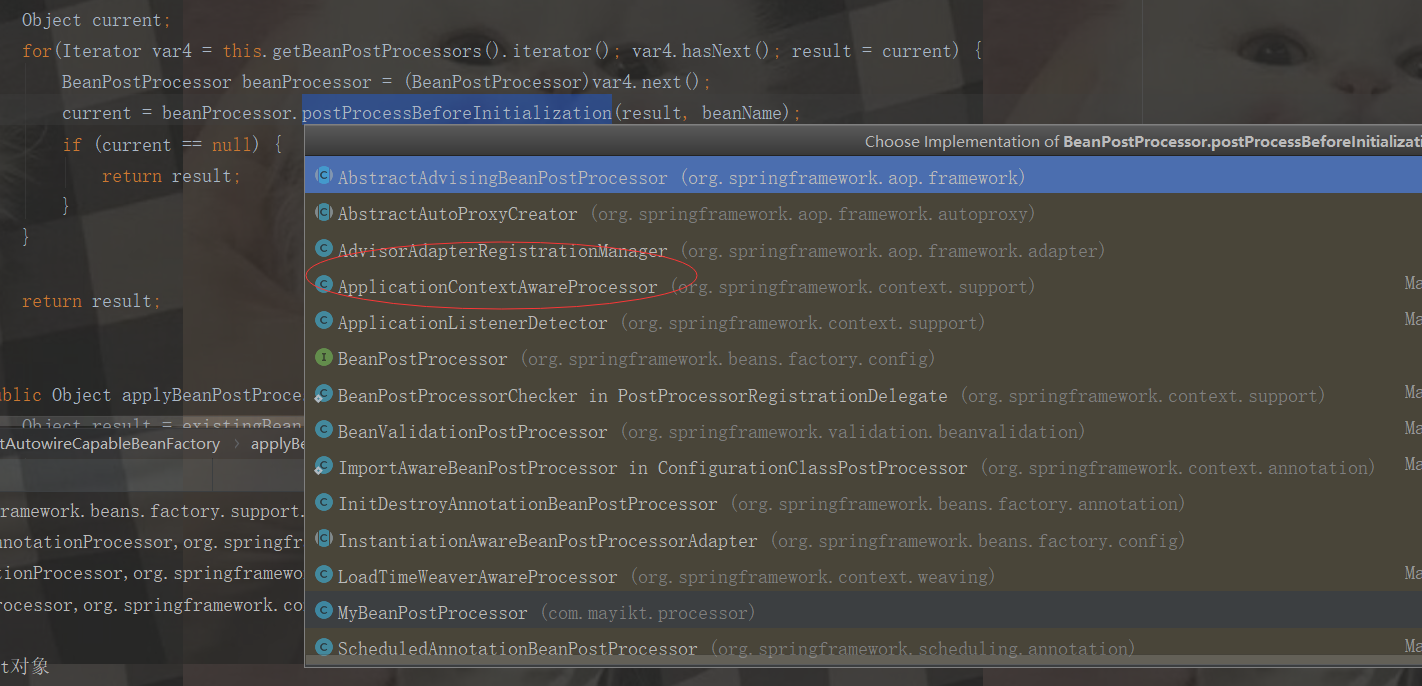
public Object postProcessBeforeInitialization(final Object bean, String beanName) throws BeansException { AccessControlContext acc = null;
if (System.getSecurityManager() != null && (bean instanceof EnvironmentAware || bean instanceof EmbeddedValueResolverAware || bean instanceof ResourceLoaderAware || bean instanceof ApplicationEventPublisherAware || bean instanceof MessageSourceAware || bean instanceof ApplicationContextAware)) { acc = this.applicationContext.getBeanFactory().getAccessControlContext(); }
if (acc != null) { AccessController.doPrivileged((PrivilegedAction<Object>) () -> { invokeAwareInterfaces(bean); return null; }, acc); } else { invokeAwareInterfaces(bean); }
return bean; }
private void invokeAwareInterfaces(Object bean) { if (bean instanceof Aware) { if (bean instanceof EnvironmentAware) { ((EnvironmentAware) bean).setEnvironment(this.applicationContext.getEnvironment()); } if (bean instanceof EmbeddedValueResolverAware) { ((EmbeddedValueResolverAware) bean).setEmbeddedValueResolver(this.embeddedValueResolver); } if (bean instanceof ResourceLoaderAware) { ((ResourceLoaderAware) bean).setResourceLoader(this.applicationContext); } if (bean instanceof ApplicationEventPublisherAware) { ((ApplicationEventPublisherAware) bean).setApplicationEventPublisher(this.applicationContext); } if (bean instanceof MessageSourceAware) { ((MessageSourceAware) bean).setMessageSource(this.applicationContext); } if (bean instanceof ApplicationContextAware) {//判断ApplicationContextAware类型,赋值 ((ApplicationContextAware) bean).setApplicationContext(this.applicationContext); } } }
看到没有,最后判断:bean instanceof ApplicationContextAware类型,再赋值
我们就可以知道上面提出的这个问题:实现ApplicationAware接口怎么就可以setApplicationContext?
所以我们知道ApplicationContextAware是通过BeanPostProcessor后置处理器的postProcessBeforeInitialization****前置处理实现的。
SpringBean的生命周期总结
源码分析流程:
1.进入到刷新refresh()方法
2.finishBeanFactoryInitialization()初始化所有单例对象
3.preInstantiateSingletons()初始化所有的单例对象:注意是非懒加载
4.getBean()-》doGetBean()先查询该对象是否有初始化过,没有的化就创建注册到IOC容器中
5.createBean()判断对象如果是单例的情况下,就调用该方法去创建对象
6.doCreateBean()创建IOC对象
7.createBeanInstance()使用Java的反射机制实例化我们的对象
8.populateBean()给对象的set属性赋值
9.initializeBean()执行初始化方法(也可以自己定义初始化的方法)
10.invokeAwareMethods()判断bean的类型是否是Aware相关依赖,如果存在的情况回调方法
11.applyBeanPostProcessorsBeforeInitialization()在初始化方法之前执行处理(增强)
12.invokeInitMethods()调用自定义的init方法,Java反射技术
13.applyBeanPostProcessorsAfterInitialization()在初始化方法之后执行处理(增强)
14.正常是用我们初始化好的这个Bean对象
15.销毁bean
本文参考
参考书籍:Spring源码深度解析