
Docker is an increasingly popular software package that creates a container for application development.
Developing in Docker speeds up applications, as it shares the kernel and other resources, instead of requiring dedicated resources.
There are two versions of Docker – Docker CE (Community Edition) and Docker EE (Enterprise Edition). If you have a small-scale project, or you’re just learning, you’ll want to use Docker CE.
In this tutorial, we will cover how to install Docker on Ubuntu 18.04.

Prerequisites
- Ubuntu 18.04 64-bit operating system
- A user account with sudo privileges
- Command line / terminal (CTRL-ALT-T or Applications menu > Accessories > Terminal)
- Docker software repositories (optional)
Install Docker on Ubuntu Using Default Repositories
Step 1: Update Software Repositories
As usual, it’s a good idea to update the local database of software to make sure you’ve got access to the latest revisions.
Therefore, open a terminal window and type:
sudo apt-get update
Allow the operation to complete.
Step 2: Uninstall Old Versions of Docker
Next, it’s recommended to uninstall any old Docker software before proceeding.
Use the command:
sudo apt-get remove docker docker-engine docker.io
Step 3: Install Docker
To install Docker on Ubuntu, in the terminal window enter the command:
sudo apt install docker.io
Step 4: Start and Automate Docker
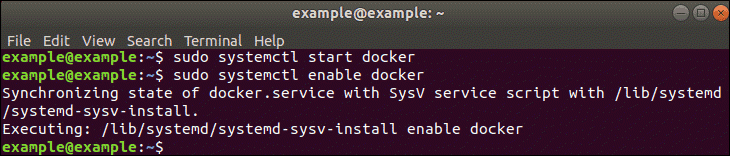
The Docker service needs to be setup to run at startup. To do so, type in each command followed by enter:
1sudo systemctl start docker
2
3sudo systemctl enable docker
Step 5 (Optional): Check Docker Version
To verify the installed Docker version number, enter:
docker --version

Note: The official Docker website does not offer support for Ubuntu 18.04. It’s possible that the Ubuntu default repositories have not updated to the latest revision. There’s nothing wrong with running this installation. However, if you are up for a slightly more intensive operation, you can install a more recent (or specific) Docker from the official Docker repositories.

Alternative: Install Docker from Official Repository
Step 1: Update Local Database
Update the local database with the command:
sudo apt-get update
Step 2: Download Dependencies
You’ll need to run these commands to allow your operating system to access the Docker repositories over HTTPS.
In the terminal window, type:
sudo apt-get install apt-transport-https ca-certificates curl software-properties-common
To clarify, here’s a brief breakdown of each command:
- apt-transport-https: Allows the package manager to transfer files and data over https
- ca-certificates: Allows the system (and web browser) to check security certificates
- curl: This is a tool for transferring data
- software-properties-common: Adds scripts for managing software
Step 3: Add Docker’s GPG Key
The GPG key is a security feature.
To ensure that the software you’re installing is authentic enter:
curl -fsSL https://download.docker.com/linux/ubuntu/gpg | sudo apt-key add –

Step 4: Install the Docker Repository
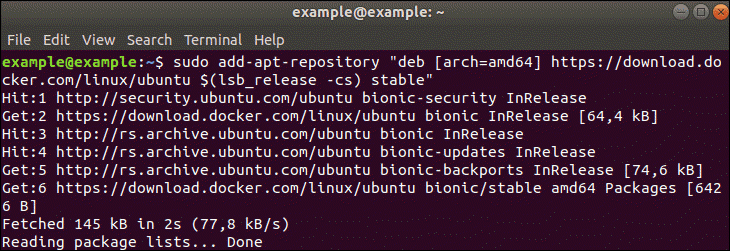
To install the Docker repository, enter the command:
sudo add-apt-repository "deb [arch=amd64] https://download.docker.com/linux/ubuntu $(lsb_release -cs) stable"
The command “$(lsb_release –cs)” scans and returns the codename of your Ubuntu installation – in this case, Bionic. Also, the final word of the command – stable– is the type of Docker release.
A stable release is tested and confirmed to work, but updates are released less frequently. You may substitute edge if you’d like more frequent updates, at the cost of potential instability. There are other repositories, but they are riskier – more info can be found on the Docker web page.
Step 5: Update Repositories
Update the repositories you just added:
sudo apt-get update
Step 6: Install Latest Version of Docker
To install the latest version of docker:
sudo apt-get install docker-ce
Step 7 (Optional): Install Specific Version of Docker
List the available versions of Docker by entering the following in a terminal window:
apt-cache madison docker-ce

The system should return a list of available versions as in the image above.
At this point, type the command:
sudo apt-get install docker-ce=<VERSION>
However, substitute <VERSION> for the version you want to install (pulled from the list you just generated).
For example:

Step 8 (Optional): Install from a .deb Package
First, open a web browser, and go to the following web address:
https://download.docker.com/linux/ubuntu/dists/bionic/
Next, click on the pool link, then stable, then amd64. This is the location of the stable Docker releases for Ubuntu 18.04.
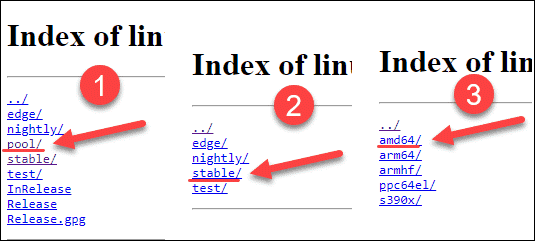
At the time this article was written, this directory was empty. This indicates that there are no verified stable releases for Ubuntu 18.04.
Not to worry, though! The previous versions should work just fine. Alternatively, you can install an edge release by browsing to:
https://download.docker.com/linux/ubuntu/dists/bionic/pool/edge/amd64/
Download the file, and make a note of the path where you saved it. Use the following command:
sudo dpkg -i /path/to/package.deb
Substitute your file location for /path/to/package.deb. Allow the installer to run.
Conclusion
Great job! You’ve got three (3) different options for installing Docker on Ubuntu 18.04.
Finally, you can check the Docker guides if you get into trouble, plus they have a fairly robust forum you can search. Happy developing!
Next, You Should Also Read:
- How To Install Docker on Centos 7
- How To Install Docker On Debian 10 Buster
- 25 DevOps Tools For 2019 For Speed and Agility
- How to Manager Docker Containers, Best Practices
- Containers versus Virtual Machines (VMs): The Differences
- How to Install Ubuntu 18.04 Bionic Beaver
Author

Sofija Simic
Sofija Simic is an aspiring Technical Writer at phoenixNAP. Alongside her educational background in teaching and writing, she has had a lifelong passion for information technology. She is committed to unscrambling confusing IT concepts and streamlining intricate software installations.