
译文的GitHub地址:RecyclerView之ItemDecoration由浅入深
译者注:RecyclerView第一篇,希望后面坚持下来
RecyclerView没有像之前ListView提供divider属性,而是提供了方法
recyclerView.addItemDecoration()
其中ItemDecoration需要我们自己去定制重写,一开始可能有人会觉得麻烦不好用,最后你会发现这种可插拔设计不仅好用,而且功能强大。
ItemDecoration类主要是三个方法:
1public void onDraw(Canvas c, RecyclerView parent, State state)
2public void onDrawOver(Canvas c, RecyclerView parent, State state)
3public void getItemOffsets(Rect outRect, View view, RecyclerView parent, State state)
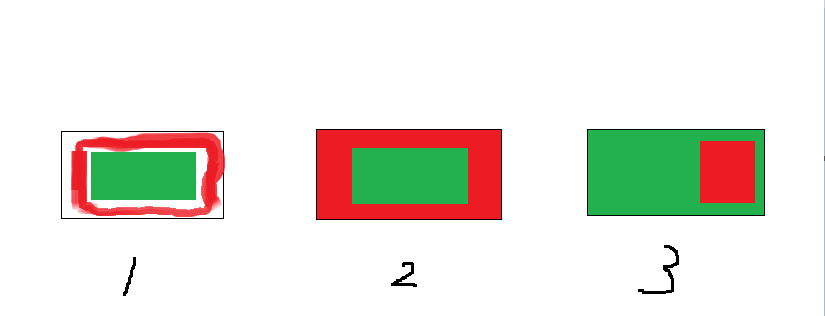
官方源码虽然都写的很清楚,但还不少小伙伴不知道怎么理解,怎么用或用哪个方法,下面我画个简单的图来帮你们理解一下。
ItemDecoration
图画的丑请见谅,首先我们假设绿色区域代表的是我们的内容,红色区域代表我们自己绘制的装饰,可以看到:
图1:代表了getItemOffsets(),可以实现类似padding的效果
图2:代表了onDraw(),可以实现类似绘制背景的效果,内容在上面
图3:代表了onDrawOver(),可以绘制在内容的上面,覆盖内容
注意上面是我个人从应用角度的看法,事实上实现上面的效果可能三个方法每个方法都可以实现。只不过这种方法更好理解。
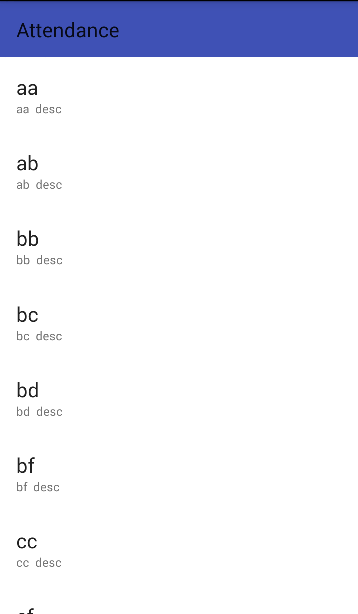
下面是我们没有添加任何ItemDecoration的界面
Activity
主页布局界面很简单,背景设成灰色
1<?xml version="1.0" encoding="utf-8"?>
2<android.support.design.widget.CoordinatorLayout
3    xmlns:android="http://schemas.android.com/apk/res/android"
4    xmlns:app="http://schemas.android.com/apk/res-auto"
5    xmlns:tools="http://schemas.android.com/tools"
6    android:layout_width="match_parent"
7    android:layout_height="match_parent"
8    android:background="@color/gray">//灰色背景
9
10
11    <android.support.design.widget.AppBarLayout
12        android:layout_width="match_parent"
13        android:layout_height="wrap_content">
14
15        <android.support.v7.widget.Toolbar
16            android:id="@+id/toolbar"
17            android:layout_width="match_parent"
18            android:layout_height="?attr/actionBarSize"
19            android:background="?attr/colorPrimary"
20            app:layout_scrollFlags="scroll|enterAlways"/>
21
22    </android.support.design.widget.AppBarLayout>
23
24    <android.support.v7.widget.RecyclerView
25        android:id="@+id/recycler_view"
26        android:layout_width="match_parent"
27        android:layout_height="match_parent"
28        app:layout_behavior="@string/appbar_scrolling_view_behavior"
29        />
30
31</android.support.design.widget.CoordinatorLayout>
ok 接下来,让我们来实现实际开发中常遇到的场景。
padding
从前面的图可以看到实现这个效果,需要重写getItemOffsets方法。
1public class SimplePaddingDecoration extends RecyclerView.ItemDecoration {
2
3    private int dividerHeight;
4
5
6    public SimplePaddingDecoration(Context context) {
7        dividerHeight = context.getResources().getDimensionPixelSize(R.dimen.divider_height);
8    }
9
10    @Override
11    public void getItemOffsets(Rect outRect, View view, RecyclerView parent, RecyclerView.State state) {
12        super.getItemOffsets(outRect, view, parent, state);
13        outRect.bottom = dividerHeight;//类似加了一个bottom padding
14    }
15}
没错,就这么2行代码,然后添加到RecyclerView
recyclerView.addItemDecoration(new SimplePaddingDecoration(this));
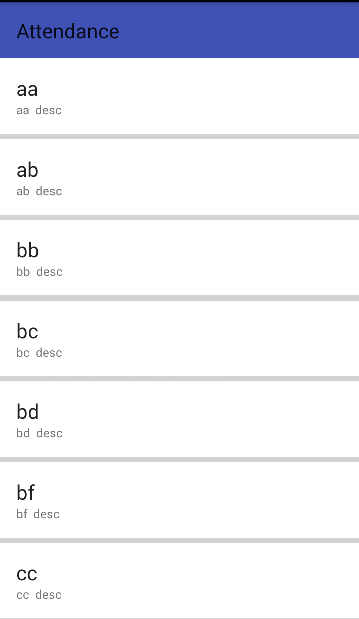
实现效果:
Padding ItemDecoration
分割线
分割线在app中是经常用到的,用ItemDecoration怎么实现呢,其实上面padding改成1dp就实现了分割线的效果,但是分割线的颜色只能是背景灰色,所以不能用这种方法。
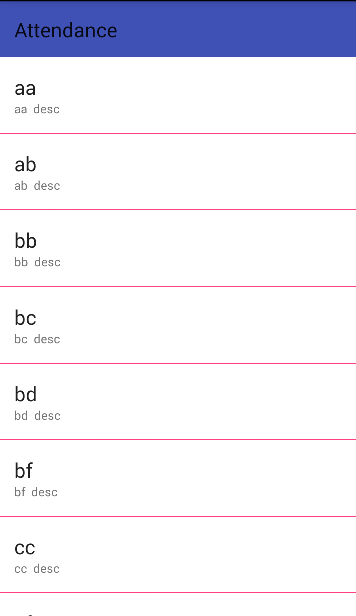
要实现分割线效果需要 getItemOffsets()和 onDraw()2个方法,首先用 getItemOffsets给item下方空出一定高度的空间(例子中是1dp),然后用onDraw绘制这个空间
1public class SimpleDividerDecoration extends RecyclerView.ItemDecoration {
2
3    private int dividerHeight;
4    private Paint dividerPaint;
5
6    public SimpleDividerDecoration(Context context) {
7        dividerPaint = new Paint();
8        dividerPaint.setColor(context.getResources().getColor(R.color.colorAccent));
9        dividerHeight = context.getResources().getDimensionPixelSize(R.dimen.divider_height);
10    }
11
12
13    @Override
14    public void getItemOffsets(Rect outRect, View view, RecyclerView parent, RecyclerView.State state) {
15        super.getItemOffsets(outRect, view, parent, state);
16        outRect.bottom = dividerHeight;
17    }
18
19    @Override
20    public void onDraw(Canvas c, RecyclerView parent, RecyclerView.State state) {
21        int childCount = parent.getChildCount();
22        int left = parent.getPaddingLeft();
23        int right = parent.getWidth() - parent.getPaddingRight();
24
25        for (int i = 0; i < childCount - 1; i++) {
26            View view = parent.getChildAt(i);
27            float top = view.getBottom();
28            float bottom = view.getBottom() + dividerHeight;
29            c.drawRect(left, top, right, bottom, dividerPaint);
30        }
31    }
32}
实现效果:
Divider ItemDecoration
标签
现在很多电商app会给商品加上一个标签,比如“推荐”,“热卖”,“秒杀”等等,可以看到这些标签都是覆盖在内容之上的,这就可以用onDrawOver()来实现,我们这里简单实现一个有趣的标签
1public class LeftAndRightTagDecoration extends RecyclerView.ItemDecoration {
2    private int tagWidth;
3    private Paint leftPaint;
4    private Paint rightPaint;
5
6    public LeftAndRightTagDecoration(Context context) {
7        leftPaint = new Paint();
8        leftPaint.setColor(context.getResources().getColor(R.color.colorAccent));
9        rightPaint = new Paint();
10        rightPaint.setColor(context.getResources().getColor(R.color.colorPrimary));
11        tagWidth = context.getResources().getDimensionPixelSize(R.dimen.tag_width);
12    }
13
14    @Override
15    public void onDrawOver(Canvas c, RecyclerView parent, RecyclerView.State state) {
16        super.onDrawOver(c, parent, state);
17        int childCount = parent.getChildCount();
18        for (int i = 0; i < childCount; i++) {
19            View child = parent.getChildAt(i);
20            int pos = parent.getChildAdapterPosition(child);
21            boolean isLeft = pos % 2 == 0;
22            if (isLeft) {
23                float left = child.getLeft();
24                float right = left + tagWidth;
25                float top = child.getTop();
26                float bottom = child.getBottom();
27                c.drawRect(left, top, right, bottom, leftPaint);
28            } else {
29                float right = child.getRight();
30                float left = right - tagWidth;
31                float top = child.getTop();
32                float bottom = child.getBottom();
33                c.drawRect(left, top, right, bottom, rightPaint);
34
35            }
36        }
37    }
38}
实现效果:
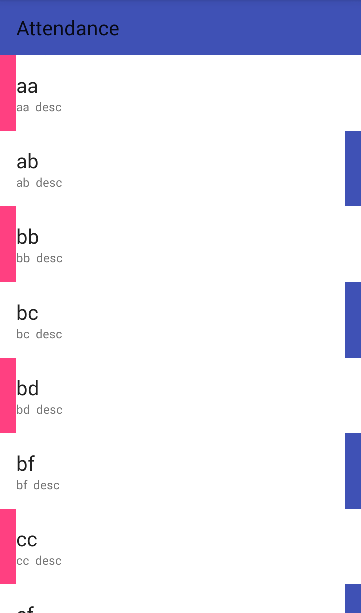
Tag ItemDecoration
组合
不要忘记的是ItemDecoration是可以叠加的
1 recyclerView.addItemDecoration(new LeftAndRightTagDecoration(this));
2recyclerView.addItemDecoration(new SimpleDividerDecoration(this));
我们把上面2个ItemDecoration同时添加到RecyclerView看下什么效果
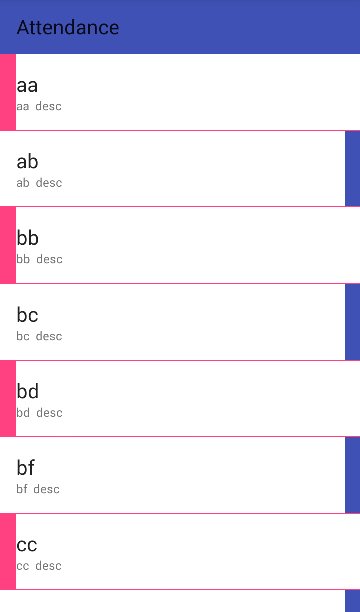
ItemDecoration
是不是有种狂拽炫酷吊炸天的赶脚。。。
三个方法都用了一遍,你以为这就结束了?呵呵 并没有
section
这个是什么呢,先看下我们实现的效果
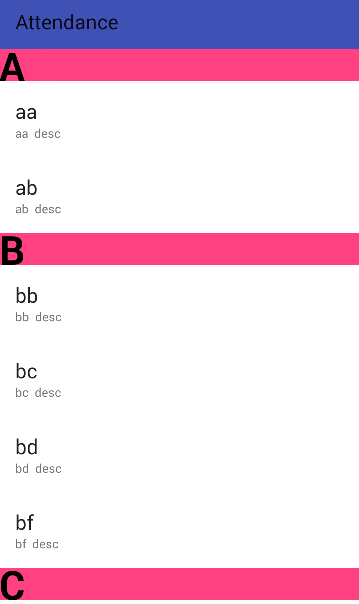
Section ItemDecoration
一看这个就很熟悉吧,手机上面的通讯录联系人,知乎日报都是这样效果,可以叫分组,也可以叫section分块 先不管它叫什么。
这个怎么实现呢? 其实和实现分割线是一样的道理 ,只是不是所有的item都需要分割线,只有同组的第一个需要。
我们首先定义一个接口给activity进行回调用来进行数据分组和获取首字母
1public interface DecorationCallback {
2
3        long getGroupId(int position);
4
5        String getGroupFirstLine(int position);
6    }
然后再来看我们的ItemDecoration
1public class SectionDecoration extends RecyclerView.ItemDecoration {
2    private static final String TAG = "SectionDecoration";
3
4    private DecorationCallback callback;
5    private TextPaint textPaint;
6    private Paint paint;
7    private int topGap;
8    private Paint.FontMetrics fontMetrics;
9
10
11    public SectionDecoration(Context context, DecorationCallback decorationCallback) {
12        Resources res = context.getResources();
13        this.callback = decorationCallback;
14
15        paint = new Paint();
16        paint.setColor(res.getColor(R.color.colorAccent));
17
18        textPaint = new TextPaint();
19        textPaint.setTypeface(Typeface.DEFAULT_BOLD);
20        textPaint.setAntiAlias(true);
21        textPaint.setTextSize(80);
22        textPaint.setColor(Color.BLACK);
23        textPaint.getFontMetrics(fontMetrics);
24        textPaint.setTextAlign(Paint.Align.LEFT);
25        fontMetrics = new Paint.FontMetrics();
26        topGap = res.getDimensionPixelSize(R.dimen.sectioned_top);//32dp
27
28
29    }
30
31
32    @Override
33    public void getItemOffsets(Rect outRect, View view, RecyclerView parent, RecyclerView.State state) {
34        super.getItemOffsets(outRect, view, parent, state);
35        int pos = parent.getChildAdapterPosition(view);
36        Log.i(TAG, "getItemOffsets:" + pos);
37        long groupId = callback.getGroupId(pos);
38        if (groupId < 0) return;
39        if (pos == 0 || isFirstInGroup(pos)) {//同组的第一个才添加padding
40            outRect.top = topGap;
41        } else {
42            outRect.top = 0;
43        }
44    }
45
46    @Override
47    public void onDraw(Canvas c, RecyclerView parent, RecyclerView.State state) {
48        super.onDraw(c, parent, state);
49        int left = parent.getPaddingLeft();
50        int right = parent.getWidth() - parent.getPaddingRight();
51        int childCount = parent.getChildCount();
52        for (int i = 0; i < childCount; i++) {
53            View view = parent.getChildAt(i);
54            int position = parent.getChildAdapterPosition(view);
55            long groupId = callback.getGroupId(position);
56            if (groupId < 0) return;
57            String textLine = callback.getGroupFirstLine(position).toUpperCase();
58            if (position == 0 || isFirstInGroup(position)) {
59                float top = view.getTop() - topGap;
60                float bottom = view.getTop();
61                c.drawRect(left, top, right, bottom, paint);//绘制红色矩形
62                c.drawText(textLine, left, bottom, textPaint);//绘制文本
63            }
64        }
65    }
66
67
68    private boolean isFirstInGroup(int pos) {
69        if (pos == 0) {
70            return true;
71        } else {
72            long prevGroupId = callback.getGroupId(pos - 1);
73            long groupId = callback.getGroupId(pos);
74            return prevGroupId != groupId;
75        }
76    }
77
78    public interface DecorationCallback {
79
80        long getGroupId(int position);
81
82        String getGroupFirstLine(int position);
83    }
84}
可以看到和divider实现一样,都是重写getItemOffsets()和onDraw()2个方法,不同的是根据数据做了处理。
在Activity中使用
1 recyclerView.addItemDecoration(new SectionDecoration(this, new SectionDecoration.DecorationCallback() {
2            @Override
3            public long getGroupId(int position) {
4                return Character.toUpperCase(dataList.get(position).getName().charAt(0));
5            }
6
7            @Override
8            public String getGroupFirstLine(int position) {
9                return dataList.get(position).getName().substring(0, 1).toUpperCase();
10            }
11        }));
干净舒服,不少github类似的库都是去adapter进行处理 侵入性太强 或许ItemDecoration是个更好的选择,可插拔,可替换。
到这里细心的人就会发现了,header不会动啊,我手机上的通讯录可是会随的滑动而变动呢,这个可以实现么?
StickyHeader
这个东西怎么叫我也不知道啊 粘性头部?英文也有叫 pinned section 取名字真是个麻烦事。
先看下我们简单实现的效果
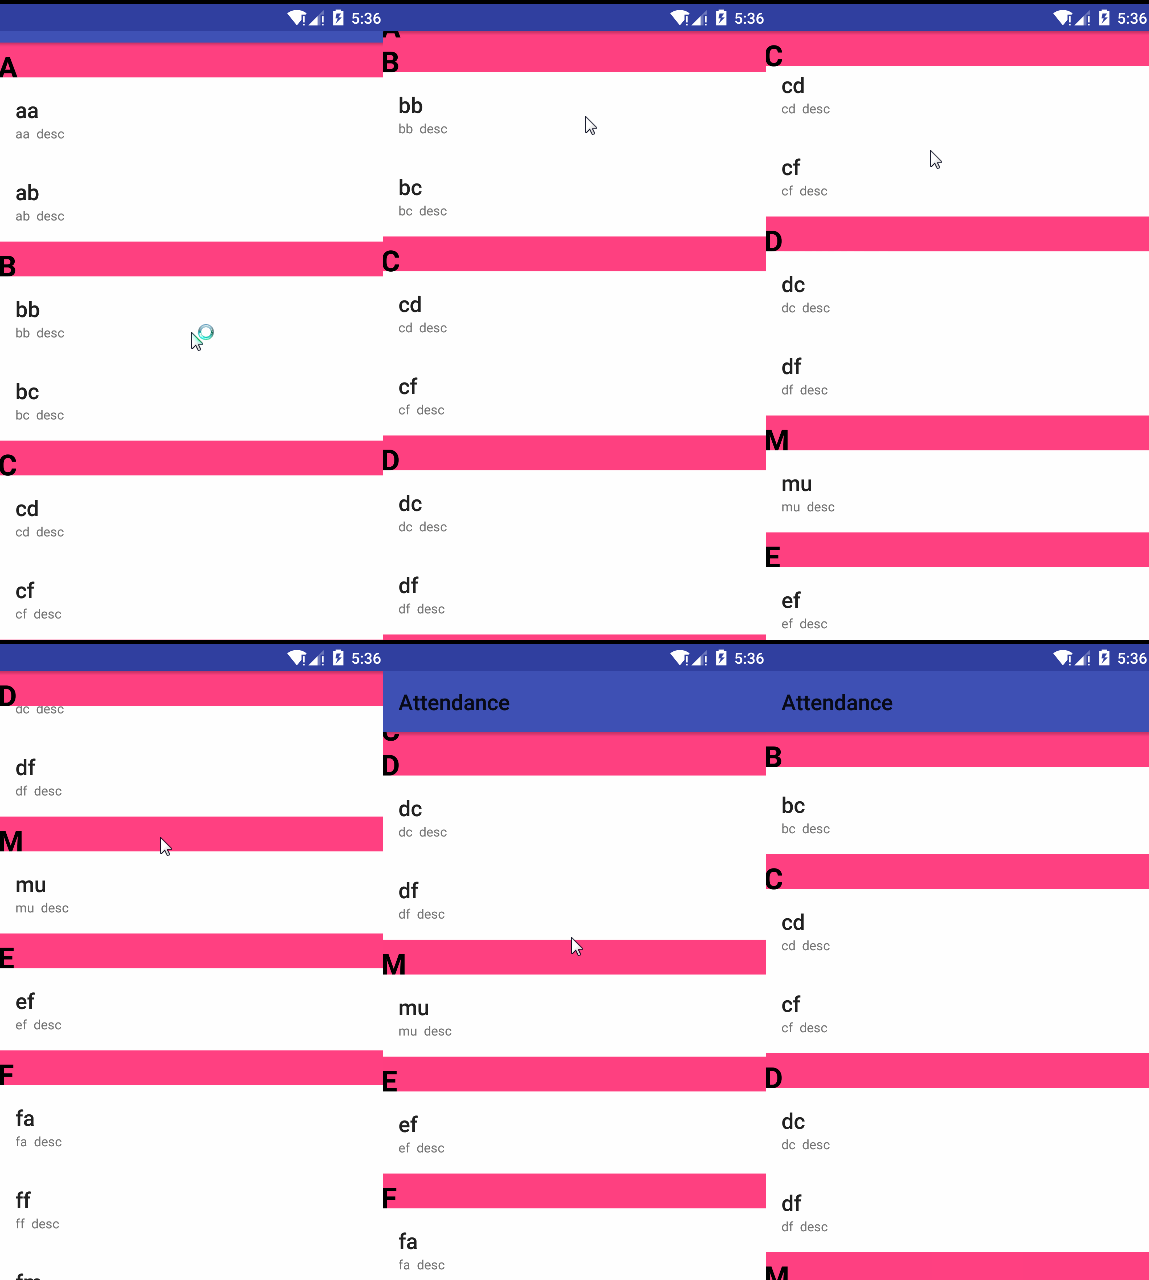
stickyheader
首先一看到图,我们就应该想到header不动肯定是要绘制item内容之上的,需要重写onDrawOver()方法,其他地方和section实现一样。
1public class PinnedSectionDecoration extends RecyclerView.ItemDecoration {
2    private static final String TAG = "PinnedSectionDecoration";
3
4    private DecorationCallback callback;
5    private TextPaint textPaint;
6    private Paint paint;
7    private int topGap;
8    private Paint.FontMetrics fontMetrics;
9
10
11    public PinnedSectionDecoration(Context context, DecorationCallback decorationCallback) {
12        Resources res = context.getResources();
13        this.callback = decorationCallback;
14
15        paint = new Paint();
16        paint.setColor(res.getColor(R.color.colorAccent));
17
18        textPaint = new TextPaint();
19        textPaint.setTypeface(Typeface.DEFAULT_BOLD);
20        textPaint.setAntiAlias(true);
21        textPaint.setTextSize(80);
22        textPaint.setColor(Color.BLACK);
23        textPaint.getFontMetrics(fontMetrics);
24        textPaint.setTextAlign(Paint.Align.LEFT);
25        fontMetrics = new Paint.FontMetrics();
26        topGap = res.getDimensionPixelSize(R.dimen.sectioned_top);
27
28
29    }
30
31
32    @Override
33    public void getItemOffsets(Rect outRect, View view, RecyclerView parent, RecyclerView.State state) {
34        super.getItemOffsets(outRect, view, parent, state);
35        int pos = parent.getChildAdapterPosition(view);
36        long groupId = callback.getGroupId(pos);
37        if (groupId < 0) return;
38        if (pos == 0 || isFirstInGroup(pos)) {
39            outRect.top = topGap;
40        } else {
41            outRect.top = 0;
42        }
43    }
44
45
46    @Override
47    public void onDrawOver(Canvas c, RecyclerView parent, RecyclerView.State state) {
48        super.onDrawOver(c, parent, state);
49        int itemCount = state.getItemCount();
50        int childCount = parent.getChildCount();
51        int left = parent.getPaddingLeft();
52        int right = parent.getWidth() - parent.getPaddingRight();
53        float lineHeight = textPaint.getTextSize() + fontMetrics.descent;
54
55        long preGroupId, groupId = -1;
56        for (int i = 0; i < childCount; i++) {
57            View view = parent.getChildAt(i);
58            int position = parent.getChildAdapterPosition(view);
59
60            preGroupId = groupId;
61            groupId = callback.getGroupId(position);
62            if (groupId < 0 || groupId == preGroupId) continue;
63
64            String textLine = callback.getGroupFirstLine(position).toUpperCase();
65            if (TextUtils.isEmpty(textLine)) continue;
66
67            int viewBottom = view.getBottom();
68            float textY = Math.max(topGap, view.getTop());
69            if (position + 1 < itemCount) { //下一个和当前不一样移动当前
70                long nextGroupId = callback.getGroupId(position + 1);
71                if (nextGroupId != groupId && viewBottom < textY ) {//组内最后一个view进入了header
72                    textY = viewBottom;
73                }
74            }
75            c.drawRect(left, textY - topGap, right, textY, paint);
76            c.drawText(textLine, left, textY, textPaint);
77        }
78
79    }
80
81}
好了,现在发现ItemDecoration有多强大了吧! 当然还有更多就需要你自己去发现了。