
用centos自带的yum源来安装nginx,mysql和php,超级方便,省去编译的麻烦,省去自己配置的麻烦,还能节省非常多的时间。
我们先把yum源换成国内的阿里云镜像源(当然不换也可以),先备份一下原来的源镜像文件,以免出错后可以恢复:
[root@192 ~]# mv /etc/yum.repos.d/CentOS-Base.repo /etc/yum.repos.d/CentOS-Base.repo.backup
下载新的CentOS-Base.repo 到/etc/yum.repos.d/,版本根据自己的系统版本选择下载:

CentOS 5 wget -O /etc/yum.repos.d/CentOS-Base.repo http://mirrors.aliyun.com/repo/Centos-5.repo
CentOS 6 wget -O /etc/yum.repos.d/CentOS-Base.repo http://mirrors.aliyun.com/repo/Centos-6.repo
CentOS 7 wget -O /etc/yum.repos.d/CentOS-Base.repo http://mirrors.aliyun.com/repo/Centos-7.repo
更改/etc/yum.repos.d/CentOS-Media.repo使其为不生效:
enabled=0
运行yum makecache生成缓存:
yum clean all yum makecache yum update
安装Nginx
由于yum源中没有我们想要的nginx,那么我们就需要创建一个“/etc/yum.repos.d/nginx.repo”的文件,其实就是新增一个yum源。
[root@192 yum.repos.d]# vi /etc/yum.repos.d/nginx.repo
把如下内容复制进去:
[nginx] name=nginx repo baseurl=http://nginx.org/packages/centos/$releasever/$basearch/ gpgcheck=0 enabled=1
然后保存退出,输入 yum list nginx 查看,
[root@192 yum.repos.d]# yum list nginx
已加载插件:fastestmirror
nginx | 2.9 kB 00:00:00
nginx/7/x86_64/primary_db | 18 kB 00:00:04
Loading mirror speeds from cached hostfile
* base: mirrors.aliyun.com
* extras: mirrors.aliyun.com
* updates: mirrors.aliyun.com
可安装的软件包
nginx.x86_64 1:1.10.2-1.el7.ngx nginx
[root@192 yum.repos.d]# yum list |grep nginx
nginx.x86_64 1:1.10.2-1.el7.ngx nginx
nginx-debug.x86_64 1:1.8.0-1.el7.ngx nginx
nginx-debuginfo.x86_64 1:1.10.2-1.el7.ngx nginx
nginx-module-geoip.x86_64 1:1.10.2-1.el7.ngx nginx
nginx-module-geoip-debuginfo.x86_64 1:1.10.2-1.el7.ngx nginx
nginx-module-image-filter.x86_64 1:1.10.2-1.el7.ngx nginx
nginx-module-image-filter-debuginfo.x86_64 1:1.10.2-1.el7.ngx nginx
nginx-module-njs.x86_64 1:1.10.2.0.0.20160414.1c50334fbea6-2.el7.ngx
nginx
nginx-module-njs-debuginfo.x86_64 1:1.10.2.0.0.20160414.1c50334fbea6-2.el7.ngx
nginx
nginx-module-perl.x86_64 1:1.10.2-1.el7.ngx nginx
nginx-module-perl-debuginfo.x86_64 1:1.10.2-1.el7.ngx nginx
nginx-module-xslt.x86_64 1:1.10.2-1.el7.ngx nginx
nginx-module-xslt-debuginfo.x86_64 1:1.10.2-1.el7.ngx nginx
nginx-nr-agent.noarch 2.0.0-10.el7.ngx nginx
pcp-pmda-nginx.x86_64 3.10.6-2.el7 base
[root@192 yum.repos.d]#
如果执行命令是这样的显示效果,那么我们的nginx的yum源就配置成功啦!
然后要安装我们的nginx就直接执行:
yum -y install nginx
这样nginx的最新官网版本就安装好了!
启动nginx:
# nginx #启动nginx
curl 127.0.0.1
<!DOCTYPE html> <html> <head> <title>Welcome to nginx!</title> <style> body { width: 35em; margin: 0 auto; font-family: Tahoma, Verdana, Arial, sans-serif; } </style> </head> <body> <h1>Welcome to nginx!</h1> <p>If you see this page, the nginx web server is successfully installed and working. Further configuration is required.</p> <p>For online documentation and support please refer to <a href="http://nginx.org/">nginx.org</a>.<br/> Commercial support is available at <a href="http://nginx.com/">nginx.com</a>.</p> <p><em>Thank you for using nginx.</em></p> </body> </html>
安装MySQL 5.7版本,官网http://dev.mysql.com/downloads/repo/yum/
rpm -Uvh http://dev.mysql.com/get/mysql57-community-release-el7-9.noarch.rpm
可以看到已经有了,并且5.7版本已经启用,可以直接安装:
root@192 yum.repos.d]# yum repolist all | grep mysql mysql-connectors-community/x86_64 MySQL Connectors Community 启用: 24 mysql-connectors-community-source MySQL Connectors Community - Sourc 禁用 mysql-tools-community/x86_64 MySQL Tools Community 启用: 38 mysql-tools-community-source MySQL Tools Community - Source 禁用 mysql-tools-preview/x86_64 MySQL Tools Preview 禁用 mysql-tools-preview-source MySQL Tools Preview - Source 禁用 mysql55-community/x86_64 MySQL 5.5 Community Server 禁用 mysql55-community-source MySQL 5.5 Community Server - Sourc 禁用 mysql56-community/x86_64 MySQL 5.6 Community Server 禁用 mysql56-community-source MySQL 5.6 Community Server - Sourc 禁用 mysql57-community/x86_64 MySQL 5.7 Community Server 启用: 146 mysql57-community-source MySQL 5.7 Community Server - Sourc 禁用 mysql80-community/x86_64 MySQL 8.0 Community Server 禁用 mysql80-community-source MySQL 8.0 Community Server - Sourc 禁用 [root@192 yum.repos.d]#
如果没有开启,或者你想要选择需要的版本进行安装,修改 /etc/yum.repos.d/mysql-community.repo,选择需要的版本把enable改为1即可,其它的改为0:
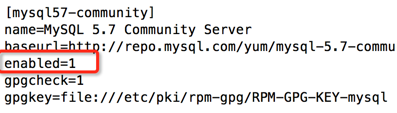
修改好后查看可用的安装版本:
[root@192 yum.repos.d]# yum repolist enabled | grep mysql mysql-connectors-community/x86_64 MySQL Connectors Community 24 mysql-tools-community/x86_64 MySQL Tools Community 38 mysql57-community/x86_64 MySQL 5.7 Community Server 146
不用犹豫,开始安装吧!
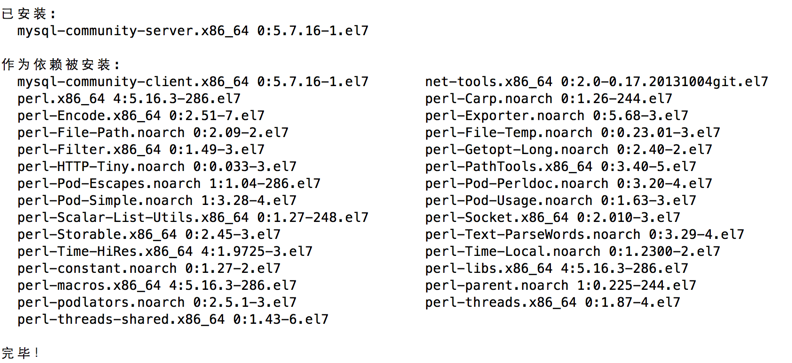
yum -y install mysql-community-server
……经过漫长的等待后,看到下图所示:
开始启动mysql:
service mysqld start Redirecting to /bin/systemctl start mysqld.service
看下mysql的启动状态:
[root@192 yum.repos.d]# service mysqld status Redirecting to /bin/systemctl status mysqld.service ● mysqld.service - MySQL Server Loaded: loaded (/usr/lib/systemd/system/mysqld.service; enabled; vendor preset: disabled) Active: active (running) since 日 2016-10-23 22:51:48 CST; 3min 14s ago Process: 36884 ExecStart=/usr/sbin/mysqld --daemonize --pid-file=/var/run/mysqld/mysqld.pid $MYSQLD_OPTS (code=exited, status=0/SUCCESS) Process: 36810 ExecStartPre=/usr/bin/mysqld_pre_systemd (code=exited, status=0/SUCCESS) Main PID: 36887 (mysqld) CGroup: /system.slice/mysqld.service └─36887 /usr/sbin/mysqld --daemonize --pid-file=/var/run/mysqld/mysqld.pid
10月 23 22:51:45 192.168.0.14 systemd[1]: Starting MySQL Server... 10月 23 22:51:48 192.168.0.14 systemd[1]: Started MySQL Server. 10月 23 22:52:24 192.168.0.14 systemd[1]: Started MySQL Server.
开机启动设置:
systemctl enable mysqld systemctl daemon-reload
mysql安装完成之后,在/var/log/mysqld.log文件中给root生成了一个默认密码。通过下面的方式找到root默认密码,然后登录mysql进行修改:
[root@192 yum.repos.d]# grep 'temporary password' /var/log/mysqld.log 2016-10-23T14:51:45.705458Z 1 [Note] A temporary password is generated for root@localhost: a&sqr7dou7N_ mysql -uroot -p
修改root密码:
ALTER USER 'root'@'localhost' IDENTIFIED BY 'NewPassWord!';
注意:mysql5.7默认安装了密码安全检查插件,默认密码检查策略要求密码必须包含:大小写字母、数字和特殊符号,并且长度不能少于8位。否则会提示ERROR 1819 (HY000): Your password does not satisfy the current policy requirements错误,如下图所示:

通过msyql环境变量可以查看密码策略的相关信息:
mysql> show variables like '%password%'; +---------------------------------------+--------+ | Variable_name | Value | +---------------------------------------+--------+ | default_password_lifetime | 0 | | disconnect_on_expired_password | ON | | log_builtin_as_identified_by_password | OFF | | mysql_native_password_proxy_users | OFF | | old_passwords | 0 | | report_password | | | sha256_password_proxy_users | OFF | | validate_password_check_user_name | OFF | | validate_password_dictionary_file | | | validate_password_length | 8 | | validate_password_mixed_case_count | 1 | | validate_password_number_count | 1 | | validate_password_policy | MEDIUM | | validate_password_special_char_count | 1 | +---------------------------------------+--------+ 14 rows in set (0.00 sec)
validate_password_policy:密码策略,默认为MEDIUM策略
validate_password_dictionary_file:密码策略文件,策略为STRONG才需要
validate_password_length:密码最少长度
validate_password_mixed_case_count:大小写字符长度,至少1个
validate_password_number_count :数字至少1个
validate_password_special_char_count:特殊字符至少1个
上述参数是默认策略MEDIUM的密码检查规则。
修改密码策略
如果想修改密码策略,在/etc/my.cnf文件添加validate_password_policy配置:
# 选择0(LOW),1(MEDIUM),2(STRONG)其中一种,选择2需要提供密码字典文件 validate_password_policy=0
配置默认编码为utf8
修改/etc/my.cnf配置文件,在[mysqld]下添加编码配置,如下所示:
[mysqld] character_set_server=utf8 init_connect='SET NAMES utf8'
重新启动mysql服务使配置生效:
systemctl restart mysqld
添加远程登录用户
默认只允许root帐户在本地登录,如果要在其它机器上连接mysql,必须修改root允许远程连接,或者添加一个允许远程连接的帐户,为了安全起见,我们添加一个新的帐户:
mysql> GRANT ALL PRIVILEGES ON *.* TO 'evai'@'%' IDENTIFIED BY '@evai2016' WITH GRANT OPTION;
mysql> FLUSH PRIVILEGES;
这样远程就可以用账户名为evai,密码为@evai2016来登录数据库了,运行 select host, user from mysql.user 查看下:
mysql> select host,user from mysql.user; +-----------+-----------+ | host | user | +-----------+-----------+ | % | evai | | localhost | mysql.sys | | localhost | root | +-----------+-----------+ 3 rows in set (0.00 sec)
安装PHP7
rpm -Uvh https://dl.fedoraproject.org/pub/epel/epel-release-latest-7.noarch.rpm rpm -Uvh https://mirror.webtatic.com/yum/el7/webtatic-release.rpm
执行命令安装php7:
yum install php70w.x86_64 php70w-cli.x86_64 php70w-common.x86_64 php70w-gd.x86_64 php70w-ldap.x86_64 php70w-mbstring.x86_64 php70w-mcrypt.x86_64 php70w-mysql.x86_64 php70w-pdo.x86_64
安装php-fpm:
yum install php70w-fpm php70w-opcache
启动php-fpm:
systemctl start php-fpm
修改 /etc/nginx/conf.d/default.conf 文件,找到下面这段并改为如下所示:
location ~ \.php$ { root /usr/share/nginx/html; fastcgi_pass 127.0.0.1:9000; fastcgi_index index.php; fastcgi_param SCRIPT_FILENAME $document_root$fastcgi_script_name; include fastcgi_params; }
接着到 /usr/share/nginx/html 目录下创建一个test.php文件,内容为phpinfo():
vi /usr/share/nginx/html/test.php
#内容
<?php phpinfo(); 保存退出。接着重启nginx: nginx -s reload 打开浏览器,看到如下图说明运行成功: 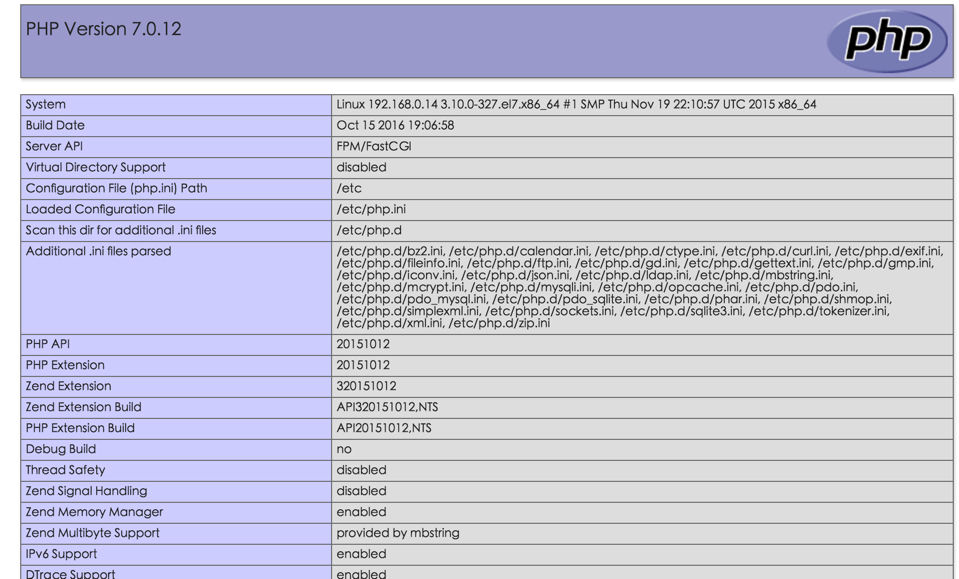 至此环境搭建完成。