
Android窗口管理框架:Android应用视图的管理者Window
文章目录
- 一 窗口类型
- 二 窗口参数
- 三 窗口模式
- 四 窗口回调
- 五 窗口实现
从这篇文章开始,我们来分析和Window以及WindowManager相关的内容,
Abstract base class for a top-level window look and behavior policy.
Window在Android是一个窗口的概念,日常开发中我们和它接触的不多,我们更多接触的是View,但是View都是通过Window来呈现的,Window是View的直接管理者。 而WindowManager承担者管理Window的责任。
一 窗口类型
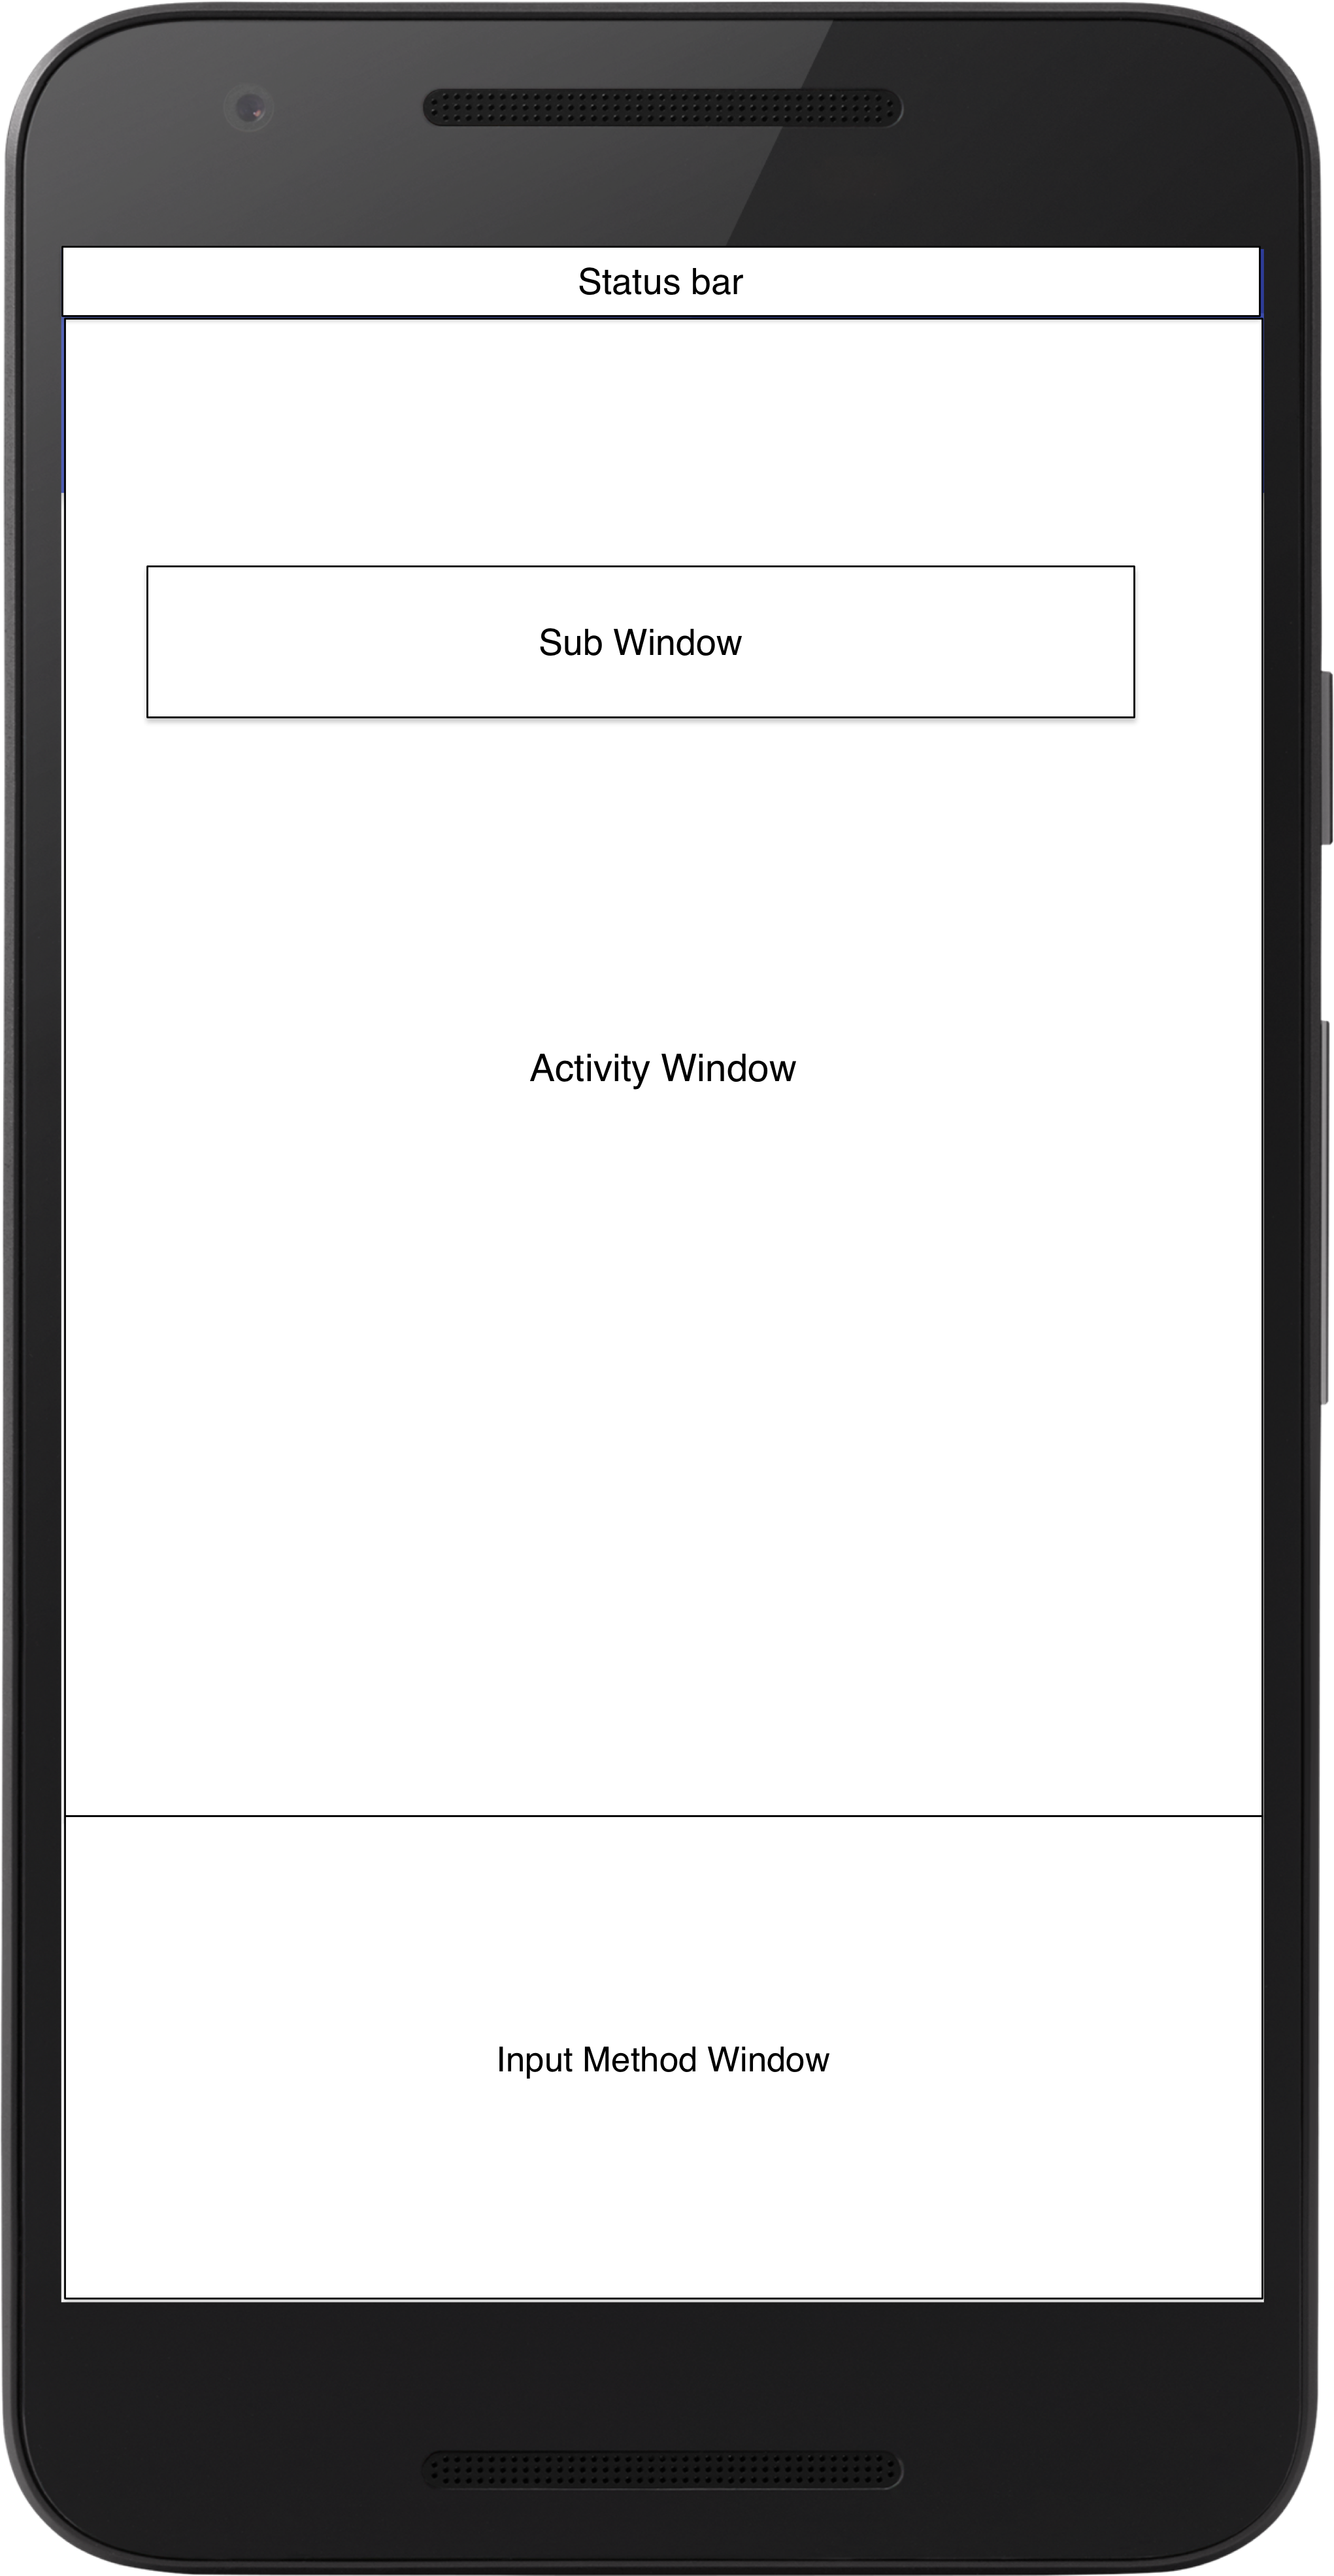
Window在Android中有三种类型:
- 应用Window:z-index在1~99之间,它往往对应着一个Activity。
- 子Window:z-index在1000~1999之间,它往往不能独立存在,需要依附在父Window上,例如Dialog等。
- 系统Window:z-index在2000~2999之间,它往往需要声明权限才能创建,例如Toast、状态栏、系统音量条、错误提示框都是系统Window。
z-index是Android窗口的层级的概念,z-index越大的窗口越居于顶层,
z-index对应着WindowManager.LayoutParams里的type参数,具体说来。
应用Window
- public static final int FIRST_APPLICATION_WINDOW = 1;//1
- public static final int TYPE_BASE_APPLICATION = 1;//窗口的基础值,其他的窗口值要大于这个值
- public static final int TYPE_APPLICATION = 2;//普通的应用程序窗口类型
- public static final int TYPE_APPLICATION_STARTING = 3;//应用程序启动窗口类型,用于系统在应用程序窗口启动前显示的窗口。
- public static final int TYPE_DRAWN_APPLICATION = 4;
- public static final int LAST_APPLICATION_WINDOW = 99;//2
子Window
- public static final int FIRST_SUB_WINDOW = 1000;//子窗口类型初始值
- public static final int TYPE_APPLICATION_PANEL = FIRST_SUB_WINDOW;
- public static final int TYPE_APPLICATION_MEDIA = FIRST_SUB_WINDOW + 1;
- public static final int TYPE_APPLICATION_SUB_PANEL = FIRST_SUB_WINDOW + 2;
- public static final int TYPE_APPLICATION_ATTACHED_DIALOG = FIRST_SUB_WINDOW + 3;
- public static final int TYPE_APPLICATION_MEDIA_OVERLAY = FIRST_SUB_WINDOW + 4;
- public static final int TYPE_APPLICATION_ABOVE_SUB_PANEL = FIRST_SUB_WINDOW + 5;
- public static final int LAST_SUB_WINDOW = 1999;//子窗口类型结束值
系统Window
- public static final int FIRST_SYSTEM_WINDOW = 2000;//系统窗口类型初始值
- public static final int TYPE_STATUS_BAR = FIRST_SYSTEM_WINDOW;//系统状态栏窗口
- public static final int TYPE_SEARCH_BAR = FIRST_SYSTEM_WINDOW+1;//搜索条窗口
- public static final int TYPE_PHONE = FIRST_SYSTEM_WINDOW+2;//通话窗口
- public static final int TYPE_SYSTEM_ALERT = FIRST_SYSTEM_WINDOW+3;//系统ALERT窗口
- public static final int TYPE_KEYGUARD = FIRST_SYSTEM_WINDOW+4;//锁屏窗口
- public static final int TYPE_TOAST = FIRST_SYSTEM_WINDOW+5;//TOAST窗口
二 窗口参数
在WindowManager里定义了一个LayoutParams内部类,它描述了窗口的参数信息,主要包括:
- public int x:窗口x轴坐标
- public int y:窗口y轴坐标
- public int type:窗口类型
- public int flags:窗口属性
- public int softInputMode:输入法键盘模式
关于窗口属性,它控制着窗口的行为,举几个常见的:
- FLAG_ALLOW_LOCK_WHILE_SCREEN_ON 只要窗口可见,就允许在开启状态的屏幕上锁屏
- FLAG_NOT_FOCUSABLE 窗口不能获得输入焦点,设置该标志的同时,FLAG_NOT_TOUCH_MODAL也会被设置
- FLAG_NOT_TOUCHABLE 窗口不接收任何触摸事件
- FLAG_NOT_TOUCH_MODAL 在该窗口区域外的触摸事件传递给其他的Window,而自己只会处理窗口区域内的触摸事件
- FLAG_KEEP_SCREEN_ON 只要窗口可见,屏幕就会一直亮着
- FLAG_LAYOUT_NO_LIMITS 允许窗口超过屏幕之外
- FLAG_FULLSCREEN 隐藏所有的屏幕装饰窗口,比如在游戏、播放器中的全屏显示
- FLAG_SHOW_WHEN_LOCKED 窗口可以在锁屏的窗口之上显示
- FLAG_IGNORE_CHEEK_PRESSES 当用户的脸贴近屏幕时(比如打电话),不会去响应此事件
- FLAG_TURN_SCREEN_ON 窗口显示时将屏幕点亮
关于窗口类型,它对应着窗口的层级,上面我们也提到过了。
它的构造函数也主要是针对这几个参数的。
1 public static class LayoutParams extends ViewGroup.LayoutParams implements Parcelable {
2            public LayoutParams() {
3                super(LayoutParams.MATCH_PARENT, LayoutParams.MATCH_PARENT);
4                type = TYPE_APPLICATION;
5                format = PixelFormat.OPAQUE;
6            }
7
8            public LayoutParams(int _type) {
9                super(LayoutParams.MATCH_PARENT, LayoutParams.MATCH_PARENT);
10                type = _type;
11                format = PixelFormat.OPAQUE;
12            }
13
14            public LayoutParams(int _type, int _flags) {
15                super(LayoutParams.MATCH_PARENT, LayoutParams.MATCH_PARENT);
16                type = _type;
17                flags = _flags;
18                format = PixelFormat.OPAQUE;
19            }
20
21            public LayoutParams(int _type, int _flags, int _format) {
22                super(LayoutParams.MATCH_PARENT, LayoutParams.MATCH_PARENT);
23                type = _type;
24                flags = _flags;
25                format = _format;
26            }
27
28            public LayoutParams(int w, int h, int _type, int _flags, int _format) {
29                super(w, h);
30                type = _type;
31                flags = _flags;
32                format = _format;
33            }
34
35            public LayoutParams(int w, int h, int xpos, int ypos, int _type,
36                    int _flags, int _format) {
37                super(w, h);
38                x = xpos;
39                y = ypos;
40                type = _type;
41                flags = _flags;
42                format = _format;
43            }
44 }
三 窗口模式
关于窗口模式我们就比较熟悉了,我们会在AndroidManifest.xml里Activity的标签下设置android:windowSoftInputMode="adjustNothing",来控制输入键盘显示行为。
可选的有6个参数,源码里也有6个值与之对应:
- SOFT_INPUT_STATE_UNSPECIFIED:没有指定软键盘输入区域的显示状态。
- SOFT_INPUT_STATE_UNCHANGED:不要改变软键盘输入区域的显示状态。
- SOFT_INPUT_STATE_HIDDEN:在合适的时候隐藏软键盘输入区域,例如,当用户导航到当前窗口时。
- SOFT_INPUT_STATE_ALWAYS_HIDDEN:当窗口获得焦点时,总是隐藏软键盘输入区域。
- SOFT_INPUT_STATE_VISIBLE:在合适的时候显示软键盘输入区域,例如,当用户导航到当前窗口时。
- SOFT_INPUT_STATE_ALWAYS_VISIBLE:当窗口获得焦点时,总是显示软键盘输入区域。
当然,我们也可以通过代码设置键盘模式。
1getWindow().setSoftInputMode(WindowManager.LayoutParams.SOFT_INPUT_ADJUST_RESIZE);
四 窗口回调
Window里定义了一个Callback接口,Activity实现了Window.Callback接口,将Activity关联给Window,Window就可以将一些事件交由Activity处理。
1 public interface Callback {
2
3        //键盘事件分发
4        public boolean dispatchKeyEvent(KeyEvent event);
5
6        //触摸事件分发
7        public boolean dispatchTouchEvent(MotionEvent event);
8
9        //轨迹球事件分发
10        public boolean dispatchTrackballEvent(MotionEvent event);
11
12        //可见性事件分发
13        public boolean dispatchPopulateAccessibilityEvent(AccessibilityEvent event);
14
15        //创建Panel View
16        public View onCreatePanelView(int featureId);
17
18        //创建menu
19        public boolean onCreatePanelMenu(int featureId, Menu menu);
20
21        //画板准备好时回调
22        public boolean onPreparePanel(int featureId, View view, Menu menu);
23
24        //menu打开时回调
25        public boolean onMenuOpened(int featureId, Menu menu);
26
27        //menu item被选择时回调
28        public boolean onMenuItemSelected(int featureId, MenuItem item);
29
30        //Window Attributes发生变化时回调
31        public void onWindowAttributesChanged(WindowManager.LayoutParams attrs);
32
33        //Content View发生变化时回调
34        public void onContentChanged();
35
36        //窗口焦点发生变化时回调
37        public void onWindowFocusChanged(boolean hasFocus);
38
39        //Window被添加到WIndowManager时回调
40        public void onAttachedToWindow();
41
42        //Window被从WIndowManager中移除时回调
43        public void onDetachedFromWindow();
44
45         */
46        //画板关闭时回调
47        public void onPanelClosed(int featureId, Menu menu);
48
49        //用户开始执行搜索操作时回调
50        public boolean onSearchRequested();
51    }
五 窗口实现
Window是一个抽象类,它的唯一实现类是PhoneWindow,PhoneWindow里包含了以下内容:
- private DecorView mDecor:DecorView是Activity中的顶级View,它本质上是一个FrameLayout,一般说来它内部包含标题栏和内容栏(com.android.internal.R.id.content)。
- ViewGroup mContentParent:窗口内容视图,它是mDecor本身或者是它的子View。
- private ImageView mLeftIconView:左上角图标
- private ImageView mRightIconView:右上角图标
- private ProgressBar mCircularProgressBar:圆形loading条
- private ProgressBar mHorizontalProgressBar:水平loading条
- 其他的一些和转场动画相关的Transition与listener
看到这些,大家有没有觉得很熟悉,这就是我们日常开发中经常见到的东西,它在PhoneWindow里被创建。另外,我们在Activity里经常调用的方法,它的实际实现也是 在PhoneWindow里,我们分别来看一看。
setContentView()
这是一个我们非常熟悉的方法,只不过我们通常是在Activity里进行调用,但是它的实际实现是在PhoneWindow里。
1public class PhoneWindow extends Window implements MenuBuilder.Callback {
2
3    @Override
4    public void setContentView(int layoutResID) {
5        // Note: FEATURE_CONTENT_TRANSITIONS may be set in the process of installing the window
6        // decor, when theme attributes and the like are crystalized. Do not check the feature
7        // before this happens.
8        if (mContentParent == null) {
9            //1. 如果没有DecorView则创建它,并将创建好的DecorView赋值给mContentParent
10            installDecor();
11        } else if (!hasFeature(FEATURE_CONTENT_TRANSITIONS)) {
12            mContentParent.removeAllViews();
13        }
14
15        if (hasFeature(FEATURE_CONTENT_TRANSITIONS)) {
16            final Scene newScene = Scene.getSceneForLayout(mContentParent, layoutResID,
17                    getContext());
18            transitionTo(newScene);
19        } else {
20            //2. 将Activity传入的布局文件生成View并添加到mContentParent中
21            mLayoutInflater.inflate(layoutResID, mContentParent);
22        }
23        mContentParent.requestApplyInsets();
24        final Callback cb = getCallback();
25        if (cb != null && !isDestroyed()) {
26            //3. 回调Window.Callback里的onContentChanged()方法,这个Callback也被Activity
27            //所持有,因此它实际回调的是Activity里的onContentChanged()方法,通知Activity
28            //视图已经发生改变。
29            cb.onContentChanged();
30        }
31        mContentParentExplicitlySet = true;
32    }
33}
这个方法主要做了两件事情:
- 如果没有DecorView则创建它,并将创建好的DecorView赋值给mContentParent
- 将Activity传入的布局文件生成View并添加到mContentParent中
- 回调Window.Callback里的onContentChanged()方法,这个Callback也被Activity所持有,因此它实际回调的是Activity里的onContentChanged()方法,通知Activity视图已经发生改变。
创建DecorView是通过installDecor()方法完成的,它的逻辑也非常简单,就是创建了一个ViewGroup然后返回给了mDecor和mContentParent。
1public class PhoneWindow extends Window implements MenuBuilder.Callback {
2
3 public static final int ID_ANDROID_CONTENT = com.android.internal.R.id.content;
4
5  private void installDecor() {
6         mForceDecorInstall = false;
7         if (mDecor == null) {
8             //生成DecorView
9             mDecor = generateDecor(-1);
10             mDecor.setDescendantFocusability(ViewGroup.FOCUS_AFTER_DESCENDANTS);
11             mDecor.setIsRootNamespace(true);
12             if (!mInvalidatePanelMenuPosted && mInvalidatePanelMenuFeatures != 0) {
13                 mDecor.postOnAnimation(mInvalidatePanelMenuRunnable);
14             }
15         } else {
16             mDecor.setWindow(this);
17         }
18         if (mContentParent == null) {
19             mContentParent = generateLayout(mDecor);
20             ...
21             } else {
22                ...
23             }
24            ...
25         }
26     }
27
28 protected ViewGroup generateLayout(DecorView decor) {
29        //读取并设置主题颜色、状态栏颜色等信息
30        ...
31        ViewGroup contentParent = (ViewGroup)findViewById(ID_ANDROID_CONTENT);
32        //设置窗口参数等信息
33        ...
34        return contentParent;
35    }
36}
通过以上这些流程,DecorView已经被创建并初始化完毕,Activity里的布局文件也被成功的添加到PhoneWindow的mContentParent(实际上就是DecorView,它是Activity的顶层View) 中,但是这个时候DecorView还没有真正的被WindowManager添加到Window中,它还无法接受用户的输入信息和焦点事件,这个时候就相当于走到了Activity的onCreate()流程,界面还 未展示给用户。
直到走到Activity的onResume()方法,它会调用Activity的makeVisiable()方法,DecorView才真正的被用户所看到。
1public class Activity extends ContextThemeWrapper
2        implements LayoutInflater.Factory2,
3        Window.Callback, KeyEvent.Callback,
4        OnCreateContextMenuListener, ComponentCallbacks2,
5        Window.OnWindowDismissedCallback, WindowControllerCallback {
6
7    void makeVisible() {
8        if (!mWindowAdded) {
9            ViewManager wm = getWindowManager();
10            wm.addView(mDecor, getWindow().getAttributes());
11            mWindowAdded = true;
12        }
13        mDecor.setVisibility(View.VISIBLE);
14    }
15}
通常以上的分析,我们理解了setContentView的工作原理,另外还有addContentView、clearContentView,正如它们的名字那样,setContentView是替换View,addContentView是添加View。实现原理相同。
好了,以上便是本篇文章的全部内容,下一篇文章我们来分析WindowManager的内容,分析Window的添加、移除和更新的流程。
附录
文章末尾给大家提供一个WindowUtils工具类。
1import android.animation.ValueAnimator;
2import android.app.Activity;
3import android.content.Context;
4import android.content.res.Configuration;
5import android.view.Surface;
6import android.view.Window;
7import android.view.WindowManager;
8
9public final class WindowUtils {
10
11    /**
12     * Don't let anyone instantiate this class.
13     */
14    private WindowUtils() {
15        throw new Error("Do not need instantiate!");
16    }
17
18    /**
19     * 获取当前窗口的旋转角度
20     *
21     * @param activity activity
22     * @return  int
23     */
24    public static int getDisplayRotation(Activity activity) {
25        switch (activity.getWindowManager().getDefaultDisplay().getRotation()) {
26            case Surface.ROTATION_0:
27                return 0;
28            case Surface.ROTATION_90:
29                return 90;
30            case Surface.ROTATION_180:
31                return 180;
32            case Surface.ROTATION_270:
33                return 270;
34            default:
35                return 0;
36        }
37    }
38
39    /**
40     * 当前是否是横屏
41     *
42     * @param context  context
43     * @return  boolean
44     */
45    public static final boolean isLandscape(Context context) {
46        return context.getResources().getConfiguration().orientation == Configuration.ORIENTATION_LANDSCAPE;
47    }
48
49    /**
50     * 当前是否是竖屏
51     *
52     * @param context  context
53     * @return   boolean
54     */
55    public static final boolean isPortrait(Context context) {
56        return context.getResources().getConfiguration().orientation == Configuration.ORIENTATION_PORTRAIT;
57    }
58    /**
59     *  调整窗口的透明度  1.0f,0.5f 变暗
60     * @param from  from>=0&&from<=1.0f
61     * @param to  to>=0&&to<=1.0f
62     * @param context  当前的activity
63     */
64    public static void dimBackground(final float from, final float to, Activity context) {
65        final Window window = context.getWindow();
66        ValueAnimator valueAnimator = ValueAnimator.ofFloat(from, to);
67        valueAnimator.setDuration(500);
68        valueAnimator.addUpdateListener(
69                new ValueAnimator.AnimatorUpdateListener() {
70                    @Override
71                    public void onAnimationUpdate(ValueAnimator animation) {
72                        WindowManager.LayoutParams params
73                                = window.getAttributes();
74                        params.alpha = (Float) animation.getAnimatedValue();
75                        window.setAttributes(params);
76                    }
77                });
78        valueAnimator.start();
79    }
80}